简单记录Hibernate3.3.2如何快速配置环境
一、下载hibernate-distribution-3.3.2.GA-dist.zip文件,建立User libraries.
打开windows->preferences->JAVA->Build Path->User libraries。新建一个名为Hibernate的文件夹。然后添加hibernate-distribution-3.3.2.GA-dist.zip下的jar文件
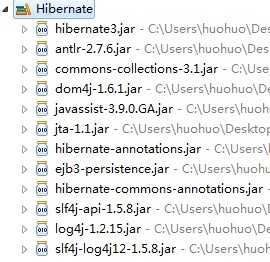
第一个包在解压缩之后的文件夹下,剩下的JAR包除了倒数三个(用来配置DDL语句输出)和annotation包以外在lib->required文件夹下。
二、配置hibernate.cfg.xml配置文件(数据库为SqlServer2008 EXPRESS)
|
1
2
3
4
5
6
7
8
9
10
11
12
13
14
15
16
17
18
19
20
21
22
23
24
25
26
27
28
29
30
31
32
33
34
35
36 |
<?xml version=‘1.0‘
encoding=‘utf-8‘?><!DOCTYPE hibernate-configuration PUBLIC "-//Hibernate/Hibernate Configuration DTD 3.0//EN"<hibernate-configuration> <session-factory> <!-- Database connection settings --> <property name="connection.driver_class">com.microsoft.sqlserver.jdbc.SQLServerDriver</property> <property name="connection.url">jdbc:sqlserver://localhost:1433; DatabaseName=hibernate</property> <property name="connection.username">aa</property> <property name="connection.password">aa</property> <!-- JDBC connection pool (use the built-in) --> <!-- <property name="connection.pool_size">1</property> --> <!-- SQL dialect --> <property name="dialect">org.hibernate.dialect.SQLServerDialect</property> <!-- Enable Hibernate‘s automatic session context management --> <!-- <property name="current_session_context_class">thread</property> --> <!-- Disable the second-level cache --> <property name="cache.provider_class">org.hibernate.cache.NoCacheProvider</property> <!-- Echo all executed SQL to stdout --> <property name="show_sql">true</property> <!-- Drop and re-create the database schema on
startup --> <property name="hbm2ddl.auto">create</property> </session-factory></hibernate-configuration> |
三)使用JAVABEAN的hbm.xml配置:
1、建立Student类
|
1
2
3
4
5
6
7
8
9
10
11
12
13
14
15
16
17
18
19
20
21
22
23
24
25
26
27
28
29
30
31
32
33
34
35 |
package com.huohuo.model;public
class Student { public
int id; public
String name; public
int age; public
String grade; public
int getId() { return
id; } public
void setId(int
id) { this.id = id; } public
String getName() { return
name; } public
void setName(String name) { this.name = name; } public
int getAge() { return
age; } public
void setAge(int
age) { this.age = age; } public
String getGrade() { return
grade; } public
void setGrade(String grade) { this.grade = grade; } } |
2、配置Student.hbm.xml(注意该文件和Student类放在同一个文件夹下)
|
1
2
3
4
5
6
7
8
9
10
11
12
13
14
15
16
17 |
<?xml version=‘1.0‘
encoding=‘utf-8‘?><!DOCTYPE hibernate-mapping PUBLIC "-//Hibernate/Hibernate Mapping DTD 3.0//EN" <hibernate-mapping package="com.huohuo.model"> <class
name="Student"
table="student"> <id name="id"
> </id> <property name="age"/> <property name="name"/> <property name="grade"/> </class></hibernate-mapping> |
3、在hibernate.cfg.xml加入这样一句话
|
1
2 |
<!-- 使用Student.hbm.xml --> <mapping resource="com/huohuo/model/Student.hbm.xml"/> |
配置完这三步以后,写一个测试类StudentTest.class
|
1
2
3
4
5
6
7
8
9
10
11
12
13
14
15
16
17
18
19
20
21
22
23
24
25
26
27
28
29
30
31
32
33
34
35 |
import org.hibernate.Session;import org.hibernate.SessionFactory;import org.hibernate.cfg.Configuration;import com.huohuo.model.Student;public
class StudentTest { /** * @param args */ public
static void main(String[] args) { // TODO Auto-generated method stub Student s1 = new
Student(); s1.setId(10); s1.setName("huohuo2"); s1.setAge(23); s1.setGrade("二年级"); Configuration cfg = new
Configuration(); SessionFactory sf = cfg.configure().buildSessionFactory(); Session session = sf.openSession(); session.beginTransaction(); session.save(s1); session.getTransaction().commit(); session.close(); sf.close(); } } |
之后执行测试类,就会成功。以上几步是hibernate中自己写的类手动配置的步骤。
四)使用hibernate annotation配置方法(这个比3简单)
加入两个包:
写一个Teacher类
|
1
2
3
4
5
6
7
8
9
10
11
12
13
14
15
16
17
18
19
20
21
22
23
24
25
26
27
28
29
30
31
32
33
34
35
36 |
package com.huohuo.model;import javax.persistence.Entity;import javax.persistence.Id;@Entitypublic
class Teacher { public
int id; public
String name; public
String title; @Id public
int getId() { return
id; } public
void setId(int
id) { this.id = id; } public
String getName() { return
name; } public
void setName(String name) { this.name = name; } public
String getTitle() { return
title; } public
void setTitle(String title) { this.title = title; } } |
@是annotation的语法,@id表示主码
写一个测试类TeacherTest.class
|
1
2
3
4
5
6
7
8
9
10
11
12
13
14
15
16
17
18
19
20
21
22
23
24
25
26
27
28
29
30
31
32
33 |
import org.hibernate.Session;import org.hibernate.SessionFactory;import org.hibernate.cfg.AnnotationConfiguration;import org.hibernate.cfg.Configuration;import com.huohuo.model.Teacher; public
class TeacherTest { /** * @param args */ public
static void main(String[] args) { // TODO Auto-generated method stub Teacher t = new
Teacher(); t.setId(3); t.setName("huohuo"); t.setTitle("低级教师"); Configuration cfg = new
AnnotationConfiguration(); SessionFactory sf = cfg.configure().buildSessionFactory(); Session session = sf.openSession(); session.beginTransaction(); session.save(t); session.getTransaction().commit(); session.close(); sf.close(); }} |
在hibernate.cfg.xml中加入两行代码:
|
1
2 |
<!-- 使用hibernate_annotation自动配置 --><mapping class="com.huohuo.model.Teacher"/> |
然后就可以直接运行了,省去了Teacher.hbm.xml映射的配置,方便很多。
Hibernate3.3.2 手动配置annotation环境,布布扣,bubuko.com
Hibernate3.3.2 手动配置annotation环境
原文:http://www.cnblogs.com/BrowserSnake/p/3641793.html