首页 > 其他 > 详细

Block的正向传值 和 反向传值 在自定义cell 中的表现

时间:2015-10-01 21:43:57      阅读:378      评论:0      收藏:0      [点我收藏+]

我们都习惯说 反向传值用Block,但是正向和反向都只是相对的

下面我 先 用一个自定义cell来给button“正向”传值,效果如下图(带颜色的是重点哦)

1、“正向”传值
 
技术分享

首先创建 UITableView

  1. <h2>#pragma mark*******创建UITableView*******</h2>-(void)createTableView{  
  2.       
  3.     UITableView *table = [[UITableView alloc]initWithFrame:[UIScreen mainScreen].bounds style: UITableViewStylePlain];  
  4.     table.delegate = self;  
  5.     table.dataSource = self;  
  6.     [self.view addSubview:table];  
  7.       
  8.       
  9. }  
  1. <h2>#pragma mark*******设置其它参数************</h2><pre name="code" class="objc">- (NSInteger)numberOfSectionsInTableView:(UITableView *)tableView{  
  2.       
  3.     return 3;  
  4.       
  5. }  
[objc] view plaincopy
 
  1. - (NSInteger)tableView:(UITableView *)tableView numberOfRowsInSection:(NSInteger)section{  
  2.       
  3.       
  4.     return 1;  
  5.       
  6. }  


#pragma mark*******下面是两个必须实现的UITableView 方法******

  1. - (CGFloat)tableView:(UITableView *)tableView heightForRowAtIndexPath:(NSIndexPath *)indexPath{  
  2.       
  3.     if (indexPath.section == 0) {  
  4.         return 200;  
  5.     }  
  6.     return 100;  
  7.       
  8. }  

//*******看case 0:就行了******

[objc] view plaincopy
 
  1. - (UITableViewCell *)tableView:(UITableView *)tableView cellForRowAtIndexPath:(NSIndexPath *)indexPath{  
  2.       
  3.     switch (indexPath.<span style="color:#3333ff;">section </span>) {  
  4.         <span style="color:#ff0000;">case 0:</span>  
  5.         {  
  6.               
  7.             NSString *messageID = @"ID";  
  8.             <span style="color:#ff0000;">Practice_TableViewCell</span> *cell = [tableView <span style="color:#3333ff;">dequeueReusableCellWithIdentifier</span>:messageID];  
  9.             if (!cell) {  
  10.                  cell = [[<span style="color:#ff0000;">Practice_TableViewCell</span> <span style="color:#3333ff;">alloc]initWithStyle:UITableViewCellStyleDefault reuseIdentifier</span>:messageID];  
  11.                   
  12.         }  
  13.              
  14.             cell.<span style="color:#3366ff;">backgroundColor = [UIColor blueColor]</span>;  
  15.             cell.<span style="color:#3366ff;">selectionStyle = UITableViewCellSelectionStyleNone</span>;  
  16.             <span style="color:#ff0000;">return</span> cell;  
  17.               
  18.         }  
  19.             break;  
  20.               
  21.             case 1:  
  22.         {  
  23.             NSString *messageID = @"IDD";  
  24.             UITableViewCell *cell = [tableView dequeueReusableCellWithIdentifier:messageID];  
  25.             if (!cell) {  
  26.                 cell = [[UITableViewCell alloc]initWithStyle:UITableViewCellStyleDefault reuseIdentifier:messageID];  
  27.             }  
  28.             cell.backgroundColor = [UIColor blueColor];  
  29.               
  30.               
  31.             return cell;  
  32.               
  33.         }  
  34.             break;  
  35.               
  36.             case 2:  
  37.         {  
  38.             NSString *messageID = @"IDDD";  
  39.             UITableViewCell *cell = [tableView dequeueReusableCellWithIdentifier:messageID];  
  40.             if (!cell) {  
  41.                 cell = [[UITableViewCell alloc]initWithStyle:UITableViewCellStyleDefault reuseIdentifier:messageID];  
  42.             }  
  43.             cell.backgroundColor = [UIColor blueColor];  
  44.               
  45.             return cell;  
  46.         }  
  47.             break;  
  48.               
  49.         default:  
  50.             break;  
  51.     }  
  52.       
  53.       
  54.     return nil;  
  55. }  

下面是对cell的重写

  1. Practice_TableViewCell.h  
  1. <pre name="code" class="objc">#import <UIKit/UIKit.h>  
  2.   
  3. @interface Practice_TableViewCell : UITableViewCell  
  1. <h1>// 定义Block</h1><h3><span style="color:#ff0000;">@property(nonatomic,copy)void(^buttonBlock)(</span><span style="color:#3366ff;">UIButton *button , UITableViewCell *cell</span><span style="color:#ff0000;">);//这里很重要,一会正向传button的  
  2. </span>这里我为什么还在Block中定义 cell呢?这样理解吧,因为是自定义cell,目的是在cell上添加其它东西,所以得<span style="color:#3333ff;">把cell和要添加的东西写在一起</span>啊</h3>  
  1. @end  


  1. Practice_TableViewCell.m  
  1. @implementation Practice_TableViewCell  
  2.   
  3. -(instancetype)initWithStyle:(UITableViewCellStyle)style reuseIdentifier:(NSString *)reuseIdentifier{  
  4.       
  5.     self = [super initWithStyle:style reuseIdentifier:reuseIdentifier];  
  6.     if (self) {  
  7.           
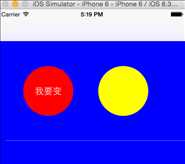
  8.         for (int i=0; i<2; i++) {  
  9.               
  10.             UIButton *buttonxx = [UIButton buttonWithType:UIButtonTypeCustom];  
  11.             buttonxx.frame = CGRectMake(50+(100+50)*i, 50, 100, 100);  
  12.             buttonxx.layer.cornerRadius = 50;  
  13.             buttonxx.tag = 10+i;  
  14.             [buttonxx addTarget:self action:@selector(btnBlock:) forControlEvents:UIControlEventTouchUpInside];  
  15.             [self.contentView addSubview:buttonxx];  
  16.               
  17.     }  
  18.           
  19.             UIButton *button00 = (UIButton *)[self.contentView viewWithTag:10];  
  20.             button00.backgroundColor = [UIColor redColor];  
  21.             [button00 setTitle:@"我要变" forState:UIControlStateNormal];  
  22.             UIButton *button01 = (UIButton *)[self.contentView viewWithTag:11];  
  23.             button01.backgroundColor = [UIColor yellowColor];  
  24.     }  
  25.       
  26.       
  27.       
  28.             return self;  
  29. }  
  30.   
  31. -(void)btnBlock:(UIButton *)sender{  
  32.       
  33.     NSLog(@"点击的是%ld",sender.tag);  
  34.       
  35.       
  36. <h3>    <span style="color:#ff0000;">self.buttonBlock(</span><span style="color:#3333ff;">sender, self</span><span style="color:#ff0000;">);//这里是在点击button的时候传值,另一个目的也是让它能在cell上响应</span></h3>      
  37.       
  38. }  

下面我们就在上面的viewController中实现Block,也就是刚才让 看case :0的那里,插入的代码如下:有颜色的部分就是对Block的实现

  1. <span style="white-space:pre">    </span>    if (!cell) {  
  2.                 cell = [[LianXi_TableViewCell alloc]initWithStyle:UITableViewCellStyleDefault reuseIdentifier:messageID];  
  3.                   
  4.             }  
  5.               
  6.               
  7. <h3>            <span style="color:#ff0000;">cell.buttonBlock = ^(UIButton *button , UITableViewCell *cell){</span></h3>                  
  8.                 <span style="color:#3333ff;">switch (button.tag) {  
  9.                     case </span><span style="color:#ff0000;">10</span><span style="color:#3333ff;">:  
  10.                     {  
  11.                         Next_ViewController *next = [[Next_ViewController alloc]init];  
  12.                         [self.navigationController pushViewController:next animated:YES];  
  13.       
  14.                     }  
  15.                         break;  
  16.                           
  17.                         case </span><span style="color:#ff0000;">11</span><span style="color:#3333ff;">:  
  18.                     {  
  19.                         //这里暂时不写  
  20.                           
  21.                     }  
  22.                         break;  
  23.                           
  24.                     default:  
  25.                         break;  
  26.                 }  
  27.                 </span>  
  28. <h3>            <span style="color:#ff0000;">};</span></h3>            cell.backgroundColor = [UIColor blueColor];  
  29.             cell.selectionStyle = UITableViewCellSelectionStyleNone;  
  30.               
  31.             return cell;  
  32.         }  
 

运行之后点击红色button就可以跳转了,这里既解释了自定义cell,又解释了Block的"正向"传值

综上所述就相当于"正向"传值

 
2、“反向”传值
下面我在这个的基础上 进行 “反向” 传值,这是第二个页面Next_ViewController
  1. <span style="font-size:24px;">Next_ViewController.h</span>  
  1. #import <UIKit/UIKit.h>  
  2.   
  3. @interface Next_ViewController : UIViewController  
  4.   
  5. <span style="font-size:24px;color:#ff0000;">@property(nonatomic, copy)void(^imageJumpBlock)(</span><span style="font-size:24px;color:#3333ff;">UIButton *imageJump</span><span style="font-size:24px;color:#ff0000;">);//定义</span>  
  6.   
  7. @end  

  1. <span style="font-size:24px;">Next_ViewController.m</span>  
  1. #import "Next_ViewController.h"  
  2. #import "ViewController.h"  
  3.   
  4.   
  5. @interface Next_ViewController ()  
  6. {  
  7.       
  8.     UIButton *buttonModel;  
  9.       
  10. }  
  11. @end  
  12.   
  13. @implementation Next_ViewController  
  14.   
  15. - (void)viewDidLoad {  
  16.     [super viewDidLoad];  
  17.       
  18.     self.view.backgroundColor = [UIColor whiteColor];  
  19.       
  20.     UILabel *labelChange = [[UILabel alloc]initWithFrame:CGRectMake(20, 250, CGRectGetWidth([UIScreen mainScreen].bounds)-40, 50)];  
  21.     labelChange.backgroundColor = [UIColor redColor];  
  22.     labelChange.text = @"你猜我变了吗?";  
  23.     labelChange.textAlignment = NSTextAlignmentCenter;  
  24.     labelChange.font = [UIFont systemFontOfSize:45];  
  25.     [self.view addSubview:labelChange];  
  26.       
  27.    <span style="color:#3333ff;"> </span><span style="color:#ff0000;">buttonModel</span><span style="color:#3333ff;"> = [</span><span style="color:#ff0000;">UIButton</span><span style="color:#3333ff;"> buttonWithType:UIButtonTypeCustom];  
  28.    </span><span style="background-color: rgb(255, 255, 255);"><span style="color:#ff0000;"> buttonModel</span></span><span style="color:#3333ff;">.frame = CGRectMake(100, 150, CGRectGetWidth([UIScreen mainScreen].bounds)-200, 50);  
  29.     </span><span style="color:#ff0000;">buttonModel</span><span style="color:#3333ff;">.backgroundColor = [UIColor redColor];  
  30.     [</span><span style="color:#ff0000;">buttonModel</span><span style="color:#3333ff;"> setTitle:@"返回" forState:UIControlStateNormal];  
  31.     [</span><span style="color:#ff0000;">buttonModel</span><span style="color:#3333ff;"> addTarget:self action:@selector(returnAction:) forControlEvents:UIControlEventTouchUpInside];  
  32.       
  33.     [self.view addSubview:buttonModel];</span>  
  34.       
  35.       
  36. }  
  37.   
  38. -(void)returnAction:(UIButton *)sender{  
  39.       
  40.     [self.navigationController popViewControllerAnimated:YES];  
  41.       
  42.    <span style="color:#3333ff;"> <span style="font-size:24px;">self.imageJumpBlock(</span></span><span style="font-size:24px;"><span style="color:#ff0000;">buttonModel</span><span style="color:#3333ff;">);//</span><span style="color:#ff0000;">这是第二个页面传button的地方</span></span>  
  43.       
  44.       
  45. }  

ViewController这里是第一个页面:实现的地方,依然是看case:0里面,我在刚才的Block的里面又嵌套了一个 Block,虽然这里看着像嵌套,但是是在switch里面实现的,是,这里的实现是为了 跳转到第二个页面Next_viewController的瞬间,就从那里把

buttonModel传到ViewController 的next.imageJumpBlock = ^(UIButton *imageJum){实现};里面,但是为了看到传值的效果,我把

  1. <span style="color:#3333ff;"> <span style="font-size:24px;">self.imageJumpBlock(</span></span><span style="font-size:24px;"><span style="color:#ff0000;">buttonModel</span><span style="color:#3333ff;">);放到了button的触发方法里面</span></span>  


  1. - (UITableViewCell *)tableView:(UITableView *)tableView cellForRowAtIndexPath:(NSIndexPath *)indexPath{  
  2.       
  3.     switch (indexPath.section ) {  
  4.         case 0:  
  5.         {  
  6.               
  7.             NSString *messageID = @"ID";  
  8.             LianXi_TableViewCell *cell = [tableView dequeueReusableCellWithIdentifier:messageID];  
  9.             if (!cell) {  
  10.                 cell = [[LianXi_TableViewCell alloc]initWithStyle:UITableViewCellStyleDefault reuseIdentifier:messageID];  
  11.                   
  12.             }  
  13.               
  14.               
  15.            <span style="color:#3333ff;"> cell.buttonBlock = ^(UIButton *button , UITableViewCell *cell){  
  16.                   
  17.                 switch (button.tag) {  
  18.                     case 10:  
  19.                     {  
  20.                         Next_ViewController *next = [[Next_ViewController alloc]init];  
  21.                         [self.navigationController pushViewController:next animated:YES];</span>  
  1. <span style="color:#3333ff;">                       </span><span style="font-size:18px;color:#ff0000;"> next.imageJumpBlock = ^(UIButton *imageJum){  
  2.                           
  3.                             </span><span style="font-size:18px;color:#3333ff;">[button setBackgroundImage:[UIImage imageNamed:</span><span style="font-size:18px;color:#ff0000;">@"000"</span><span style="font-size:18px;color:#3333ff;">] forState:UIControlStateNormal];</span><span style="font-size:18px;color:#ff0000;">  
  4.                         </span><span style="font-size:24px;color:#3333ff;">记住</span><span style="font-size:24px;color:#ff0000;">@“000”</span><span style="font-size:24px;color:#3333ff;">我这里是给button 添加的一张图片,不要忘了<span style="font-family: Arial, Helvetica, sans-serif;">    </span></span><span style="font-size:18px;color:#ff0000;">  
  5.                         };</span><span style="font-size:24px;color:#ff0000;">//这括号里面的就是第二个页面 传过来的值 用来实现的</span><span style="color:#3333ff;">  
  6.       
  7.                     }  
  8.                         break;</span>  
  9.                           
  10.                         case 11:  
  11.                     {  
  12.                         //这里暂时不写  
  13.                           
  14.                     }  
  15.                         break;  
  16.                           
  17.                     default:  
  18.                         break;  
  19.                 }  
  20.                   
  21.             };  
  22.             cell.backgroundColor = [UIColor blueColor];  
  23.             cell.selectionStyle = UITableViewCellSelectionStyleNone;  
  24.               
  25.             return cell;  
  26.         }  
  27.             break;  

运行之后点击红色button
技术分享
 
调到的这个页面是Next_viewController,为了看到效果你可以先点 <Back 反回去看红色button变没变,然后再回到Next_viewController点击      返回       这样就会很明显的看到反向传值的效果了
 
大家可以自己对比一下 “正向” 和 “反向” 它们传button的地方 和 实现的地方的不同
 
如果哪里写得不对,希望大家批评指正

Block的正向传值 和 反向传值 在自定义cell 中的表现

原文:http://www.cnblogs.com/theForceCommander/p/4851527.html

(0)
(0)
   
举报
评论 一句话评论(0
关于我们 - 联系我们 - 留言反馈 - 联系我们:wmxa8@hotmail.com
© 2014 bubuko.com 版权所有
打开技术之扣,分享程序人生!