OpenResty 官网:http://openresty.org/
OpenResty 是一个nginx和它的各种三方模块的一个打包而成的软件平台。最重要的一点是它将lua/luajit打包了进来,使得我们可以使用lua脚本来进行web的开发。有了lua,我们可以借助于nginx的异步非阻塞的功能,达到使用 lua 异步并发访问后端的 MySQL, PostgreSQL, Memcached, Redis等等服务。特别是特有的 ngx.location.capture_multi 功能让人印象深刻,其可以达到极大的减少浏览器的http连接数量,并且可以异步并发的访问后台 Java/PHP/Python 等等接口。OpenResty 架构的web可以轻松超越Node.js的性能,并且对后端语言没有限制,你可以使用Java/PHP/Python等等各种语言。OpenResty(nginx+lua)可以替代node.js的前端渲染的功能。
OpenResty (aka. ngx_openresty) is a full-fledged web application server by bundling the standard Nginx core, lots of 3rd-party Nginx modules, as well as most of their external dependencies.
By taking advantage of various well-designed Nginx modules, OpenResty
effectively turns the nginx server into a powerful web app server, in
which the web developers can use the Lua programming language to script
various existing nginx C modules and Lua modules and construct extremely
high-performance web applications that are capable to handle 10K+
connections.
OpenResty aims to run your server-side web app
completely in the Nginx server, leveraging Nginx‘s event model to do
non-blocking I/O not only with the HTTP clients, but also with remote
backends like MySQL, PostgreSQL, Memcached, and Redis.
1. 安装OpenResty
先安装依赖:yum install readline-devel pcre-devel openssl-devel gcc
解压: tar zxvf ngx_openresty-1.9.3.1.tar.gz
建立一个软连接:ln -s ngx_openresty-1.9.3.1 openresty
进入目录:cd openresty
编译:
./configure              --with-cc-opt="-I/usr/local/include"              --with-ld-opt="-L/usr/local/lib"              --prefix=/opt/openresty

... ...
Configuration summary
  + using system PCRE library
  + using system OpenSSL library
  + md5: using OpenSSL library
  + sha1: using OpenSSL library
  + using system zlib library

  nginx path prefix: "/opt/openresty/nginx"
  nginx binary file: "/opt/openresty/nginx/sbin/nginx"
  nginx configuration prefix: "/opt/openresty/nginx/conf"
  nginx configuration file: "/opt/openresty/nginx/conf/nginx.conf"
  nginx pid file: "/opt/openresty/nginx/logs/nginx.pid"
  nginx error log file: "/opt/openresty/nginx/logs/error.log"
  nginx http access log file: "/opt/openresty/nginx/logs/access.log"
  nginx http client request body temporary files: "client_body_temp"
  nginx http proxy temporary files: "proxy_temp"
  nginx http fastcgi temporary files: "fastcgi_temp"
  nginx http uwsgi temporary files: "uwsgi_temp"
  nginx http scgi temporary files: "scgi_temp"
其中 --prefix=/opt/openresty 指定了安装目录,不指定的话默认会安装到 /usr/local/openresty 目录下。
编译安装: make && make install
[root@localhost src]# cd /opt/openresty/
[root@localhost openresty]# ls
bin  luajit  lualib  nginx
可以看到 /opt/openresty 目录下四个文件夹,其中包括了 luajit,nginx。
启动openresty: /opt/openresty/nginx/sbin/nginx -c /opt/openresty/nginx/conf/nginx.conf -p /opt/openresty/nginx/
[root@localhost src]# ps -elf|grep nginx
1 S root      2076     1  0  80   0 - 34999 -      21:24 ?        00:00:00 nginx: master process /opt/openresty/nginx/sbin/nginx -c /opt/openresty/nginx/conf/nginx.conf -p /opt/openresty/nginx/
5 S nobody    2077  2076  0  80   0 - 35045 -      21:24 ?        00:00:00 nginx: worker process
0 S root      2079  1678  0  80   0 -  1088 -      21:24 pts/1    00:00:00 grep nginx
验证可以访问: curl 127.0.0.1
2. content_by_lua 和 content_by_lua_file
nginx 如何嵌入 lua 脚本。方法就是在nginx的配置文件nginx.conf 中使用 content_by_lua 或者 cotent_by_lua_file 指令:
1) content_by_lua 一般在很简单的lua脚本时使用:
        location /lua {
                set $test "hello, world.";
                content_by_lua ‘
                        ngx.header.content_type = "text/plain";
                        ngx.say(ngx.var.test);
                ‘;
        }
访问 http://localhost/lua 可以看到输出到页面的 hello, world.
2)cotent_by_lua_file 适应于复杂的 lua 脚本,专门放入一个文件中:
        location /lua2 {
            #lua_code_cache off;
            content_by_lua_file lua/hello.lua;
        }
路径相对于 /opt/openresty/nginx
[root@localhost lua]# pwd
/opt/openresty/nginx/lua
[root@localhost lua]# cat hello.lua
ngx.say(‘hello ngx_lua!!!!‘);
本例子中 hello.lua 只包含一句: ngx.say(‘hello ngx_lua!!!!‘);
访问 /lua2 :
[root@localhost lua]# curl localhost/lua
hello ngx_lua!!!!
可以看到访问成功。
在 nginx.conf 文件的 server {.. ...} 中加入 lua_code_cache off; 可以方便调试lua脚本,修改lua脚本之后,不需要 reload nginx.
openresty 中的 nginx 嵌入 luajit 的原理:
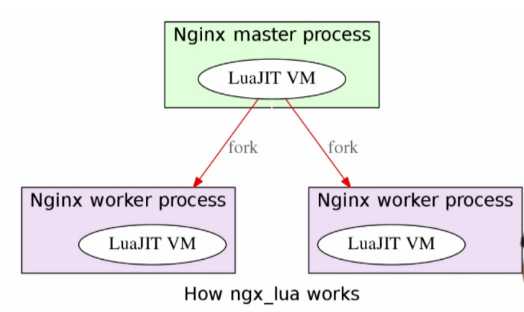
每一个nginx的进程中都嵌入了一个 luajit的虚拟机,来执行lua脚本。nginx将lua脚本的执行交给了luajit vm.
3. lua 访问 redis
4. lua 访问mysql
5. lua 的 capture 和 capture_multi
原文:http://www.cnblogs.com/digdeep/p/4859575.html