f_DeltaTime值。 //自己计算每一帧时间
|
1
2
3
4
5
6
7
8
9
10
11
12 |
float
f_LastFrameRealtime;void Start(){f_LastFrameRealtime = Time.realtimeSinceStartup ;}void Update(){float
f_DeltaTime = Time.realtimeSinceStartup - f_LastFrameRealtime;f_LastFrameRealtime = Time.realtimeSinceStartup ;} |
(2) mecanim系统中 muscle可以控制角色各部位摆动幅度等, 速度为负,动画倒着播放
|
1
2
3
4
5
6
7
8
9
10
11 |
Vector3 wantedDir = (target.position- anim.rootPosition).normalized; //想要到达的面向Vector3 currentDir = anim.rootRotation * Vector3.forward;//当前面向if(Vector3.Dot(currentDir, wantedDir) > 0){//dot cos值>0既在currentDir的前半圆anim.SetFloat("Direction", Vector3.Cross(currentDir, wantedDir).y, .25f, Time.deltaTime); 这里在currentDir右边既为正.//cross叉乘 ,叉乘向量的y值既,在xz面中,wantedDir在currentdir 的哪个位置,1到-1之间,左手坐标系,四指指向原向量,四指弯曲指向目标向量,大拇指所指方向既为正}else{anim.SetFloat("Direction",Vector3.Cross(currentDir,wantedDir).y > 0 ? 1 : -1, .25f, Time.deltaTime);}col.Move(anim.deltaPosition);//animator动画的帧位置transform.rotation = anim.rootRotation;//根旋转量<br><br> |
animator anystate 优先级最高,只要设定了变量,为真,马上执行
setikposition
可以调制角色不同部位的单独控制,分建不同的层
//修改摄像机的cullingMask
|
1
2
3
4
5
6
7 |
int oldMask = camera.cullingMask;// change maskcamera.cullingMask = (1 << LayerMask.NameToLayer("TransparentFX")) | (1 << LayerMask.NameToLayer("OtherLayer"));// do something// ...// restore maskcamera.cullingMask = oldMask; |
Profiler 探查窗口 可以查看cpu使用率等
RenderTexture 摄像机 制作舞台效果
组件右上角,copy component 可以粘贴属性,或复制。
meshrenderer不激活,则物体不显示,但仍然存在,可以碰到
在编辑器选中需要添加碰撞的UITexture对象,给该对象必须要先赋予Texture,直接操作“Alt+Shift+C”,
NGUI会给你计算出一个适合于当前对象的BoxCoillder。如果说该对象已经有一个BoxCoillder,那NGUI会调整它的大小以适应UITexture的大小。
剩下的就是按照自己的需要调整顺序关系。
右键向深度高的,左键向深度低的
start里面使用协同,可以不用update而按时间执行比如
|
1
2
3
4
5
6
7
8
9 |
void Start(){StartCoroutine(GoToSleep());}IEnumerator GoToSleep(){yield
return new WaitForSeconds(startCheckInSeconds);while( sth){yield
return new WaitForSeconds(checkEverySeconds);}<br>do
last sth;<br>finish;<br>} |
shader 中加Cull off 不遮挡,背部也能看到
InfiniLearning Game Development With Unity 3D.rar 第六章讲钢体,cloth ragdoll
camera.layerCullDistances 设置各层的fardistance ,可以把小物体放在合适的层,设置distance,离相机多远时不显示小物体
使用协同做时间冷却
direction = transform.TransformDirection(direction);
direction本来是世界坐标vector3, TransformDirection(里面基于自身local坐标系)将里面转为世界坐标值.
//摄像机按鼠标左右移动旋转
|
1
2
3 |
xAngl += Input.GetAxis ("Mouse X") * xSpeed * 0.02f;Quaternion camRot = Quaternion.Euler (yAngl, xAngl, 0);cam.rotation = camRot; |
|
1
2
3
4
5
6
7
8
9
10
11 |
/** 按固定速度旋转var target: Transform;var rotateSpeed=30.0;var t=float;var q:Quaternion;var wantedRotation=Quaternion.FromToRotation(transform.position,target.position);t=rotateSpeed/Quaternion.Angle(transform.rotation,wantedRotation)*Time.deltaTime;q=Quaternion.Slerp(transform.rotation, target.rotation,t);transform.rotation=q;**/ |
mecanim系统中 ,选中IK PASS
OnAnimatorIK()里的对应层的IK动作才能起作用
anystate代表所有状态都能进入当条件为真时
Quaternion.SetLookRotation(z轴朝向的位置,y轴朝向的位置)
返回Quaternion;
当你启动Unity按住ALT键时,可以让你选择所需打开项目。(否则它将尝试更新最后打开的项目)
请问有没有遇到过 添加了第三方插件SDK之后 如果手机处于待机状态的时候 就会退出APP的情况的呢
北京-KL-程序(1557899269)
下午
18:11:28
有人提过改xml
android:configChanges="orientation|keyboardHidden|navigation|screenSize"
计算那么角色速度角速度。
flota speed =
agent.desiredVelocity.magnitude;
Vector3 velocity =
Quaternion.Inver(trnasform.rotation) * agent.desiredVelocity;
float angle =
Mathf.Atan2(velocity.x, velocity.z)*
180.0f/3.14159f;
//当有rootMotion的时候OnAnimatorMove回调函数
agent.velocity
=animator.deltaPosition/Time.deltatime
transform.rotation =
animator.rootRotation;
By default Unity compresses all textures when importing. This can be
turned off in the Preferences for faster workflow. But when building a game, all
not-yet-compressed textures will be
compressed.
默认情况下,Unity会在导入时对纹理进行压缩,为了加速工作,你可以在Preferences里关闭该功能,但是当编译游戏时,所有尚未被压缩纹理都将被重新压缩。
Guitext 屏幕坐标,x:0-1 y:0-1
欧拉角限制 绕y和z 为-180到180,即左右转,和左右倾斜 x为-90到90即前后倾斜
Layer的用法
LayerMask.NameToLayer("Ground"); // 通过名字获取layer
物理摄像头取色(WebCamTexture)
|
1
2
3
4
5
6
7
8
9
10
11
12
13 |
Texture2D exactCamData() { // get the sample pixels Texture2D snap = new
Texture2D((int)detectSize.x, (int)detectSize.y); snap.SetPixels(webcamTexture.GetPixels((int)detectStart.x, (int)detectStart.y, (int)detectSize.x, (int)detectSize.y)); snap.Apply(); return
snap; } |
保存截图:System.IO.File.WriteAllBytes(Application.dataPath + "/test.png", exactCamData().EncodeToPNG());
动画编码
http://www.cnblogs.com/lopezycj/archive/2012/05/18/Unity3d_AnimationEvent.html
http://game.ceeger.com/Components/animeditor-AnimationEvents.html
http://answers.unity3d.com/questions/8172/how-to-add-new-curves-or-animation-events-to-an-im.html
调试技巧(Debug)
可以在OnDrawGizmos函数来进行矩形区域等,达到调试的目的,请参考NGUI中的UIDraggablePanel.cs文件中的那个函数实现。
|
1
2
3
4
5
6
7
8
9
10
11
12
13
14
15 |
#if UNITY_EDITOR /// <summary> /// Draw a visible orange outline of the bounds. /// </summary> void
OnDrawGizmos () { if
(mPanel != null) { Bounds b = bounds; Gizmos.matrix = transform.localToWorldMatrix; Gizmos.color = new
Color(1f, 0.4f, 0f); Gizmos.DrawWireCube(new
Vector3(b.center.x, b.center.y, b.min.z), new
Vector3(b.size.x, b.size.y, 0f)); } }#endif |
Lerp函数的使用场景
|
1
2 |
// Set the health bar‘s colour to proportion of the way between green and red based on the player‘s health.healthBar.material.color = Color.Lerp(Color.green, Color.red, 1 - health * 0.01f); |
在特定位置播放声音
|
1
2 |
// Play the bomb laying sound.AudioSource.PlayClipAtPoint(bombsAway,transform.position); |
通过脚本修改shader中uniform的值
|
1
2
3
4
5
6
7
8
9
10
11
12
13
14
15
16
17
18 |
//shader的写法Properties { ... disHeight ("threshold distance", Float) = 3} SubShader { Pass { CGPROGRAM #pragma vertex vert #pragma fragment frag ... uniform float
disHeight; ... // ===================================// 修改shader中的disHeight的值gameObject.renderer.sharedMaterial.SetFloat("disHeight", height); |
双击事件
|
1
2
3
4
5
6 |
void OnGUI() { Event Mouse = Event.current; if
( Mouse.isMouse && Mouse.type == EventType.MouseDown && Mouse.clickCount == 2) { print("Double Click"); }} |
RootAnimation中移动的脚本处理
|
1
2
3
4
5
6
7
8
9
10 |
class
RootControl : MonoBehaviour { void
OnAnimatorMove() { Animator anim = GetComponent<Animator>(); if(anim) { Vector3 newPos = transform.position; newPos.z += anim.GetFloat("Runspeed") * Time.deltaTime; transform.position = newPos; } }} |
BillBoard效果(广告牌效果,或者向日葵效果,使得对象重视面向摄像机
|
1
2
3
4
5
6 |
public
class BillBoard : MonoBehaviour { // Update is called once per frame void
Update () { transform.LookAt(Camera.main.transform.position, -Vector3.up); }} |
script中的属性编辑器(Property Drawers),还可以自定义属性编辑器
|
1
2
3
4
5
6
7
8
9
10
11
12
13
14
15
16
17
18
19
20
21
22
23
24
25
26
27
28
29
30 |
public
class Example : MonoBehaviour { public
string playerName = "Unnamed"; [Multiline] public
string playerBiography = "Please enter your biography"; [Popup ("Warrior", "Mage", "Archer", "Ninja")] public
string @class
= "Warrior"; [Popup ("Human/Local", "Human/Network", "AI/Easy", "AI/Normal", "AI/Hard")] public
string controller; [Range (0, 100)] public
float health = 100; [Regex (@"^(?:\d{1,3}\.){3}\d{1,3}$", "Invalid IP address!\nExample: ‘127.0.0.1‘")] public
string serverAddress = "192.168.0.1"; [Compact] public
Vector3 forward = Vector3.forward; [Compact] public
Vector3 target = new
Vector3 (100, 200, 300); public
ScaledCurve range; public
ScaledCurve falloff; [Angle] public
float turnRate = (Mathf.PI / 3) * 2;} |
debug下画线
Debug.DrawLine (Vector3.zero, new Vector3 (10, 0, 0), Color.red);
获取AnimationCurve的时长
|
1 |
_curve.keys[_curve.length-1].time; |
使得脚本能够在editor中实时反映:
在脚本前加上:[ExecuteInEditMode], 参考UISprite。
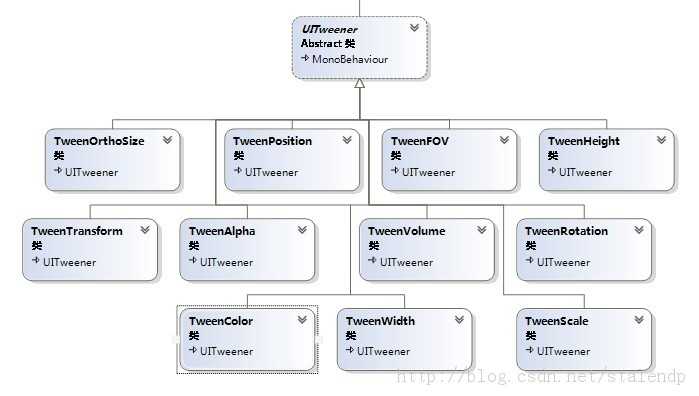
NGUI类关系图
//在2秒内使颜色变黑。
|
1
2
3
4
5
6
7
8
9
10
11
12
13
14
15
16 |
function Update (){ light.color-= Color.white / 2.0 * Time.deltaTime;}//在2个颜色之间来回插值光源颜色。var duration =1.0;var color0 = Color.red;var color1 = Color.blue;function Update (){ //设置光源颜色 var
t = Mathf.PingPong (Time.time, duration) / duration; light.color= Color.Lerp (color0, color1, t);} |
//随时间改变光照强度
|
1
2
3
4
5
6
7
8
9
10
11 |
var duration = 1.0;function Update(){ //余弦理论 var
phi = Time.time / duration * 2 * Mathf.PI; //获取余弦,并将范围从-1~1变为0~1 var
amplitude = Mathf.Cos( phi ) * 0.5 + 0.5; //设置光的颜色 light.intensity = amplitude;} |
描述:光源的范围。
即使光源关闭了attenuate,它还是只影响在它范围内的物体。
|
1
2
3
4
5
6
7
8
9
10
11
12
13 |
//在原始范围与原始范围一般处变换光照范围var duration =3.0;private
var originalRange : float;originalRange = light.range;function Update(){ var
amplitude = Mathf.PingPong( Time.time,duration ); //将0..持续时间改为0.5..1范围 amplitude = amplitude / duration * 0.5 + 0.5; //设置光照范围 light.range = originalRange * amplitude;} |
var renderMode :LightRenderMode
描述:如何渲染该光源?此处可以是LightRenderMode.Auto,LightRenderMode.ForceVertex 或LightRenderMode.ForcePixel。像素光渲染比较慢但是看起来较好,尤其是对那些没有较高面数的几何体。一些效果(例如凹凸)只会在像素光照下显示。
Cancellnvoke():void
描述:取消所有在这个MonoBehaviour上调用
Cancellvoke(methodName:string):void
描述:撤销该行为中名为methodName的所有调用。
Invoke and InvokeRepeating
描述:OnBecameInvisible函数在渲染上的脚本。OnBecameVisible和OnBecameInvisible可以用于只需要在需要在物体可见时才进行的计算。
//当它不可见时禁用这个行为
function
OnBecameInvisible()
{
enabled=false;
}
OnBecameInvisible可以是一个coroutine,简单地在这个函数中使用yield语句。当在编辑器中运行时,场景试图相机也会导致这个函数被调用。
functiononParticleCollision(other:GameObject):void
描述:当一个粒子碰到一个碰撞器时OnParticleCollision被调用。
这个可以在游戏物体被粒子击中时应用伤害到它的上面,这个消息被发送到所有附加到
WorldParticleCollider
的脚本上和被击中的Collider上,这个消息只有当你在
WorldParticleCollider检视面板中启用了sendCollisionMessage时才会被发送。
//应用力到所有被粒子击中的刚体上
|
1
2
3
4
5
6
7
8
9
10
11
12 |
functionOnParticleCollison(other:GameObject){ varbody=other.rigidbody; if(body) { var
direction=other.transform.position+transform.position; direction=direction.normalized; body.AddForce(direction*5); }} |
OnParticleCollision可以是一个coroutine,简单地在这个函数中使用yield语句。
function OnpostRender():void
描述:OnPostRender在相机渲染场景之后调用。
只有脚本被附加到相机上时才会调用这个函数。OnPostRender可以是一个coroutine,简单地在这个函数中使用yield语句。
OnPostRender在相机渲染完所有它的物体之后被调用。如果你想在所有相机和GUI被渲染之后做一些事情,使用WaitForEndFramecoroutine
参见:OnPreRender,WaitForEndOfFrame
//当附加到机时,将消除
//相机纹理的alpha通道为纯白色
//如果你有一个渲染纹理并想将它显示在GUI上时可以使用这个函数
|
1
2
3
4
5
6
7
8
9
10
11 |
private
varmat:Material;function OnPostRender(){ //创建一个只渲染白色到alpha通道的着色器 if(mat) { mat=newMaterial(“Shader Hidden SetAlpha”+) “SubShader{“+”pass{”+”ZTest Always Cull off ZwriteOff”+”ColorMaskA”+”Color (1,1,1,1)”+”}”+”}”+”}”); }} |
// 用上述着色器绘制一个全屏四边形
|
1
2
3
4
5
6
7
8
9
10
11
12
13
14
15 |
GL.PushMatrix();GL.LoadOrtho();for(var
i=0;i<mat.pssCount;++i){ mat.SetPass(i); GL.Begin(GL.QUADS); GL.Vertex3(0,0,0.1); GL.Vertex3(1,0,0.1); GL.Vertex3(1,1,0.1); GL.Vertex3(0,1,0.1); GL.End(); } GL.PopMatrix();} |
function OnRender():void
描述:OnpreRender在相机开始渲染场景之前调用。
只用脚本被附加到相机上时才会调用这个函数。
注意如是果你在这里改变了相机的视野参数(例如fieldOfView),它们将影响下一帧。用OnPreCull代替。
强烈建议使用DestroyImmediate 代替 Destroy。
|
1
2
3
4
5
6
7
8
9
10
11
12
13 |
OnCollisionEnter(collision:Collision){ //调试绘制所有的接触点和法线 for(varcontact:ContacePoint in
collision.contacts) { Debug.DrawRay(contact.point,contact.normal,color.white); } //如果碰撞物体有较大的冲击就播放声音 if(collision.relativeVelocity.magnitude.2) Audio.Play(); } |
U3D屏幕截图
|
1
2
3
4
5
6
7
8
9
10
11
12
13
14
15
16
17
18
19
20
21
22
23
24
25
26
27
28
29
30
31
32
33 |
function ScreenshotEncode(){// wait for graphics to renderyield WaitForEndOfFrame();// create a texture to pass to encodingvar texture:Texture2D = new
Texture2D (Screen.width, Screen.height, TextureFormat.RGB24, false);// put buffer into texturetexture.ReadPixels(Rect(0.0, 0.0, Screen.width, Screen.height), 0.0, 0.0);texture.Apply();// split the process up--ReadPixels() and the GetPixels() call inside of the encoder are both pretty heavyyield;// create our encoder for this texturevar
encoder:JPGEncoder = new
JPGEncoder(texture, 75.0);// encoder is threaded; wait for it to finishwhile(!encoder.isDone)yield;// save our test image (could also upload to WWW)File.WriteAllBytes(Application.dataPath + "/../testscreen-"
+ count + ".jpg", encoder.GetBytes());count++;}//简便方法看下面:function OnMouseDown() {Application.CaptureScreenshot("Screenshot.png");} |
Unity脚本周期关系
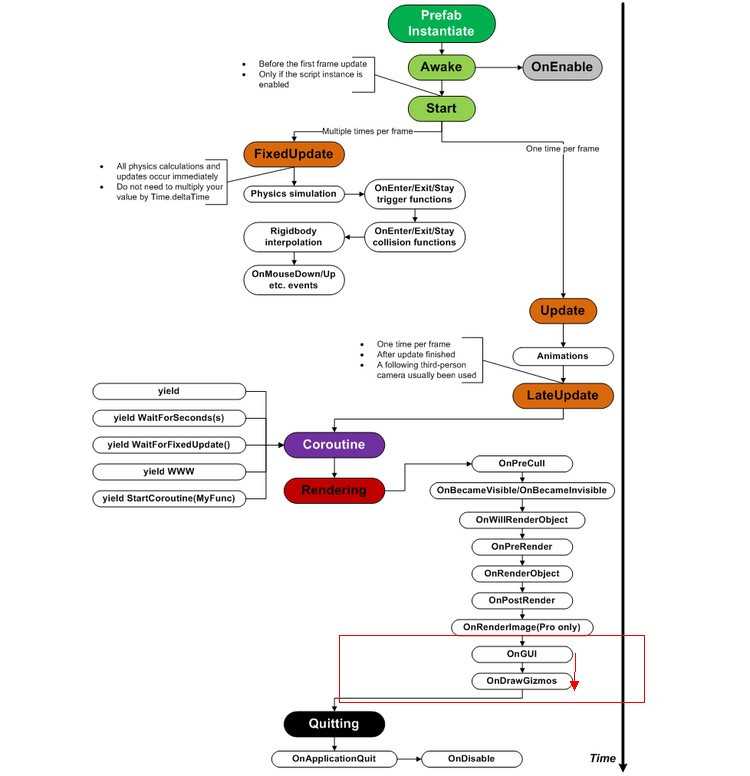
PS:摘抄自互联网 有删改
http://blog.csdn.net/stalendp/article/details/17114135
http://dearymz.blog.163.com/blog/static/20565742013341916919/
http://angeson1987.blog.163.com/blog/static/162590090201062931129143/
http://cl314413.blog.163.com/blog/static/1905079762012757504225/
原文:http://www.cnblogs.com/DragonX/p/3647523.html