原文地址:http://www.codejava.net/frameworks/spring/sending-e-mail-with-spring-mvc
Table of contents:
1.Spring framework’s support for e-mail
3.Creating e-mail sending form
4.Configuring SMTP server settings and Spring MVC
5.Creating Spring MVC controller class
6.Creating result page and error page
8.Download Eclipse project/WAR file
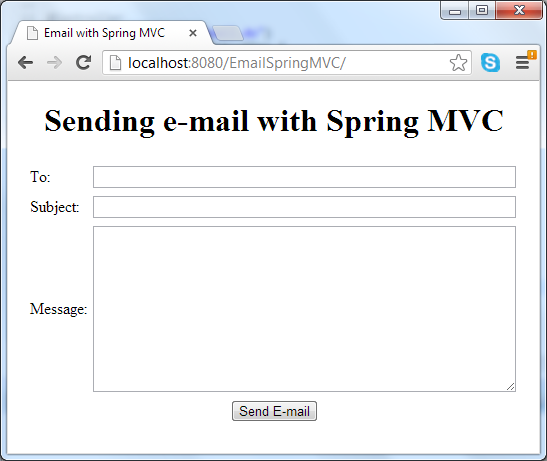
This tutorial provides a sample spring MVC application that allows user sending an e-mail message by filling a web form. The e-mail form looks like following screenshot:

In this tutorial, you are supposed to familiar with Java EE development as well as developing Spring MVC-based applications.
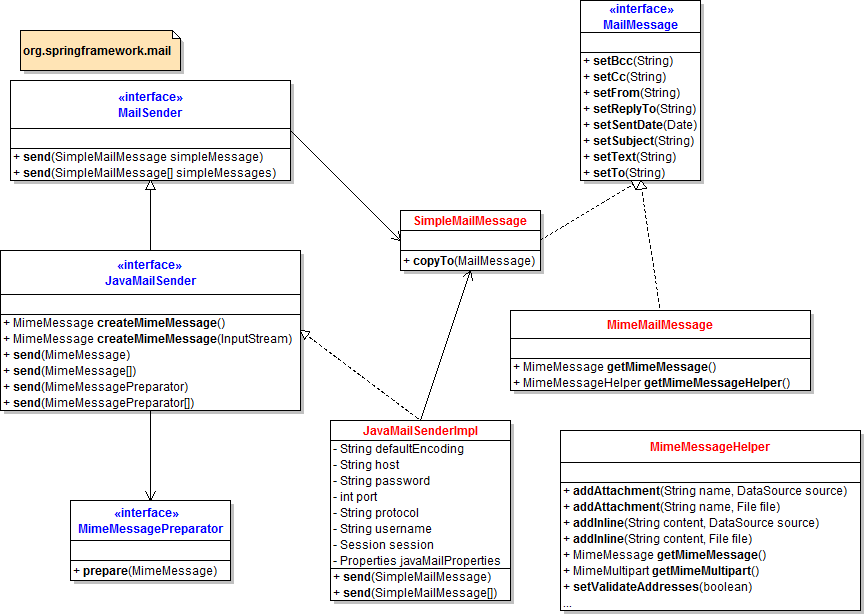
Based on JavaMail, Spring framework provides high-level abstraction API which greatly simplifies e-mail sending process. Let’s take a brief look at this API in the following class diagram:

To send e-mail messages, we can use an implementation of interface MailSender – the JavaMailSenderImpl class which is built upon on JavaMail. It’s convenient to configure this implementation as a bean in Spring’s context:
|
1
2
3
4
5
6
7
8
9
10
11
12
13
14
15
16
|
<bean id="mailSender" class="org.springframework.mail.javamail.JavaMailSenderImpl"> <!-- SMTP settings --> <property name="host" value="SMTP_HOST" /> <property name="port" value="SMTP_PORT" /> <property name="username" value="USER_NAME" /> <property name="password" value="PASSWORD" /> <property name="javaMailProperties"> <!-- additional properties specific to JavaMail --> <props> <prop key="mail.transport.protocol">smtp</prop> <prop key="mail.smtp.auth">true</prop> <prop key="mail.smtp.starttls.enable">true</prop> </props> </property></bean> |
This bean holds properties for SMTP and JavaMail and can be injected to a business/service class which needs to send an e-mail, for example:
|
1
|
mailSender.send(email); |
In which email is an object of a type that implements MailMessage interface, such as SimpleMailMessage class. We can construct the email object as follows:
|
1
2
3
4
|
SimpleMailMessage email = new SimpleMailMessage();email.setTo(toAddress);email.setSubject(subject);email.setText(body); |
That’s for a simple mail message (plain text). In case if we want to send HTML e-mail or attach files to the e-mail, we can use MimeMailMessage class with the help of MimeMessagePreparator class and MimeMessageHelper class. For example, sending an e-mail in HTML format with an attachment:
|
1
2
3
4
5
6
7
8
9
10
|
mailSender.send(new MimeMessagePreparator() { public void prepare(MimeMessage mimeMessage) throws MessagingException { MimeMessageHelper message = new MimeMessageHelper(mimeMessage, true, "UTF-8"); message.setFrom(fromEmail); message.setTo(toEmail); message.setSubject("A file for you"); message.setText("<b>See the attached</b>", true); message.addAttachment("CoolStuff.doc", new File("CoolStuff.doc")); }}); |
The following table summarizes the interfaces and classes provided in org.springframework.mail package:
|
org.springframework.mail |
|
Click on a link in the table to see API documentation for the corresponding interface/class.
The application requires the following jar files copied to its WEB-INF\lib directory:
|
Required jar files |
|
|
mail.jar |
|
|
spring-beans-3.2.0.RELEASE.jar spring-context-3.2.0.RELEASE.jar spring-context-support-3.2.0.RELEASE.jar spring-core-3.2.0.RELEASE.jar spring-expression-3.2.0.RELEASE.jar spring-web-3.2.0.RELEASE.jar spring-webmvc-3.2.0.RELEASE.jar |
|
|
commons-logging-1.1.1.jar |
|
NOTE: Click on a hyperlink in the table above to download the corresponding software.
The sample application we are going to build contains the following key files:
Create a JSP file called EmailForm.jsp with the following HTML code:
|
1
2
3
4
5
6
7
8
9
10
11
12
13
14
15
16
17
18
19
20
21
22
23
24
25
26
27
28
29
30
31
32
33
34
35
36
|
<%@ page language="java" contentType="text/html; charset=UTF-8" pageEncoding="UTF-8"%><!DOCTYPE html PUBLIC "-//W3C//DTD HTML 4.01 Transitional//EN" "http://www.w3.org/TR/html4/loose.dtd"><html><head><meta http-equiv="Content-Type" content="text/html; charset=UTF-8"><title>Email with Spring MVC</title></head><body> <center> <h1>Sending e-mail with Spring MVC</h1> <form method="post" action="sendEmail.do"> <table border="0" width="80%"> <tr> <td>To:</td> <td><input type="text" name="recipient" size="65" /></td> </tr> <tr> <td>Subject:</td> <td><input type="text" name="subject" size="65" /></td> </tr> <tr> <td>Message:</td> <td><textarea cols="50" rows="10" name="message"></textarea></td> </tr> <tr> <td colspan="2" align="center"> <input type="submit" value="Send E-mail" /> </td> </tr> </table> </form> </center></body></html> |
This is a simple form with three fields: To, Subject and Message – which are necessary attributes for a simple outgoing e-mail message. On submitting this form, the action named “sendEmail.do” will be called, as specified by the form’s actionattribute. We will implement a Spring controller class for handling this action in the next section.
Create a Spring context configuration file called spring-mvc.xml with the following XML code:
|
1
2
3
4
5
6
7
8
9
10
11
12
13
14
15
16
17
18
19
20
21
22
23
24
25
26
27
28
29
30
31
32
33
34
35
36
37
38
39
40
|
<?xml version="1.0" encoding="UTF-8"?><beans xmlns="http://www.springframework.org/schema/beans" xmlns:xsi="http://www.w3.org/2001/XMLSchema-instance" xmlns:context="http://www.springframework.org/schema/context" xsi:schemaLocation="http://www.springframework.org/schema/beans http://www.springframework.org/schema/beans/spring-beans-3.0.xsd http://www.springframework.org/schema/context http://www.springframework.org/schema/context/spring-context-3.0.xsd"> <context:component-scan base-package="net.codejava.spring" /> <bean id="mailSender" class="org.springframework.mail.javamail.JavaMailSenderImpl"> <property name="host" value="smtp.gmail.com" /> <property name="port" value="587" /> <property name="username" value="youremail" /> <property name="password" value="yourpassword" /> <property name="javaMailProperties"> <props> <prop key="mail.transport.protocol">smtp</prop> <prop key="mail.smtp.auth">true</prop> <prop key="mail.smtp.starttls.enable">true</prop> </props> </property> </bean> <bean id="viewResolver" class="org.springframework.web.servlet.view.InternalResourceViewResolver"> <property name="prefix" value="/" /> <property name="suffix" value=".jsp" /> </bean> <bean class="org.springframework.web.servlet.handler.SimpleMappingExceptionResolver"> <property name="exceptionMappings"> <props> <prop key="java.lang.Exception">Error</prop> </props> </property> </bean> </beans> |
This configuration is pretty straightforward:
The web deployment descriptor file (web.xml) is configured as follows:
|
1
2
3
4
5
6
7
8
9
10
11
12
13
14
15
16
17
18
19
20
21
22
23
24
25
26
27
28
|
<?xml version="1.0" encoding="UTF-8"?><web-app xmlns:xsi="http://www.w3.org/2001/XMLSchema-instance" xmlns="http://java.sun.com/xml/ns/javaee" xmlns:web="http://java.sun.com/xml/ns/javaee/web-app_2_5.xsd" xsi:schemaLocation="http://java.sun.com/xml/ns/javaee http://java.sun.com/xml/ns/javaee/web-app_3_0.xsd" id="WebApp_ID" version="3.0"> <display-name>EmailSpringMVC</display-name> <servlet> <servlet-name>SpringController</servlet-name> <servlet-class>org.springframework.web.servlet.DispatcherServlet</servlet-class> <init-param> <param-name>contextConfigLocation</param-name> <param-value>/WEB-INF/spring-mvc.xml</param-value> </init-param> <load-on-startup>1</load-on-startup> </servlet> <servlet-mapping> <servlet-name>SpringController</servlet-name> <url-pattern>*.do</url-pattern> </servlet-mapping> <welcome-file-list> <welcome-file>EmailForm.jsp</welcome-file> </welcome-file-list></web-app> |
It declares Spring controller servlet with its context configuration file (/WEB-INF/spring-mvc.xml). The controller is configured to handle all requests whose URL end with pattern: *.do. And the default page when accessing the application is the email form (EmailForm.jsp).
In order to handle submission from the e-mail form, we need to create a Spring controller class as follows:
|
1
2
3
4
5
6
7
8
9
10
11
12
13
14
15
16
17
18
19
20
21
22
23
24
25
26
27
28
29
30
31
32
33
34
35
36
37
38
39
40
41
|
package net.codejava.spring;import javax.servlet.http.HttpServletRequest;import org.springframework.beans.factory.annotation.Autowired;import org.springframework.mail.SimpleMailMessage;import org.springframework.mail.javamail.JavaMailSender;import org.springframework.stereotype.Controller;import org.springframework.web.bind.annotation.RequestMapping;import org.springframework.web.bind.annotation.RequestMethod;@Controller@RequestMapping("/sendEmail.do")public class SendEmailController { @Autowired private JavaMailSender mailSender; @RequestMapping(method = RequestMethod.POST) public String doSendEmail(HttpServletRequest request) { // takes input from e-mail form String recipientAddress = request.getParameter("recipient"); String subject = request.getParameter("subject"); String message = request.getParameter("message"); // prints debug info System.out.println("To: " + recipientAddress); System.out.println("Subject: " + subject); System.out.println("Message: " + message); // creates a simple e-mail object SimpleMailMessage email = new SimpleMailMessage(); email.setTo(recipientAddress); email.setSubject(subject); email.setText(message); // sends the e-mail mailSender.send(email); // forwards to the view named "Result" return "Result"; }} |
This controller class is quite simple. It is declared as a Spring MVC controller by the annotation @Controller, and is mapped to the e-mail form’s action by the @RequestMapping annotation. We inject the mailSender bean declared inspring-mvc.xml file into this controller through the private field also named mailSender. The injection is done automatically by Spring as we use the @Autowired annotation.
The method doSendEmail()is responsible for capturing input from e-mail form, creating a SimpleMailMessage object and sending the e-mail by invoking the send() method on the mailSender bean. The e-mail is in plain text format. Finally, it returns a view named “Result” which causes Spring to use the viewResolver to find and load appropriate JSP file (Result.jsp).
Code the Result.jsp file as follows:
|
1
2
3
4
5
6
7
8
9
10
11
12
13
14
15
|
<%@ page language="java" contentType="text/html; charset=UTF-8" pageEncoding="UTF-8"%><!DOCTYPE html PUBLIC "-//W3C//DTD HTML 4.01 Transitional//EN" "http://www.w3.org/TR/html4/loose.dtd"><html><head><meta http-equiv="Content-Type" content="text/html; charset=UTF-8"><title>Send e-mail result</title></head><body> <center> <h2>Thank you, your email has been sent.</h2> </center></body></html> |
And code the Error.jsp as follows:
|
1
2
3
4
5
6
7
8
9
10
11
12
13
14
15
16
|
<%@ page language="java" contentType="text/html; charset=UTF-8" pageEncoding="UTF-8"%><!DOCTYPE html PUBLIC "-//W3C//DTD HTML 4.01 Transitional//EN" "http://www.w3.org/TR/html4/loose.dtd"><html><head><meta http-equiv="Content-Type" content="text/html; charset=UTF-8"><title>Error</title></head><body> <center> <h2>Sorry, the email was not sent because of the following error:</h2> <h3>${exception.message}</h3> </center></body></html> |
As we can see, the result page simply tells the user that the e-mail has been sent, while the error page displays an error message if any exception thrown during the process of sending e-mail.
So far we have created all the key pieces of the application. Let’s deploy it on a servlet container like Tomcat, and access the application by typing the following URL into browser’s address bar (your host name and port number maybe different, depending on server configuration):
http://localhost:8080/EmailSpringMVC
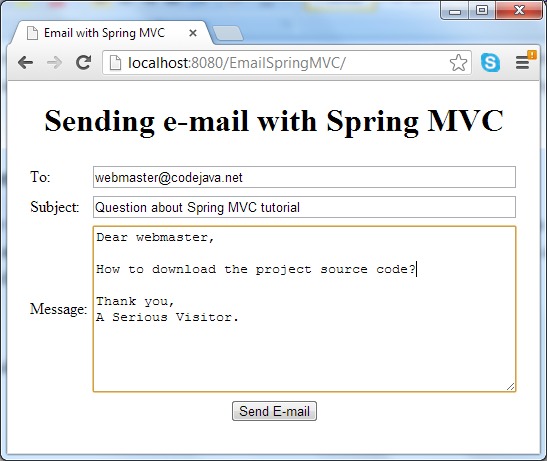
The e-mail form is displayed, type in required information:

Hit Send E-mail button, it may take a while for the e-mail to be sent. A successful message comes from the result page in case everything is going well:

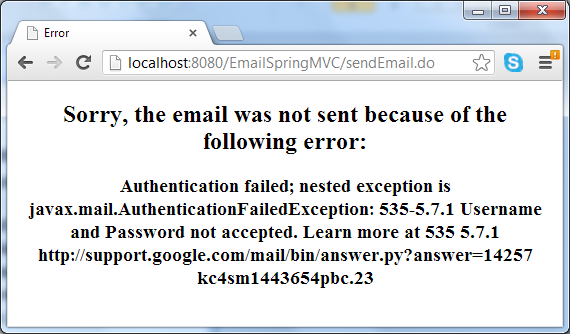
In case of error (such as network failure or the SMTP server could not be reached), the error page displays:

You can download the sample application as an Eclipse project or deployable WAR file in the attachment section, and remember to update SMTP settings to match your e-mail account.
Sending e-mail with Spring MVC--转载
原文:http://www.cnblogs.com/davidwang456/p/4918037.html