在本教程中,您将学习如何使用Eclipse创建Android JUnit测试项目,创建自动化单元测试并在各种条件下运行它们。
Android基础
能使用Eclipse和 Android SDK之类的工具。
代码下载:https://simple-calc-unit-testing.googlecode.com/files/FullCodeDownload.zip
需要FQ,如果不能FQ像看源码,请跟帖注明邮箱地址,多谢!
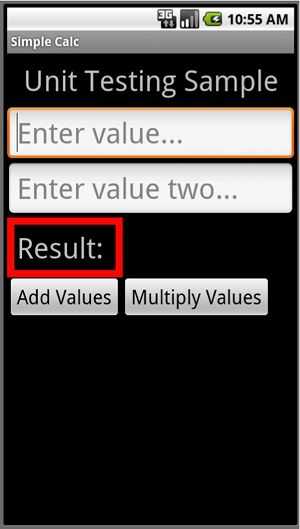
屏幕具有两个简单的功能:它允许用户输入的两个值,求和或者积。
屏幕布局如下main.xml:
<?xml version="1.0" encoding="utf-8"?>
<LinearLayout xmlns:android="http://schemas.android.com/apk/res/android"
    android:orientation="vertical" android:layout_width="fill_parent"
    android:layout_height="fill_parent" android:id="@+id/mainLayout">
    <TextView android:layout_width="fill_parent"
        android:layout_height="wrap_content" android:text="@string/hello"
        android:gravity="center_horizontal" android:textSize="48px"
        android:padding="12px" />
    <EditText android:layout_height="wrap_content" android:id="@+id/value1"
        android:hint="@string/hint1" android:inputType="numberDecimal"
        android:layout_width="fill_parent" android:textSize="48px"></EditText>
    <EditText android:layout_height="wrap_content" android:id="@+id/value2"
        android:hint="@string/hint2" android:inputType="numberDecimal"
        android:layout_width="fill_parent" android:textSize="48px"></EditText>
    <FrameLayout android:id="@+id/FrameLayout01"
        android:layout_width="wrap_content" android:layout_height="wrap_content"
        android:padding="12px" android:background="#ff0000">
        <LinearLayout android:id="@+id/LinearLayout02"
            android:layout_width="wrap_content" android:layout_height="wrap_content"
            android:orientation="horizontal" android:background="#000000"
            android:padding="4px">
            <TextView android:layout_width="wrap_content"
                android:layout_height="wrap_content" android:text="@string/resultLabel"
                android:textSize="48px" android:id="@+id/resultLabel"></TextView>
            <TextView android:layout_width="wrap_content"
                android:layout_height="wrap_content" android:id="@+id/result"
                android:textSize="48px" android:textStyle="bold"
                android:layout_marginLeft="16px"></TextView>
        </LinearLayout>
    </FrameLayout>
    <LinearLayout android:id="@+id/LinearLayout03"
        android:layout_height="wrap_content" android:layout_width="fill_parent">
        <Button android:layout_height="wrap_content" android:id="@+id/addValues"
            android:text="@string/add" android:textSize="32px"
            android:layout_width="wrap_content"></Button>
        <Button android:layout_height="wrap_content" android:id="@+id/multiplyValues"
            android:text="@string/multiply" android:textSize="32px"
            android:layout_width="wrap_content"></Button>
    </LinearLayout>
</LinearLayout>
简单解析一下这个界面设计,我们使用了LinearLayout,以使得控件能在垂直方向竖向排列。界面中包括了显示标题“Unit Testing Sample”的textview,两个输入数字的edittext控件,一个FrameLayout控件中包含了一个水平的LinearLayout,在这个LinearLayout包含了一个显示结果的textview以及其提示文字“Result”,注意的是FrameLayout的背景颜色设置为红色,而LinearLayou设置成了黑色背景。
layout针对Nexus One设计,分辨率800x480。
代码MainActivity.java:
/*
 * Copyright (c) 2010, Lauren Darcey and Shane Conder
 * All rights reserved.
 *
 * Redistribution and use in source and binary forms, with or without modification, are
 * permitted provided that the following conditions are met:
 *
 * * Redistributions of source code must retain the above copyright notice, this list of
 *   conditions and the following disclaimer.
 *
 * * Redistributions in binary form must reproduce the above copyright notice, this list
 *   of conditions and the following disclaimer in the documentation and/or other
 *   materials provided with the distribution.
 *
 * * Neither the name of the <ORGANIZATION> nor the names of its contributors may be used
 *   to endorse or promote products derived from this software without specific prior
 *   written permission.
 *
 * THIS SOFTWARE IS PROVIDED BY THE COPYRIGHT HOLDERS AND CONTRIBUTORS "AS IS" AND ANY
 * EXPRESS OR IMPLIED WARRANTIES, INCLUDING, BUT NOT LIMITED TO, THE IMPLIED WARRANTIES
 * OF MERCHANTABILITY AND FITNESS FOR A PARTICULAR PURPOSE ARE DISCLAIMED. IN NO EVENT
 * SHALL THE COPYRIGHT HOLDER OR CONTRIBUTORS BE LIABLE FOR ANY DIRECT, INDIRECT,
 * INCIDENTAL, SPECIAL, EXEMPLARY, OR CONSEQUENTIAL DAMAGES (INCLUDING, BUT NOT LIMITED
 * TO, PROCUREMENT OF SUBSTITUTE GOODS OR SERVICES; LOSS OF USE, DATA, OR PROFITS; OR
 * BUSINESS INTERRUPTION) HOWEVER CAUSED AND ON ANY THEORY OF LIABILITY, WHETHER IN CONTRACT,
 * STRICT LIABILITY, OR TORT (INCLUDING NEGLIGENCE OR OTHERWISE) ARISING IN ANY WAY OUT OF
 * THE USE OF THIS SOFTWARE, EVEN IF ADVISED OF THE POSSIBILITY OF SUCH DAMAGE.
 *
 * <ORGANIZATION> = Mamlambo
 */
package com.mamlambo.article.simplecalc;


import android.app.Activity;
import android.os.Bundle;
import android.util.Log;
import android.view.View;
import android.view.View.OnClickListener;
import android.widget.Button;
import android.widget.EditText;
import android.widget.TextView;

public class MainActivity extends Activity {
    /** Called when the activity is first created. */
    @Override
    public void onCreate(Bundle savedInstanceState) {
        final String LOG_TAG = "MainScreen";
        super.onCreate(savedInstanceState);
        setContentView(R.layout.main);

        final EditText value1 = (EditText) findViewById(R.id.value1);
        final EditText value2 = (EditText) findViewById(R.id.value2);

        final TextView result = (TextView) findViewById(R.id.result);

        Button addButton = (Button) findViewById(R.id.addValues);
        addButton.setOnClickListener(new OnClickListener() {

            public void onClick(View v) {
                try {
                    int val1 = Integer.parseInt(value1.getText().toString());
                    int val2 = Integer.parseInt(value2.getText().toString());

                    Integer answer = val1 + val2;
                    result.setText(answer.toString());
                } catch (Exception e) {
                    Log.e(LOG_TAG, "Failed to add numbers", e);
                }
            }
        });

        Button multiplyButton = (Button) findViewById(R.id.multiplyValues);
        multiplyButton.setOnClickListener(new OnClickListener() {

            public void onClick(View v) {
                try {
                    int val1 = Integer.parseInt(value1.getText().toString());
                    int val2 = Integer.parseInt(value2.getText().toString());

                    Integer answer = val1 * val2;
                    result.setText(answer.toString());
                } catch (Exception e) {
                    Log.e(LOG_TAG, "Failed to multiply numbers", e);
                }
            }
        });
    }
}
上面的代码十分简单,分别在两个按钮的onclick事件中,对用户输入的数进行了相加和相乘,看上去代码似乎没问题,但接下来,我们将通过Junit去发现其中的bug。
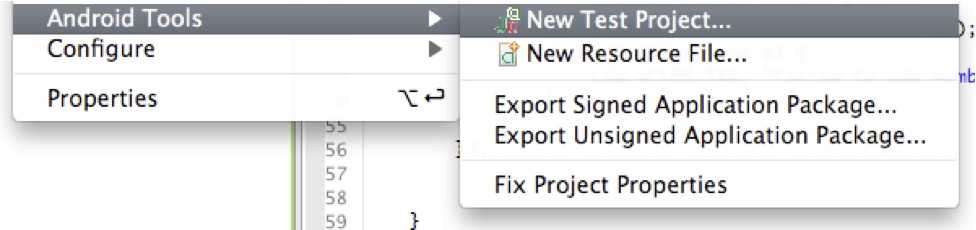
您可以通过两种方式添加一个测试项目,添加Android测试项目或从Android Tools添加项目。我们演示后者。
在项目资源管理器中,右键单击要测试的项目,选择Android Tools->New Test Project。
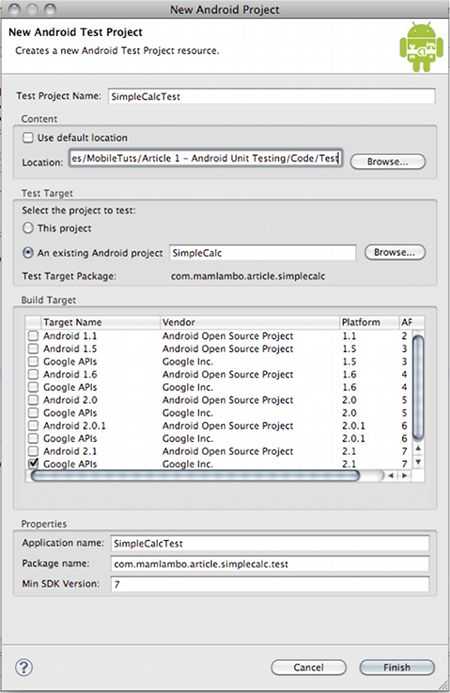
接下来需要对单元测试的工程进行设置,我们采用如下的设置方法:
测试工程名称:我们采用SimpleCalcTest
工程的位置:这个可以随便设置
选择被测试的工程:这里我们选择已经存在的SimpleCalc
构建的目标版本:这里我们选择Android 2.1
测试用例的包名:设置为com.mamlambo.article.simplecalc.test,
设置界面如下图所示:
这一步会在AndroidManifest.xml生成如下内容:
    <instrumentation
        android:name="android.test.InstrumentationTestRunner"
        android:targetPackage="com.mamlambo.article.simplecalc" />
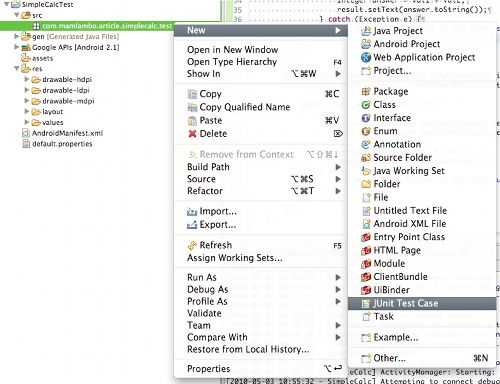
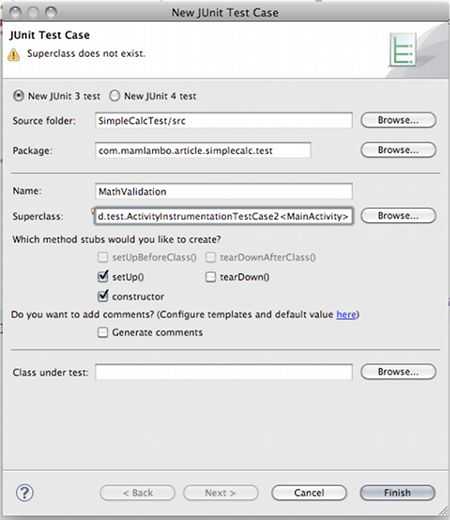
接下来对单元测试进行如下设置
设置选择使用Junit 3
源代码目录:这里要设置为SimpleCalcTest工程的代码目录
Package:这里设置为com.mamlambo.article.simplecalc.test,
测试用例名称:设置为MathValidation
测试的父类:这里选择“android.test.ActivityInstrumentationTestCase2.",这个是用来测试activity的Android的测试用例
将多选框中的setup,constructor两个都勾选上
如下图所示
在上图中,点”Finish”按钮后,MathVlidatiton.java测试用例就创建了。在单元测试中包括如下几个部分:construction, setUp(), 针对方法的测试用例, tearDown(), 和destruction。在setup()方法中,主要是实现一些在测试工作前的资源及环境设置等的初始化设置;而针对方法的测试用例中,需要用户自己编写,一般是以“test+方法名”;而tearDown()在每个测试方法之后运行,用来撤消其初始化的测试环境。
生成的代码如下:
package com.mamlambo.article.simplecalc.test;

import android.test.ActivityInstrumentationTestCase2;

public class MathValidation extends
       ActivityInstrumentationTestCase2<MainActivity> {

   public MathValidation(String name) {
       super(name);
   }

   protected void setUp() throws Exception {
       super.setUp();
   }
}
注意:忽视“Superclass does not exist.”告警即可。
在构建方法关联被测应用:
public MathValidation() {
       super("com.mamlambo.article.simplecalc", MainActivity.class);
}
初始化
package com.mamlambo.article.simplecalc.test;

import android.test.ActivityInstrumentationTestCase2;
import android.widget.TextView;
import com.mamlambo.article.simplecalc.MainActivity;
import com.mamlambo.article.simplecalc.R;

public class MathValidation extends ActivityInstrumentationTestCase2<MainActivity> {

   private TextView result;

   public MathValidation() {
       super ("com.mamlambo.article.simplecalc", MainActivity.class);
   }

   @Override
   protected void setUp() throws Exception {
       super.setUp();

       MainActivity mainActivity = getActivity();

       result = (TextView) mainActivity.findViewById(R.id.result);
   }
}
第一个测试用例
private static final String NUMBER_24 = "2 4 ENTER ";
private static final String NUMBER_74 = "7 4 ENTER ";
private static final String ADD_RESULT = "98";

public void testAddValues() {

   sendKeys(NUMBER_24);
   // now on value2 entry
   sendKeys(NUMBER_74);
   // now on Add button
   sendKeys("ENTER");

   // get result
   String mathResult = result.getText().toString();
   assertTrue("Add result should be 98", mathResult.equals(ADD_RESULT));
}
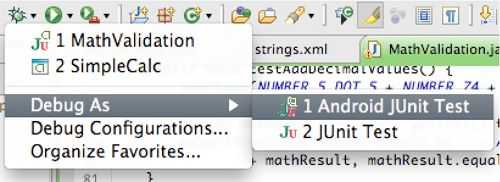
执行测试
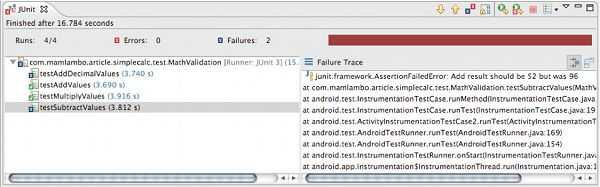
检查结果:
英文原版:http://code.tutsplus.com/tutorials/android-sdk-unit-testing-with-the-junit-testing-framework--mobile-421
原文:http://www.cnblogs.com/pythontesting/p/4932120.html