使用最多,主要用来接收客户端发送而来的请求信息,他是javax.servlet.http.HttpServletRequest接口的实例化对象。
public interface HttpServletRequest extends ServletRequest
HttpServletRequest是 ServletRequest的子接口,而 ServletRequest只有这一个子接口
既然这样,为什么不能合并成一个接口呢。,长远来看,主要协议是http,如果以后有更多的协议,就直接继承 ServletRequest接口即可。
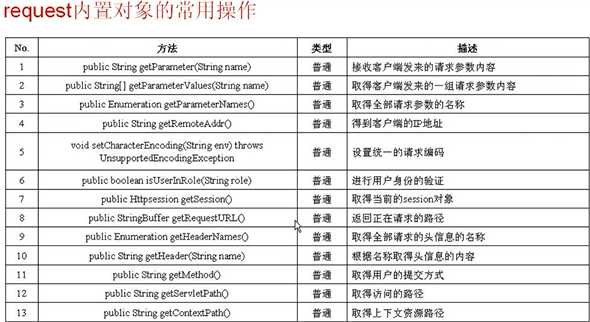
HttpServletRequest接口定义的方法很多,但是都是围绕接收客户端参数的。
回顾下客户端参数:
request_demo_01.htm:
<html>
<head><title>www.mldnjava.cn,MLDN高端Java培训</title></head>
<body>
<form action="request_demo01.jsp" method="get">
    请输入信息:<input type="text" name="info">
    <input type="submit" value="提交">
</form>
</body>
</html>
request_demo_01.jsp:
<%@ page contentType="text/html" pageEncoding="GBK"%>
<html>
<head><title>www.mldnjava.cn,MLDN高端Java培训</title></head>
<body>
<%
    request.setCharacterEncoding("GBK") ;// 设置的是统一编码
    //String content = new // String(request.getParameter("info").getBytes("ISO8859-1")) ;
    String content = request.getParameter("info") ;
%>
<h2><%=content%></h2>
</body>
</html>
如下下面不加request.setCharacterEncoding("GBK")的话,会产生乱码问题。
因为request属于接收客户端的参数,所以必然有其默认的语言编码,浏览器默认UTF-8,而中文是GBK。两种编码不同,所以产生乱码。
要解决乱码问题,就要使用request提供的统一设置编码的方法setCharacterEncoding()
以后,只要进行了传递,则肯定使用这条语句进行乱码解决。
request.setCharacterEncoding("GBK") ;// 设置的是统一编码
String content = request.getParameter("info") ;
如果这种方法不能解决的话,第二种方法:
String content = new String(request.getParameter("info").getBytes("ISO8859-1")) ;
request_demo02.htm:
<html>
<head><title>www.mldnjava.cn,MLDN高端Java培训</title></head>
<body>
<form action="request_demo02.jsp" method="post">
    姓名:    <input type="text" name="uname"><br>
    兴趣:    <input type="checkbox" name="inst" value="唱歌">唱歌
            <input type="checkbox" name="inst" value="跳舞">跳舞
            <input type="checkbox" name="inst" value="游泳">游泳
            <input type="checkbox" name="inst" value="看书">看书
            <input type="checkbox" name="inst" value="旅游">旅游
    <br><input type="hidden" name="id" value="3">
    <input type="submit" value="提交">
    <input type="reset" value="重置">
</form>
</body>
</html>
request_demo02.jsp:
注意下面inst接收方式,还有!=null的判断
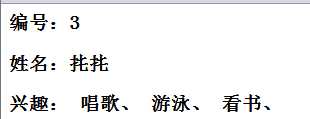
<%@ page contentType="text/html" pageEncoding="GBK"%>
<html>
<head><title>www.mldnjava.cn,MLDN高端Java培训</title></head>
<body>
<%
    request.setCharacterEncoding("GBK") ;// 设置的是统一编码
    String id = request.getParameter("id") ;
    String name = request.getParameter("uname") ;
    String inst[] = request.getParameterValues("inst") ;
%>
<h3>编号:<%=id%></h3>
<h3>姓名:<%=name%></h3>
<h3>兴趣:
<%
if(inst != null) {
    for(int x=0;x<inst.length;x++){
%>
        <%=inst[x]%>、
<%
    }
}
%>
</h3>
</body>
</html>
结果:
需要注意的是,参数是表单传递过来的,也就是说传递文本,密码,单选,复选,可以还有一种参数传递的方法,叫做地址重写。

例子: request_demo03.jsp:
<%@ page contentType="text/html" pageEncoding="GBK"%>
<html>
<head><title>www.mldnjava.cn,MLDN高端Java培训</title></head>
<body>
<%
    request.setCharacterEncoding("GBK") ;// 设置的是统一编码
    String param1 = request.getParameter("name") ;
    String param2 = request.getParameter("password") ;
%>
<h3>姓名:<%=param1%></h3>
<h3>密码:<%=param2%></h3>
</body>
</html>
在运行的时候,必定为null,地址重写需要在地址栏输入以下内容;
http://localhost:8080/wly/requestdemo/request_demo03.jsp?name=hello&password=mldn
结果可以写入:

学习表单的时候,知道有两种提交形式,get,post,区别:
在request中有个很重要的方法:getParameterNames().返回所有参数的名字。
request_demo04.htm;
<html>
<head><title>www.mldnjava.cn,MLDN高端Java培训</title></head>
<body>
<form action="request_demo04.jsp" method="post">
    姓名:    <input type="text" name="uname"><br>
    性别:    <input type="radio" name="sex" value="男" CHECKED>男
            <input type="radio" name="sex" value="女">女<br>
    城市:    <select name="city">
                <option value="北京">北京</option>
                <option value="天津">天津</option>
                <option value="洛阳">洛阳</option>
            </select><br>
    兴趣:    <input type="checkbox" name="**inst" value="唱歌">唱歌
            <input type="checkbox" name="**inst" value="跳舞">跳舞
            <input type="checkbox" name="**inst" value="游泳">游泳
            <input type="checkbox" name="**inst" value="看书">看书
            <input type="checkbox" name="**inst" value="旅游">旅游<br>
    自我介绍:<textarea cols="30" rows="3" name="note"></textarea><br>
    <input type="hidden" name="uid" value="1">
    <input type="submit" value="提交">
    <input type="reset" value="重置">
</form>
</body>
</html>
request_demo04.jsp:
<%@ page contentType="text/html" pageEncoding="GBK"%>
<%@ page import="java.util.*"%>
<html>
<head><title>www.mldnjava.cn,MLDN高端Java培训</title></head>
<body>
<%
    request.setCharacterEncoding("GBK") ;// 设置的是统一编码
    Enumeration enu = request.getParameterNames() ;
%>
<table border="1">
    <tr>
        <td>参数名称</td>
        <td>参数内容</td>
    </tr>
<%
    while(enu.hasMoreElements()){
        String paramName = (String) enu.nextElement() ;
%>
        <tr>
            <td><%=paramName%></td>
            <td>
<%
            if(paramName.startsWith("**")){        // 是以**开头
                String paramValue[] = request.getParameterValues(paramName) ;
                for(int x=0;x<paramValue.length;x++){
%>
                    <%=paramValue[x]%>、
<%
                }
            } else {
                String paramValue = request.getParameter(paramName) ;
%>
                <%=paramValue%>
<%
            }
%>
            </td>
        </tr>
<%
    }
%>
</table>
</body>
</html>
普通接收参数:String paramValue = request.getParameter(paramName) ;
复选框接收参数:String paramValue[] = request.getParameterValues(paramName)
此类操作一般都是在表单不确定的时候使用,比如购物车的设计。
要取得头信息的名称通过request的getHeaderNames(),要取出每个头信息的内容,需要使用getHeader()方法
<%@ page contentType="text/html" pageEncoding="GBK"%>
<%@ page import="java.util.*"%>
<html>
<head><title>www.mldnjava.cn,MLDN高端Java培训</title></head>
<body>
<%
    Enumeration enu = request.getHeaderNames() ;    // 取得全部的头信息
    while(enu.hasMoreElements()){
        String headerName = (String) enu.nextElement() ;
        String headerValue = request.getHeader(headerName) ;
%>
        <h5><%=headerName%> --> <%=headerValue%></h5>
<%
    }
%>
</table>
</body>
</html>
运行结果:
host --> localhost:8080

connection --> keep-alive

accept --> text/html,application/xhtml+xml,application/xml;q=0.9,image/webp,*/*;q=0.8

upgrade-insecure-requests --> 1

user-agent --> Mozilla/5.0 (Windows NT 6.1) AppleWebKit/537.36 (KHTML, like Gecko) Chrome/45.0.2454.101 Safari/537.36

referer --> http://localhost:8080/wly/requestdemo/

accept-encoding --> gzip, deflate, sdch

accept-language --> zh-CN,zh;q=0.8

cookie --> JSESSIONID=7E97BB870F530DA079659225E1C4D6FC
理解即可,很少操作头信息的。
Tomcat安装时曾经设置过一个用户名和密码都是admin,那个登录验证框可以通过程序实现:isUserInRole(),相当于在tomcat新增用户,如果要增加用户,使用修改配置文件tomcat-users.xml即可。
<?xml version=‘1.0‘ encoding=‘utf-8‘?>
<tomcat-users>
  <role rolename="manager"/>
  <role rolename="admin"/>
  <role rolename="mldnuser"/>
  <user username="lixinghua" password="mldnjava" roles="admin"/>
  <user username="admin" password="admin" roles="admin,manager"/>
  <user username="mldn" password="mldn" roles="mldnuser"/>
</tomcat-users>
还要改web.xml;
<security-constraint>
        <web-resource-collection>
            <web-resouce-name>RegisteredUsers    </web-resouce-name>
            <url-pattern>/requestdemo/security.jsp
            </url-pattern>
        </web-resource-collection>
        <auth-constraint>
            <role-name>mldnuser</role-name>
            <role-name>admin</role-name>
        </auth-constraint>
    </security-constraint>
    <login-config>
        <auth-method>BASIC</auth-method>
        <realm-name>Registered Users</realm-name>
    </login-config>
    <security-role>
        <role-name>mldnuser</role-name>
    </security-role>
    <security-role>
        <role-name>admin</role-name>
    </security-role>
下面编写角色验证代码:
security.jsp:
<%@ page contentType="text/html" pageEncoding="GBK"%>
<%@ page import="java.util.*"%>
<html>
<head><title>www.mldnjava.cn,MLDN高端Java培训</title></head>
<body>
<%
    if(request.isUserInRole("admin")){
%>
        <h2>欢迎光临!</h2>
<%
    }
%>
</table>
</body>
</html>
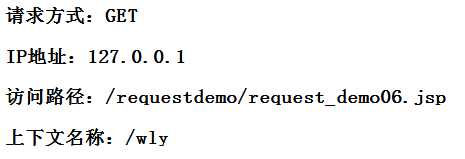
<%@ page contentType="text/html" pageEncoding="GBK"%>
<%@ page import="java.util.*"%>
<html>
<head><title>www.mldnjava.cn,MLDN高端Java培训</title></head>
<body>
<%
    String method = request.getMethod() ;
    String ip = request.getRemoteAddr() ;
    String path = request.getServletPath() ;
    String contextPath = request.getContextPath() ;
%>
<h3>请求方式:<%=method%></h3>
<h3>IP地址:<%=ip%></h3>
<h3>访问路径:<%=path%></h3>
<h3>上下文名称:<%=contextPath%></h3>
</table>
</body>
</html>
结果:
注意:直接输入地址属于get提交!!!
对于request中的getContextPath()方法时非常重要的操作,以后可以通过它,解决路径跳转问题。解决
src=../image/1024.jpg问题
other.jsp:
<%@ page contentType="text/html" pageEncoding="GBK"%>
<%@ page import="java.util.*"%>
<html>
<head><title>www.mldnjava.cn,MLDN高端Java培训</title></head>
<body>
<%=request.getContextPath()%>/images/1024.jpg
<img src="<%=request.getContextPath()%>/images/1024.jpg">
</body>
</html>
原文:http://www.cnblogs.com/wujixing/p/4950669.html