作为一个样式如何使其在WPF使用的例子,,让我们看一下TTT简单的实现,如示例5-1。
示例5-1
 <!-- Window1.xaml -->
<Window
x:Class="TicTacToe.Window1"
xmlns="http://schemas.microsoft.com/winfx/avalon/2005"
xmlns:x="http://schemas.microsoft.com/winfx/xaml/2005"
Text="TicTacToe">
<!-- the black background lets the tic-tac-toe -->
<!-- crosshatch come through on the margins -->
<Grid Background="Black">
<Grid.RowDefinitions>
<RowDefinition />
<RowDefinition />
<RowDefinition />
</Grid.RowDefinitions>
<Grid.ColumnDefinitions>
<ColumnDefinition />
<ColumnDefinition />
<ColumnDefinition />
</Grid.ColumnDefinitions>
<Button Margin="0,0,2,2" Grid.Row="0" Grid.Column="0" x:Name="cell00" />
<Button Margin="2,0,2,2" Grid.Row="0" Grid.Column="1" x:Name="cell01" />
<Button Margin="2,0,0,2" Grid.Row="0" Grid.Column="2" x:Name="cell02" />
<Button Margin="0,2,2,2" Grid.Row="1" Grid.Column="0" x:Name="cell10" />
<Button Margin="2,2,2,2" Grid.Row="1" Grid.Column="1" x:Name="cell11" />
<Button Margin="2,2,0,2" Grid.Row="1" Grid.Column="2" x:Name="cell12" />
<Button Margin="0,2,2,0" Grid.Row="2" Grid.Column="0" x:Name="cell20" />
<Button Margin="2,2,2,0" Grid.Row="2" Grid.Column="1" x:Name="cell21" />
<Button Margin="2,2,0,0" Grid.Row="2" Grid.Column="2" x:Name="cell22" />
</Grid>
</Window>
这个
示例5-2
// Window1.xaml.cs

 namespace TicTacToe {
 public partial class Window1 : Window {
 // Track the current player (X or O)
string currentPlayer;
// Track the list of cells for finding a winner etc.
Button[] cells;
public Window1( ) {
InitializeComponent( );
// Cache the list of buttons and handle their clicks
this.cells = new Button[] { this.cell00, this.cell01, };
foreach( Button cell in this.cells ) {
cell.Click += cell_Click;
 }
}
// Initialize a new game
NewGame( );
}
// Wrapper around the current player for future expansion,
// e.g. updating status text with the current player
string CurrentPlayer {
get { return this.currentPlayer; }
set { this.currentPlayer = value; }
}
// Use the buttons to track game state
void NewGame( ) {
foreach( Button cell in this.cells ) {
cell.Content = null;
}
CurrentPlayer = "X";
}
void cell_Click(object sender, RoutedEventArgs e) {
Button button = (Button)sender;
// Don‘t let multiple clicks change the player for a cell
if( button.Content != null ) { return; }
// Set button content
button.Content = CurrentPlayer;
// Check for winner or a tie
if( HasWon(this.currentPlayer) ) {
MessageBox.Show("Winner!", "Game Over");
NewGame( );
return;
}
else if( TieGame( ) ) {
MessageBox.Show("No Winner!", "Game Over");
NewGame( );
return;
}
// Switch player
if( CurrentPlayer == "X" ) {
CurrentPlayer = "O";
}
else {
CurrentPlayer = "X";
}
}
// Use this.cells to find a winner or a tie
bool HasWon(string player) {}
bool TieGame( ) {}
}
 }
}
我们的简单
图5-1
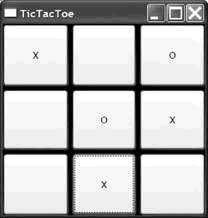
注意到图5-1中,grid的背景来自页面的空白。这些空白差不多使grid看上去像一个可绘制的TTT木板(虽然我们将来会做的更好)。然而,如果我们真的指望模仿一个手绘的游戏,我们已经对按钮上的字体大小做了设置,但并没匹配到线条的厚度。
一种修复这个问题的方法是为每一个按钮对象设置字体和宽度,如示例5-3。
示例5-3
依照我的视觉敏感性,今天,虽然这样做使得<Button FontSize="32" FontWeight="Bold" x:Name="cell00" />
<Button FontSize="32" FontWeight="Bold" x:Name="cell01" />
<Button FontSize="32" FontWeight="Bold" x:Name="cell02" />
<Button FontSize="32" FontWeight="Bold" x:Name="cell10" />
<Button FontSize="32" FontWeight="Bold" x:Name="cell11" />
<Button FontSize="32" FontWeight="Bold" x:Name="cell12" />
<Button FontSize="32" FontWeight="Bold" x:Name="cell20" />
<Button FontSize="32" FontWeight="Bold" x:Name="cell21" />
<Button FontSize="32" FontWeight="Bold" x:Name="cell22" />
《Programming WPF》翻译 第5章 1.不使用样式
原文:http://www.cnblogs.com/lonelyxmas/p/4962862.html

