
主要内容:
1.指针事件
2.操作事件
1.指针事件
指针事件由各种活动输入源引发,包括触摸、触摸板、笔和鼠标(它们替代传统的鼠标事件)。指针事件基于单一输入点(手指、笔尖、鼠标光标),但不支持基于速度的交互。下面是指针事件列表及其相关的事件参数列表:
| 事件或类 | 描述 |
|---|---|
| PointerPressed | 单根手指触摸屏幕时发生。 |
| PointerReleased | 该同一触摸接触抬起时发生。 |
| PointerMoved | 在屏幕上拖动指针时发生。 |
| PointerEntered | 在指针进入元素的点击测试区时发生。 |
| PointerExited | 在指针退出元素的点击测试区时发生。 |
| PointerCanceled | 异常丢失触摸接触时发生。 |
| PointerCaptureLost | 当另一个元素捕获指针时发生。 |
| PointerWheelChanged | 当鼠标滚轮的增量值更改时发生。 |
| PointerRoutedEventArgs | 为所有指针事件提供数据。 |
这些事件都是基于UI共同基类UIElement类的事件,对于大多数的UI元素都是适用的,利用上表中的前5个事件就基本可以实现单指操作的各种场景。一般用得最多的是PointerEntered和PointerExited两个事件。使用时,我们既可以在XAML里面注册这些事件,也可以在构造函数里面进行注册。
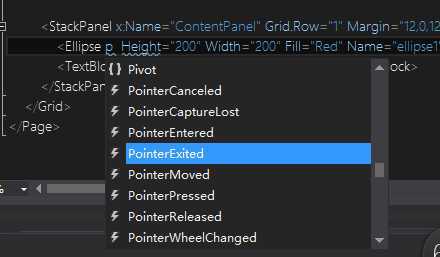
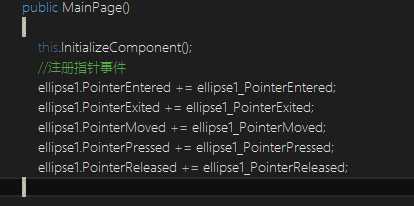
然后我们在这些事件里通过Debug.WriteLine("触发PointerXXX事件");打印出如下调试信息:
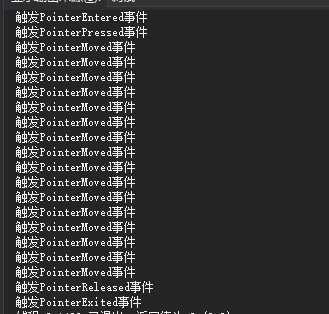
可以发现依次触发的事件是PointerEntered、PointerPressed、PointerMoved、PointerReleased、PointerExisted,手指只要在屏幕上稍微滑动一下,就有很多很多的PointerMoved事件被触发。。。
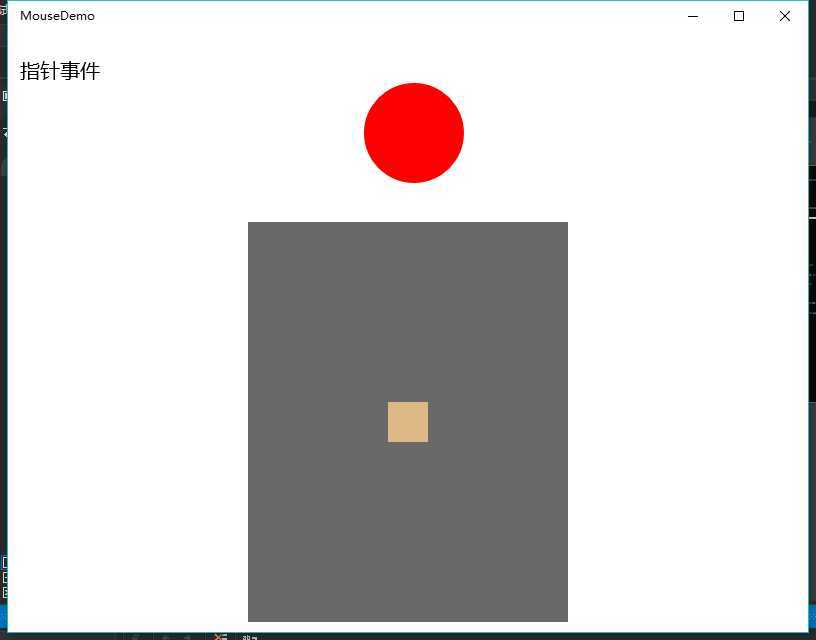
我们来看实例:
通过在圆上滑动来控制方块在一个区域的移动。
XAML:在这里使用的布局容器是Canvas,便于后面方块位置的控制。
   <StackPanel x:Name="TitlePanel" Grid.Row="0" Margin="12,24,0,28">
            <TextBlock x:Name="ApplicationTitle" Text="鼠标事件" FontSize="20"/>
            <Ellipse   Height="100" Width="100" Fill="Red" Name="ellipse1" />
        </StackPanel>
        <Canvas x:Name="canvas" Background="DimGray" Height="400" Width="320" Grid.Row="1">
            <Rectangle x:Name="rect"  Fill="BurlyWood" Canvas.Left="140" Canvas.Top="180"  Height="40" Width="40"></Rectangle>
        </Canvas>
C#代码:判断是点击操作还是滑动操作,以及左滑右滑等是固定模式的代码,能理解就理解,不用刻意琢磨。还需注意如何获取控件在Canvas里的位置以及把方块限定在一个区域内。
    private void ellipse1_PointerExited(object sender, PointerRoutedEventArgs e)
        {
            Debug.WriteLine("触发PointerExited事件");
            Point end = e.GetCurrentPoint(ellipse1).Position;
            double angle = 0;
            double verticalDistance = (double)rect.GetValue(Canvas.TopProperty);
            double horizontalDistance = (double)rect.GetValue(Canvas.LeftProperty);

            if (Math.Abs(end.X - start.X) < 1 && Math.Abs(end.Y - start.Y) < 1)
            {
                angle = 0;
            }
            else if (end.X > start.X)
            {
                if (end.Y > start.Y)
                {
                    angle = 360 - Math.Atan((end.Y - start.Y) * 1.0 / (end.X - start.X)) * 180 / Math.PI;
                }
                else
                {
                    angle = Math.Atan((start.Y - end.Y) * 1.0 / (end.X - start.X)) * 180 / Math.PI;
                }
            }
            else if (end.X < start.X)
            {
                if (end.Y > start.Y)
                {
                    angle = Math.Atan((end.Y - start.Y) * 1.0 / (start.X - end.X)) * 180 / Math.PI + 180;
                }
                else
                {
                    angle = 180 - Math.Atan((start.Y - end.Y) * 1.0 / (start.X - end.X)) * 180 / Math.PI;
                }
            }
            if (angle == 0)
            {
                //点击操作
            }
            else if (angle >= 45 && angle < 135)
            {
                // 滑动操作:从下往上
                if (verticalDistance >0)
                    Canvas.SetTop(rect, (double)rect.GetValue(Canvas.TopProperty)-20);
            }
            else if (angle <= 45 || angle > 315)
            {
                // 滑动操作:从左向右滑
                if (horizontalDistance < canvas.Width-40)
                    Canvas.SetLeft(rect, (double)rect.GetValue(Canvas.LeftProperty) + 20);
            }
            else if (angle >= 135 && angle < 225)
            {
                //滑动操作:从右向左滑
                if (horizontalDistance >0)
                    Canvas.SetLeft(rect, (double)rect.GetValue(Canvas.LeftProperty) - 20);
            }
            else if (angle >= 225 && angle < 315)
            {
                //滑动操作:从上往下
                if (verticalDistance <canvas.Height-40)
                    Canvas.SetTop(rect, (double)rect.GetValue(Canvas.TopProperty) + 20);
            }
        }
        private void ellipse1_PointerEntered(object sender, PointerRoutedEventArgs e)
        {
            start = e.GetCurrentPoint(ellipse1).Position;
        }
来一个很小的预览图意思一下:
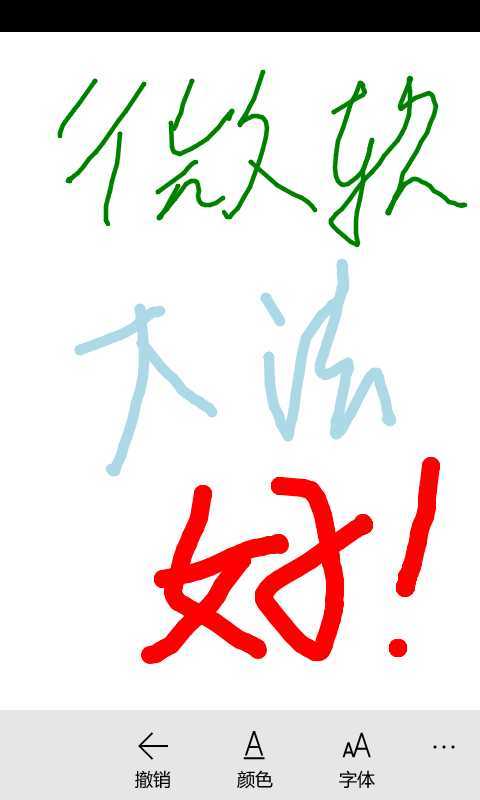
简单的实现一个涂鸦板
XAML:定义了一个Canvas、三个AppBarButton。
 <Grid Background="{ThemeResource ApplicationPageBackgroundThemeBrush}">
        <Canvas Name="canvas"
           Background="Transparent"
           PointerEntered="canvas_PointerEntered"
           PointerPressed="canvas_PointerPressed"
           PointerMoved="canvas_PointerMoved"
           PointerExited="canvas_PointerExited">
        </Canvas>
    </Grid>

    <Page.BottomAppBar>
        <CommandBar IsOpen="False">
            <CommandBar.PrimaryCommands>
                <AppBarButton  Icon="Back" Label="撤销" Click="AppBarButton_Click"></AppBarButton>
                <AppBarButton Icon="FontColor" Label="颜色">
                    <AppBarButton.Flyout>
                        <Flyout x:Name="colorflyout">
                            <ListView x:Name="colorlv" IsItemClickEnabled="True" ItemClick="colorlv_ItemClick" >
                                <ListView.ItemTemplate>
                                    <DataTemplate>
                                        <TextBlock FontSize="12" Text="{Binding}"></TextBlock>
                                    </DataTemplate>
                                </ListView.ItemTemplate>
                            </ListView>
                        </Flyout>
                    </AppBarButton.Flyout>
                </AppBarButton>
                <AppBarButton Icon="FontSize" Label="字体">
                    <AppBarButton.Flyout>
                        <Flyout x:Name="fontflyout" >
                            <Slider x:Name="fontslider" Width="100" Minimum="2" Maximum="15" SmallChange="1"
                                    Orientation="Horizontal" ValueChanged="Slider_ValueChanged" ></Slider>
                        </Flyout>
                    </AppBarButton.Flyout>
                </AppBarButton>
            </CommandBar.PrimaryCommands>
        </CommandBar>
    </Page.BottomAppBar>
C#代码:
下面这段代码主要用来画线,涉及到PointerPressed和PointerMoved事件。
 private void canvas_PointerPressed(object sender, PointerRoutedEventArgs e)
        {
            currentPoint = e.GetCurrentPoint(canvas).Position;
            lastPoint = currentPoint;
        }

        private void canvas_PointerMoved(object sender, PointerRoutedEventArgs e)
        {
            currentPoint = e.GetCurrentPoint(canvas).Position;

            Line line = new Line() { X1 = currentPoint.X, Y1 = currentPoint.Y, X2 = lastPoint.X, Y2 = lastPoint.Y };
            line.Stroke = new SolidColorBrush(color);
            line.StrokeThickness = fontsize;
            line.StrokeLineJoin = PenLineJoin.Round;
            line.StrokeStartLineCap = PenLineCap.Round;
            line.StrokeEndLineCap = PenLineCap.Round;
            this.canvas.Children.Add(line);
            lastPoint = currentPoint;
            lineCount++;
        }
接着,我们考虑一下,该如何删除最后画在屏幕上的那条线呢?你可能会想到这句代码this.canvas.Children.RemoveAt(this.canvas.Children.Count - 1);(如果用这句代码,你可能要点很多下撤销按钮才能删除最后那条线),然而我们从上面可以知道,只要手指有滑动,就会不断触发PointerMoved事件,每次触发这个事件都会画一条线,只是那些线都首尾相接了,所以我们最后画在屏幕上的那条线其实是一系列的线首尾相接而成。具体的删除方法,请看下面的代码:
 private void canvas_PointerEntered(object sender, PointerRoutedEventArgs e)
        {
            lineCount = 0;
        }
        private void canvas_PointerExited(object sender, PointerRoutedEventArgs e)
        {
            lineCountList.Add(lineCount);
        }
        private void AppBarButton_Click(object sender, RoutedEventArgs e)
        {
            if (lineCountList.Count > 0)
            {
                int lines = lineCountList[lineCountList.Count - 1];
                for (int i = 0; i < lines; i++)
                {
                    this.canvas.Children.RemoveAt(this.canvas.Children.Count - 1);
                }
                lineCountList.RemoveAt(lineCountList.Count - 1);
            }
        }
lineCount是定义在MainPage类中的变量(用来记录在PointerMoved中画的线的条数,也就是我们最近在屏幕上画的那条线实际包含线的条数),我们在PointerEntered给lineCount赋初值0,然后在PointerMoved里面执行加1操作,最后在PointerExited事件中将lineCount添加到集合lineCountList中进行保存,然后在AppBarButton_Click中进行具体的删除。至于一下删除所有,那就直接 canvas.Children.Clear();
颜色设置和字号设置的代码很简单就不贴了,下面来看图吧。我们这个示例最好在手机上调试,PC的话,只要鼠标在应用程序的区域移动就会画线,有点烦人。
2.操作事件
如果需要在应用中支持多个手指或速度数据的交互,则要使用操作事件。我们还可以使用操作事件来检测拖动、缩放和按住之类的交互。下表是操作事件及其相关的事件参数。
| 事件或类 | 描述 |
|---|---|
| ManipulationStarting event | 首次创建操作处理器时发生。 |
| ManipulationStarted event | 当输入设备在 UIElement 上开始操作时发生。 |
| ManipulationDelta event | 当输入设备在操作期间更改位置时发生。 |
| ManipulationInertiaStarting event | 在操作过程中,当延迟开始时,如果输入设备与 UIElement 对象失去联系,则会发生。 |
| ManipulationCompleted event | 当 UIElement 上的操作和延迟完成时发生。 |
| ManipulationStartingRoutedEventArgs | 提供 ManipulationStarting 事件的数据。 |
| ManipulationStartedRoutedEventArgs | 提供 ManipulationStarted 事件的数据。 |
| ManipulationDeltaRoutedEventArgs | 提供 ManipulationDelta 事件的数据。 |
| ManipulationInertiaStartingRoutedEventArgs | 提供 ManipulationInertiaStarting 事件的数据。 |
| ManipulationVelocities | 描述操作发生的速度。 |
| ManipulationCompletedRoutedEventArgs | 提供 ManipulationCompleted 事件的数据。 |
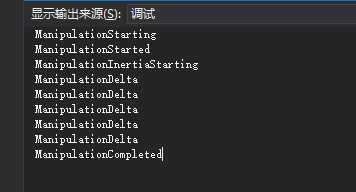
我们的手势事件是由一系列操作事件组成。每个手势都是从ManipulationStarted事件开始,当用户触摸屏幕时,将会触发一个或多个ManipulationDelta事件,当手势完成用户手指离开屏幕时,会触发ManipulationCompleted事件。ManipulationStarting事件则是Manipulation系列事件最开始触发的事件,ManipulationInertialStarting事件则是在ManipulationDelta事件触发的过程中,如果有延迟则会发生,并不是必然会触发的事件。如下图所示:
在这些事件中,最重要的一个事件就是ManipulationDelta事件,相关手势的逻辑判断都要依赖于这个事件,而在一次触控当中,这个事件又可能被触发多次,和上面提到的PointerMoved事件类似,所以处理起来还是比较麻烦的。ManipulationDelta事件通过参数ManipulationDeltaRoutedEventArgs对象来传递相关的触摸和滑动信息,我们可以转到定义看一下这个类它所提供的一些属性,主要关注ManipulationDelta类型的两个属性Cumulative和Delta,Cumulative记录自开始操作之后的全部更改,Delta则是当前操作的最近更改。ManipulationDelta类,我们也可以转到定义看一下, 有System.Single(单精度浮点类型)类型的三个参数:Expansion(触摸触点间的距离更改,以DIP表示)、Rotation(旋转角度的变化,以度为单位)、Scale(触摸触点间的距离更改,以百分比表示)和Point类型的Translation(表示平移距离)。
另外,我们在使用Manipulation系列事件的时候,还需要设置ManipulationMode属性,其值为ManipulationModes枚举,具体的枚举值我们可以转到定义进行查看。
(实例实例,,,,请看下回。。。。)
操作事件,尤其是ManipulationDelta事件用得还是比较多的,然后这一部分的内容也是有一定的难度,需要重点掌握一下。由于准备不足,这部分的内容下次再继续讨论咯。好了,晚安!
本次内容的Demo链接:http://pan.baidu.com/s/1jHaa2BO 密码:5btc
原文:http://www.cnblogs.com/czhwust/p/Win10_touch.html