spring-in-aciton-mvc-helloWorld代码
本章纪录最小单元的mvc,hello world
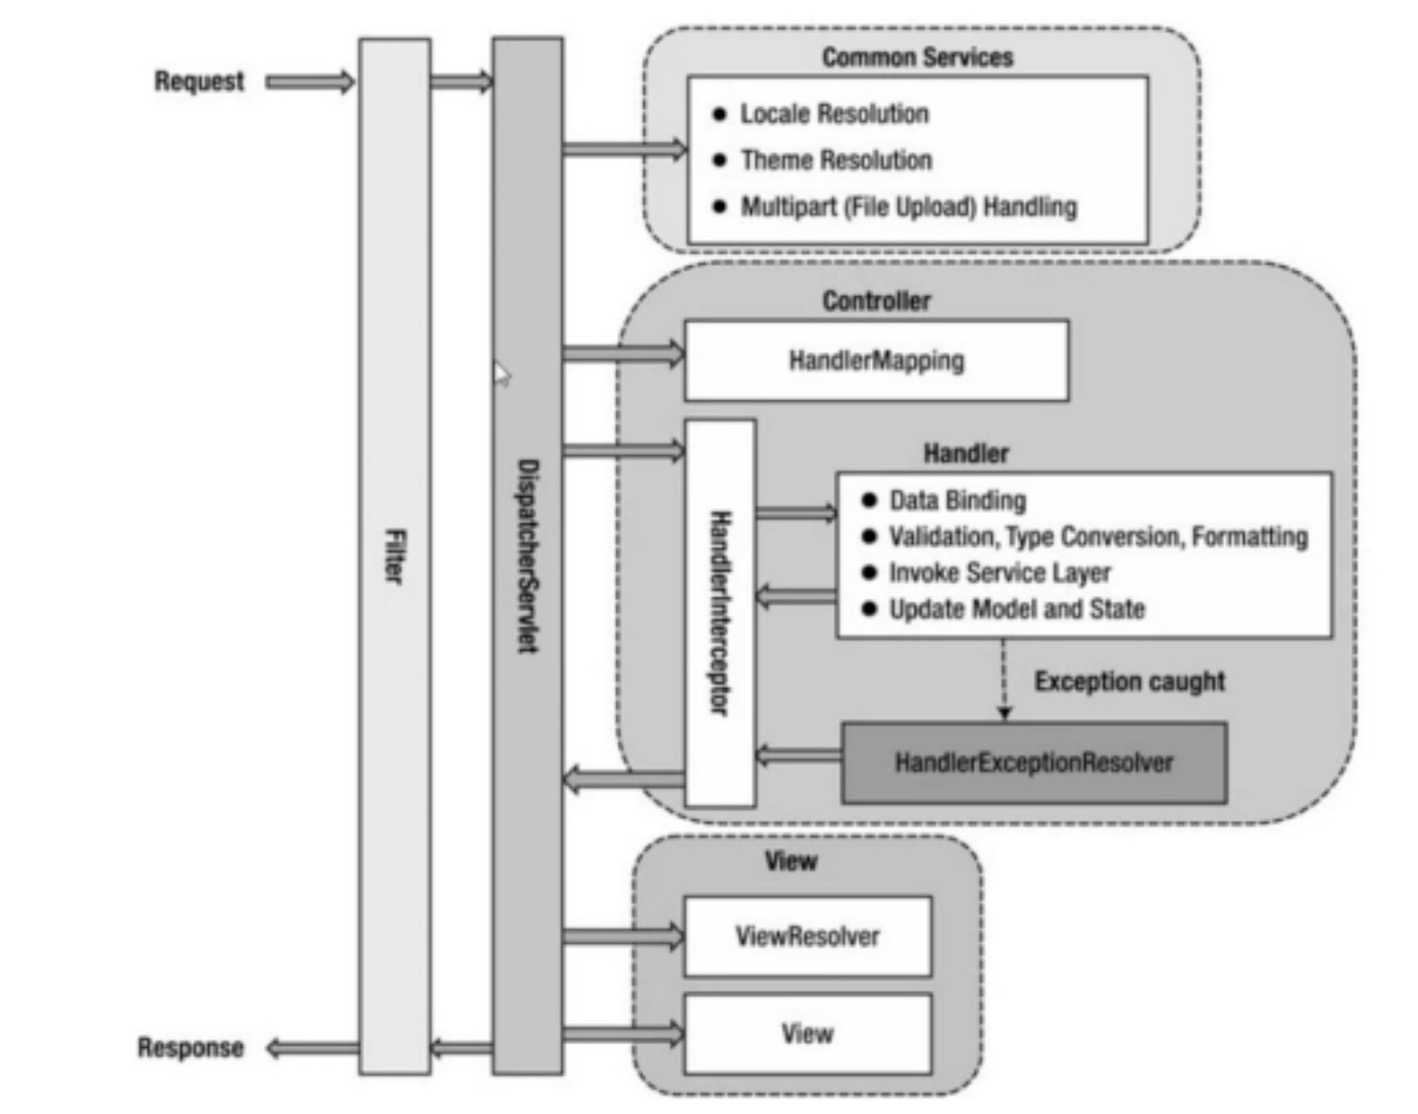
首先是对这张图有个一般的概念,核心为DispatchServlet,包括HandlerMapping和ViewResolver, HandlerInterceptor等等

对于一个最小单元的hello world mvc首先创建maven工程
mvn archetype:generate -DgroupId=cuimiao-spring -DartifactId=spring-in-action-mvc-demo -DarchetypeArtifactId=maven-archetype-webapp -DinteractiveMode=false
创建完成后需要引入pom文件,对于一个基本的单元,以下依赖即可
<project xmlns="http://maven.apache.org/POM/4.0.0" xmlns:xsi="http://www.w3.org/2001/XMLSchema-instance"
  xsi:schemaLocation="http://maven.apache.org/POM/4.0.0 http://maven.apache.org/maven-v4_0_0.xsd">
  <modelVersion>4.0.0</modelVersion>
  <groupId>cuimiao-spring</groupId>
  <artifactId>spring-in-action-mvc-imooc</artifactId>
  <packaging>war</packaging>
  <version>1.0-SNAPSHOT</version>
  <name>spring-in-action-mvc-imooc Maven Webapp</name>
  <url>http://maven.apache.org</url>
  <properties>
    <commons-lang.version>2.6</commons-lang.version>
    <slf4j.version>1.7.6</slf4j.version>
    <spring.version>4.1.3.RELEASE</spring.version>
    <jackson.version>2.5.4</jackson.version>
  </properties>

  <dependencyManagement>
    <dependencies>
      <dependency>
        <groupId>org.springframework</groupId>
        <artifactId>spring-framework-bom</artifactId>
        <version>${spring.version}</version>
        <type>pom</type>
        <scope>import</scope>
      </dependency>
    </dependencies>
  </dependencyManagement>

  <dependencies>
    <dependency>
      <groupId>junit</groupId>
      <artifactId>junit</artifactId>
      <version>3.8.1</version>
      <scope>test</scope>
    </dependency>

    <dependency>
      <groupId>org.slf4j</groupId>
      <artifactId>slf4j-log4j12</artifactId>
      <version>${slf4j.version}</version>
      <exclusions>
        <exclusion>
          <artifactId>slf4j-api</artifactId>
          <groupId>org.slf4j</groupId>
        </exclusion>
      </exclusions>
    </dependency>

    <dependency>
      <groupId>org.slf4j</groupId>
      <artifactId>slf4j-api</artifactId>
      <version>${slf4j.version}</version>
    </dependency>

    <!--这没有版本号是因为上面已经指定了版本-->
    <dependency>
      <groupId>org.springframework</groupId>
      <artifactId>spring-webmvc</artifactId>
    </dependency>

    <dependency>
      <groupId>commons-lang</groupId>
      <artifactId>commons-lang</artifactId>
      <version>${commons-lang.version}</version>
    </dependency>

  </dependencies>

  <build>
    <plugins>
      <plugin>
        <groupId>org.eclipse.jetty</groupId>
        <artifactId>jetty-maven-plugin</artifactId>
        <version>9.2.2.v20140723</version>
      </plugin>
    </plugins>
  </build>
</project>
引入pom后需要对web.xml进行配置,其实就是配置一个servlet
<!DOCTYPE web-app PUBLIC
 "-//Sun Microsystems, Inc.//DTD Web Application 2.3//EN"
 "http://java.sun.com/dtd/web-app_2_3.dtd" >

<web-app>
  <display-name>Archetype Created Web Application</display-name>

    <!-- DispatcherServlet, Spring MVC的核心 -->
    <servlet>
        <servlet-name>mvc-dispatcher</servlet-name>
        <servlet-class> org.springframework.web.servlet.DispatcherServlet</servlet-class>
        <!-- DispatcherServlet对应的上下文配置, 默认为/WEB-INF/$servlet-name$-servlet.xml,现在init-param定义了一个新的位置
         -->
        <init-param>
            <param-name>contextConfigLocation</param-name>
            <param-value>/WEB-INF/conf/spring/mvc-dispatcher-servlet.xml</param-value>
        </init-param>
        <load-on-startup>1</load-on-startup>
    </servlet>
    <servlet-mapping>
        <servlet-name>mvc-dispatcher</servlet-name>
        <!-- mvc-dispatcher拦截所有的请求-->
        <url-pattern>/</url-pattern>
    </servlet-mapping>
</web-app>
这里需要serlet-name相对应,mapping告诉需要拦截哪些request,init-param告诉mvc的核心DispatchServlet的配置在哪????这里放在了/WEB-INF/conf/spring/mvc-dispatcher-servlet.xml,DispatchServlet的配置如下
<?xml version="1.0" encoding="UTF-8"?> <beans xmlns="http://www.springframework.org/schema/beans" xmlns:xsi="http://www.w3.org/2001/XMLSchema-instance" xmlns:context="http://www.springframework.org/schema/context" xmlns:mvc="http://www.springframework.org/schema/mvc" xsi:schemaLocation=" http://www.springframework.org/schema/beans http://www.springframework.org/schema/beans/spring-beans.xsd http://www.springframework.org/schema/context http://www.springframework.org/schema/context/spring-context.xsd http://www.springframework.org/schema/mvc http://www.springframework.org/schema/mvc/spring-mvc.xsd"> <!-- 本配置文件是工名为mvc-dispatcher的DispatcherServlet使用, 提供其相关的Spring MVC配置 --> <!--启用Spring基于annotation的DI, 使用户可以在Spring MVC中使用Spring的强大功能。 激活 @Required @Autowired,JSR 250‘s @PostConstruct, @PreDestroy and @Resource 等标注 --> <!--告诉可以用激活依赖注入(注释的方法)--> <context:annotation-config /> <!--告诉上下文扫描范围,扫描什么类型的--> <!-- DispatcherServlet上下文, 只管理@Controller类型的bean, 忽略其他型的bean, 如@Service --> <context:component-scan base-package="com.spring.mvc"> <context:include-filter type="annotation" expression="org.springframework.stereotype.Controller" /> </context:component-scan> <!-- HandlerMapping, 无需配置, Spring MVC可以默认启动。 DefaultAnnotationHandlerMapping annotation-driven HandlerMapping --> <!-- 告诉可以用mapping进行映射url;这个主要是用controller的mapping;扩充了注解驱动,可以将请求参数绑定到控制器参数 --> <mvc:annotation-driven /> <!--<!– 静态资源处理, css, js, imgs –>--> <!--<mvc:resources mapping="/resources/**" location="/resources/" />--> <!--告诉dispatchServlet用哪个viewResolver;告诉页面放在哪了--> <bean class="org.springframework.web.servlet.view.InternalResourceViewResolver"> <property name="viewClass" value="org.springframework.web.servlet.view.JstlView" /> <!--前缀--> <property name="prefix" value="/WEB-INF/static/jsp/" /> <!--后缀 home = /WEB-INF/static/jsp/home.jsp--> <property name="suffix" value=".jsp" /> </bean> </beans>
最后写一个简单的controller
package com.spring.mvc.controller;

import org.springframework.stereotype.Controller;
import org.springframework.web.bind.annotation.RequestMapping;

/**
 * Created by cuimiao on 15/12/22.
 */
@Controller
@RequestMapping("/hello")
public class HelloWorldController {

    @RequestMapping("/world")
    public String helloWorld (){
        return "home";
    }
}
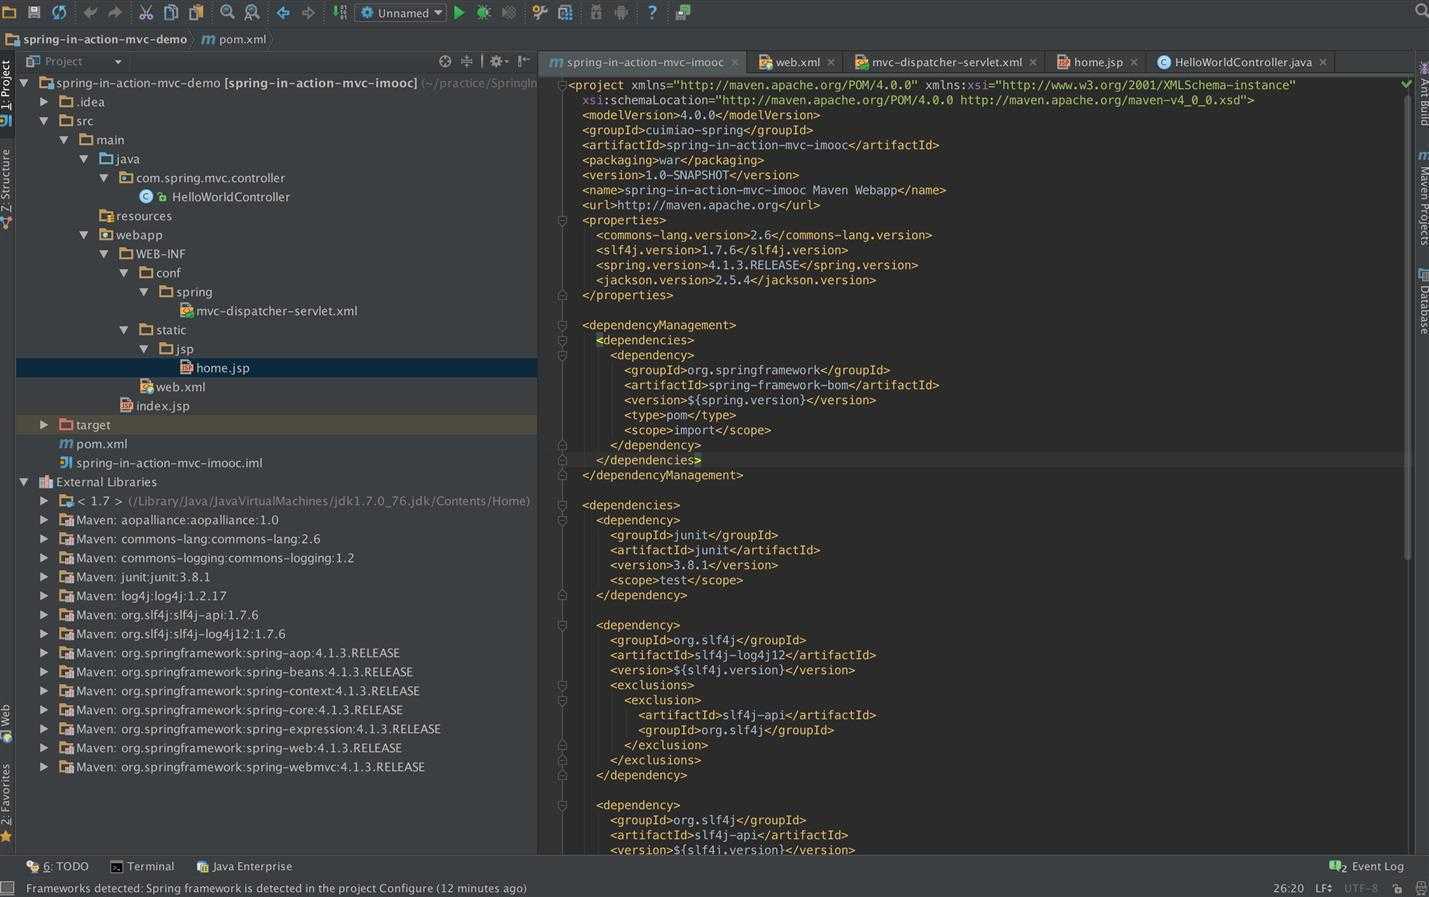
整体的结构为

完事!!!!

spring-in-action-mvc-helloworld
原文:http://www.cnblogs.com/damiao-hungry/p/5065421.html