本文参照以下两个链接,将实验重做了一遍,目的就是加深印象及提升实操能力
参照链接:http://www.opsers.org/base/learning-linux-the-day-that-the-system-configuration-in-the-rhel6-disk-array-raid.html
参照链接:http://www.cnblogs.com/mchina/p/linux-centos-disk-array-software_raid.html
Linux之在CENTOS系统上配置磁盘阵列(RAID)
实验环境
虚拟机:Oracle VM 5.0.10 r104061
系统平台:CentOS Linux release 7.2.1511 (Core)
mdadm版本:mdadm - v3.3.2 - 21st August 2014
磁盘阵列全名是Redundant Arrays of Inexpensive Disks, RAID ,大概的意思是:廉价的磁盘冗余阵列。 RAID 可以通过一个技术(软件或硬件),将多个较小的磁盘整合成为一个较大的磁盘设备,而这个较大的磁盘不但扩展了储存空间,而且还有数据保护的功能。RAID会根据等级 (level) 的不同,而使得整合后的磁盘具有不同的功能,基本常见的 level 有以下这几种
这种模式一般是使用相同型号与容量的磁盘来组成。这种模式的 RAID 会将磁盘先切出等量的区块, 然后当一个文件需要要写入 RAID 设备时,该文件就会依据区块的大小切割好,然后再依次放到各个磁盘里。由于每个磁盘会交错的存放数据, 因此数据要写入 RAID 时,会被等量的放在各个磁盘上面。
所以说,RAID 0,他的特点就是:
1、磁盘越多RAID设备的容量就越大。
2、容量的总大小是多个硬盘的容量的总和。
3、磁盘越多,写入的效能就越高。
4、如果使用非等大的硬盘,那么当小的磁盘写满后,就直接向空间大的磁盘中写数据了。
5、最少的磁盘数是2个,而且磁盘使用率为100%
他的致使之处就是:万一其中一个磁盘有问题,那么数据就会全部出问题。因为数据是分开存储的。
这种模式主要是让同一份数据,完整的保存在不同的磁盘上。由于同一份数据会被分别写入到其他不同磁盘。因此在大量写入 RAID 1 设备的情况下,写入的效能会变的非常差。但如果你使用的是硬件 RAID (磁盘阵列卡) 时,磁盘阵列卡会主动的复制一份而不使用系统的 I/O总线,这对效能影响是不大的。 如果使用软件磁盘阵列,效能就会明显下降了。
RAID 1,他的特点是:
1、保证了数据的安全,
2、RAID 1设备的容量是所有磁盘容量总和的一半
3、在多个磁盘组成RAID 1设备的时候,总容量将以最小的那一颗磁盘为主
4、读取的效能相对增加。这是因为数据在不同的磁盘上面,如果多个进程在读取同一笔数据时,RAID 会自行取得最佳的读取平衡。
5、磁盘数必需是2的整数倍。磁盘利用率为50%
不足之处就是:写入的效能会降低
RAID 5:至少需要三个以上的磁盘才能够组成这种类型的磁盘阵列。这种磁盘阵列的数据写入有点类似 RAID 0, 不过每个循环的写入过程中,在每颗磁盘还加入一个校验数据(Parity),这个数据会记录其他磁盘的备份数据, 用于当有磁盘损毁时的救援。
特点:
1、当任何一个磁盘损坏时,都能够通过其他磁盘的检查码来重建原本磁盘内的数据,安全性明显增强。
2、由于有同位检查码的存在,因此 RAID 5 的总容量会是整个磁盘数量减一个。
3、当损毁的磁盘数量大于等于两颗时,那么 RAID 5 的资料就损坏了。 因为 RAID 5 预设只能支持一颗磁盘的损坏情况。
4、在读写效能上与 RAID-0 差不多。
5、最少磁盘是3块,磁盘利用率N-1块
不足:数据写入的效能不一定增加,因为要写入 RAID 5 的数据还得要经过计算校验码 (parity)。所以写入的效能与系统的硬件关系较大。尤其当使用软件磁盘阵列时,校验码 (parity)是通过 CPU 去计算而非专职的磁盘阵列卡, 因此在数据校验恢复的时候,硬盘的效能会明显下降。
RAID0 RAID1 RAID5三个级别的数据存储流程,大家可以参考下图

图片来自:http://www.opsers.org/base/learning-linux-the-day-that-the-system-configuration-in-the-rhel6-disk-array-raid.html
这个RAID级别就是针对上面的特点与不足,把RAID 0和RAID 1这两个结合起来了。
所谓的RAID 01就是:
1.先让组成 RAID 0
2.再组成 RAID 1,这就是 RAID 0+1
所谓的RAID 10就是:
1.先组成 RAID 1
2.再组成 RAID 0,这就是RAID 1+0
特点与不足:由于具有 RAID 0 的优点,所以效能得以提升,由于具有 RAID 1 的优点,所以数据得以备份。 但是也由于 RAID 1 的缺点,所以总容量会少一半用来做为备份。
RAID10级别的数据存储流程,大家可以参考下图 
图片来自:http://www.opsers.org/base/learning-linux-the-day-that-the-system-configuration-in-the-rhel6-disk-array-raid.html
由于 RAID5 仅能支持一颗磁盘的损毁,因此还有发展出另外一种等级,就是 RAID 6 ,这个 RAID 6 则使用两颗磁盘的容量作为 parity 的储存,因此整体的磁盘容量就会少两颗,但是允许出错的磁盘数量就可以达到两颗,也就是在 RAID 6 的情况下,同时两颗磁盘损毁时,数据还是可以恢复回来的。而此级别的RAID磁盘最少是4块,利用率为 N-2。
他的作用就是:当磁盘阵列中的磁盘有损毁时,这个热备磁盘就能立刻代替损坏磁盘的位置,这时候我们的磁盘阵列就会主动重建。然后把所有的数据自动恢复。而这个或多个热备磁盘是没有包含在原本磁盘阵列等级中的磁盘,只有当磁盘阵列有任何磁盘损毁时,才真正的起作用。
关于理论知识我们就只介绍到这里,当然还可以延伸出多种组合,只要理解了上面的内容,那么其他级别就不难了,无非是多种组合而已。通过上面的讲解,我相信大家也知道了做磁盘阵列的优点了:1、数据的安全性明显增强,2、读写的效能明显提高,3、磁盘的容量有效扩展。但也别忘记了他的缺点就是成本提高。但相对于数据而言,我想这点成本也不算什么吧!
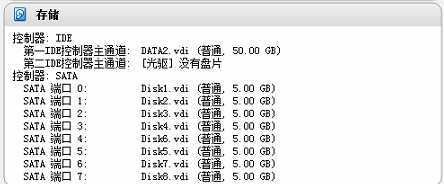
设置磁盘
在Oracle VM VirtualBox 里模拟物理增加磁盘,在这篇文章中,我们将创建RAID0, RAID1, RAID5分区,RAID0 需要两块硬盘,RAID1 需要两块硬盘,RAID5需要四块硬盘,所以在这里添加了八块物理硬盘,每块5.00 GB.
mdadm 是multiple devices admin 的简称,它是Linux下的一款标准的软件RAID 管理工具
开始安装
先安装mdadm,yum install mdadm
[root@raid]# rpm -qa | grep mdadm
mdadm-3.3.2-7.el7.x86_64
查看新增加的物理磁盘
[root@raid]# fdisk -l

Disk /dev/sdb: 5368 MB, 5368709120 bytes, 10485760 sectors
Units = sectors of 1 * 512 = 512 bytes
Sector size (logical/physical): 512 bytes / 512 bytes
I/O size (minimum/optimal): 512 bytes / 512 bytes


Disk /dev/sdc: 5368 MB, 5368709120 bytes, 10485760 sectors
Units = sectors of 1 * 512 = 512 bytes
Sector size (logical/physical): 512 bytes / 512 bytes
I/O size (minimum/optimal): 512 bytes / 512 bytes


Disk /dev/sdd: 5368 MB, 5368709120 bytes, 10485760 sectors
Units = sectors of 1 * 512 = 512 bytes
Sector size (logical/physical): 512 bytes / 512 bytes
I/O size (minimum/optimal): 512 bytes / 512 bytes


Disk /dev/sde: 5368 MB, 5368709120 bytes, 10485760 sectors
Units = sectors of 1 * 512 = 512 bytes
Sector size (logical/physical): 512 bytes / 512 bytes
I/O size (minimum/optimal): 512 bytes / 512 bytes


Disk /dev/sdf: 5368 MB, 5368709120 bytes, 10485760 sectors
Units = sectors of 1 * 512 = 512 bytes
Sector size (logical/physical): 512 bytes / 512 bytes
I/O size (minimum/optimal): 512 bytes / 512 bytes


Disk /dev/sdh: 5368 MB, 5368709120 bytes, 10485760 sectors
Units = sectors of 1 * 512 = 512 bytes
Sector size (logical/physical): 512 bytes / 512 bytes
I/O size (minimum/optimal): 512 bytes / 512 bytes


Disk /dev/sdi: 5368 MB, 5368709120 bytes, 10485760 sectors
Units = sectors of 1 * 512 = 512 bytes
Sector size (logical/physical): 512 bytes / 512 bytes
I/O size (minimum/optimal): 512 bytes / 512 bytes


Disk /dev/sdg: 5368 MB, 5368709120 bytes, 10485760 sectors
Units = sectors of 1 * 512 = 512 bytes
Sector size (logical/physical): 512 bytes / 512 bytes
I/O size (minimum/optimal): 512 bytes / 512 bytes
Raid0实验:使用Disk /dev/sdb Disk /dev/sdc两块盘
1.对磁盘分区
[root@raid ~]# fdisk /dev/sdb
Welcome to fdisk (util-linux 2.23.2).

Changes will remain in memory only, until you decide to write them.
Be careful before using the write command.

Device does not contain a recognized partition table
Building a new DOS disklabel with disk identifier 0xd7c6c9b7.

Command (m for help): m
Command action
   a   toggle a bootable flag
   b   edit bsd disklabel
   c   toggle the dos compatibility flag
   d   delete a partition
   g   create a new empty GPT partition table
   G   create an IRIX (SGI) partition table
   l   list known partition types
   m   print this menu
   n   add a new partition
   o   create a new empty DOS partition table
   p   print the partition table
   q   quit without saving changes
   s   create a new empty Sun disklabel
   t   change a partition‘s system id
   u   change display/entry units
   v   verify the partition table
   w   write table to disk and exit
   x   extra functionality (experts only)

Command (m for help): n
Partition type:
   p   primary (0 primary, 0 extended, 4 free)
   e   extended
Select (default p): p
Partition number (1-4, default 1):
First sector (2048-10485759, default 2048):
Using default value 2048
Last sector, +sectors or +size{K,M,G} (2048-10485759, default 10485759):
Using default value 10485759
Partition 1 of type Linux and of size 5 GiB is set

Command (m for help): t
Selected partition 1
Hex code (type L to list all codes): L

 0  Empty           24  NEC DOS         81  Minix / old Lin bf  Solaris
 1  FAT12           27  Hidden NTFS Win 82  Linux swap / So c1  DRDOS/sec (FAT-
 2  XENIX root      39  Plan 9          83  Linux           c4  DRDOS/sec (FAT-
 3  XENIX usr       3c  PartitionMagic  84  OS/2 hidden C:  c6  DRDOS/sec (FAT-
 4  FAT16 <32M      40  Venix 80286     85  Linux extended  c7  Syrinx
 5  Extended        41  PPC PReP Boot   86  NTFS volume set da  Non-FS data
 6  FAT16           42  SFS             87  NTFS volume set db  CP/M / CTOS / .
 7  HPFS/NTFS/exFAT 4d  QNX4.x          88  Linux plaintext de  Dell Utility
 8  AIX             4e  QNX4.x 2nd part 8e  Linux LVM       df  BootIt
 9  AIX bootable    4f  QNX4.x 3rd part 93  Amoeba          e1  DOS access
 a  OS/2 Boot Manag 50  OnTrack DM      94  Amoeba BBT      e3  DOS R/O
 b  W95 FAT32       51  OnTrack DM6 Aux 9f  BSD/OS          e4  SpeedStor
 c  W95 FAT32 (LBA) 52  CP/M            a0  IBM Thinkpad hi eb  BeOS fs
 e  W95 FAT16 (LBA) 53  OnTrack DM6 Aux a5  FreeBSD         ee  GPT
 f  W95 Ext‘d (LBA) 54  OnTrackDM6      a6  OpenBSD         ef  EFI (FAT-12/16/
10  OPUS            55  EZ-Drive        a7  NeXTSTEP        f0  Linux/PA-RISC b
11  Hidden FAT12    56  Golden Bow      a8  Darwin UFS      f1  SpeedStor
12  Compaq diagnost 5c  Priam Edisk     a9  NetBSD          f4  SpeedStor
14  Hidden FAT16 <3 61  SpeedStor       ab  Darwin boot     f2  DOS secondary
16  Hidden FAT16    63  GNU HURD or Sys af  HFS / HFS+      fb  VMware VMFS
17  Hidden HPFS/NTF 64  Novell Netware  b7  BSDI fs         fc  VMware VMKCORE
18  AST SmartSleep  65  Novell Netware  b8  BSDI swap       fd  Linux raid auto
1b  Hidden W95 FAT3 70  DiskSecure Mult bb  Boot Wizard hid fe  LANstep
1c  Hidden W95 FAT3 75  PC/IX           be  Solaris boot    ff  BBT
1e  Hidden W95 FAT1 80  Old Minix
Hex code (type L to list all codes): fd
Changed type of partition ‘Linux‘ to ‘Linux raid autodetect‘

Command (m for help): p

Disk /dev/sdb: 5368 MB, 5368709120 bytes, 10485760 sectors
Units = sectors of 1 * 512 = 512 bytes
Sector size (logical/physical): 512 bytes / 512 bytes
I/O size (minimum/optimal): 512 bytes / 512 bytes
Disk label type: dos
Disk identifier: 0xd7c6c9b7

   Device Boot      Start         End      Blocks   Id  System
/dev/sdb1            2048    10485759     5241856   fd  Linux raid autodetect

Command (m for help): w
The partition table has been altered!

Calling ioctl() to re-read partition table.
Syncing disks.
注:同方法对/dev/sdc分区
使kernel重新读取分区表
[root@raid ~]# partprobe
查看一下状态
[root@raid ~]# fdisk -l /dev/sdb /dev/sdc

Disk /dev/sdb: 5368 MB, 5368709120 bytes, 10485760 sectors
Units = sectors of 1 * 512 = 512 bytes
Sector size (logical/physical): 512 bytes / 512 bytes
I/O size (minimum/optimal): 512 bytes / 512 bytes
Disk label type: dos
Disk identifier: 0xd7c6c9b7

   Device Boot      Start         End      Blocks   Id  System
/dev/sdb1            2048    10485759     5241856   fd  Linux raid autodetect

Disk /dev/sdc: 5368 MB, 5368709120 bytes, 10485760 sectors
Units = sectors of 1 * 512 = 512 bytes
Sector size (logical/physical): 512 bytes / 512 bytes
I/O size (minimum/optimal): 512 bytes / 512 bytes
Disk label type: dos
Disk identifier: 0x7fd6e126

   Device Boot      Start         End      Blocks   Id  System
/dev/sdc1            2048    10485759     5241856   fd  Linux raid autodetect
开始创建Raid0
[root@raid ~]# mdadm -C /dev/md0 -ayes -l0 -n2 /dev/sd[b,c]1
mdadm: Defaulting to version 1.2 metadata
mdadm: array /dev/md0 started.
说明:
-C --create 创建阵列;
-a --auto 同意创建设备,如不加此参数时必须先使用mknod 命令来创建一个RAID设备,不过推荐使用-a yes参数一次性创建;
-l --level 阵列模式,支持的阵列模式有 linear, raid0, raid1, raid4, raid5, raid6, raid10, multipath, faulty, container;
-n --raid-devices 阵列中活动磁盘的数目,该数目加上备用磁盘的数目应该等于阵列中总的磁盘数目;
/dev/md0 阵列的设备名称;
/dev/sd{b,c}1 参与创建阵列的磁盘名称;
查看raid状态
[root@raid ~]# cat /proc/mdstat
Personalities : [raid0]
md0 : active raid0 sdc1[1] sdb1[0]
      10475520 blocks super 1.2 512k chunks

unused devices: <none>

[root@raid ~]# mdadm -D /dev/md0
/dev/md0:
        Version : 1.2
  Creation Time : Mon Dec 28 14:48:12 2015
     Raid Level : raid0
     Array Size : 10475520 (9.99 GiB 10.73 GB)
   Raid Devices : 2
  Total Devices : 2
    Persistence : Superblock is persistent

    Update Time : Mon Dec 28 14:48:12 2015
          State : clean
 Active Devices : 2
Working Devices : 2
 Failed Devices : 0
  Spare Devices : 0

     Chunk Size : 512K

           Name : raid:0  (local to host raid)
           UUID : 1100e7ee:d40cbdc2:21c359b3:b6b966b6
         Events : 0

    Number   Major   Minor   RaidDevice State
       0       8       17        0      active sync   /dev/sdb1
       1       8       33        1      active sync   /dev/sdc1
说明:Raid Level : 阵列级别;
Array Size : 阵列容量大小;
Raid Devices : RAID成员的个数;
Total Devices : RAID中下属成员的总计个数,因为还有冗余硬盘或分区,也就是spare,为了RAID的正常运珩,随时可以推上去加入RAID的;
State : clean, degraded, recovering 状态,包括三个状态,clean 表示正常,degraded 表示有问题,recovering 表示正在恢复或构建;
Active Devices : 被激活的RAID成员个数;
Working Devices : 正常的工作的RAID成员个数;
Failed Devices : 出问题的RAID成员;
Spare Devices : 备用RAID成员个数,当一个RAID的成员出问题时,用其它硬盘或分区来顶替时,RAID要进行构建,在没构建完成时,这个成员也会被认为是spare设备;
UUID : RAID的UUID值,在系统中是唯一的;
创建RAID配置文件/etc/mdadm.conf,默认是不存在的,需要手工创建。该配置文件的主要作用是系统启动的时候能够自动加载软RAID,同时也方便日后管理。但不是必须的,推荐对该文件进行配置。我们这里需要创建这个文件,测试中发现,如果没有这个文件,则reboot 后,已经创建好的md0 会自动变成md127。
/etc/mdadm.conf 文件内容包括:
由DEVICE 选项指定用于软RAID的所有设备,和ARRAY 选项所指定阵列的设备名、RAID级别、阵列中活动设备的数目以及设备的UUID号。
创建/etc/mdadm.conf
echo DEVICE /dev/sd{b,c}1 >> /etc/mdadm.conf
mdadm -Ds >> /etc/mdadm.conf
当前生成的/etc/mdadm.conf 文件内容并不符合所规定的格式,所以也是不生效的,这时需要手工修改该文件内容为如下格式:
[root@raid ~]# cat /etc/mdadm.conf
DEVICE /dev/sdb1 /dev/sdc1
ARRAY /dev/md0 level=raid0 num-devices=2 UUID=1100e7ee:d40cbdc2:21c359b3:b6b966b6
格式化磁盘阵列
[root@raid ~]# mkfs.ext4 /dev/md0
mke2fs 1.42.9 (28-Dec-2013)
Filesystem label=
OS type: Linux
Block size=4096 (log=2)
Fragment size=4096 (log=2)
Stride=128 blocks, Stripe width=256 blocks
655360 inodes, 2618880 blocks
130944 blocks (5.00%) reserved for the super user
First data block=0
Maximum filesystem blocks=2151677952
80 block groups
32768 blocks per group, 32768 fragments per group
8192 inodes per group
Superblock backups stored on blocks:
        32768, 98304, 163840, 229376, 294912, 819200, 884736, 1605632

Allocating group tables: done
Writing inode tables: done
Creating journal (32768 blocks): done
Writing superblocks and filesystem accounting information: done
建立挂载点并挂载
[root@raid ~]# mkdir -p /raid0
mount /dev/md0 /raid0
查看磁盘状态
[root@raid ~]# df -Th
Filesystem              Type      Size  Used Avail Use% Mounted on
/dev/mapper/centos-root xfs        46G  4.1G   42G   9% /
devtmpfs                devtmpfs  2.0G     0  2.0G   0% /dev
tmpfs                   tmpfs     2.0G  144K  2.0G   1% /dev/shm
tmpfs                   tmpfs     2.0G  8.8M  2.0G   1% /run
tmpfs                   tmpfs     2.0G     0  2.0G   0% /sys/fs/cgroup
/dev/sda1               xfs       497M  140M  358M  29% /boot
tmpfs                   tmpfs     396M   16K  396M   1% /run/user/0
/dev/md0                ext4      9.8G   37M  9.2G   1% /raid0
写入/etc/fstab
[root@raid ~]# cat /etc/fstab

#
# /etc/fstab
# Created by anaconda on Mon Dec 28 11:06:31 2015
#
# Accessible filesystems, by reference, are maintained under ‘/dev/disk‘
# See man pages fstab(5), findfs(8), mount(8) and/or blkid(8) for more info
#
/dev/mapper/centos-root                    /                       xfs     defaults        0 0
UUID=5ea4bc6c-3846-41c6-9716-8a273e36a0f0  /boot                   xfs     defaults        0 0
/dev/mapper/centos-swap                    swap                    swap    defaults        0 0
/dev/md0                                   /raid0                  ext4    defaults        0 0
然后reboot 测试开机是否自动挂载,raid0 创建完毕。
磁盘I/O测试,这里使用dd命令,该命令只能提供一个大概的测试结果,而且是连续IO,而不是随机IO
写测试
[root@raid ~]# time dd if=/dev/zero of=/raid0/iotest bs=8k count=655360 conv=fdatasync
655360+0 records in
655360+0 records out
5368709120 bytes (5.4 GB) copied, 26.4606 s, 203 MB/s

real    0m26.466s
user    0m0.425s
sys     0m23.814s

[root@raid ~]# time dd if=/dev/zero of=/iotest bs=8k count=655360 conv=fdatasync
655360+0 records in
655360+0 records out
5368709120 bytes (5.4 GB) copied, 30.9296 s, 174 MB/s

real    0m30.932s
user    0m0.080s
sys     0m3.623s

一个写在raid0上,一个写在根目录下,速度分别是203 MB/s,174 MB/s,耗时分别是0m26.466s,0m30.932s,可见raid0的速度获胜


读测试
[root@raid]# time dd if=/raid0/iotest of=/dev/null bs=8k count=655360
655360+0 records in
655360+0 records out
5368709120 bytes (5.4 GB) copied, 3.98003 s, 1.3 GB/s

real    0m3.983s
user    0m0.065s
sys     0m3.581s

[root@raid raid0]# time dd if=/iotest of=/dev/null bs=8k count=655360
655360+0 records in
655360+0 records out
5368709120 bytes (5.4 GB) copied, 6.81647 s, 788 MB/s

real    0m6.819s
user    0m0.020s
sys     0m4.975s

一个读取/raid0/iotest,一个读取/iotest,速度分别是1.3 GB/s,788 MB/s,耗时分别是0m3.983s,0m6.819s,可见raid0的读几乎是2倍普通分区

读写测试
[root@raid ~]# time dd if=/raid0/iotest of=/raid0/iotest1 bs=8k count=327680 conv=fdatasync
327680+0 records in
327680+0 records out
2684354560 bytes (2.7 GB) copied, 7.04209 s, 381 MB/s

real    0m7.045s
user    0m0.073s
sys     0m3.984s

[root@raid ~]# time dd if=/iotest of=/iotest1 bs=8k count=327680 conv=fdatasync
327680+0 records in
327680+0 records out
2684354560 bytes (2.7 GB) copied, 21.2412 s, 126 MB/s

real    0m21.244s
user    0m0.051s
sys     0m2.954s

一个读写/raid0/iotest,/raid0/iotest1,一个读写/iotest,/iotest1,速度分别是381 MB/s,126 MB/s,耗时分别是0m7.045s,0m21.244s,可见raid0的读写是普通分区2倍还不止
原文:http://www.cnblogs.com/david-zhang-index/p/5083236.html