一、模块
模块,是用一堆代码实现了某个功能的代码集合,模块分为三种:自定义模块(自己定义)、内置模块(python自带)、开源模块
导入模块
(1)、导入一个py文件,解释器解释该py文件
(2)、导入一个包,解释器解释该包下的 __init__.py 文件
#模块导入
import module
from module.xx import xx
from module.xx.xx import *

from module.xx.xx import xx as rename
#自己给模块定义一个名字rename,用在有两个模块分别有相同的文件名并同时导入时
(3) 导入模块时查找的路径

import sys
import os
print sys.path  #输出导入模块时找的路径

#如果sys.path路径列表没有你想要的路径,可以通过 sys.path.append(‘路径‘) 添加。
pre_path = os.path.abspath(‘路径‘)
sys.path.append(pre_path)
(4)模块源码安装
#下载源码、解压源码、进入目录、编译源码:python setup.py build、安装源码:python setup.py install

#注:在使用源码安装时,需要使用到gcc编译和python开发环境,所以,需要先执行:
#yum install gcc
#yum install python-devel
#或apt-get python-dev
1.json 和 pickle (用于序列化的两个模块)
Json模块和pickle模块提供了四个功能:dumps、dump、loads、load
pickle模块中的两个主要函数是dump()和load()。
dump()函数接受一个数据对象和一个文件句柄作为参数,把数据对象以特定的格式保存到给定的文件中。当我们使用load()函数从文件中取出已保存的对象时,pickle知道如何恢复它们本来的格式。
import pickle
import json
dic={"name":"zhangsan","age":18}

p_str=pickle.dumps(dic)      #pickle.dumps 将数据通过特殊形式转换为只有pytho语言认识的字符串

with open("test.txt","w") as o:
    pickle.dump(dic,o)      #pickle.dump 将数据通过特殊形式转换为只有pytho语言认识的字符串并写入文件

with open("test.txt","r") as o:#读取文件
    dic=pickle.load(o)


j_str=json.dumps(dic)       #json.dumps 将数据通过特殊形式转换为所有程序语言都认识的字符串

with open("test.txt","w") as o:
    json.dump(dic,o)        # json.dump 将数据通过特殊形式转换为所有程序语言都认识的字符串并写入文件

with open("test.txt","r") as o:#读取文件
    dic=pickle.load(o)
2.os
os.getcwd() 获取当前工作目录,即当前python脚本工作的目录路径
os.chdir("dirname")  改变当前脚本工作目录;相当于shell下cd
os.curdir  返回当前目录: (‘.‘)
os.pardir  获取当前目录的父目录字符串名:(‘..‘)
os.makedirs(‘dirname1/dirname2‘)    可生成多层递归目录
os.removedirs(‘dirname1‘)    若目录为空,则删除,并递归到上一级目录,如若也为空,则删除,依此类推
os.mkdir(‘dirname‘)    生成单级目录;相当于shell中mkdir dirname
os.rmdir(‘dirname‘)    删除单级空目录,若目录不为空则无法删除,报错;相当于shell中rmdir dirname
os.listdir(‘dirname‘)    列出指定目录下的所有文件和子目录,包括隐藏文件,并以列表方式打印
os.remove()  删除一个文件
os.rename("oldname","newname")  重命名文件/目录
os.stat(‘path/filename‘)  获取文件/目录信息
os.sep    输出操作系统特定的路径分隔符,win下为"\\",Linux下为"/"
os.linesep    输出当前平台使用的行终止符,win下为"\t\n",Linux下为"\n"
os.pathsep    输出用于分割文件路径的字符串
os.name    输出字符串指示当前使用平台。win->‘nt‘; Linux->‘posix‘
os.system("bash command")  运行shell命令,直接显示
os.environ  获取系统环境变量
os.path.abspath(path)  返回path规范化的绝对路径
os.path.split(path)  将path分割成目录和文件名二元组返回
os.path.dirname(path)  返回path的目录。其实就是os.path.split(path)的第一个元素
os.path.basename(path)  返回path最后的文件名。如何path以/或\结尾,那么就会返回空值。即os.path.split(path)的第二个元素
os.path.exists(path)  如果path存在,返回True;如果path不存在,返回False
os.path.isabs(path)  如果path是绝对路径,返回True
os.path.isfile(path)  如果path是一个存在的文件,返回True。否则返回False
os.path.isdir(path)  如果path是一个存在的目录,则返回True。否则返回False
os.path.join(path1[, path2[, ...]])  将多个路径组合后返回,第一个绝对路径之前的参数将被忽略
os.path.getatime(path)  返回path所指向的文件或者目录的最后存取时间
os.path.getmtime(path)  返回path所指向的文件或者目录的最后修改时间
3.sys
sys.argv           命令行参数List,第一个元素是程序本身路径
sys.exit(n)        退出程序,正常退出时exit(0)
sys.version        获取Python解释程序的版本信息
sys.maxint         最大的Int值
sys.path           返回模块的搜索路径,初始化时使用PYTHONPATH环境变量的值
sys.platform       返回操作系统平台名称
sys.stdout.write(‘please:‘)
val = sys.stdin.readline()[:-1]
4.hashlib(加密)
import hashlib

# ######## md5 ########
hash = hashlib.md5()
hash.update(‘zhangsan‘)
print hash.hexdigest()

# ######## sha1 ########
hash = hashlib.sha1()
hash.update(‘zhangsan‘)
print hash.hexdigest()

# ######## sha256 ########
hash = hashlib.sha256()
hash.update(‘zhangsan‘)
print hash.hexdigest()

# ######## sha384 ########
hash = hashlib.sha384()
hash.update(‘zhangsan‘)
print hash.hexdigest()

# ######## sha512 ########
hash = hashlib.sha512()
hash.update(‘zhangsan‘)
print hash.hexdigest()

#以上加密算法虽然依然非常厉害,但时候存在缺陷,即:通过撞库可以反解。所以,有必要对加密算法中添加自定义key再来做加密。
import hashlib
# ######## md5 ########
hash = hashlib.md5(‘898oaFs09f‘)
hash.update(‘zhangsan‘)
print hash.hexdigest()

#python还有一个 hmac 模块,它内部对我们创建 key 和 内容 再进行处理然后再加密
import hmac
h = hmac.new(‘zhangsan‘)
h.update(‘hello‘)
print h.hexdigest()
5.subprocess(执行系统命令)
#subprocess
import subprocess
#call
#执行命令,返回状态码
ret = subprocess.call(["ls", "-l"], shell=False)
ret = subprocess.call("ls -l", shell=True)

#check_call
#执行命令,如果执行状态码是 0 ,则返回0,否则抛异常
subprocess.check_call(["ls", "-l"])
subprocess.check_call("exit 1", shell=True)

#check_output
#执行命令,如果状态码是 0 ,则返回执行结果,否则抛异常
subprocess.check_output(["echo", "Hello World!"])
subprocess.check_output("exit 1", shell=True)
#(shell = True ,允许 shell 命令是字符串形式)

#subprocess.Popen(...)
#用于执行复杂的系统命令
#参数:

‘‘‘
args:shell  命令,可以是字符串或者序列类型(如:list,元组)
bufsize:    指定缓冲。0 无缓冲,1 行缓冲,其他 缓冲区大小,负值 系统缓冲
stdin, stdout, stderr:  分别表示程序的标准输入、输出、错误句柄
preexec_fn: 只在Unix平台下有效,用于指定一个可执行对象(callable object),它将在子进程运行之前被调用
close_sfs: 在windows平台下,如果close_fds被设置为True,则新创建的子进程将不会继承父进程的输入、输出、错误管道。
            所以不能将close_fds设置为True同时重定向子进程的标准输入、输出与错误(stdin, stdout, stderr)。
shell:同上
cwd:    用于设置子进程的当前目录
env:    用于指定子进程的环境变量。如果env = None,子进程的环境变量将从父进程中继承。
universal_newlines: 不同系统的换行符不同,True -> 同意使用 \n
startupinfo与createionflags只在windows下有效
‘‘‘
#执行普通命令
import subprocess
ret1 = subprocess.Popen(["mkdir","t1"])
ret2 = subprocess.Popen("mkdir t2", shell=True)

#-----
import subprocess
obj = subprocess.Popen(["python"], stdin=subprocess.PIPE, stdout=subprocess.PIPE, stderr=subprocess.PIPE)
obj.stdin.write(‘print 1 \n ‘)
obj.stdin.write(‘print 2 \n ‘)
obj.stdin.write(‘print 3 \n ‘)
obj.stdin.write(‘print 4 \n ‘)
obj.stdin.close()

cmd_out = obj.stdout.read()
obj.stdout.close()
cmd_error = obj.stderr.read()
obj.stderr.close()
print cmd_out
print cmd_error

#等于上面,可以省几个步骤,不用手动去读输出读错误,communicate会自动做这些事情
#------
import subprocess
obj = subprocess.Popen(["python"], stdin=subprocess.PIPE, stdout=subprocess.PIPE, stderr=subprocess.PIPE)
obj.stdin.write(‘print 1 \n ‘)
obj.stdin.write(‘print 2 \n ‘)
obj.stdin.write(‘print 3 \n ‘)
obj.stdin.write(‘print 4 \n ‘)

out_error_list = obj.communicate()
print out_error_list
#---------

obj = subprocess.Popen(["python"], stdin=subprocess.PIPE, stdout=subprocess.PIPE, stderr=subprocess.PIPE)
out_error_list = obj.communicate(‘print "hello"‘)
print out_error_list
6.shutil(拷贝、压缩)
import shutil
#拷贝文件
#shutil.copyfile(src, dst) src原文件,dst新文件
shutil.copyfile("111.txt", "222.txt")

#将文件内容拷贝到另一个文件中,可以部分内容
#shutil.copyfileobj(fsrc, fdst[, length])

#仅拷贝权限。内容、组、用户均不变
#shutil.copymode(src, dst)

#拷贝状态的信息,包括:mode bits, atime, mtime, flags
#shutil.copystat(src, dst)

#拷贝文件和权限
#shutil.copy(src, dst)

#拷贝文件和状态信息
#shutil.copy2(src, dst)

#压缩
#shutil.make_archive(base_name, format,...)
#将/test/bbb下的文件打包放置当前程序目录
import shutil
ret = shutil.make_archive("aaa", ‘gztar‘, root_dir=‘/test/bbb‘)

#将/test/bbb下的文件打包放置/Users目录
import shutil
ret = shutil.make_archive("/Users/aaa", ‘gztar‘, root_dir=‘/test/bbb‘)
‘‘‘
创建压缩包并返回文件路径,例如:zip、tar
base_name: 压缩包的文件名,也可以是压缩包的路径。只是文件名时,则保存至当前目录,否则保存至指定路径,
            如:/Users/111.txt =>保存至/Users目录
format:    压缩包种类,“zip”, “tar”, “bztar”,“gztar”
root_dir:    要压缩的文件夹路径(默认当前目录)
owner:    用户,默认当前用户
group:    组,默认当前组
logger:    用于记录日志,通常是logging.Logger对象
‘‘‘

#shutil不能直接解压缩,要调用相应模块来解压
#shutil 对压缩包的处理是调用 ZipFile 和 TarFile 两个模块来进行的
import zipfile
# 解压
z = zipfile.ZipFile(‘laxi.zip‘, ‘r‘)
z.extractall()
z.close()

import tarfile
# 解压
tar = tarfile.open(‘your.tar‘,‘r‘)
tar.extractall()  # 可设置解压地址
tar.close()
7.ConfigParser
用于对特定的配置文件进行操作,当前模块的名称在 python 3.x 版本中变更为 configparser
#ConfigParser模块
#用于内容类似如下的文件
‘‘‘
[section1]
name = lisi
age = 20

[section2]
name = zhangsan
age = 18
‘‘‘


import ConfigParser
config = ConfigParser.ConfigParser()
config.read("text.txt")

print config.sections() #所有section
print config.options("section1")    #section1下的所有key
print config.items("section1")  #section1下的所有key和value
print config.get("section1","k1")   #section1下k1的value
print config.getint("section1","k1")#同get,只是多了个int()转换

config.remove_section("section1")   #把读在config里的内容删除section1
config.write(open("text.txt","w"))  #在把config里的内容写进文件

print config.has_section("section1")#有没有section1,True或False

config.add_section(‘section1‘)#添加一个section1
config.write(open("text.txt","w"))#写入

config.remove_option("section2","name")
config.write(open("text.txt","w"))#写入
8.logging
写入文件
import logging
logging.basicConfig(filename=‘log.log‘,
                    format=‘%(asctime)s - %(name)s - %(levelname)s -%(module)s:  %(message)s‘,
                    datefmt=‘%Y-%m-%d %H:%M:%S %p‘, #日期格式
                    level=10)   #大于当前日志等级的操作才会被记录
#asctime:当前时间  name:写日志的人  levelname:日志级别 module:什么模块调用的日志 message:具体的消息
logging.debug(‘debug‘)
logging.info(‘info‘)
logging.warning(‘warning‘)
logging.error(‘error‘)
logging.critical(‘critical‘)
logging.log(10,‘log‘)

#日志级别:只有大于当前日志等级的操作才会被记录
CRITICAL = 50
FATAL = CRITICAL
ERROR = 40
WARNING = 30
WARN = WARNING
INFO = 20
DEBUG = 10
NOTSET = 0
屏幕输出并写入文件
#屏幕输出和写入文件同时进行
logging.basicConfig(filename=‘log.log‘, #日志文件名
                    format=‘%(asctime)s - %(name)s - %(levelname)s -%(module)s - %(message)s‘,
                    datefmt=‘%Y-%m-%d %H:%M:%S‘, #日期格式
                    level=logging.DEBUG)   #大于当前日志等级的操作才会被记录

ch = logging.StreamHandler()    #定义一个StreamHandler
ch.setLevel(logging.INFO)   #输出比INFO级别高的日志到屏幕
formatter = logging.Formatter("%(name)s -%(module)s - %(message)s")#屏幕输出的格式
ch.setFormatter(formatter)  #把格式应用给屏幕
logging.getLogger(‘‘).addHandler(ch)  #把屏幕和文件的句柄交给Logger接口执行

logging.debug(‘debug‘)
logging.info(‘info‘)
logging.warning(‘warning‘)
logging.error(‘error‘)
logging.critical(‘critical‘)
logging.log(10,‘log‘)

#日志级别:只有大于当前日志等级的操作才会被记录
‘‘‘
CRITICAL = 50
FATAL = CRITICAL
ERROR = 40
WARNING = 30
WARN = WARNING
INFO = 20
DEBUG = 10
NOTSET = 0
‘‘‘
9.time
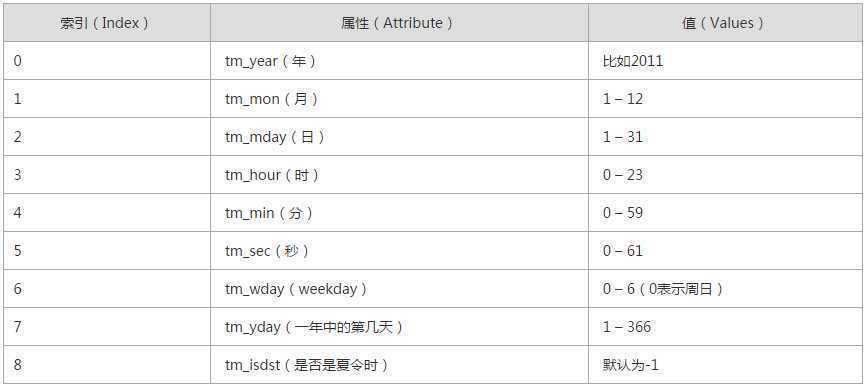
import time
print time.time()   #打印时间戳
print time.mktime(time.localtime())
print time.gmtime()    #可加时间戳参数
print time.localtime() #可加时间戳参数
#(‘2014-12-12 12:12‘, ‘%Y-%m-%d %H:%S‘)
print time.strftime(‘%Y-%m-%d‘) #默认当前时间,日期转字符串
print time.strftime(‘%Y-%m-%d‘,time.localtime()) #默认当前时间
print time.asctime()
print time.asctime(time.localtime())
print time.ctime(time.time())


t=time.strptime(‘2014-12-12 12:12‘,‘%Y-%m-%d %H:%S‘,)#字符串转日期,
#print time.mktime(t)#日期转时间戳
print t
print t.tm_year
print t[0]
#结果:
#time.struct_time(tm_year=2014, tm_mon=12, tm_mday=12, tm_hour=12, tm_min=0, tm_sec=12, tm_wday=4, tm_yday=346, tm_isdst=-1)
#2014
#2014
#datetime
‘‘‘
datetime.date   :表示日期的类。常用的属性有year, month, day
datetime.time   :表示时间的类。常用的属性有hour, minute, second, microsecond
datetime.datetime   :表示日期时间
datetime.timedelta  :表示时间间隔,即两个时间点之间的长度
timedelta([days[, seconds[, microseconds[, milliseconds[, minutes[, hours[, weeks]]]]]]])
strftime("%Y-%m-%d")
‘‘‘
import datetime
print datetime.datetime.now()
print datetime.datetime.now() - datetime.timedelta(days=5)
#结果:(减5天)
#2016-01-07 18:35:30.948000
#2016-01-02 18:35:30.948000
10.random(验证码)
import random
print random.random()
print random.randint(1,2)   #1,2随机
print random.randrange(1,10)    #1-10随机

#随机验证码实例:
import random
checkcode = ‘‘
for i in range(4):
    current = random.randrange(0,4)
    if current != i:
        temp = chr(random.randint(65,90))   #26个字母
    else:
        temp = random.randint(0,9)  #0-9
    checkcode += str(temp)
print checkcode
11.re正则表达式
re模块用于对python的正则表达式的操作
‘‘‘
字符:
  . 匹配除换行符以外的任意字符
  \w    匹配字母或数字或下划线或汉字
  \s    匹配任意的空白符
  \d    匹配数字
  \b    匹配单词的开始或结束
  ^    匹配字符串的开始
  $    匹配字符串的结束
次数:
  * 重复零次或更多次
  + 重复一次或更多次
  ? 重复零次或一次
  {n}      重复n次
  {n,}  重复n次或更多次
  {n,m} 重复n到m次
‘‘‘
(1)、match
import re
#match(pattern, string, flags=0) 1.正则表达式 2.要匹配的字符串 3.标志位(用于控制正则表达式的匹配方式))
#从起始位置开始根据规则去字符串中匹配指定内容,匹配单个
str1="23ffdd333ss"
str2="dd23ffddss"
#例:匹配
print re.match("\d+",str1).group()  #匹配成功 返回:23
print re.match("\d+",str2).group()    #没有匹配成功,报错
(2)、search
#根据规则去字符串中匹配指定内容,匹配单个
str1="23ffdd333ss"
str2="dd23ffddss"
print re.search("\d+",str1).group() #输出:23
print re.search("\d+",str1).group() #输出:23
(3)、group
#group
str1="23ffdd333"                                           #输出:
print re.search("([0-9]*)([a-z]*)([0-9]*)", str1).group()  #23ffdd333
print re.search("([0-9]*)([a-z]*)([0-9]*)", str1).group(0) #23ffdd333
print re.search("([0-9]*)([a-z]*)([0-9]*)", str1).group(1) #23
print re.search("([0-9]*)([a-z]*)([0-9]*)", str1).group(2) #ffdd
print re.search("([0-9]*)([a-z]*)([0-9]*)", str1).groups() #(‘23‘, ‘ffdd‘, ‘333‘)
(4)、findall
#匹配到字符串中所有符合条件的元素
str1="23ffdd333"
print re.findall("\d+",str1)  #[‘23‘, ‘333‘]
(5)、sub
#用于替换匹配的字符串
str1="aa22aa3345aa"
print re.sub("aa","bb",str1)    #bb22bb3345bb
(6)、split
#根据指定匹配进行分组
str1="aa22aa3345aa"
print re.split("\d+",str1)  #[‘aa‘, ‘aa‘, ‘aa‘]
参考:
http://www.cnblogs.com/wupeiqi
原文:http://www.cnblogs.com/melonjiang/p/5104312.html
