上一节我们讲到了LVS/NAT模式实例部署,这节将会讲到LVS/DR实例部署,LVS/DR模式也是日常企业中比较常用的一种模式,下面我们来讲讲LVS/DR部署过程
LVS/NAT实例部署
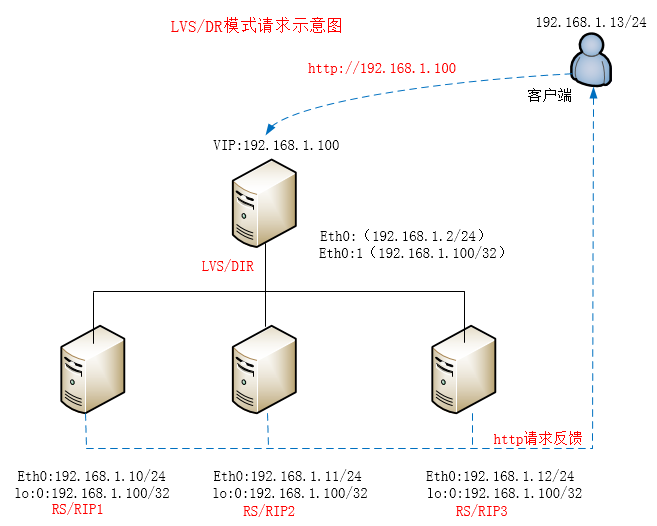
如图所示为整体的拓扑图:
一.部署前说明:
(1)系统版本: centos 6.6
(2)角色及ip相关信息:
CIP:192.168.1.13/24
VIP:192.168.1.100/24
DIR:eth0:192.168.1.2/24
Real-server:192.168.1.10/24 和 192.168.1.11/24. 192.168.1.12/24(提供http服务)
二.部署操作:
负载均衡器上配置操作
(1)在DIR上安装ipvsadm软件包以及相关依赖包:
# yum install popt-devel libnl-devel ipvsadm -y
(2)在DIR上新建一个shell脚本文件,如下操作所示:
# vim /etc/init.d/lvs-dr
脚本内容如下
#!/bin/sh
#
# Startup script handle the initialisation of LVS
# chkconfig: - 28 72
# description: Initialise the Linux Virtual Server for DR
#
### BEGIN INIT INFO
# Provides: ipvsadm
# Required-Start: $local_fs $network $named
# Required-Stop: $local_fs $remote_fs $network
# Short-Description: Initialise the Linux Virtual Server
# Description: The Linux Virtual Server is a highly scalable and highly
#   available server built on a cluster of real servers, with the load
#   balancer running on Linux.
# description: start LVS of DR
LOCK=/var/lock/ipvsadm.lock
VIP=192.168.1.100
RIP1=192.168.1.10
RIP2=192.168.1.11
RIP3=192.168.1.12
. /etc/rc.d/init.d/functions
start() {
     if    [ -e $LOCK ];
     then
           echo "The LVS-DR Server is already running !"
     else
           #Set the Virtual IP Address
           /sbin/ifconfig eth0:1 $VIP broadcast $VIP netmask 255.255.255.255 up
           /sbin/route add -host $VIP dev eth0:1
           #Clear IPVS Table
           /sbin/ipvsadm -C
           #Set Lvs
           /sbin/ipvsadm -At $VIP:80 -s rr
           /sbin/ipvsadm -at $VIP:80 -r $RIP1:80 -g  -w 1
           /sbin/ipvsadm -at $VIP:80 -r $RIP2:80 -g  -w 1
           /sbin/ipvsadm -at $VIP:80 -r $RIP3:80 -g  -w 1
           /bin/touch $LOCK
           #Run Lvs
           echo "starting LVS-DR Server is ok !"
     fi
}

stop()    {
           /sbin/ipvsadm -C
           /sbin/ifconfig eth0:1 down >/dev/null
           /sbin/route del -host $VIP dev eth0:1
           rm -rf $LOCK
           echo "stopping LVS-DR server is ok !"
}

status() {
     if [ -e $LOCK ];
     then
         echo "The LVS-DR Server is already running !"
     else
         echo "The LVS-DR Server is not running !"
     fi
}

case "$1" in
  start)
        start
        ;;
  stop)
        stop
        ;;
  restart)
        stop
        start
        ;;
  status)
        status
        ;;
  *)
        echo "Usage: $1 {start|stop|restart|status}"
        exit 1
esac
exit 0
# chmod 777 /etc/init.d/lvs-dr
# service lvd-dr start
RS server 上配置操作
(1)分别在每个RIP(RIP1,RIP2,RIP3)上新建一个shell脚本文件,如下操作所示:
# vim /etc/init.d/lvs-dr
脚本内容如下
#!/bin/sh
#
# Startup script handle the initialisation of LVS
# chkconfig: - 28 72
# description: Initialise the Linux Virtual Server for NAT
#
### BEGIN INIT INFO
# Provides: ipvsadm
# Required-Start: $local_fs $network $named
# Required-Stop: $local_fs $remote_fs $network
# Short-Description: Initialise the Linux Virtual Server
# Description: The Linux Virtual Server is a highly scalable and highly
#   available server built on a cluster of real servers, with the load
#   balancer running on Linux.
# description: start LVS of DR-RIP
LOCK=/var/lock/ipvsadm.lock
VIP=192.168.10.100
. /etc/rc.d/init.d/functions
start() {
     if [ -e $LOCK ];
     then
         echo "The LVS-DR-RIP Server is already running !"
     else
         /sbin/ifconfig lo:0 $VIP netmask 255.255.255.255 broadcast $VIP up
         /sbin/route add -host $VIP dev lo:0
         echo "1" >/proc/sys/net/ipv4/conf/lo/arp_ignore
         echo "2" >/proc/sys/net/ipv4/conf/lo/arp_announce
         echo "1" >/proc/sys/net/ipv4/conf/all/arp_ignore
         echo "2" >/proc/sys/net/ipv4/conf/all/arp_announce
         /bin/touch $LOCK
         echo "starting LVS-DR-RIP server is ok !"
     fi
}

stop() {
         /sbin/ifconfig lo:0 down
         echo "0" >/proc/sys/net/ipv4/conf/lo/arp_ignore
         echo "0" >/proc/sys/net/ipv4/conf/lo/arp_announce
         echo "0" >/proc/sys/net/ipv4/conf/all/arp_ignore
         echo "0" >/proc/sys/net/ipv4/conf/all/arp_announce
         rm -rf $LOCK
         echo "stopping LVS-DR-RIP server is ok !"
}

status() {
     if [ -e $LOCK ];
     then
        echo "The LVS-DR-RIP Server is already running !"
     else
        echo "The LVS-DR-RIP Server is not running !"
     fi
}

case "$1" in
  start)
        start
        ;;
  stop)
        stop
        ;;
  restart)
        stop
        start
        ;;
  status)
        status
        ;;
  *)
        echo "Usage: $1 {start|stop|restart|status}"
        exit 1
esac
exit 0
授权并启动该脚本
# chmod 777 /etc/init.d/lvs-dr
# service lvd-dr start
(2)分别在每个RIP上安装http服务,并创建测试页,如下分别为RIP上测试页面:
RIP1上的测试页:

RIP2上的测试页:

RIP3上的测试页:

三.LVS负载测试:
在客户端上访问:http://vip,这时我们就可以看到如下的页面,此时页面为RIP1的页面

多次刷新页面会分别跳转到RIP2,RIP3上,如下:


这时我们用命令ipvsadm -Ln -c 可以看到如下链接信息:
原文:http://blief.blog.51cto.com/6170059/1747263