其实这个一直都想要做成一个例子的,因为朋友一直叫我教他,但是一直没能教他,so sorry!希望能帮到他吧!
这里呢,我只是做了几个按钮,然后就让这个按钮随着自己的点击然后变换按钮颜色,这样就能有一个更好的视觉体验了。
定义一个xml文件用来写btn的一个style的选择情况:

<?xml version="1.0" encoding="utf-8" ?>
<selector xmlns:android="http://schemas.android.com/apk/res/android">
    <item android:state_pressed="true">
        <shape>
            <solid
                 android:color="#4870ff"/>
            <stroke android:width="2dp" android:color="#ffff00"/>
            <corners android:radius="8dp"/>
            <padding android:bottom="15dp" android:left="10dp" android:right="10dp" android:top="5dp"/>
        </shape>
    </item>
       <item android:state_pressed="false">
        <shape>
            <solid
                 android:color="#4870ff"/>
            <corners android:radius="5dp"/>
             <padding android:bottom="10dp" android:left="10dp" android:right="10dp" android:top="10dp"/>
        </shape>
    </item>

    </selector>
然后将布局文件的xml写出来:
<FrameLayout xmlns:android="http://schemas.android.com/apk/res/android"
    xmlns:tools="http://schemas.android.com/tools"
    android:id="@+id/container"
    android:layout_width="match_parent"
    android:layout_height="match_parent"
    tools:context="com.example.btn.MainActivity"
    tools:ignore="MergeRootFrame" >

    <LinearLayout
        android:layout_width="match_parent"
        android:layout_height="match_parent" >

        <Button
            android:layout_width="wrap_content"
            android:layout_height="wrap_content"
            android:background="@drawable/btn_selector"
            android:text="one" />

        <Button
            android:layout_width="wrap_content"
            android:layout_height="wrap_content"
            android:background="@drawable/btn_selector"
            android:text="two" />

        <Button
            android:layout_width="wrap_content"
            android:layout_height="wrap_content"
            android:background="@drawable/btn_selector"
            android:text="three" />

        <Button
            android:layout_width="wrap_content"
            android:layout_height="wrap_content"
            android:background="@drawable/btn_selector"
            android:text="four" />
    </LinearLayout>

</FrameLayout>
好了,it‘s ok!看看吧!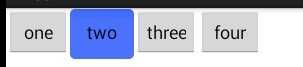
原文:http://www.cnblogs.com/Catherine-Brain/p/3693136.html