PySide——Python图形化界面入门教程(六)
——QListView和QStandardItemModel
翻译自:http://pythoncentral.io/pyside-pyqt-tutorial-qlistview-and-qstandarditemmodel/
上一个教程中,我们讨论了Qt的QListWidget类,它用来实现简单的单列列表框(list boxes)。然而,我们还需要更加灵活的widget来实现列表,Qt为此提供了QListView 来实现多种多样的项。它是一个纯粹的显示部件,用来显示数据模型提供的信息。这样做将将显示功能和数据逻辑分离开来;这同时还有一些其他widget可以显示来自同一模型结构的数据。
这里已经有一些创建好的几种类型的模型。比如,QStandardItemModel提供了比上一节QListWidget更棒的能力;拿文本和图标来说,它提供了拖拽的能力、checkable items和其他一些特性。自定义行为可以通过QAbstractlistModel继承实现——列表数据的通用模型。
PySide的QStandardItemModel
我们首先从讨论QListView来开始。QListView可以像其他的QWidget一样进行实例化——你是不是对每次讲一个widget都说这句话感到厌烦了?虽然有些啰嗦,但是让我们清晰的记得对象模型;PyQt/Pyside最优秀的地方就是它的简单、好记和继承性。这就是说,QListView构造器接收一个可选的参数parent:
list = QListView(parent)
现在我们的列表需要一个模型来管理它的数据。以我们的列表作为parent参数创建一个QStandardItemModel:
model = QStandardItemModel(list)
QStandardItemModel还有其他一些构造器,但是和我们的单列列表无关,我们有时间再来讨论。
PySide的QStandardItem
创建列表和模型是最简单的部分;列表的主要任务创建并嵌入模型。例如,我们先创建一个项:
item = QStandardItem()
方便地设置它的文本和图标:
item.setText(‘Item text‘)
item.setIcon(some_QIcon)
我们也可以让项目变成多选的,这将在项目的最左边添加一个复选框(checkbox)
item.setCheckable(True)
你还可以让复选框有三种状态——checked,unchecked,和null,使用
一个简单的QStandardItem例子
我们现在已经了解了QListView足够的背景,尽管它还什么都不能做。我们让QListView成为主窗口来尽可能的简化,就像其它任何QWidget作为主窗口的例子一样进行最基本的设置:
1 list = QListView()
2 list.setWindowTitle(‘Example List‘)
3 list.setMinimumSize(600, 400)
接下来创建我们的模型:
model = QStandardItemModel(list)
然后我们创建一些QStandardItem来填充我们的模型。就列出我们想要的吃的事物吧,每一个都有一个文本标题和复选框。

 1 foods = [
 2     ‘Cookie dough‘, # Must be store-bought
 3     ‘Hummus‘, # Must be homemade
 4     ‘Spaghetti‘, # Must be saucy
 5     ‘Dal makhani‘, # Must be spicy
 6     ‘Chocolate whipped cream‘ # Must be plentiful
 7 ]
 8
 9 for food in foods:
10     # Create an item with a caption
11     item = QStandardItem(food)
12
13     # Add a checkbox to it
14     item.setCheckable(True)
15
16     # Add the item to the model
17     model.appendRow(item)
最后,将模型应用至QListView,显示窗口运行app。
1 list.setModel(model)
2 list.show()
3 app.exec_()
完整的例子代码如下:

 1 # Create a Qt application
 2 app = QApplication(sys.argv)
 3
 4 # Our main window will be a QListView
 5 list = QListView()
 6 list.setWindowTitle(‘Example List‘)
 7 list.setMinimumSize(600, 400)
 8
 9 # Create an empty model for the list‘s data
10 model = QStandardItemModel(list)
11
12 # Add some textual items
13 foods = [
14     ‘Cookie dough‘, # Must be store-bought
15     ‘Hummus‘, # Must be homemade
16     ‘Spaghetti‘, # Must be saucy
17     ‘Dal makhani‘, # Must be spicy
18     ‘Chocolate whipped cream‘ # Must be plentiful
19 ]
20
21 for food in foods:
22     # create an item with a caption
23     item = QStandardItem(food)
24
25     # add a checkbox to it
26     item.setCheckable(True)
27
28     # Add the item to the model
29     model.appendRow(item)
30
31 # Apply the model to the list view
32 list.setModel(model)
33
34 # Show the window and run the app
35 list.show()
36 app.exec_()
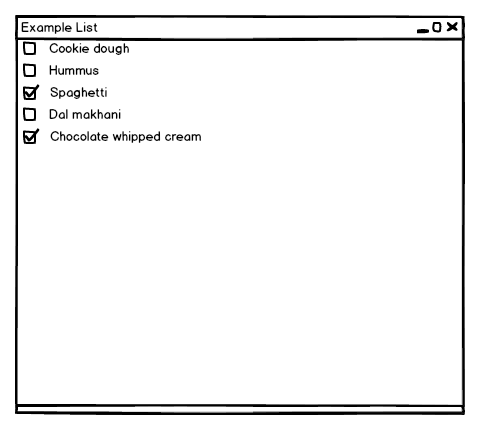
运行的时候看上去像是这样:

添加简单的功能
让我们看看如何让带有QStandardItemModel的QListView来与用户交互。你或许想象每个QStandardItem都像一个QPushButton,当被选择、编辑、等等的时候都会发出信号。如果你这样想,就像我一样,那就错了!在QStandardItemModel中,有一个更加强大的信号——itemChanged(item)来说明发生了什么。就像你看到的那样,它把发生变化的项发送给槽,你需要检查项来知道发生了什么。虽然不完美,但它确是这样的。
你还可以使用模型的item方法来检查没有改变过的项,它返回指定行(从0开始)的项。(同样可接受单列、多列模型)
这还有许多信号来表现模型结构的改变;它们都是从QAbstractItemModel继承而来,我们会在讨论QAbstractItemModel主题时再来学习它们。现在的例子我们还不需要。
现在我们来让清单更甜蜜(honey-do,作者还是很幽默的,但是我翻译不出来^_^)一些。你使用列表登记已经购买了的项,当你完成时,窗口会关闭。首先,改变标题:
list.setWindowTitle(‘Honey-Do List‘)
然后,我们需要一个槽来连接模型的itemChanged信号。当然, 我们首先需要使用checkState方法检查发生变化的项是否被选中,来避免每次遍历项。如果已经选中了,我们再检查是否其他的都被选中;如果都被选中了(即你已经都购买了),则退出QApplication。

 1 def on_item_changed(item):
 2     # If the changed item is not checked, don‘t bother checking others
 3     if not item.checkState():
 4         return
 5
 6     i = 0
 7
 8     # loop through the items until you get None, which
 9     # means you‘ve passed the end of the list
10     while model.item(i):
11         if not model.item(i).checkState():
12             return
13         i += 1
14
15     app.quit()
然后,我们将信号和槽连接起来:
model.itemChanged.connect(on_item_changed)
完整的代码如下所示:

 1 # Create a Qt application
 2 app = QApplication(sys.argv)
 3
 4 # Our main window will be a QListView
 5 list = QListView()
 6 list.setWindowTitle(‘Honey-Do List‘)
 7 list.setMinimumSize(600, 400)
 8
 9 # Create an empty model for the list‘s data
10 model = QStandardItemModel(list)
11
12 # Add some textual items
13 foods = [
14     ‘Cookie dough‘, # Must be store-bought
15     ‘Hummus‘, # Must be homemade
16     ‘Spaghetti‘, # Must be saucy
17     ‘Dal makhani‘, # Must be spicy
18     ‘Chocolate whipped cream‘ # Must be plentiful
19 ]
20
21 for food in foods:
22     # Create an item with a caption
23     item = QStandardItem(food)
24
25     # Add a checkbox to it
26     item.setCheckable(True)
27
28     # Add the item to the model
29     model.appendRow(item)
30
31 def on_item_changed(item):
32     # If the changed item is not checked, don‘t bother checking others
33     if not item.checkState():
34         return
35
36     # Loop through the items until you get None, which
37     # means you‘ve passed the end of the list
38     i = 0
39     while model.item(i):
40         if not model.item(i).checkState():
41             return
42         i += 1
43
44     app.quit()
45
46 model.itemChanged.connect(on_item_changed)
47
48 # Apply the model to the list view
49 list.setModel(model)
50
51 # Show the window and run the app
52 list.show()
53 app.exec_()
这是一个QListView的简单例子。它还可以做更多的事情,但是相同的模型同样也可以用于其他的widget。下一次,我们将看一些完全不同的东西,一个最让原作者兴奋的部件,QWebView,一个基于WebKit的可以解析HTML/CSS/XML/XSLT页面的控件。(话虽如此,但是下个教程不在Qt wiki的入门教程之列,所以我就先不进行翻译了,需要的读者可以查看原作者的原文http://pythoncentral.io/pyside-pyqt-tutorial-qwebview/)
一些感想:
对于初学者,更多的资料应该还是要参考https://wiki.qt.io/PySide_Tutorials,这一至六的教程就是翻译的PythonCentral的3至8部分,仅仅起到抛砖引玉的作用。在学习之前,我首先还是喜欢搜索中文的资料,因为毕竟母语接受的快一些。可是搜索中却发现优秀的中文教程太少了,而英文教程我感觉要清晰的多,能让我从0基础开始更好的理解PySide,而不是不知其所以然的简单操作步骤。正是这个原因,我边看边进行了翻译,希望能帮到更多新手入门。同时也希望出现更多优秀的中文教程,并有更多的人来翻译优秀的英文官方教程。最后,由于译者水平十分有限,不周之处还请谅解。
By Ascii0x03
转载请注明出处:http://www.cnblogs.com/ascii0x03/p/5505439.html
原文:http://www.cnblogs.com/ascii0x03/p/5505439.html