iOS 多线程的四种技术方案
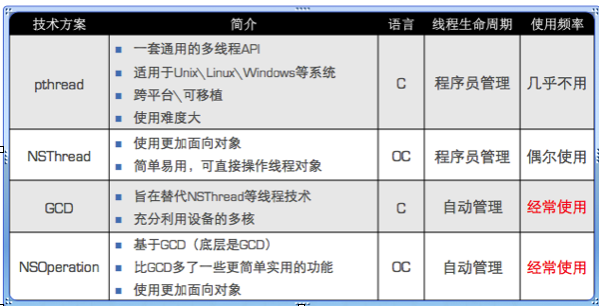
pthread 实现多线程操作
代码实现:
void * run(void *param)
{
    for (NSInteger i = 0; i < 1000; i++) {
        NSLog(@"---buttonclick---%zd---%@", i, [NSThread currentThread]);
    }

    return NULL;
}

@implementation ViewController

- (IBAction)clickButton:(id)sender {
    // 定义一个线程
    pthread_t thread;
    // 创建一个线程  (参1)pthread_t *restrict:创建线程的指针,(参2)const pthread_attr_t *restrict:线程属性  (参3)void *(*)(void *):线程执行的函数的指针,(参4)void *restrict:null
    pthread_create(&thread, NULL, run, NULL);
    // 何时回收线程不需要你考虑
    pthread_t thread2;
    pthread_create(&thread2, NULL, run, NULL);
}一个 NSThread 对象就代表一条线程
#pragma mark - 执行run方法
- (void)run:(NSString *)param
{
    // 当前线程是否是主线程
    for (NSInteger i = 0; i < 100; i++) {
        NSLog(@"---%@---%zd---%d", [NSThread currentThread], i,  [NSThread isMainThread]);
    }
}
方法2和方法3的优点:快捷
方法1的优点:可以轻松拿到线程
线程间通信
线程间通信的体现
1个线程传递数据给另1个线程
在1个线程中执行完特定任务后,转到另1个线程继续执行任务
线程间通信的常用方法:小程序图片下载
-(UIImageView *)imageView
{
    if (!_imageView) {
        _imageView = [UIImageView new];
        _imageView.frame = CGRectMake(0, 0, 300, 300);
        _imageView.center = self.view.center;
        [self.view addSubview:_imageView];
    }
    return _imageView;
}
- (void)viewDidLoad {
    [super viewDidLoad];
    //监听线程结束的通知
    [[NSNotificationCenter defaultCenter] addObserver:self selector:@selector(handle_threadexit:) name:NSThreadWillExitNotification object:nil];

    // Do any additional setup after loading the view.
}

- (void)didReceiveMemoryWarning {
    [super didReceiveMemoryWarning];
    // Dispose of any resources that can be recreated.
}

-(void)touchesBegan:(NSSet<UITouch *> *)touches withEvent:(UIEvent *)event
{
    //第一种方式:先创建再启动线程
    // 创建线程
    NSThread *thread = [[NSThread alloc] initWithTarget:self selector:@selector(run:) object:@"booob"];

    // 线程启动了,事情做完了才会死, 一个NSThread对象就代表一条线程
    [thread start];

    //第二种:直接创建并启动线程
    // 直接创建并启动线程
    [NSThread detachNewThreadSelector:@selector(run:) toTarget:self withObject:@"wang"];


    //第三种:
    // 直接创建并启动线程
    [self performSelectorInBackground:@selector(run:) withObject:@"wang000"];
    // 使线程进入阻塞状态
    [NSThread sleepForTimeInterval:2.0];


    //例子
    // 获取图片的url
    NSURL *url = [NSURL URLWithString:@"https://pages.github.com/images/slideshow/yeoman.png"];
    // 另开1条线程 object用于数据的传递
    NSThread *thread3 = [[NSThread alloc] initWithTarget:self selector:@selector(downLoadWithURL:) object:url];
    thread3.name = @"downloadimage...";
    // 由于下面下载图片的耗时太长,应开启线程来完成
    [thread3 start];

}
#pragma mark - 执行run方法
- (void)run:(NSString *)param
{
    // 当前线程是否是主线程
    for (NSInteger i = 0; i < 10; i++) {
        NSLog(@"---%@---%zd---%d", [NSThread currentThread], i,  [NSThread isMainThread]);
    }

}

//线程直接的交互
// 下载图片
- (void)downLoadWithURL:(NSURL *)url
{
    NSLog(@"%s ,%s %@",__FILE__,__FUNCTION__, [NSThread currentThread]);
    // 下载图片
    NSData *data = [NSData dataWithContentsOfURL:url];
    // 生成图片
    UIImage *image = [UIImage imageWithData:data];
    // 返回主线程显示图片
    [self.imageView performSelectorOnMainThread:@selector(setImage:) withObject:image waitUntilDone:YES];
}

//处理线程结束事件
-(void)handle_threadexit:(NSNotification *)notify
{
    NSThread  * thread = (NSThread *)notify.object;
    NSLog(@"+++++++++++++++ 线程 %@ 结束 ++++++++++++",thread.name);
}
TIPS: 拓展,线程结束的通知
以上下载图片方式使用线程已经过时了,开发中我们操作线程大多都使用 GCD 和 NSOperation 来实现多线程操作。
——————————————————————————————————————————
GCD 全称是Grand Central Dispatch,可译为“超级厉害的中枢调度器”,GCD 是苹果公司为多核的并行运算提出的解决方案, GCD会自动利用更多的 CPU 内核(比如双核、四核)来开启线程执行任务,GCD 会自动管理线程的生命周期(创建线程、调度任务、销毁线程),不需要我们程序员手动管理内存。
任务和队列
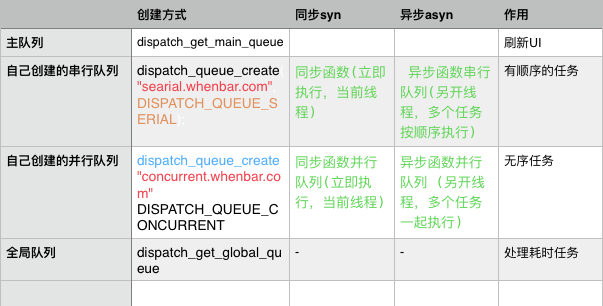
GCD会自动将队列中的任务取出,放到对应的线程,任务的取出遵循FIFO,即先入先出队列,First Input First Output 的缩写。
先进入的任务先完成并结束,再执行后面的任务。
同步函数和异步函数,并发队列和串行队列
用同步的方式执行任务:在当前线程中可立即执行任务,不具备开启线程的能力
用异步的方式执行任务:在当前线程结束时执行任务,具备开启新的线程的能力
并发队列:允许多个任务同时执行
串行队列:一个任务执行完毕后,再执行下一个任务
创建并发/串行队列代码:
- (void)viewDidLoad {
    [super viewDidLoad];
      dispatch_queue_t queue = dispatch_get_main_queue();
    // 创建串行队列  serial 串行  concurrent并发
    queueSerial = dispatch_queue_create("searial.whenbar.com", DISPATCH_QUEUE_SERIAL);

    //创建并行队列
    // 参1:const char *label 队列名称
    // 参2:dispatch_queue_attr_t attr 队列类型
    queueConcurrent = dispatch_queue_create("concurrent.whenbar.com", DISPATCH_QUEUE_CONCURRENT);

}
//1 获得主队列
-(void)runqueueMain
{
    // 获取主队列  在主队列中的任务都会在主线程中执行。
    dispatch_queue_t queueMain = dispatch_get_main_queue();

}

//2. 创建串行队列
-(void)runqueueSerial
{

    // GCD同步函数串行队列(立即执行,当前线程)
    // 参1: dispatch_queue_t queue 队列
    // 参2: 任务
    dispatch_sync(queueSerial, ^{
        for (NSInteger i = 0; i < 10; i++) {
            NSLog(@"~~~%ld %@",i, [NSThread currentThread]);
        }
    });


    // 异步函数串行队列 (另开线程,多个任务按顺序执行)
    dispatch_async(queueSerial, ^{
        dispatch_async(queueSerial, ^{
            for (NSInteger i = 0; i < 10; i++) {
                NSLog(@"~~~%ld %@",i, [NSThread currentThread]);
            }
        });
        dispatch_async(queueSerial, ^{
            for (NSInteger i = 0; i < 10; i++) {
                NSLog(@"~~~%ld %@",i, [NSThread currentThread]);
            }
        });
        dispatch_async(queueSerial, ^{
            for (NSInteger i = 0; i < 10; i++) {
                NSLog(@"~~~%ld %@",i, [NSThread currentThread]);
            }
        });
    });

}


//3. 创建并发队列
-(void)runqueueConcurrent
{

    // 同步函数并行队列(立即执行,当前线程)
    dispatch_sync(queueConcurrent, ^{
        for (NSInteger i = 0; i < 10; i++) {
            NSLog(@"~~~%ld %@",i, [NSThread currentThread]);
        }
    });

    // 异步函数并行队列 (另开线程,多个任务一起执行)
    dispatch_async(queueConcurrent, ^{
        dispatch_async(queueConcurrent, ^{
            for (NSInteger i = 0; i < 5; i++) {
                NSLog(@"~~~%ld %@",i, [NSThread currentThread]);
            }
        });
        dispatch_async(queueConcurrent, ^{
            for (NSInteger i = 0; i < 6; i++) {
                NSLog(@"~~~%ld %@",i, [NSThread currentThread]);
            }
        });
        dispatch_async(queueConcurrent, ^{
            for (NSInteger i = 0; i < 7; i++) {
                NSLog(@"~~~%ld %@",i, [NSThread currentThread]);
            }
        });
    });
}

//4. 创建全局队列
-(void)runqueueGlobal
{
    // 获取全局队列 全局队列是并发队列
    // 参1:队列的优先级
    // 参2:0(以后可能用到的参数)//#define DISPATCH_QUEUE_PRIORITY_HIGH 2 // 高    #define DISPATCH_QUEUE_PRIORITY_DEFAULT 0 // 默认(中)    #define DISPATCH_QUEUE_PRIORITY_LOW (-2) // 低    #define DISPATCH_QUEUE_PRIORITY_BACKGROUND INT16_MIN // 后台
    dispatch_queue_t queueGlobal = dispatch_get_global_queue(DISPATCH_QUEUE_PRIORITY_DEFAULT, 0);

}

// 主队列:(任何一个任务只要在主队列中,都会加入到主线程的队列中执行)
TIPS: 注意
使用sync函数(同步函数)往当前串行队列中添加任务,会卡住当前的串行队列
解释:使用同步函数添加任务 A 到串行队列,说明要在当前串行队列立即执行任务 A ,任务 A 执行完后,才会执行任务 A 后面的代码。但当前队列是串行队列,也就是说任务 A 必须等到当前串行队列中正在执行的任务 B 完成之后才能执行,因此又必须先执行任务 A 中立即执行任务,又要必须等到任务 B 执行完以后才能执行下一个任务,所以就会卡死。你等我,我等你,谁也无法执行。
小项目:下载图片
代码如下:
// 获取图片的url
NSURL *url = [NSURL URLWithString:@"http://7xjanq.com1.z0.glb.clouddn.com/6478.jpg"];

// 开启线程下载图片
dispatch_queue_t queue = dispatch_queue_create("111", DISPATCH_QUEUE_CONCURRENT);

dispatch_async(queue, ^{
    NSData *data = [NSData dataWithContentsOfURL:url];
    UIImage *image = [UIImage imageWithData:data];

    // 下载完成后返回主线程显示图片
    dispatch_async(dispatch_get_main_queue(), ^{
        self.imageView.image = image;
    });
});
————————————————————————————————————————
GCD其他常用函数
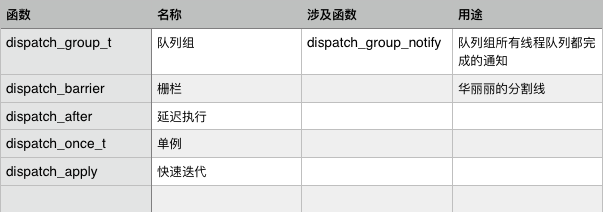
//----------------- 队列组 -----------------------------
//队列组可以将很多队列添加到一个组里,这样做的好处是,当这个组里所有的任务都执行完了,队列组会通过一个方法通知我们。下面是使用方法,这是一个很实用的功能。
-(void)rungroup
{
    //1.创建队列组
    dispatch_group_t group=dispatch_group_create();
    //2.创建队列
    dispatch_queue_t queue = dispatch_get_global_queue(DISPATCH_QUEUE_PRIORITY_DEFAULT,0);
    //3.多次使用队列组的方法执行任务, 只有异步方法
    //3.1.执行3次循环
    dispatch_group_async(group,queue,^{
        for (NSInteger i = 0; i< 3; i++){
            NSLog(@"group-01 - %@", [NSThread currentThread]);
        }
    });
    //3.2.主队列执行8次循环
    dispatch_group_async(group, dispatch_get_main_queue(), ^{
        for (NSInteger i=0;i<8;i++) {
            NSLog(@"group-02 - %@", [NSThread currentThread]);
        }
    });
    //3.3.执行5次循环
    dispatch_group_async(group, queue, ^{
        for(NSInteger i=0;i<5;i++) {
            NSLog(@"group-03 - %@", [NSThread currentThread]);
        }
    });
    //4.都完成后会自动通知
    dispatch_group_notify(group,dispatch_get_main_queue(),^{
        NSLog(@"完成 - %@", [NSThread currentThread]);
    });
}
dispatch_barrier 栅栏
// 1.barrier : 在barrier前面的先执行,然后再执行barrier,然后再执行barrier后面的 barrier的queue不能是全局的并发队列
dispatch_queue_t queue = dispatch_queue_create("11", DISPATCH_QUEUE_CONCURRENT);

dispatch_async(queue, ^{
    for (int i = 0;  i < 100; i++) {
        NSLog(@"%@--1", [NSThread currentThread]);
    }
});

dispatch_async(queue, ^{
    for (int i = 0;  i < 100; i++) {
        NSLog(@"%@--2", [NSThread currentThread]);
    }
});

dispatch_barrier_async(queue, ^{
    for (int i = 0;  i < 100; i++) {
        NSLog(@"%@--3", [NSThread currentThread]);
    }
});

dispatch_async(queue, ^{
    for (int i = 0;  i < 100; i++) {
        NSLog(@"%@--4", [NSThread currentThread]);
    }
});

//    dispatch_after 延迟执行
    // 延迟执行
    // 方法1
    [self performSelector:@selector(run:) withObject:@"参数" afterDelay:2.0];

    // 方法2
    dispatch_after(dispatch_time(DISPATCH_TIME_NOW, (int64_t)(2.0 * NSEC_PER_SEC)), dispatch_get_main_queue(), ^{
        for (NSInteger i = 0; i < 100; i++) {
            NSLog(@"%@", [NSThread currentThread]);
        }
    });

    // 方法3
    [NSTimer scheduledTimerWithTimeInterval:2.0 target:self selector:@selector(run:) userInfo:nil repeats:NO];

dispatch_once 整个程序运行中执行一次
// 整个程序中只执行一次
static dispatch_once_t onceToken;
dispatch_once(&onceToken, ^{
    // 一次性代码
});
思考题:以下函数输出的结果是什么?
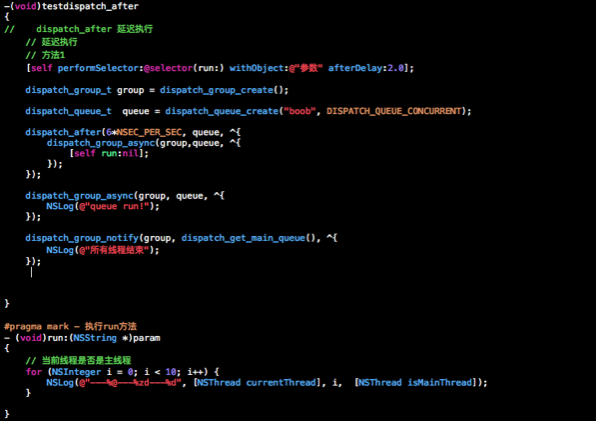
以下的代码输出是什么呢
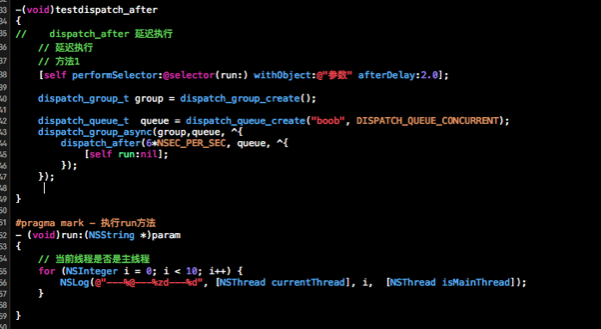
作用:实现某个类的单例对象
单例模式:在整个应用程序中,共享一份资源(这份资源只需要创建初始化1次)
//--------------单例模式--------------------

#if __has_feature(objc_instancetype)
#undef    AS_SINGLETON
#define AS_SINGLETON( ... ) - (instancetype)sharedInstance; + (instancetype)sharedInstance;

#undef    DEF_SINGLETON
#define DEF_SINGLETON - (instancetype)sharedInstance { return [[self class] sharedInstance]; } + (instancetype)sharedInstance { static dispatch_once_t once; static id __singleton__; dispatch_once( &once, ^{ __singleton__ = [[self alloc] init]; } ); return __singleton__; }
#undef    DEF_SINGLETON
#define DEF_SINGLETON( ... ) - (instancetype)sharedInstance { return [[self class] sharedInstance]; } + (instancetype)sharedInstance { static dispatch_once_t once; static id __singleton__; dispatch_once( &once, ^{ __singleton__ = [[self alloc] init]; } ); return __singleton__; }

#else    // #if __has_feature(objc_instancetype)
#undef    AS_SINGLETON
#define AS_SINGLETON( __class ) - (__class *)sharedInstance; + (__class *)sharedInstance;

#undef    DEF_SINGLETON
#define DEF_SINGLETON( __class ) - (__class *)sharedInstance { return [__class sharedInstance]; } + (__class *)sharedInstance { static dispatch_once_t once; static __class * __singleton__; dispatch_once( &once, ^{ __singleton__ = [[[self class] alloc] init]; } ); return __singleton__; }

#endif    // #if __has_feature(objc_instancetype)

#import "gcdfunViewController.h"

#pragma mark - 单例模式?? ??
@interface Person:NSObject
//+ (instancetype)shareInstance;
AS_SINGLETON(Person)
@end

@implementation Person
DEF_SINGLETON(Person)

/*
+ (instancetype)shareInstance
{
    static id _person;
    static dispatch_once_t onceToken;
    dispatch_once(&onceToken, ^{
        _person = [[super alloc] init];
    });
    return _person;
}
*/
+ (instancetype)allocWithZone:(struct _NSZone *)zone
{
    static id _person;
    static dispatch_once_t onceToken;
    dispatch_once(&onceToken, ^{
        _person = [super allocWithZone:zone];
    });
    return _person;
}
- (id)copy
{
    return [Person sharedInstance];
}

@end
开发中一般自定义成宏,比较方便,一行代码搞定。
dispatch_apply 快速迭代
//示例小程序:将一个文件夹中的图片剪切到另一个文件夹
-(void)testdispatch_apply
{
    // 将图片剪切到另一个文件夹里
    NSString *from = @"/Users/Ammar/Pictures/壁纸";
    NSString *to = @"/Users/Ammar/Pictures/to";
    NSFileManager *manager = [NSFileManager defaultManager];
    NSArray *subPaths = [manager subpathsAtPath:from];

    // 快速迭代
    dispatch_apply(subPaths.count, dispatch_get_global_queue(DISPATCH_QUEUE_PRIORITY_DEFAULT, 0), ^(size_t index) {
        NSLog(@"%@ - %zd", [NSThread currentThread], index);
        NSString *subPath = subPaths[index];
        NSString *fromPath = [from stringByAppendingPathComponent:subPath];
        NSString *toPath = [to stringByAppendingPathComponent:subPath];

        // 剪切
        [manager moveItemAtPath:fromPath toPath:toPath error:nil];
        NSLog(@"%@---%zd", [NSThread currentThread], index);
    });

    //作用是把指定次数指定的block添加到queue中, 第一个参数是迭代次数,第二个是所在的队列,第三个是当前索引,dispatch_apply可以利用多核的优势,所以输出的index顺序不是一定的
    dispatch_apply(10, dispatch_get_global_queue(DISPATCH_QUEUE_PRIORITY_DEFAULT, 0), ^(size_t index) {
        NSLog(@"dispatch_apply %zd",index);
    });
    /*输出结果 无序的
     2016-02-15 10:15:21.229 多线程[4346:48391] dispatch_apply 0
     2016-02-15 10:15:21.229 多线程[4346:48784] dispatch_apply 1
     2016-02-15 10:15:21.230 多线程[4346:48830] dispatch_apply 2
     2016-02-15 10:15:21.230 多线程[4346:48391] dispatch_apply 4
     2016-02-15 10:15:21.230 多线程[4346:48829] dispatch_apply 3
     2016-02-15 10:15:21.231 多线程[4346:48391] dispatch_apply 6
     2016-02-15 10:15:21.231 多线程[4346:48391] dispatch_apply 9
     2016-02-15 10:15:21.230 多线程[4346:48784] dispatch_apply 5
     2016-02-15 10:15:21.231 多线程[4346:48829] dispatch_apply 8
     2016-02-15 10:15:21.231 多线程[4346:48830] dispatch_apply 7
     */
}
dispatch_group 队列组
示例小程序:需求下载图片1 下载图片2 将图片1和图片2合成新的图片
// 创建队列
dispatch_queue_t queue = dispatch_get_global_queue(DISPATCH_QUEUE_PRIORITY_DEFAULT, 0);

// 创建组
dispatch_group_t group = dispatch_group_create();

// 用组队列下载图片1
dispatch_group_async(group, queue, ^{
    NSData *data = [NSData dataWithContentsOfURL:[NSURL URLWithString:@"http://7xjanq.com1.z0.glb.clouddn.com/6478.jpg"]];
    self.image1 = [UIImage imageWithData:data];
    NSLog(@"1%@", [NSThread currentThread]);
});

// 用组队列下载图片2
dispatch_group_async(group, queue, ^{
    NSData *data = [NSData dataWithContentsOfURL:[NSURL URLWithString:@"http://7xjanq.com1.z0.glb.clouddn.com/6478.jpg"]];
    self.image2 = [UIImage imageWithData:data];
    NSLog(@"2%@", [NSThread currentThread]);
});

// 将图片1和图片2合成一张图片
dispatch_group_notify(group, queue, ^{
    CGFloat imageW = self.imageView.bounds.size.width;
    CGFloat imageH = self.imageView.bounds.size.height;

    // 开启位图上下文
    UIGraphicsBeginImageContext(self.imageView.bounds.size);

    // 画图
    [self.image1 drawInRect:CGRectMake(0, 0, imageW * 0.5, imageH)];
    [self.image2 drawInRect:CGRectMake(imageW * 0.5, 0, imageW * 0.5, imageH)];

    // 将图片取出
    UIImage *image = UIGraphicsGetImageFromCurrentImageContext();

    // 关闭图形上下文
    UIGraphicsEndImageContext();

    // 在主线程上显示图片
    dispatch_async(dispatch_get_main_queue(), ^{
        self.imageView.image = image;
    });
    NSLog(@"3%@", [NSThread currentThread]);
});GCD定时器不受Mode影响因此比NSTimer要准确
#pragma mark - 定时器
//做定时器或倒计时
-(IBAction)buttonTap:(id)sender
{
    UIButton * button = (UIButton *)sender;
    button.enabled = NO;
    // 1.创建一个定时器源

    // 参1:类型定时器
    // 参2:句柄
    // 参3:mask传0
    // 参4:队列  (注意:dispatch_source_t本质是OC对象,表示源)
    dispatch_queue_t queue = dispatch_get_global_queue(DISPATCH_QUEUE_PRIORITY_DEFAULT, 0);

    dispatch_source_t timer = dispatch_source_create(DISPATCH_SOURCE_TYPE_TIMER, 0, 0, queue);

    // 严谨起见,时间间隔需要用单位int64_t,做乘法以后单位就变了
    // 下面这句代码表示回调函数时间间隔是多少
    int64_t interval = (int64_t)(1.0 * NSEC_PER_SEC);

    // 如何设置开始时间 CGD给我们了一个设置时间的方法
    // 参1:dispatch_time_t when 传一个时间, delta是增量

    dispatch_time_t start = dispatch_time(DISPATCH_TIME_NOW, (int64_t)(0 * NSEC_PER_SEC)); // 从现在起0秒后开始

    // 参1:timer
    // 参2:开始时间
    // 参3:时间间隔
    // 参4:传0 不需要   DISPATCH_TIME_NOW 表示现在 GCD 时间用 NS 表示
    dispatch_source_set_timer(timer, start, interval, 0);

    __block int count = 60;

    // 3.设置回调(即每次间隔要做什么事情)
    dispatch_source_set_event_handler(timer, ^{
        NSLog(@"----------------%@", [NSThread currentThread]);
        // 如果希望做5次就停掉
        count -- ;
        dispatch_async(dispatch_get_main_queue(), ^{
            if (count == 0) {
                dispatch_source_cancel(timer);
                [button setTitle:@"点击倒计时" forState:UIControlStateNormal];
                button.enabled = YES;
            }
            else
            {
                [button setTitle:[NSString stringWithFormat:@"%d",count] forState:UIControlStateNormal];
                [button setTitle:[NSString stringWithFormat:@"%d",count] forState:UIControlStateDisabled];
            }
        });
    });
    // 4.启动定时器  (恢复)
    dispatch_resume(timer);
}
gcd 还有一些其他的函数 下次再深入!
————————————————————————————————————————————————————————————————————————————————
讲完 GCD 就该讲讲 NSOperation,它是 GCD 的面向对象的封装,使用起来也更方便,
NSOperation是个抽象类,并不具备封装操作的能力,必须使用它的子类
NSInvocationOperation
NSBlockOperation
自定义子类继承NSOperation,实现内部相应的方法
使用 NSOperation 实现多线程的步骤:
创建任务 NSOperation 对象
NSInvocationOperation *op = [[NSInvocationOperation alloc] initWithTarget:self selector:@selector(run) object:nil];

[op start];
注意:默认情况下,调用了start方法后并不会开一条新的线程去执行,而是在当前线程同步执行操作,只有将 NSOperation 放到一个 NSOperationQueue 中,才会异步执行操作
NSBlockOperation *op = [NSBlockOperation blockOperationWithBlock:^{
  // 在主线程
    NSLog(@"下载1------%@", [NSThread currentThread]);
}];
// 添加额外的任务(在子线程执行),封装数大于1才会异步执行
[op addExecutionBlock:^{
  NSLog(@"下载2------%@", [NSThread currentThread]);
}];
自定义Operation:需要实现- (void)main方法,需要做的事情放在mian方法中
NSOperationQueue创建队列:主队列和全局队列// 创建一个其他队列(包括串行队列和并发队列) 放到这个队列中的NSOperation对象会自动放到子线程中执行
NSOperationQueue *queue = [[NSOperationQueue alloc] init];
// 创建一个主队列,放到这个队列中的NSOperation对象会自动放到子线程中执行
NSOperationQueue *mainQueue = [NSOperationQueue mainQueue];
// 表示并发数量:即同时执行任务的最大数。
queue.maxConcurrentOperationCount = 1;
队列的取消、暂停、恢复:
// NSOpertion的 - cancel 方法也可以停止单个操作
- (void)cancelAllOperations;
// YES代表暂停队列,NO代表恢复队列
- (void)setSuspended:(BOOL)b;
添加依赖
NSOperationQueue *queue = [[NSOperationQueue alloc] init];
NSBlockOperation *block1 = [NSBlockOperation blockOperationWithBlock:^{
NSLog(@"download1 -------------- %@", [NSThread currentThread]);
}];
NSBlockOperation *block2 = [NSBlockOperation blockOperationWithBlock:^{
NSLog(@"download2 -------------- %@", [NSThread currentThread]);
}];
NSBlockOperation *block3 = [NSBlockOperation blockOperationWithBlock:^{
NSLog(@"download3 -------------- %@", [NSThread currentThread]);
}];
// 添加依赖: block1 和 block2执行完后 再执行 block3 block3依赖于block1和block2
// 给block3添加依赖 让block3在block1和block2之后执行
[block3 addDependency:block1];
[block3 addDependency:block2];
[queue addOperation:block1];
[queue addOperation:block2];
[queue addOperation:block3];
注意:不能循环依赖,但可以跨队列依赖,不管NSOperation对象在哪个队列。只要是两个NSOperation对象就可以依赖
线程间通信
示例:下载图片
// 下载图片 operation实现线程间通信
[[[NSOperationQueue alloc] init] addOperation:[NSBlockOperation blockOperationWithBlock:^{
UIImage *image = [UIImage imageWithData:[NSData dataWithContentsOfURL:[NSURL URLWithString:@"http://7xjanq.com1.z0.glb.clouddn.com/6478.jpg"]]];
// 返回主线程
[[NSOperationQueue mainQueue] addOperation:[NSBlockOperation blockOperationWithBlock:^{
self.imageView.image = image;
}]];
}]];示例:下载图片1和图片2 并合成图片
-(void)demo_combinenetworkimage
{
    NSOperationQueue * queue = [[NSOperationQueue alloc] init];

    __block UIImage * image1;
    NSBlockOperation * block1 = [NSBlockOperation blockOperationWithBlock:^{
        NSData *data = [NSData dataWithContentsOfURL:[NSURL URLWithString:@"http://img1.gtimg.com/15/1513/151394/15139471_980x1200_0.jpg"]];
        image1 = [UIImage imageWithData:data];
        NSLog(@"下载图片1%@", [NSThread currentThread]);
    }];

    __block UIImage * image2;
    NSBlockOperation * block2 = [NSBlockOperation blockOperationWithBlock:^{
        NSData *data = [NSData dataWithContentsOfURL:[NSURL URLWithString:@"http://img1.gtimg.com/15/1513/151311/15131165_980x1200_0.png"]];
        image2 = [UIImage imageWithData:data];
        NSLog(@"下载图片2%@", [NSThread currentThread]);
    }];


    NSBlockOperation * block3 = [NSBlockOperation blockOperationWithBlock:^{

        CGFloat imageW = self.imageView.bounds.size.width;
        CGFloat imageH = self.imageView.bounds.size.height;

        // 开启位图上下文
        UIGraphicsBeginImageContext(self.imageView.bounds.size);

        // 画图
        [image1 drawInRect:CGRectMake(0, 0, imageW * 0.5, imageH)];
        [image2 drawInRect:CGRectMake(imageW * 0.5, 0, imageW * 0.5, imageH)];

        // 将图片取出
        UIImage *image = UIGraphicsGetImageFromCurrentImageContext();

        // 关闭图形上下文
        UIGraphicsEndImageContext();

        // 在主线程上显示图片
        [[NSOperationQueue mainQueue] addOperation:[NSBlockOperation blockOperationWithBlock:^{
            NSLog(@"合成图片 %@", [NSThread currentThread]);
            self.imageView.image = image;
        }]];
    }];

    [block3 addDependency:block1];
    [block3 addDependency:block2];

    [queue addOperation:block1];
    [queue addOperation:block2];
    [queue addOperation:block3];

}
应用:SDWebImage 框架的底层主要功能实现就是基于多线程,使用多线程,我们可以实现小图片的多图片下载。这里的逻辑其实是比较复杂的
实现小图片的多图片下载思路:
TIPS: 以上就是一些主要方法, 下面还有一些常用方法需要大家注意:
NSOperation
BOOL executing; //判断任务是否正在执行
BOOL finished; //判断任务是否完成
void (^completionBlock)(void); //用来设置完成后需要执行的操作

- (void)cancel; //取消任务
- (void)waitUntilFinished; //阻塞当前线程直到此任务执行完毕
NSOperationQueue

NSUInteger operationCount; //获取队列的任务数
- (void)cancelAllOperations; //取消队列中所有的任务
- (void)waitUntilAllOperationsAreFinished; //阻塞当前线程直到此队列中的所有任务执行完毕
[queue setSuspended:YES]; // 暂停queue
[queue setSuspended:NO]; // 继续queue所谓线程同步就是为了防止多个线程抢夺同一个资源造成的数据安全问题,所采取的一种措施。当然也有很多实现方法,请往下看:
互斥锁 :给需要同步的代码块加一个互斥锁,就可以保证每次只有一个线程访问此代码块。
@synchronized(self) {
//需要执行的代码块
}
原文:http://www.cnblogs.com/huihuige/p/5793980.html