一、单元测试的流程
1、判断组件的功能:通过定义应用的整体需求,然后将系统划分成几个对象,我们需要对组件的基本功能十分清楚。因此,J2EE单元测试实际上也属于设计过程的一部分。
2、设计组件行为:依据所处理的过程,可以通过一个正规或者非正规的过程实现组件行为的设计,我们可以使用UML或者其他文档视图来设计组件行为,从而为组件的测试打下基础。
3、编写单元测试程序(或测试用例)确认组件行为:这个阶段,应该假定组件的编码已经结束而组件工作正常,我们需要编写单元测试程序来确定其功能是否和预定义的功能相同,测试程序需要考虑所有正常和意外的输入,以及特定的方法能产生的溢出。
4、编写组件并执行测试:首先,创建类及其所对应的方法标识,然后遍历每个测试实例,为其编写相应代码使其顺利通过,然后返回测试。继续这个过程直至所有实例通过。此时,停止编码。
5、测试替代品:对组件行为的其他方式进行考虑,设计更周全的输入或者其他错误条件,编写测试用例来捕获这些条件,然后修改代码使得测试通过。
6、重整代码:如果有必要,在编码结束时,对代码进行重整和优化,改动后,返回单元测试并确认测试通过。
7、当组件有新的行为时,编写新的测试用例:每次在组件中发现故障。编写一个测试实例重复这个故障,然后修改组件以保证测试实例通过。同样,当发现新的需求或已有的需求改变时,编写或修改测试实例以响应此改变,然后修改代码。
8、代码修改,返回所有的测试:每次代码修改时,返回所有的测试以确保没有打乱代码。
java代码:
- public class Calculator {
-
- public int add(int a, int b) {
- return a + b;
- }
-
- public int minus(int a, int b) {
- return a - b;
- }
-
- public int square(int n) {
- return n * n;
- }
-
-
- public void squareRoot(int n) {
- for(; ;)
- ;
- }
-
- public int multiply(int a, int b) {
- return a * b;
- }
-
- public int divide(int a, int b) throws Exception {
- if (0 == b) {
- throw new Exception("除数不能为零");
- }
- return a / b;
- }
- }
单元测试类
- import org.junit.After;
- import org.junit.AfterClass;
- import org.junit.Assert;
- import org.junit.Before;
- import org.junit.BeforeClass;
- import org.junit.Ignore;
- import org.junit.Test;
-
- public class CalculatorTest {
-
- private Calculator cal = new Calculator();
-
- @BeforeClass
- public static void before()
- {
- System.out.println("global");
- }
-
- @AfterClass
- public static void after() {
- System.out.println("global destroy");
- }
-
- @Before
- public void setUp() throws Exception {
- System.out.println("一个测试开始。。");
- }
-
- @After
- public void tearDown() throws Exception {
- System.out.println("一个测试结束");
- }
-
- @Test
- @Ignore
- public void testAdd() {
- int result = cal.add(1, 2);
- Assert.assertEquals(3, result);
- }
-
- @Test
- public void testMinus() {
- int result = cal.minus(5, 2);
- Assert.assertEquals(3, result);
- }
-
- @Test
- public void testMultiply() {
- int result = cal.multiply(4, 2);
- Assert.assertEquals(8, result);
- }
-
- @Test(timeout = 1000)
- public void testSquareRoot() {
- cal.squareRoot(4);
- }
-
- @Test(expected = Exception.class)
- public void testDivide() throws Exception {
- System.out.println("teddd");
- cal.divide(4, 0);
- }
-
- }
运行测试类截图:
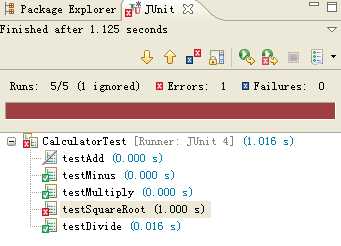
可以看到,CalculatorTest类中总共有5个测试用例,ignore了一个,3个测试用例通过,testSquareRoot测试不通过(因为超时),所以整个的测试结果飘红了。同时,控制台的输出结果为:
- global
- 一个测试开始。。
- 一个测试结束
- 一个测试开始。。
- 一个测试结束
- 一个测试开始。。
- 一个测试结束
- 一个测试开始。。
- teddd
- 一个测试结束
- global destroy
第三次作业
原文:http://www.cnblogs.com/liucong2dy/p/5860242.html