目前,几乎所有业务的开发构建都会用到 webpack 。的确,作为模块加载和打包神器,只需配置几个文件,加载各种 loader 就可以享受无痛流程化开发。但对于 webpack 这样一个复杂度较高的插件集合,它的整体流程及思想对我们来说还是很透明的。那么接下来我会带你了解 webpack 这样一个构建黑盒,首先来谈谈它的流程。
在开始了解之前,必须要能对 webpack 整个流程进行 debug ,配置过程比较简单。
先将 webpack-webstorm-debugger-script 中的 webstorm-debugger.js 置于 webpack.config.js 的同一目录下,搭建好你的脚手架后就可以直接 Debug 这个 webstorm-debugger.js 文件了。
估计大家对 webpack.config.js 的配置也尝试过不少次了,这里就大致对这个配置文件进行个分析。
|
1
2
3
4
5
6
7
8
9
10
11
12
13
14
15
16
17
18
19
20
21
22
23
24
25
26
27
28
29
30
31
32
33
34
35
36
37
38
39
40
41
42
|
var path = require(‘path‘);var node_modules = path.resolve(__dirname, ‘node_modules‘);var pathToReact = path.resolve(node_modules, ‘react/dist/react.min.js‘);module.exports = { // 入口文件,是模块构建的起点,同时每一个入口文件对应最后生成的一个 chunk。 entry: { bundle: [ ‘webpack/hot/dev-server‘, ‘webpack-dev-server/client?http://localhost:8080‘, path.resolve(__dirname, ‘app/app.js‘) ], }, // 文件路径指向(可加快打包过程)。 resolve: { alias: { ‘react‘: pathToReact } }, // 生成文件,是模块构建的终点,包括输出文件与输出路径。 output: { path: path.resolve(__dirname, ‘build‘), filename: ‘[name].js‘, }, // 这里配置了处理各模块的 loader ,包括 css 预处理 loader ,es6 编译 loader,图片处理 loader。 module: { loaders: [ { test: /\.js$/, loader: ‘babel‘, query: { presets: [‘es2015‘, ‘react‘] } } ], noParse: [pathToReact] }, // webpack 各插件对象,在 webpack 的事件流中执行对应的方法。 plugins: [ new webpack.HotModuleReplacementPlugin(); ]}; |
除此之外再大致介绍下 webpack 的一些核心概念:
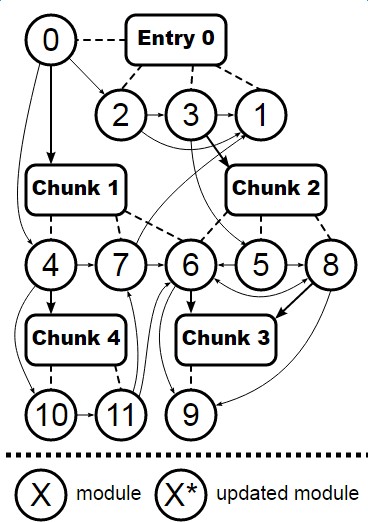
对于module和chunk的关系可以参照webpack官方的这张图:

|
1
2
3
4
5
6
7
8
9
10
11
12
13
14
15
|
function UglifyJsPlugin(options) { this.options = options; } module.exports = UglifyJsPlugin; UglifyJsPlugin.prototype.apply = function(compiler) { compiler.plugin("compilation", function(compilation) { compilation.plugin("build-module", function(module) { }); compilation.plugin("optimize-chunk-assets", function(chunks, callback) { // Uglify 逻辑 }); compilation.plugin("normal-module-loader", function(context) { }); }); }; |
在 webpack 中你经常可以看到 compilation.plugin(‘xxx‘, callback) ,你可以把它当作是一个事件的绑定,这些事件在打包时由 webpack 来触发。
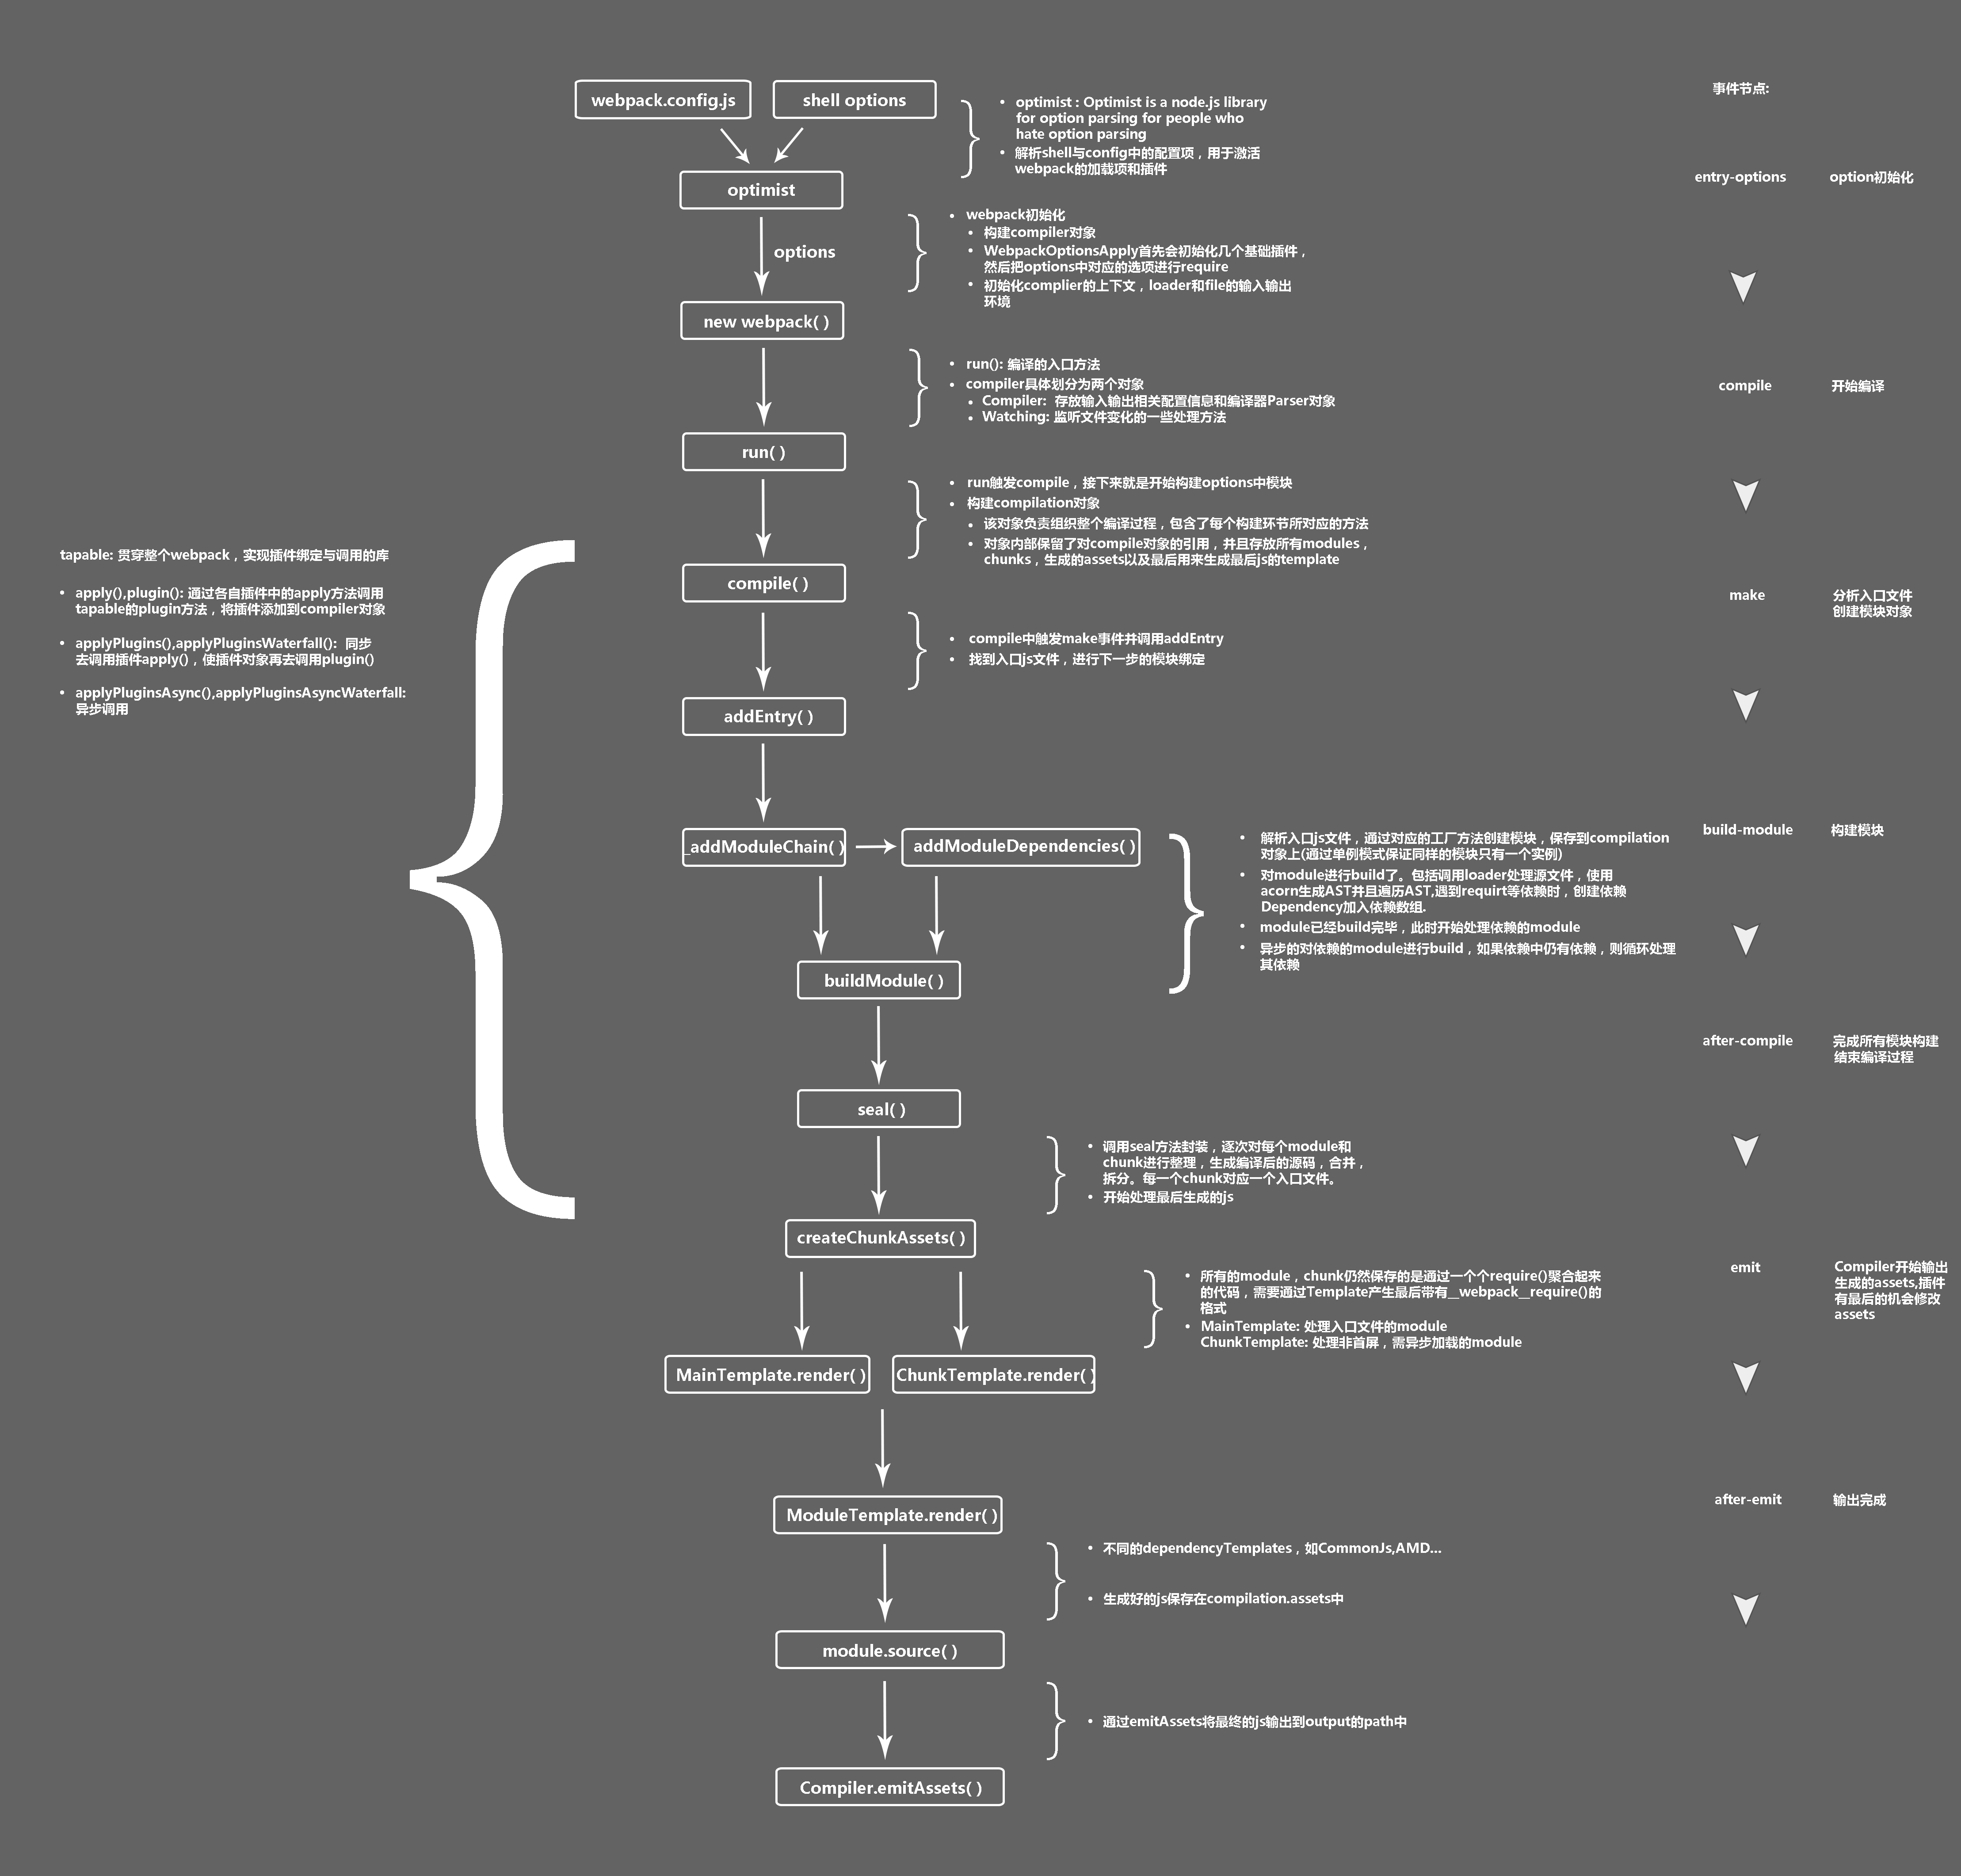
在具体流程学习前,可以先通过这幅 webpack整体流程图 了解一下大致流程(建议保存下来查看)。

每次在命令行输入 webpack 后,操作系统都会去调用 ./node_modules/.bin/webpack 这个 shell 脚本。这个脚本会去调用./node_modules/webpack/bin/webpack.js 并追加输入的参数,如 -p , -w 。(图中 webpack.js 是 webpack 的启动文件,而 $@ 是后缀参数)

在 webpack.js 这个文件中 webpack 通过 optimist 将用户配置的 webpack.config.js 和 shell 脚本传过来的参数整合成 options 对象传到了下一个流程的控制对象中。
和 commander 一样,optimist 实现了 node 命令行的解析,其 API 调用非常方便。
|
1
2
3
4
5
6
|
var optimist = require("optimist");optimist .boolean("json").alias("json", "j").describe("json") .boolean("colors").alias("colors", "c").describe("colors") .boolean("watch").alias("watch", "w").describe("watch") ... |
获取到后缀参数后,optimist 分析参数并以键值对的形式把参数对象保存在 optimist.argv 中,来看看 argv 究竟有什么?
|
1
2
3
4
5
6
7
|
// webpack --hot -w{ hot: true, profile: false, watch: true, ...} |
在加载插件之前,webpack 将 webpack.config.js 中的各个配置项拷贝到 options 对象中,并加载用户配置在 webpack.config.js 的 plugins 。接着 optimist.argv 会被传入到 ./node_modules/webpack/bin/convert-argv.js 中,通过判断 argv 中参数的值决定是否去加载对应插件。(至于 webpack 插件运行机制,在之后的运行机制篇会提到)
|
1
2
3
4
5
6
7
|
ifBooleanArg("hot", function() { ensureArray(options, "plugins"); var HotModuleReplacementPlugin = require("../lib/HotModuleReplacementPlugin"); options.plugins.push(new HotModuleReplacementPlugin());});...return options; |
options 作为最后返回结果,包含了之后构建阶段所需的重要信息。
|
1
2
3
4
5
6
7
8
|
{ entry: {},//入口配置 output: {}, //输出配置 plugins: [], //插件集合(配置文件 + shell指令) module: { loaders: [ [Object] ] }, //模块配置 context: //工程路径 ...} |
这和 webpack.config.js 的配置非常相似,只是多了一些经 shell 传入的插件对象。插件对象一初始化完毕, options 也就传入到了下个流程中。
|
1
2
|
var webpack = require("../lib/webpack.js");var compiler = webpack(options); |
在加载配置文件和 shell 后缀参数申明的插件,并传入构建信息 options 对象后,开始整个 webpack 打包最漫长的一步。而这个时候,真正的 webpack 对象才刚被初始化,具体的初始化逻辑在 lib/webpack.js 中,如下:
|
1
2
3
4
5
6
|
function webpack(options) { var compiler = new Compiler(); ...// 检查options,若watch字段为true,则开启watch线程 return compiler;}... |
webpack 的实际入口是 Compiler 中的 run 方法,run 一旦执行后,就开始了编译和构建流程 ,其中有几个比较关键的 webpack 事件节点。
compile 开始编译make 从入口点分析模块及其依赖的模块,创建这些模块对象build-module 构建模块after-compile 完成构建seal 封装构建结果emit 把各个chunk输出到结果文件after-emit 完成输出compiler.run 后首先会触发 compile ,这一步会构建出 Compilation 对象:

这个对象有两个作用,一是负责组织整个打包过程,包含了每个构建环节及输出环节所对应的方法,可以从图中看到比较关键的步骤,如 addEntry() , _addModuleChain() , buildModule() , seal() , createChunkAssets() (在每一个节点都会触发 webpack 事件去调用各插件)。二是该对象内部存放着所有 module ,chunk,生成的 asset 以及用来生成最后打包文件的 template 的信息。
在创建 module 之前,Compiler 会触发 make,并调用 Compilation.addEntry 方法,通过 options 对象的 entry 字段找到我们的入口js文件。之后,在 addEntry 中调用私有方法 _addModuleChain ,这个方法主要做了两件事情。一是根据模块的类型获取对应的模块工厂并创建模块,二是构建模块。
而构建模块作为最耗时的一步,又可细化为三步:
webpack 提供的一个很大的便利就是能将所有资源都整合成模块,不仅仅是 js 文件。所以需要一些 loader ,比如 url-loader ,jsx-loader , css-loader 等等来让我们可以直接在源文件中引用各类资源。webpack 调用 doBuild() ,对每一个 require() 用对应的 loader 进行加工,最后生成一个 js module。
|
1
2
3
4
5
6
7
8
9
10
11
12
13
14
15
|
Compilation.prototype._addModuleChain = function process(context, dependency, onModule, callback) { var start = this.profile && +new Date(); ... // 根据模块的类型获取对应的模块工厂并创建模块 var moduleFactory = this.dependencyFactories.get(dependency.constructor); ... moduleFactory.create(context, dependency, function(err, module) { var result = this.addModule(module); ... this.buildModule(module, function(err) { ... // 构建模块,添加依赖模块 }.bind(this)); }.bind(this)); }; |
|
1
2
3
4
5
6
7
8
9
10
11
12
13
|
Parser.prototype.parse = function parse(source, initialState) { var ast; if(!ast) { // acorn以es6的语法进行解析 ast = acorn.parse(source, { ranges: true, locations: true, ecmaVersion: 6, sourceType: "module" }); } ... }; |
对于当前模块,或许存在着多个依赖模块。当前模块会开辟一个依赖模块的数组,在遍历 AST 时,将 require() 中的模块通过addDependency() 添加到数组中。当前模块构建完成后,webpack 调用 processModuleDependencies 开始递归处理依赖的 module,接着就会重复之前的构建步骤。
|
1
2
3
4
5
6
7
8
9
10
|
Compilation.prototype.addModuleDependencies = function(module, dependencies, bail, cacheGroup, recursive, callback) { // 根据依赖数组(dependencies)创建依赖模块对象 var factories = []; for(var i = 0; i < dependencies.length; i++) { var factory = _this.dependencyFactories.get(dependencies[i][0].constructor); factories[i] = [factory, dependencies[i]]; } ... // 与当前模块构建步骤相同 } |
module 是 webpack 构建的核心实体,也是所有 module的 父类,它有几种不同子类:NormalModule , MultiModule ,ContextModule , DelegatedModule 等。但这些核心实体都是在构建中都会去调用对应方法,也就是 build() 。来看看其中具体做了什么:
|
1
2
3
4
5
6
7
8
9
10
11
12
13
14
15
16
17
18
19
20
21
22
23
24
25
26
27
28
29
30
31
32
33
34
35
|
// 初始化module信息,如context,id,chunks,dependencies等。NormalModule.prototype.build = function build(options, compilation, resolver, fs, callback) { this.buildTimestamp = new Date().getTime(); // 构建计时 this.built = true; return this.doBuild(options, compilation, resolver, fs, function(err) { // 指定模块引用,不经acorn解析 if(options.module && options.module.noParse) { if(Array.isArray(options.module.noParse)) { if(options.module.noParse.some(function(regExp) { return typeof regExp === "string" ? this.request.indexOf(regExp) === 0 : regExp.test(this.request); }, this)) return callback(); } else if(typeof options.module.noParse === "string" ? this.request.indexOf(options.module.noParse) === 0 : options.module.noParse.test(this.request)) { return callback(); } } // 由acorn解析生成ast try { this.parser.parse(this._source.source(), { current: this, module: this, compilation: compilation, options: options }); } catch(e) { var source = this._source.source(); this._source = null; return callback(new ModuleParseError(this, source, e)); } return callback(); }.bind(this));}; |
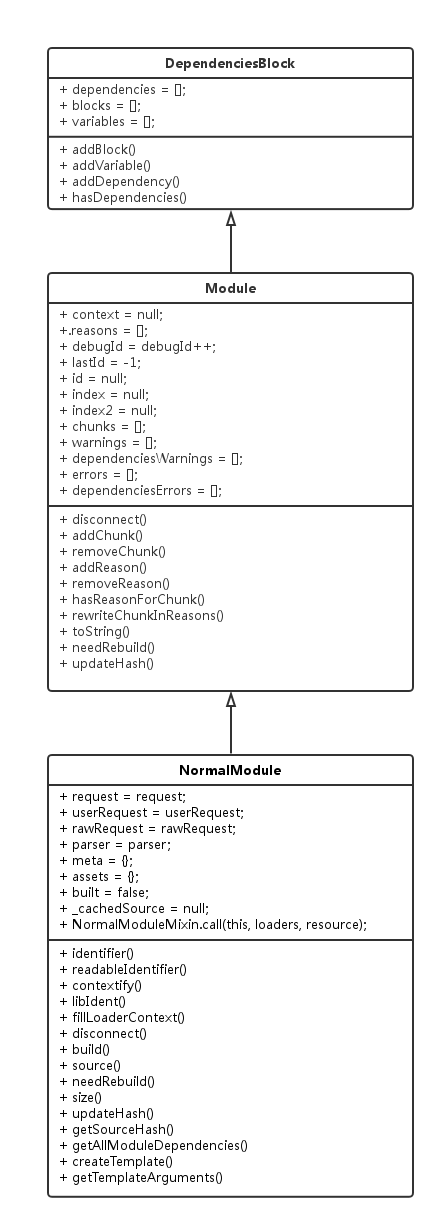
对于每一个 module ,它都会有这样一个构建方法。当然,它还包括了从构建到输出的一系列的有关 module 生命周期的函数,我们通过 module 父类类图其子类类图(这里以 NormalModule 为例)来观察其真实形态:

可以看到无论是构建流程,处理依赖流程,包括后面的封装流程都是与 module 密切相关的。
在所有模块及其依赖模块 build 完成后,webpack 会监听 seal 事件调用各插件对构建后的结果进行封装,要逐次对每个 module 和 chunk 进行整理,生成编译后的源码,合并,拆分,生成 hash 。 同时这是我们在开发时进行代码优化和功能添加的关键环节。
|
1
2
3
4
5
6
7
8
9
10
11
12
13
14
15
16
17
18
19
20
21
22
23
24
|
Compilation.prototype.seal = function seal(callback) { this.applyPlugins("seal"); // 触发插件的seal事件 this.preparedChunks.sort(function(a, b) { if(a.name < b.name) return -1; if(a.name > b.name) return 1; return 0; }); this.preparedChunks.forEach(function(preparedChunk) { var module = preparedChunk.module; var chunk = this.addChunk(preparedChunk.name, module); chunk.initial = chunk.entry = true; // 整理每个Module和chunk,每个chunk对应一个输出文件。 chunk.addModule(module); module.addChunk(chunk); }, this); this.applyPluginsAsync("optimize-tree", this.chunks, this.modules, function(err) { if(err) { return callback(err); } ... // 触发插件的事件 this.createChunkAssets(); // 生成最终assets ... // 触发插件的事件 }.bind(this));}; |
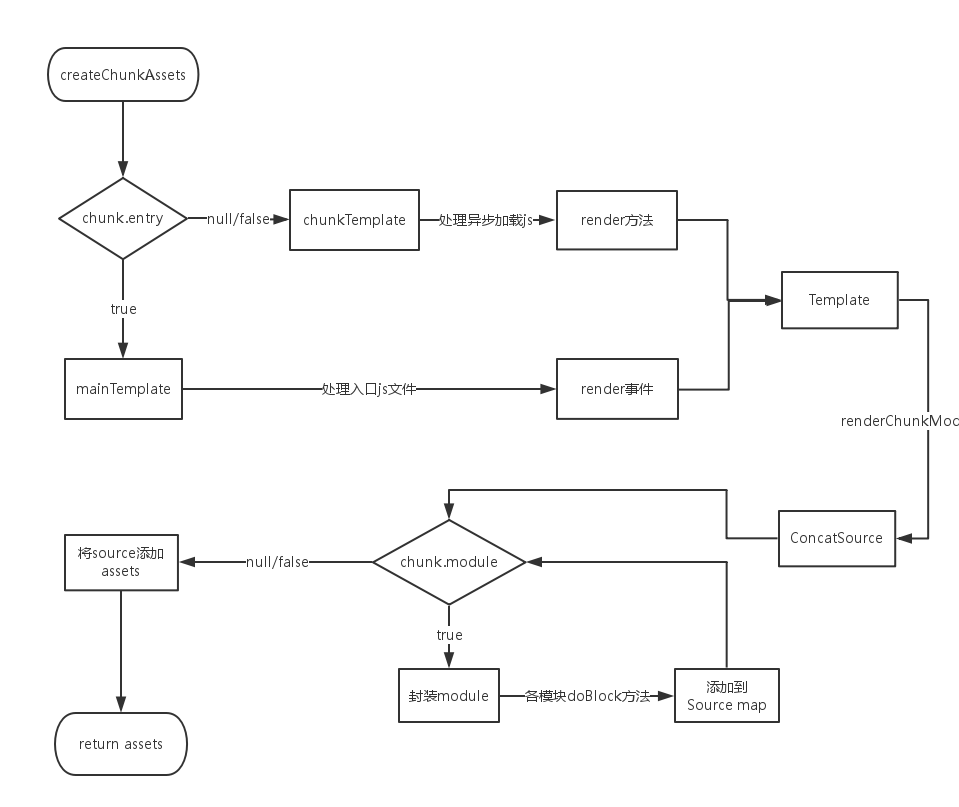
在封装过程中,webpack 会调用 Compilation 中的 createChunkAssets 方法进行打包后代码的生成。 createChunkAssets 流程如下:

从上图可以看出通过判断是入口 js 还是需要异步加载的 js 来选择不同的模板对象进行封装,入口 js 会采用webpack 事件流的 render 事件来触发 Template类 中的 renderChunkModules() (异步加载的 js 会调用 chunkTemplate 中的 render 方法)。
|
1
2
3
4
5
|
if(chunk.entry) { source = this.mainTemplate.render(this.hash, chunk, this.moduleTemplate, this.dependencyTemplates);} else { source = this.chunkTemplate.render(chunk, this.moduleTemplate, this.dependencyTemplates);} |
在 webpack 中有四个 Template 的子类,分别是 MainTemplate.js , ChunkTemplate.js ,ModuleTemplate.js ,HotUpdateChunkTemplate.js ,前两者先前已大致有介绍,而 ModuleTemplate 是对所有模块进行一个代码生成,HotUpdateChunkTemplate 是对热替换模块的一个处理。
模块在封装的时候和它在构建时一样,都是调用各模块类中的方法。封装通过调用 module.source() 来进行各操作,比如说 require() 的替换。
|
1
2
3
4
5
6
7
8
9
10
|
MainTemplate.prototype.requireFn = "__webpack_require__"; MainTemplate.prototype.render = function(hash, chunk, moduleTemplate, dependencyTemplates) { var buf = []; // 每一个module都有一个moduleId,在最后会替换。 buf.push("function " + this.requireFn + "(moduleId) {"); buf.push(this.indent(this.applyPluginsWaterfall("require", "", chunk, hash))); buf.push("}"); buf.push(""); ... // 其余封装操作 }; |
各模块进行 doBlock 后,把 module 的最终代码循环添加到 source 中。一个 source 对应着一个 asset 对象,该对象保存了单个文件的文件名( name )和最终代码( value )。
最后一步,webpack 调用 Compiler 中的 emitAssets() ,按照 output 中的配置项将文件输出到了对应的 path 中,从而 webpack 整个打包过程结束。要注意的是,若想对结果进行处理,则需要在 emit 触发后对自定义插件进行扩展。
webpack 的整体流程主要还是依赖于 compilation 和 module 这两个对象,但其思想远不止这么简单。最开始也说过,webpack 本质是个插件集合,并且由 tapable 控制各插件在 webpack 事件流上运行,至于具体的思想和细节,将会在后一篇文章中提到。同时,在业务开发中,无论是为了提升构建效率,或是减小打包文件大小,我们都可以通过编写 webpack 插件来进行流程上的控制,这个也会在之后提到。
原文:http://www.cnblogs.com/Leo_wl/p/5862997.html