经历了一段时间的加班赶项目进度之后,今天终于闲下来了。忽然不知道干啥。于是,想着做点什么吧。突然想起了码云上面有个代码分析的功能,用的是 Sonar
于是想来玩玩这个。
一、下载Sonar,和初始化,启动
打开浏览器,搜索sonarqube,进入官网,找到download按钮,下载安装包。浏览器下载慢的话, 可以复制下载链接 到迅雷里边下载。
下载之后,解压到任意目录。
解压后,如果是 windows 64位系统,进入windows-x86-64 目录,双击InstallNTService.bat,成功之后,双击StartSonar.bat 启动。
然后打开浏览器输入:http://192.168.2.100:9000/。可以看到一个界面。

二、配置和创建数据库
sonar需要java环境的支持,分析数据会保存到保存到数据库。支持mysql,oracle,PostgreSQL,SQLServer
所以,这里需要默认你已经配置好了Java开发环境,已经安装了mysql数据库。
打开 sonar 解压目录的,conf,可以看到sonar.properties 文件中有如下配置:
# User credentials.
# Permissions to create tables, indices and triggers must be granted to JDBC user.
# The schema must be created first.
sonar.jdbc.username=sonar
sonar.jdbc.password=sonar

#----- Embedded Database (default)
# H2 embedded database server listening port, defaults to 9092
#sonar.embeddedDatabase.port=9092
#----- MySQL 5.6 or greater
# Only InnoDB storage engine is supported (not myISAM).
# Only the bundled driver is supported. It can not be changed.
sonar.jdbc.url=jdbc:mysql://localhost:3306/sonar?useUnicode=true&characterEncoding=utf8&rewriteBatchedStatements=true&useConfigs=maxPerformance


#----- Oracle 11g/12c
# - Only thin client is supported
# - Only versions 11.2.x and 12.x of Oracle JDBC driver are supported
# - The JDBC driver must be copied into the directory extensions/jdbc-driver/oracle/
# - If you need to set the schema, please refer to http://jira.sonarsource.com/browse/SONAR-5000
#sonar.jdbc.url=jdbc:oracle:thin:@localhost:1521/XE
上面红色加粗的东西本来是注释掉的,现在我给解开了。并增加了配置。这里的配置,说明的数据库信息,和连接的用户信息。
但是,咱们还没有这个用户,和这个数据库,所以需要执行如下命令来创建用户和数据库。:
#mysql -u root -p

mysql> CREATE DATABASE sonar CHARACTER SET utf8 COLLATE utf8_general_ci;
mysql> CREATE USER ‘sonar‘ IDENTIFIED BY ‘sonar‘;
mysql> GRANT ALL ON sonar.* TO ‘sonar‘@‘%‘ IDENTIFIED BY ‘sonar‘;
mysql> GRANT ALL ON sonar.* TO ‘sonar‘@‘localhost‘ IDENTIFIED BY ‘sonar‘;
mysql> FLUSH PRIVILEGES;
数据库弄好之后,同时需要复制一个数据库驱动放到安装目录的:extensions\jdbc-driver\mysql 下面。比如我用的是:mysql-connector-java-6.0.3.jar
到这里工作完成一半了。如果要想运行分析,则还需要一个东西。根据官方的文档,有如下内容:
Once the SonarQube platform has been installed, you‘re ready to install an analyzer and begin creating projects. A project is created in the platform automatically on its first analysis. However, if you need to set some configuration on your project before its first analysis, you have the option of provisioning it.
Running Analysis
First, you should install the plugin(s) for the language(s) of the project to be analyzed, either by a direct download or through the update center.
Then, you need to choose an analysis method. The following are available:
Note that we do not recommend running an antivirus on the machine where a SonarQube analysis runs, it could result in unpredictable behavior.
也就是,我们需要下载一个SonarQube Scanner 才能运行代码分析。上面提供了6种,我选择了第一种。下载点这里
1.下载之后,解压到随意目录。假设目录是:D:\develop\sonarqube-6.2\sonar-scanner-2.8
2. 将目录D:\develop\sonarqube-6.2\sonar-scanner-2.8\bin 配置到环境变了path中。
3.打开D:\develop\sonarqube-6.2\sonar-scanner-2.8\conf 下的sonar-scanner.properties 文件,进行如下配置:
#Configure here general information about the environment, such as SonarQube DB details for example
#No information about specific project should appear here

#----- Default SonarQube server
sonar.host.url=http://localhost:9000

#----- Default source code encoding
#sonar.sourceEncoding=UTF-8

#----- Global database settings (not used for SonarQube 5.2+)
sonar.jdbc.username=sonar
sonar.jdbc.password=sonar

#----- PostgreSQL
#sonar.jdbc.url=jdbc:postgresql://localhost/sonar

#----- MySQL
sonar.jdbc.url=jdbc:mysql://localhost:3306/sonar?useUnicode=true&characterEncoding=utf8

#----- Oracle
#sonar.jdbc.url=jdbc:oracle:thin:@localhost/XE

#----- Microsoft SQLServer
#sonar.jdbc.url=jdbc:jtds:sqlserver://localhost/sonar;SelectMethod=Cursor
三、运行代码分析
假设上的步骤你都配合好了。并且,启动了SonarQube。
假设现在有项目myproject,进入到项目的根目录创建一个文件sonar-project.properties,文件内容如下:
# must be unique in a given SonarQube instance
sonar.projectKey=my:myproject    #key是唯一的
# this is the name and version displayed in the SonarQube UI. Was mandatory prior to SonarQube 6.1.
sonar.projectName=myproject   #项目名字
sonar.projectVersion=1.0

# Path is relative to the sonar-project.properties file. Replace "\" by "/" on Windows.
# Since SonarQube 4.2, this property is optional if sonar.modules is set.
# If not set, SonarQube starts looking for source code from the directory containing
# the sonar-project.properties file.
sonar.sources=.

# Encoding of the source code. Default is default system encoding
#sonar.sourceEncoding=UTF-8
进入CMD.进入到项目的目录,就是刚才包含sonar-project.properties文件的这个目录。
执行命令:sonar-scanner
然后就是等待执行结果,大概几分钟吧。成功之后,进入:http://192.168.2.100:9000/
可以看到项目分析的结果,当然了,可能需要等待一会儿才能看到,因为有处理时间,我在运行上面的命令之后,看到cmd窗口成功完成了。马上到这个页面看,发现还没有。
大概一分钟之后刷新,发现,有了!如下所示:
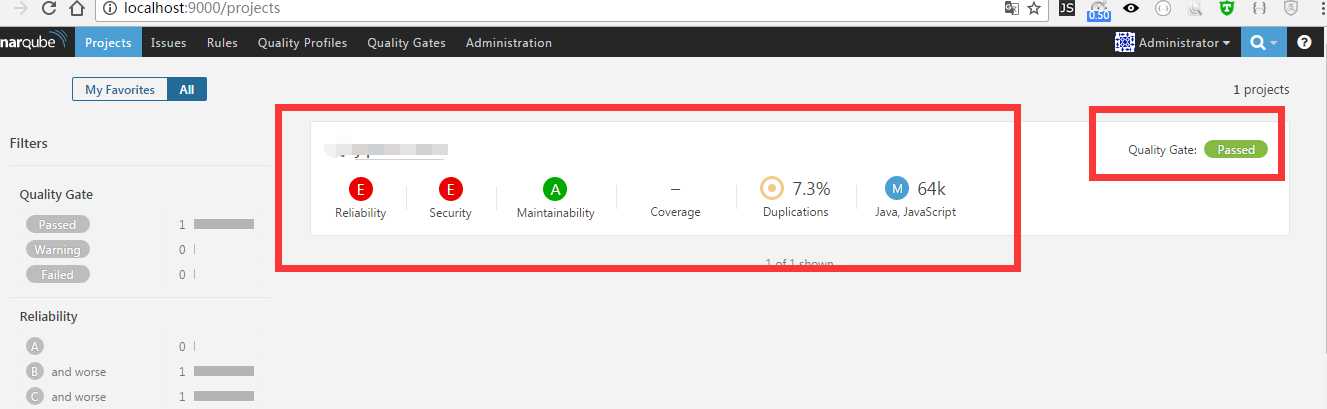
点这个进去看就知道了。里边有很详细的结果汇报。有问题的代码片段展示,并提示如何修改。还是挺好的。
使用 Sonar 检测代码质量
原文:http://www.cnblogs.com/demingblog/p/6270187.html