一、什么是web框架
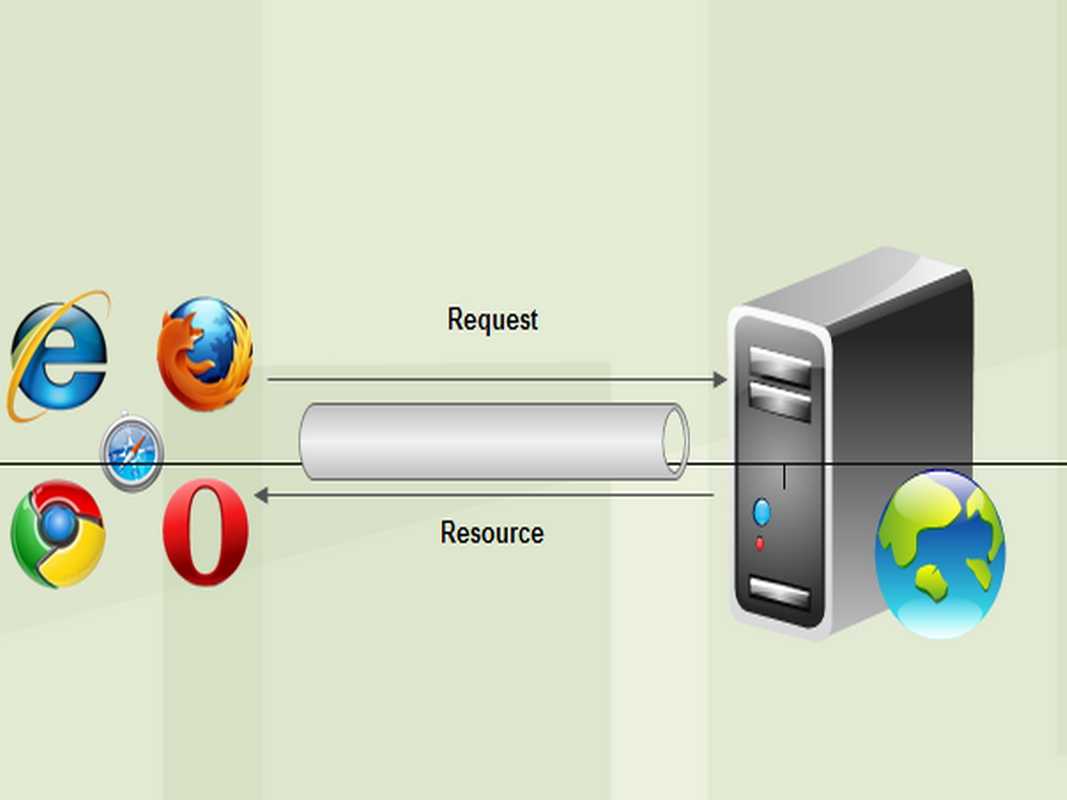
框架,即framework,特指为解决一个开放性问题而设计的具有一定约束性的支撑结构,使用框架可以帮你快速开发特定的系统,简单地说,就是你用别人搭建好的舞台来做表演。 对于所有的Web应用,本质上其实就是一个socket服务端,用户的浏览器其实就是一个socket客户端。
示例:自己写一个框架
最简单的Web应用就是先把HTML用文件保存好,用一个现成的HTTP服务器软件,接收用户请求,从文件中读取HTML,返回。 如果要动态生成HTML,就需要把上述步骤自己来实现。不过,接受HTTP请求、解析HTTP请求、发送HTTP响应都是苦力活,如果我们自己来写这些底层代码,还没开始写动态HTML呢,就得花个把月去读HTTP规范。 正确的做法是底层代码由专门的服务器软件实现,我们用Python专注于生成HTML文档。因为我们不希望接触到TCP连接、HTTP原始请求和响应格式,所以,需要一个统一的接口,让我们专心用Python编写Web业务。 这个接口就是WSGI:Web Server Gateway Interface。
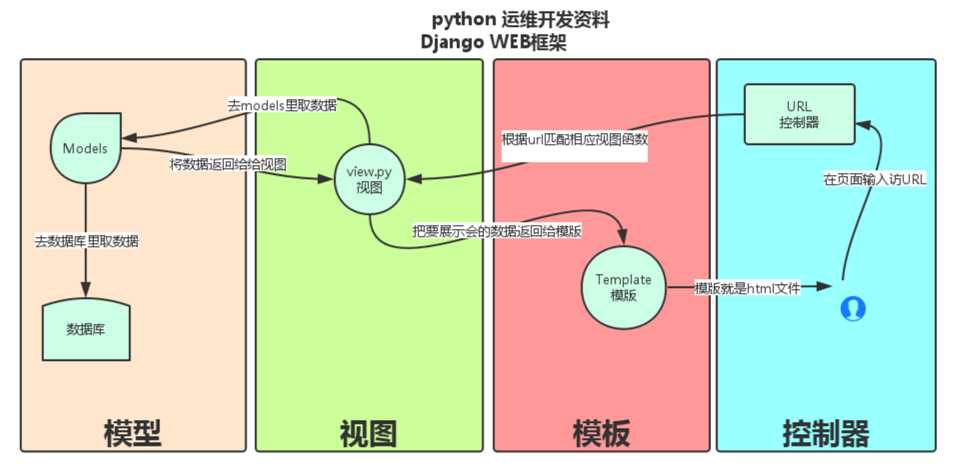
二、MVC和MTV模式
著名的MVC模式:所谓MVC就是把web应用分为模型(M),控制器(C),视图(V)三层;他们之间以一种插件似的,松耦合的方式连接在一起。
模型负责业务对象与数据库的对象(ORM),视图负责与用户的交互(页面),控制器(C)接受用户的输入调用模型和视图完成用户的请求。

Django的MTV模式本质上与MVC模式没有什么差别,也是各组件之间为了保持松耦合关系,只是定义上有些许不同,Django的MTV分别代表:
Model(模型):负责业务对象与数据库的对象(ORM)
Template(模版):负责如何把页面展示给用户
View(视图):负责业务逻辑,并在适当的时候调用Model和Template
此外,Django还有一个url分发器,它的作用是将一个个URL的页面请求分发给不同的view处理,view再调用相应的Model和Template。
django
    #安装: pip3 install django

          添加环境变量

    #1  创建project
       django-admin startproject mysite

       ---mysite

          ---settings.py
          ---url.py
          ---wsgi.py

       ---- manage.py(启动文件)

    #2  创建APP
       python mannage.py startapp  app01

    #3  settings配置

       TEMPLATES

       STATICFILES_DIRS=(
            os.path.join(BASE_DIR,"statics"),
        )

       STATIC_URL = ‘/static/‘
       #  我们只能用 STATIC_URL,但STATIC_URL会按着你的STATICFILES_DIRS去找#4  根据需求设计代码
           url.py
           view.py

    #5  使用模版
       render(req,"index.html")

    #6  启动项目
       python manage.py runserver  127.0.0.1:8090

    #7  连接数据库,操作数据
       model.py
django-admin.py 是Django的一个用于管理任务的命令行工具,manage.py是对django-admin.py的简单包装,每一个Django Project里都会有一个mannage.py。
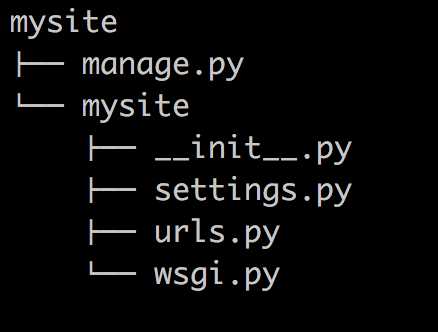
<1> 创建一个django工程 : django-admin.py startproject mysite
当前目录下会生成mysite的工程,目录结构如下:
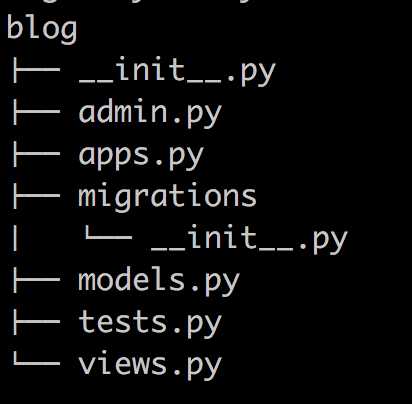
<2>在mysite目录下创建blog应用: python manage.py startapp blog
<3>启动django项目:python manage.py runserver 8080
这样我们的django就启动起来了!当我们访问:http://127.0.0.1:8080/时就可以看到:

<4>生成同步数据库的脚本:python manage.py makemigrations
同步数据库: python manage.py migrate
注意:在开发过程中,数据库同步误操作之后,难免会遇到后面不能同步成功的情况,解决这个问题的一个简单粗暴方法是把migrations目录下
的脚本(除__init__.py之外)全部删掉,再把数据库删掉之后创建一个新的数据库,数据库同步操作再重新做一遍。
<5>当我们访问http://127.0.0.1:8080/admin/时,会出现:
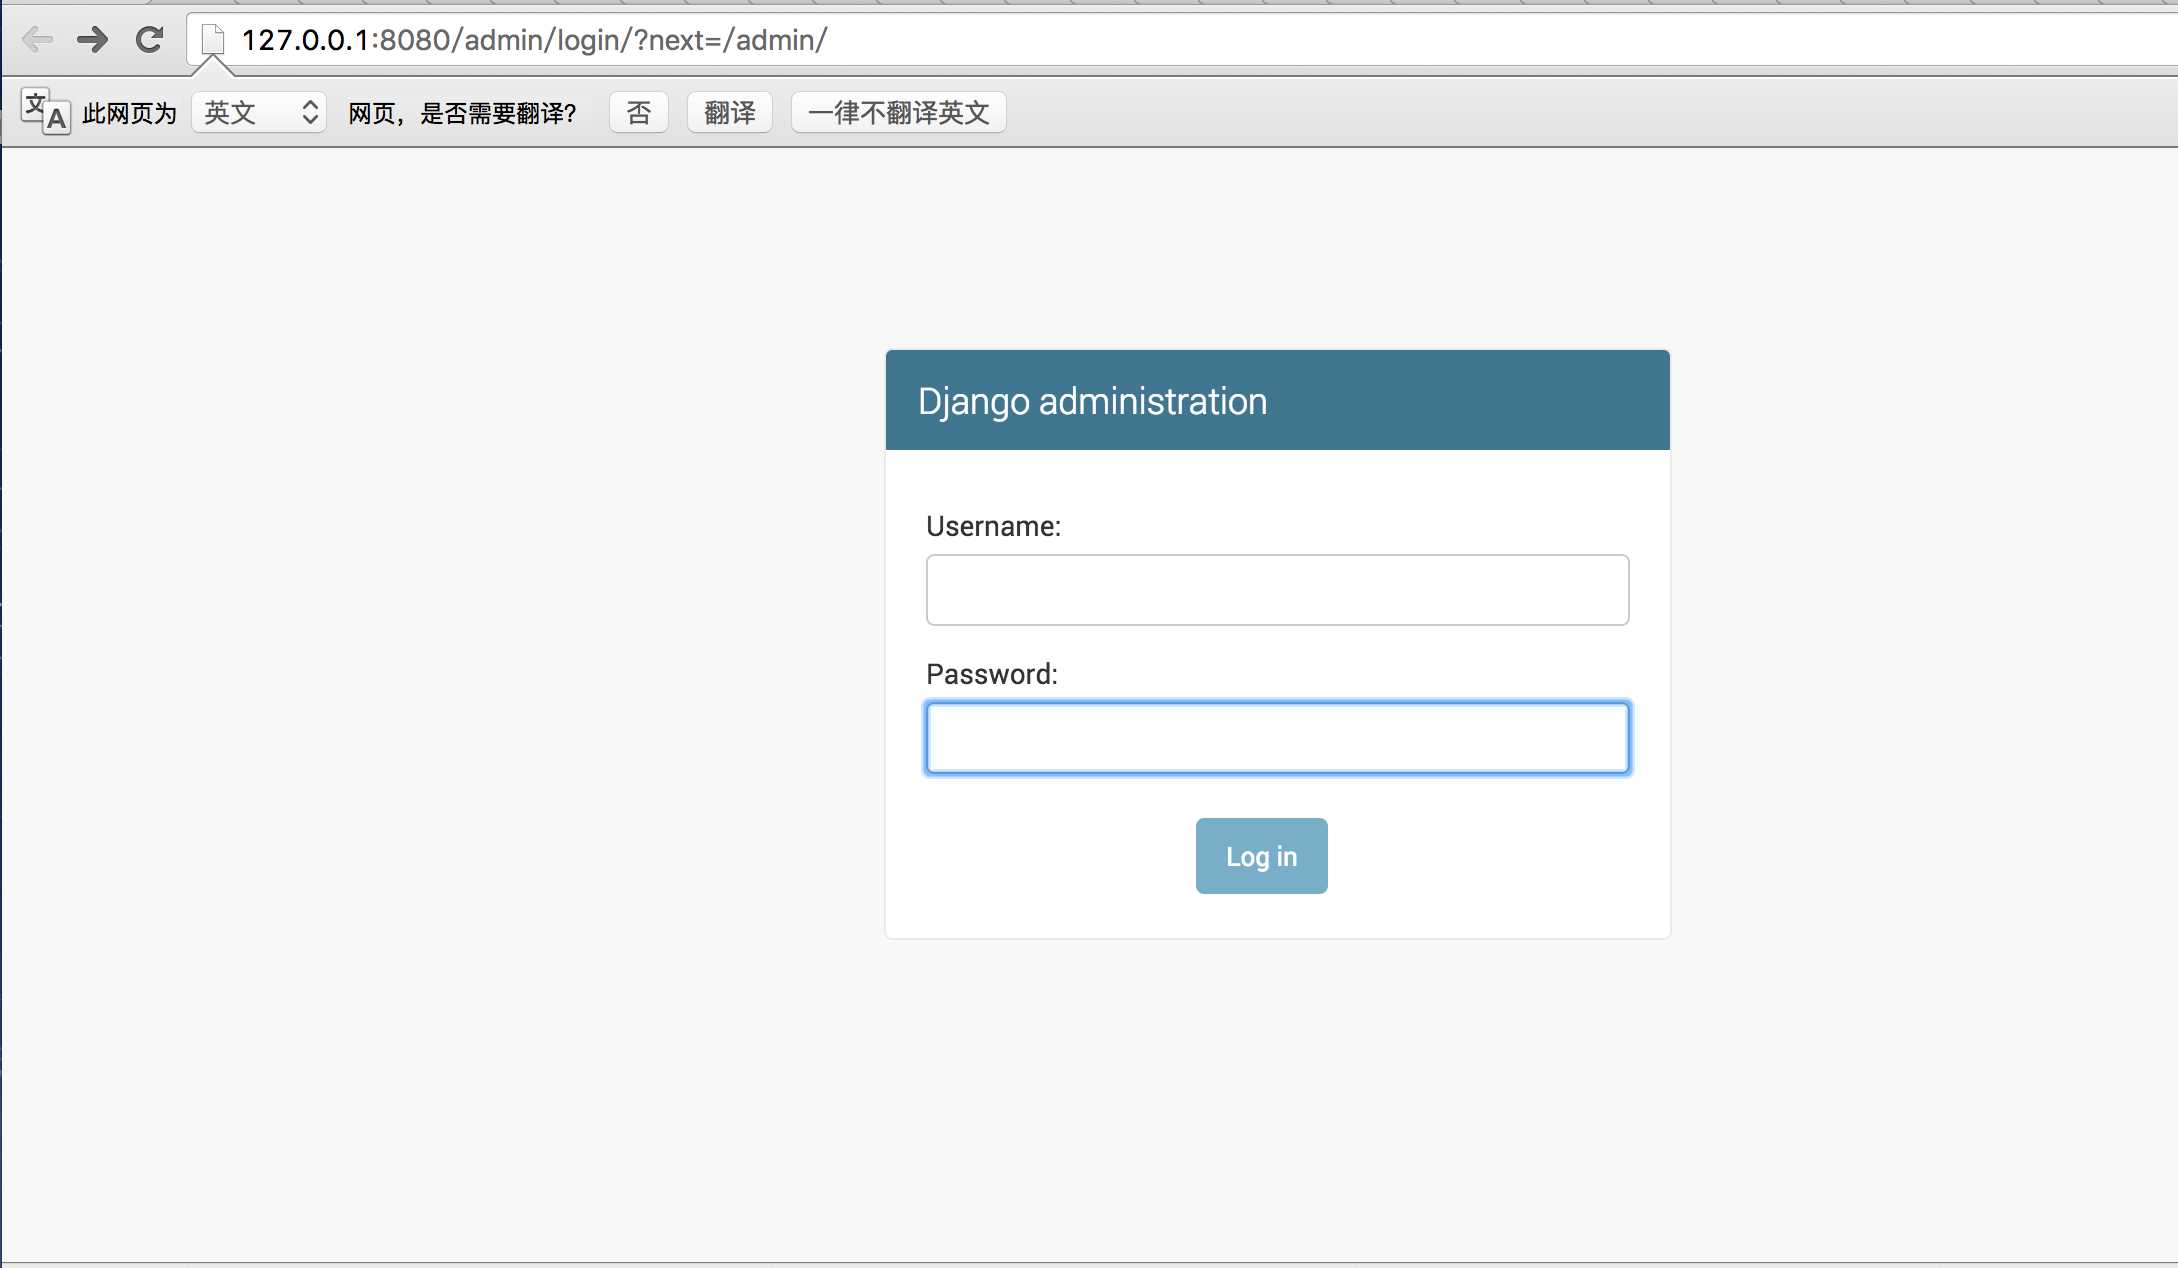
所以我们需要为进入这个项目的后台创建超级管理员:python manage.py createsuperuser,设置好用户名和密码后便可登录啦!
<6>清空数据库:python manage.py flush
<7>查询某个命令的详细信息: django-admin.py help startapp
admin 是Django 自带的一个后台数据库管理系统。
<8>启动交互界面 :python manage.py shell
这个命令和直接运行 python 进入 shell 的区别是:你可以在这个 shell 里面调用当前项目的 models.py 中的 API,对于操作数据,还有一些小测试非常方便。
<9> 终端上输入python manage.py 可以看到详细的列表,在忘记子名称的时候特别有用。
<!DOCTYPE html>
<html lang="en">
<head>
    <meta charset="UTF-8">
    <title>Title</title>
</head>
<body>
<h1>创建个人信息</h1>

<form action="/userInfor/" method="post">

    <p>姓名<input type="text" name="username"></p>
    <p>性别<input type="text" name="sex"></p>
    <p>邮箱<input type="text" name="email"></p>
    <p><input type="submit" value="submit"></p>

</form>

<hr>

<h1>信息展示</h1>

<table border="1">

    <tr>
        <td>姓名</td>
        <td>性别</td>
        <td>邮箱</td>
    </tr>
    {% for i in info_list %}

        <tr>
            <td>{{ i.username }}</td>
            <td>{{ i.sex }}</td>
            <td>{{ i.email }}</td>
        </tr>

    {% endfor %}

</table>

</body>
</html>


-----------------------url.py---------------------------------------
url(r‘^userInfor/‘, views.userInfor)

-----------------------views.py--------------------------------------

info_list=[]

def userInfor(req):

    if req.method=="POST":
        username=req.POST.get("username",None)
        sex=req.POST.get("sex",None)
        email=req.POST.get("email",None)

        info={"username":username,"sex":sex,"email":email}
        info_list.append(info)

    return render(req,"userInfor.html",{"info_list":info_list})
<!DOCTYPE html>
<html lang="en">
<head>
    <meta charset="UTF-8">
    <title>Title</title>
</head>
<body>
<h1>创建个人信息</h1>

<form action="/userInfor/" method="post">

    <p>姓名<input type="text" name="username"></p>
    <p>性别<input type="text" name="sex"></p>
    <p>邮箱<input type="text" name="email"></p>
    <p><input type="submit" value="submit"></p>

</form>

<hr>

<h1>信息展示</h1>

<table border="1">

    <tr>
        <td>姓名</td>
        <td>性别</td>
        <td>邮箱</td>
    </tr>
    {% for i in info_list %}

        <tr>
            <td>{{ i.username }}</td>
            <td>{{ i.sex }}</td>
            <td>{{ i.email }}</td>
        </tr>

    {% endfor %}

</table>

</body>
</html>


----------------------------------------------models.py
from django.db import models

# Create your models here.


class UserInfor(models.Model):

    username=models.CharField(max_length=64)
    sex=models.CharField(max_length=64)
    email=models.CharField(max_length=64)

----------------------------------------------views.py

from django.shortcuts import render

from app01 import models
# Create your views here.


def userInfor(req):

    if req.method=="POST":
        u=req.POST.get("username",None)
        s=req.POST.get("sex",None)
        e=req.POST.get("email",None)


       #---------表中插入数据方式一
            # info={"username":u,"sex":e,"email":e}
            # models.UserInfor.objects.create(**info)

       #---------表中插入数据方式二
        models.UserInfor.objects.create(
            username=u,
            sex=s,
            email=e
        )

        info_list=models.UserInfor.objects.all()

        return render(req,"userInfor.html",{"info_list":info_list})

    return render(req,"userInfor.html")
一、概述:

     #静态文件交由Web服务器处理,Django本身不处理静态文件。简单的处理逻辑如下(以nginx为例):

     #          URI请求-----> 按照Web服务器里面的配置规则先处理,以nginx为例,主要求配置在nginx.
                             #conf里的location

                         |---------->如果是静态文件,则由nginx直接处理

                         |---------->如果不是则交由Django处理,Django根据urls.py里面的规则进行匹配

    # 以上是部署到Web服务器后的处理方式,为了便于开发,Django提供了在开发环境的对静态文件的处理机制,方法是这样:

    #1、在INSTALLED_APPS里面加入‘django.contrib.staticfiles‘,

    #2、在urls.py里面加入
       if settings.DEBUG:
           urlpatterns += patterns(‘‘, url(r‘^media/(?P<path>.*)$‘,
           ‘django.views.static.serve‘, {‘document_root‘: settings.MEDIA_ROOT }),
            url(r‘^static/(?P<path>.*)$‘,
          ‘django.views.static.serve‘,{‘document_root‘:settings.STATIC_ROOT}), )

    # 3、这样就可以在开发阶段直接使用静态文件了。

二、MEDIA_ROOT和MEDIA_URL

        #而静态文件的处理又包括STATIC和MEDIA两类,这往往容易混淆,在Django里面是这样定义的:

        #MEDIA:指用户上传的文件,比如在Model里面的FileFIeld,ImageField上传的文件。如果你定义

        #MEDIA_ROOT=c:\temp\media,那么File=models.FileField(upload_to="abc/")#,上传的文件就会被保存到c:\temp\media\abc
        #eg:
            class blog(models.Model):
                   Title=models.charField(max_length=64)
                   Photo=models.ImageField(upload_to="photo")
        #     上传的图片就上传到c:\temp\media\photo,而在模板中要显示该文件,则在这样写
        #在settings里面设置的MEDIA_ROOT必须是本地路径的绝对路径,一般是这样写:
                 BASE_DIR= os.path.abspath(os.path.dirname(__file__))
                 MEDIA_ROOT=os.path.join(BASE_DIR,‘media/‘).replace(‘\\‘,‘/‘)

        #MEDIA_URL是指从浏览器访问时的地址前缀,举个例子:
            MEDIA_ROOT=c:\temp\media\photo
            MEDIA_URL="/data/"
        #在开发阶段,media的处理由django处理:

        #    访问http://localhost/data/abc/a.png就是访问c:\temp\media\photo\abc\a.png

        #    在模板里面这样写<img src="{{MEDIA_URL}}abc/a.png">

        #    在部署阶段最大的不同在于你必须让web服务器来处理media文件,因此你必须在web服务器中配置,
        #  以便能让web服务器能访问media文件
        #    以nginx为例,可以在nginx.conf里面这样:

                 location ~/media/{
                       root/temp/
                       break;
                    }

        #    具体可以参考如何在nginx部署django的资料。

三、STATIC_ROOT和STATIC_URL、
    STATIC主要指的是如css,js,images这样文件,在settings里面可以配置STATIC_ROOT和STATIC_URL,
    配置方式与MEDIA_ROOT是一样的,但是要注意

    #STATIC文件一般保存在以下位置:

    #1、STATIC_ROOT:在settings里面设置,一般用来放一些公共的js,css,images等。

    #2、app的static文件夹,在每个app所在文夹均可以建立一个static文件夹,然后当运行collectstatic时,
    #    Django会遍历INSTALL_APPS里面所有app的static文件夹,将里面所有的文件复制到STATIC_ROOT。因此,
    #   如果你要建立可复用的app,那么你要将该app所需要的静态文件放在static文件夹中。

    # 也就是说一个项目引用了很多app,那么这个项目所需要的css,images等静态文件是分散在各个app的static文件的,比
    #  较典型的是admin应用。当你要发布时,需要将这些分散的static文件收集到一个地方就是STATIC_ROOT。

    #3、STATIC文件还可以配置STATICFILES_DIRS,指定额外的静态文件存储位置。
    #  STATIC_URL的含义与MEDIA_URL类似。

    # ----------------------------------------------------------------------------
    #注意1:
        #为了后端的更改不会影响前端的引入,避免造成前端大量修改

        STATIC_URL = ‘/static/‘               #引用名
        STATICFILES_DIRS = (
            os.path.join(BASE_DIR,"statics")  #实际名 ,即实际文件夹的名字
        )

        #django对引用名和实际名进行映射,引用时,只能按照引用名来,不能按实际名去找
        #<script src="/statics/jquery-3.1.1.js"></script>
        #------error-----不能直接用,必须用STATIC_URL = ‘/static/‘:
        #<script src="/static/jquery-3.1.1.js"></script>

    #注意2(statics文件夹写在不同的app下,静态文件的调用):

        STATIC_URL = ‘/static/‘

        STATICFILES_DIRS=(
            (‘hello‘,os.path.join(BASE_DIR,"app01","statics")) ,
        )

        #<script src="/static/hello/jquery-1.8.2.min.js"></script>

    #注意3:
        STATIC_URL = ‘/static/‘
        {% load staticfiles %}
       # <script src={% static "jquery-1.8.2.min.js" %}></script>
APPEND_SLASH
       Default: True
       When set to True, if the request URL does not match any of the patterns in the URLconf and it
       doesn’t end in a slash, an HTTP redirect is issued to the same URL with a slash appended. Note
       that the redirect may cause any data submitted in a POST request to be lost.
URL配置(URLconf)就像Django 所支撑网站的目录。它的本质是URL模式以及要为该URL模式调用的视图函数之间的映射表;你就是以这种方式告诉Django,对于这个URL调用这段代码,对于那个URL调用那段代码。
urlpatterns = [
    url(正则表达式, views视图函数,参数,别名),
]
参数说明:
from django.conf.urls import url
from django.contrib import admin

from app01 import views

urlpatterns = [

    url(r‘^articles/2003/$‘, views.special_case_2003),

    #url(r‘^articles/[0-9]{4}/$‘, views.year_archive),

    url(r‘^articles/([0-9]{4})/$‘, views.year_archive),  #no_named group

    url(r‘^articles/([0-9]{4})/([0-9]{2})/$‘, views.month_archive),

    url(r‘^articles/([0-9]{4})/([0-9]{2})/([0-9]+)/$‘, views.article_detail),

]
Note:
#1   There’s no need to add a leading slash, because every URL has that. For
#    example, it’s ^articles, not ^/articles.

#2   A request to /articles/2005/03/ would match the third entry in the list.
#    Django would call the function views.month_archive(request, ‘2005‘, ‘03‘).

#3   /articles/2005/3/ would not match any URL patterns

#4   /articles/2003/ would match the first pattern in the list, not the second one

#5   /articles/2003/03/03/ would match the final pattern. Django would call the
#    functionviews.article_detail(request, ‘2003‘, ‘03‘, ‘03‘).
The above example used simple, non-named regular-expression groups (via parenthesis) to capture bits of the URL and pass them as positional arguments to a view. In more advanced usage, it’s possible to use named regular-expression groups to capture URL bits and pass them as keyword arguments to a view.
In Python regular expressions, the syntax for named regular-expression groups is (?P<name>pattern), where name is the name of the group and pattern is some pattern to match.
Here’s the above example URLconf, rewritten to use named groups:
import re

ret=re.search(‘(?P<id>\d{3})/(?P<name>\w{3})‘,‘weeew34ttt123/ooo‘)

print(ret.group())
print(ret.group(‘id‘))
print(ret.group(‘name‘))

ready
from django.conf.urls import url

from . import views

urlpatterns = [
    url(r‘^articles/2003/$‘, views.special_case_2003),
    url(r‘^articles/(?P<year>[0-9]{4})/$‘, views.year_archive),
    url(r‘^articles/(?P<year>[0-9]{4})/(?P<month>[0-9]{2})/$‘, views.month_archive),
    url(r‘^articles/(?P<year>[0-9]{4})/(?P<month>[0-9]{2})/(?P<day>[0-9]{2})/$‘, views.article_detail),
]
This accomplishes exactly the same thing as the previous example, with one subtle difference: The captured values are passed to view functions as keyword arguments rather than positional arguments.
URLconfs have a hook that lets you pass extra arguments to your view functions, as a Python dictionary.
The django.conf.urls.url() function can take an optional third argument which should be a dictionary of extra keyword arguments to pass to the view function.
For example:
from django.conf.urls import url
from . import views

urlpatterns = [
    url(r‘^blog/(?P<year>[0-9]{4})/$‘, views.year_archive, {‘foo‘: ‘bar‘}),
]
In this example, for a request to /blog/2005/, Django will call views.year_archive(request, year=‘2005‘,foo=‘bar‘).
This technique is used in the syndication framework to pass metadata and options to views.
Dealing with conflicts
It’s possible to have a URL pattern which captures named keyword arguments, and also passes arguments with the same names in its dictionary of extra arguments. When this happens, the arguments in the dictionary will be used instead of the arguments captured in the URL.
urlpatterns = [
    url(r‘^index‘,views.index,name=‘bieming‘),
    url(r‘^admin/‘, admin.site.urls),
    # url(r‘^articles/2003/$‘, views.special_case_2003),
    url(r‘^articles/([0-9]{4})/$‘, views.year_archive),
    # url(r‘^articles/([0-9]{4})/([0-9]{2})/$‘, views.month_archive),
    # url(r‘^articles/([0-9]{4})/([0-9]{2})/([0-9]+)/$‘, views.article_detail),

]
###################

def index(req):
    if req.method==‘POST‘:
        username=req.POST.get(‘username‘)
        password=req.POST.get(‘password‘)
        if username==‘alex‘ and password==‘123‘:
            return HttpResponse("登陆成功")


    return render(req,‘index.html‘)

#####################

<!DOCTYPE html>
<html lang="en">
<head>
    <meta charset="UTF-8">
    <title>Title</title>
</head>
<body>
{#     <form action="/index/" method="post">#}
     <form action="{% url ‘bieming‘ %}" method="post">
         用户名:<input type="text" name="username">
         密码:<input type="password" name="password">
         <input type="submit" value="submit">
     </form>
</body>
</html>


#######################
#At any point, your urlpatterns can “include” other URLconf modules. This
#essentially “roots” a set of URLs below other ones.

#For example, here’s an excerpt of the URLconf for the Django website itself.
#It includes a number of other URLconfs:


from django.conf.urls import include, url

urlpatterns = [
   url(r‘^admin/‘, admin.site.urls),
   url(r‘^blog/‘, include(‘blog.urls‘)),
]
http请求中产生两个核心对象:
http请求:HttpRequest对象
http响应:HttpResponse对象
所在位置:django.http
之前我们用到的参数request就是HttpRequest 检测方法:isinstance(request,HttpRequest)
# path:       请求页面的全路径,不包括域名
#
# method:     请求中使用的HTTP方法的字符串表示。全大写表示。例如
#
#                    if  req.method=="GET":
#
#                              do_something()
#
#                    elseif req.method=="POST":
#
#                              do_something_else()
#
# GET:         包含所有HTTP GET参数的类字典对象
#
# POST:       包含所有HTTP POST参数的类字典对象
#
#              服务器收到空的POST请求的情况也是可能发生的,也就是说,表单form通过
#              HTTP POST方法提交请求,但是表单中可能没有数据,因此不能使用
#              if req.POST来判断是否使用了HTTP POST 方法;应该使用  if req.method=="POST"
#
#
#
# COOKIES:     包含所有cookies的标准Python字典对象;keys和values都是字符串。
#
# FILES:      包含所有上传文件的类字典对象;FILES中的每一个Key都是<input type="file" name="" />标签中                     name属性的值,FILES中的每一个value同时也是一个标准的python字典对象,包含下面三个Keys:
#
#             filename:      上传文件名,用字符串表示
#             content_type:   上传文件的Content Type
#             content:       上传文件的原始内容
#
#
# user:       是一个django.contrib.auth.models.User对象,代表当前登陆的用户。如果访问用户当前
#              没有登陆,user将被初始化为django.contrib.auth.models.AnonymousUser的实例。你
#              可以通过user的is_authenticated()方法来辨别用户是否登陆:
#              if req.user.is_authenticated();只有激活Django中的AuthenticationMiddleware
#              时该属性才可用
#
# session:    唯一可读写的属性,代表当前会话的字典对象;自己有激活Django中的session支持时该属性才可用。

#方法
get_full_path(),   比如:http://127.0.0.1:8000/index33/?name=123 ,req.get_full_path()得到的结果就是/index33/?name=123
req.path:/index33
对于HttpRequest对象来说,是由django自动创建的,但是,HttpResponse对象就必须我们自己创建。每个view请求处理方法必须返回一个HttpResponse对象。
HttpResponse类在django.http.HttpResponse
在HttpResponse对象上扩展的常用方法:
页面渲染:         render()(推荐)
                 render_to_response(),
页面跳转:         redirect("路径")
locals():    可以直接将函数中所有的变量传给模板
补充:
-----------------------------------url.py

 url(r"login",   views.login),
 url(r"yuan_back",   views.yuan_back),

-----------------------------------views.py
def login(req):
    if req.method=="POST":
        if 1:
            # return redirect("/yuan_back/")
            name="yuanhao"

            return render(req,"my backend.html",locals())

    return render(req,"login.html",locals())


def yuan_back(req):

    name="苑昊"

    return render(req,"my backend.html",locals())

-----------------------------------login.html

<form action="/login/" method="post">
    <p>姓名<input type="text" name="username"></p>
    <p>性别<input type="text" name="sex"></p>
    <p>邮箱<input type="text" name="email"></p>
    <p><input type="submit" value="submit"></p>
</form>
-----------------------------------my backend.html
<h1>用户{{ name }}你好</h1>

#总结: render和redirect的区别:
#   1 if render的页面需要模板语言渲染,需要的将数据库的数据加载到html,那么所有的这一部分
#     除了写在yuan_back的视图函数中,必须还要写在login中,代码重复,没有解耦.

#   2 the most important: url没有跳转到/yuan_back/,而是还在/login/,所以当刷新后
#     又得重新登录.
一、概述:
#静态文件交由Web服务器处理,Django本身不处理静态文件。简单的处理逻辑如下(以nginx为例):
# URI请求-----> 按照Web服务器里面的配置规则先处理,以nginx为例,主要求配置在nginx. #conf里的location
|---------->如果是静态文件,则由nginx直接处理
|---------->如果不是则交由Django处理,Django根据urls.py里面的规则进行匹配
# 以上是部署到Web服务器后的处理方式,为了便于开发,Django提供了在开发环境的对静态文件的处理机制,方法是这样:
#1、在INSTALLED_APPS里面加入‘django.contrib.staticfiles‘,
#2、在urls.py里面加入 if settings.DEBUG: urlpatterns += patterns(‘‘, url(r‘^media/(?P<path>.*)$‘, ‘django.views.static.serve‘, {‘document_root‘: settings.MEDIA_ROOT }), url(r‘^static/(?P<path>.*)$‘, ‘django.views.static.serve‘,{‘document_root‘:settings.STATIC_ROOT}), )
# 3、这样就可以在开发阶段直接使用静态文件了。
二、MEDIA_ROOT和MEDIA_URL
#而静态文件的处理又包括STATIC和MEDIA两类,这往往容易混淆,在Django里面是这样定义的:
#MEDIA:指用户上传的文件,比如在Model里面的FileFIeld,ImageField上传的文件。如果你定义
#MEDIA_ROOT=c:\temp\media,那么File=models.FileField(upload_to="abc/")#,上传的文件就会被保存到c:\temp\media\abc #eg: class blog(models.Model): Title=models.charField(max_length=64) Photo=models.ImageField(upload_to="photo") # 上传的图片就上传到c:\temp\media\photo,而在模板中要显示该文件,则在这样写 #在settings里面设置的MEDIA_ROOT必须是本地路径的绝对路径,一般是这样写: BASE_DIR= os.path.abspath(os.path.dirname(__file__)) MEDIA_ROOT=os.path.join(BASE_DIR,‘media/‘).replace(‘\\‘,‘/‘)
#MEDIA_URL是指从浏览器访问时的地址前缀,举个例子: MEDIA_ROOT=c:\temp\media\photo MEDIA_URL="/data/" #在开发阶段,media的处理由django处理:
# 访问http://localhost/data/abc/a.png就是访问c:\temp\media\photo\abc\a.png
# 在模板里面这样写<img src="{{MEDIA_URL}}abc/a.png">
# 在部署阶段最大的不同在于你必须让web服务器来处理media文件,因此你必须在web服务器中配置, # 以便能让web服务器能访问media文件 # 以nginx为例,可以在nginx.conf里面这样:
location ~/media/{ root/temp/ break; }
# 具体可以参考如何在nginx部署django的资料。
三、STATIC_ROOT和STATIC_URL、 STATIC主要指的是如css,js,images这样文件,在settings里面可以配置STATIC_ROOT和STATIC_URL, 配置方式与MEDIA_ROOT是一样的,但是要注意
#STATIC文件一般保存在以下位置:
#1、STATIC_ROOT:在settings里面设置,一般用来放一些公共的js,css,images等。
#2、app的static文件夹,在每个app所在文夹均可以建立一个static文件夹,然后当运行collectstatic时, # Django会遍历INSTALL_APPS里面所有app的static文件夹,将里面所有的文件复制到STATIC_ROOT。因此, # 如果你要建立可复用的app,那么你要将该app所需要的静态文件放在static文件夹中。
# 也就是说一个项目引用了很多app,那么这个项目所需要的css,images等静态文件是分散在各个app的static文件的,比 # 较典型的是admin应用。当你要发布时,需要将这些分散的static文件收集到一个地方就是STATIC_ROOT。
#3、STATIC文件还可以配置STATICFILES_DIRS,指定额外的静态文件存储位置。 # STATIC_URL的含义与MEDIA_URL类似。
# ---------------------------------------------------------------------------- #注意1: #为了后端的更改不会影响前端的引入,避免造成前端大量修改
STATIC_URL = ‘/static/‘ #引用名 STATICFILES_DIRS = ( os.path.join(BASE_DIR,"statics") #实际名 ,即实际文件夹的名字 )
#django对引用名和实际名进行映射,引用时,只能按照引用名来,不能按实际名去找 #<script src="/statics/jquery-3.1.1.js"></script> #------error-----不能直接用,必须用STATIC_URL = ‘/static/‘: #<script src="/static/jquery-3.1.1.js"></script>
#注意2(statics文件夹写在不同的app下,静态文件的调用):
STATIC_URL = ‘/static/‘
STATICFILES_DIRS=( (‘hello‘,os.path.join(BASE_DIR,"app01","statics")) , )
#<script src="/static/hello/jquery-1.8.2.min.js"></script>
#注意3: STATIC_URL = ‘/static/‘ {% load staticfiles %} # <script src={% static "jquery-1.8.2.min.js" %}></script>
原文:http://www.cnblogs.com/nulige/p/6475756.html