|
cpu |
i5 6代 |
|
内存容量 |
8G |
|
gpu |
GTX960 |
|
显存容量 |
2G(建议显存在4G以上,否则一些稍具规模的神经网络无法训练,会提示显存容量不足) |
|
安装包 |
重要依赖 |
|
安装ubuntu 14.04 |
|
|
安装显卡驱动 nvidia-367 |
|
|
安装cuda tool kit 8.0 |
|
|
安装cuDNN v5 |
安装版本取决于cuda toolkit版本 |
|
*安装基本工具包 右键终端 git |
|
|
*Python工具 pip 1.5.4 ipython 1.2.1 ipython-notebook *安装python基本科学计算包 python-numpy 1.11.1 python-scipy 0.18.1 python-matplotlib 1.3.1 python-pandas 0.13.1 python-sympy 0.7.4.1 python-nose 1.3.1 |
|
|
安装Qt4(c++) 和 PyQt4 |
|
|
安装wxWidgets(c++) 2.8 和 wxPython |
|
|
安装wine |
|
|
安装程序开发环境 codeblocks 16.04 sublime pycharm matlab source insight |
wxWidgets
wine |
|
安装 cmake 3.2.2 cmake-qt-gui |
Qt |
|
安装boost 1.54.0 |
|
|
*安装BLAS |
|
|
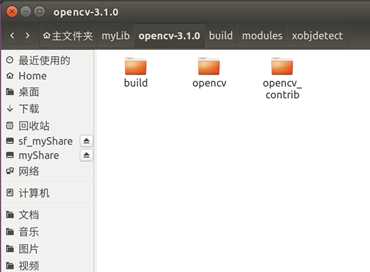
安装opencv 3.1.0 |
cmake >= 3.2.2 (3.2.2) Qt (选装) CUDA (选装) Matlab (选装) |
|
安装PyCUDA v5 |
gcc > 4.3 (4.8.2) Boost C++ libraries (1.54.0) numpy (1.8.2) |
|
安装theano 0.8.0 |
*Requirements************************ Python 2 >= 2.6 or Python 3 >= 3.3 (python2.7) g++ >= 4.2 (4.8.2) NumPy >= 1.7.1 (1.11.1) SciPy >= 0.11 (0.18.1) A BLAS (可选) (openblas 0.2.8) *Optional***************************** nose >= 1.3.0 (1.3.1) nose-parameterized >= 0.5.0 Sphinx >= 0.5.1 pygments Git graphiz either pydot-ng or pydot NVIDIA CUDA drivers and SDK-v4 (PyCUDA v5) libgpuarray |
|
安装lasagne 0.2.dev1 |
Theano==0.8.0 (0.8.0) Python >=2.7 or >=3.4 (python2.7) numpy >= 1.6.2 (1.11.1) scipy >= 0.11 (0.18.1) BLAS (可选) (openblas 0.2.8) pip C compiler |
|
安装caffe 1.0.0-rc3 |
*Requirments********************** CUDA >=6 BLAS (ATLAS, MKL, or OpenBLAS) Boost >= 1.55 protobuf, glog, gflags, hdf5 *Optional************************** OpenCV >= 2.4 including 3.0 IO libraries: lmdb, leveldb (note: leveldb requires snappy) cuDNN for GPU acceleration (>=v4) |
|
安装TensorFlow 0.12.1 |
numpy 1.11.1 CUDA 8.0 cuDNN v5.1 |
使用ultraiso工具制作u盘启动,安装Ubuntu14.04LTS。120G固态硬盘分区方案
|
/ |
50G |
|
/swap |
8G(与内存大小相同) |
|
/home |
62G |
手动添加源
|
##Mirrors.shlug.org更新服务器(电信服务器,Ubuntu China Official Mirror, maintained by Shanghai Linux User Group): deb http://cn.archive.ubuntu.com/ubuntu hardy main restricted universe multiverse deb http://cn.archive.ubuntu.com/ubuntu hardy-security main restricted universe multiverse deb http://cn.archive.ubuntu.com/ubuntu hardy-updates main restricted universe multiverse deb http://cn.archive.ubuntu.com/ubuntu hardy-backports main restricted universe multiverse deb http://cn.archive.ubuntu.com/ubuntu hardy-proposed main restricted universe multiverse deb-src http://cn.archive.ubuntu.com/ubuntu hardy main restricted universe multiverse deb-src http://cn.archive.ubuntu.com/ubuntu hardy-security main restricted universe multiverse deb-src http://cn.archive.ubuntu.com/ubuntu hardy-updates main restricted universe multiverse deb-src http://cn.archive.ubuntu.com/ubuntu hardy-backports main restricted universe multiverse deb-src http://cn.archive.ubuntu.com/ubuntu hardy-proposed main restricted universe multiverse
##成都市电子科技大学更新服务器(校园网) deb http://ubuntu.uestc.edu.cn/ubuntu/ hardy main multiverse restricted universe deb http://ubuntu.uestc.edu.cn/ubuntu/ hardy-backports main multiverse restricted universe deb http://ubuntu.uestc.edu.cn/ubuntu/ hardy-proposed main multiverse restricted universe deb http://ubuntu.uestc.edu.cn/ubuntu/ hardy-security main multiverse restricted universe deb http://ubuntu.uestc.edu.cn/ubuntu/ hardy-updates main multiverse restricted universe deb-src http://ubuntu.uestc.edu.cn/ubuntu/ hardy main multiverse restricted universe deb-src http://ubuntu.uestc.edu.cn/ubuntu/ hardy-backports main multiverse restricted universe deb-src http://ubuntu.uestc.edu.cn/ubuntu/ hardy-proposed main multiverse restricted universe deb-src http://ubuntu.uestc.edu.cn/ubuntu/ hardy-security main multiverse restricted universe deb-src http://ubuntu.uestc.edu.cn/ubuntu/ hardy-updates main multiverse restricted universe
##上海市上海交通大学更新服务器(校园网) deb http://ftp.sjtu.edu.cn/ubuntu/ hardy main multiverse restricted universe deb http://ftp.sjtu.edu.cn/ubuntu/ hardy-backports main multiverse restricted universe deb http://ftp.sjtu.edu.cn/ubuntu/ hardy-proposed main multiverse restricted universe deb http://ftp.sjtu.edu.cn/ubuntu/ hardy-security main multiverse restricted universe deb http://ftp.sjtu.edu.cn/ubuntu/ hardy-updates main multiverse restricted universe deb-src http://ftp.sjtu.edu.cn/ubuntu/ hardy main multiverse restricted universe deb-src http://ftp.sjtu.edu.cn/ubuntu/ hardy-backports main multiverse restricted universe deb-src http://ftp.sjtu.edu.cn/ubuntu/ hardy-proposed main multiverse restricted universe deb-src http://ftp.sjtu.edu.cn/ubuntu/ hardy-security main multiverse restricted universe deb-src http://ftp.sjtu.edu.cn/ubuntu/ hardy-updates main multiverse restricted universe
## 官方源 deb http://archive.ubuntu.com/ubuntu/ hardy main restricted universe multiverse deb http://archive.ubuntu.com/ubuntu/ hardy-security main restricted universe multiverse deb http://archive.ubuntu.com/ubuntu/ hardy-updates main restricted universe multiverse deb http://archive.ubuntu.com/ubuntu/ hardy-proposed main restricted universe multiverse deb http://archive.ubuntu.com/ubuntu/ hardy-backports main restricted universe multiverse deb-src http://archive.ubuntu.com/ubuntu/ hardy main restricted universe multiverse deb-src http://archive.ubuntu.com/ubuntu/ hardy-security main restricted universe multiverse deb-src http://archive.ubuntu.com/ubuntu/ hardy-updates main restricted universe multiverse deb-src http://archive.ubuntu.com/ubuntu/ hardy-proposed main restricted universe multiverse deb-src http://archive.ubuntu.com/ubuntu/ hardy-backports main restricted universe multiverse |
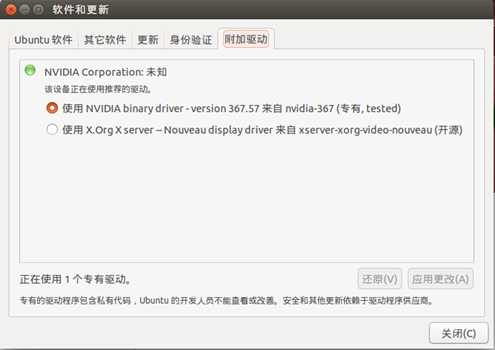
Ubuntu14.04默认使用Nouveau显卡驱动。由于linux系统对Navidia显卡的兼容性并不是特别好,所以选择使用闭源N卡官方驱动,在启动器搜索附加驱动程序。
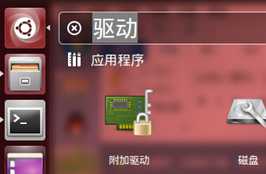
在附加驱动面板中,选择NVIDIA binary driver(闭源驱动) 367,然后点击应用更改。Reboot后,驱动就安装成功了。
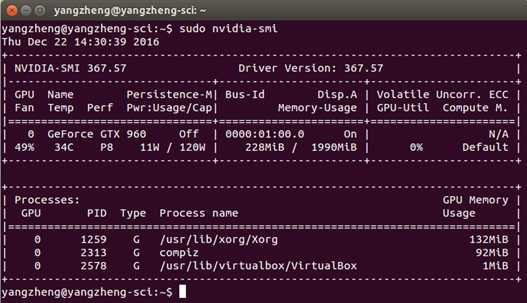
Terminal输入:sudo nvidia-smi查看显卡及驱动信息
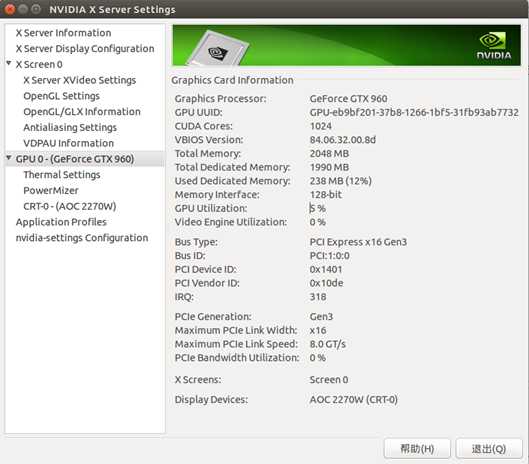
也可以Terminal输入:nvidia-settings,在nvidia驱动管理器中查看
以上方法最为保险,在ubuntu14.04不会出现登录界面loop的问题。
一般说来ubuntu源里面提供的都不是包的最新版本,如果想安装最新版驱动可以去(http://www.nvidia.cn/Download/index.aspx?lang=cn)下载
附:网上有另一种方法安装驱动(但是在ubuntu16.04LTS按照此方法安装后出现登录界面loop问题)
参考:http://blog.csdn.net/solar_paper/article/details/52969212
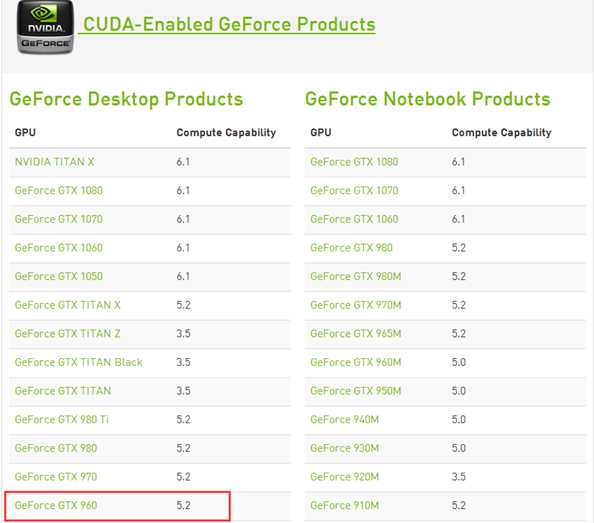
首先cuda toolkit是什么?
官方网站上说:The NVIDIA? CUDA? Toolkit provides a comprehensive development environment for C and C++ developers building GPU-accelerated applications.
也就是说,CUDA Toolkit是一个提供C/C++接口使用GPU加速计算的工具包。要想使用NVIDIA GPU加速计算(GPU浮点运算能力比CPU高几十倍),必须安装CUDA Toolkit,当然前提是你的N卡是CUDA核心。(https://developer.nvidia.com/cuda-gpus 网站可以查看你的设备是否支持CUDA Toolkit)
比如我的显卡是NVIDIA GeForce GTX960,明显支持CUDA,计算性能5.2分。
安装:
1. 首先去(https://developer.nvidia.com/cuda-downloads )下载安装包,推荐下载runfile安装
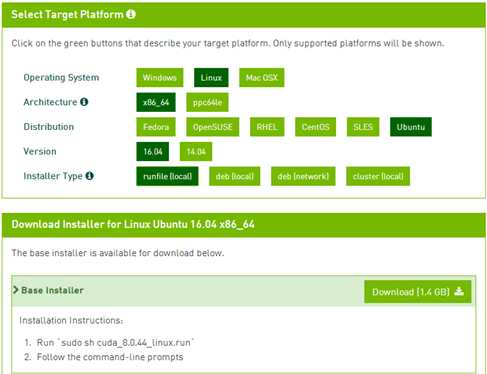
我下载的是CUDA Toolkit 8.0 : cuda_8.0.44_linux.run
2. 然后执行安装命令: sudo sh cuda_8.0.44_linux.run
[注意:执行此句会有一系列提示让你确认,但是注意,有个让你选择是否安装nvidia361驱动,Install NVIDIA Accelerated Graphics Driver for Linux-x86_64 361.62?
一定要选择否。因为前面我们已经安装了更加新的nvidia 367,所以这里不要选择安装。其余的都直接默认或者选择是即可。]
3. 最后配置环境变量,输入如下命令打开profile
sudo gedit /etc/profile
在最后加入以下两行,保存并退出。
export PATH=/usr/local/cuda-8.0/bin:$PATH
export LD_LIBRARY_PATH=/usr/local/cuda-8.0/lib64:$LD_LIBRARY_PATH
使配置生效
source /etc/profile
或者
sudo ldconfig 也可以
4. 验证CUDA安装成功
Terminal 输入 nvcc –V 查看CUDA版本信息

什么是cuDNN?
官网说法:NVIDIA cuDNN is a GPU-accelerated library of primitives for deep neural networks.
即cuDNN是专门针对Deep Learning框架设计的一套GPU计算加速方案,目前支持的DL库包括Caffe,ConvNet, Torch7等。
安装:
1.首先下载cuDNN包(https://developer.nvidia.com/rdp/cudnn-download)
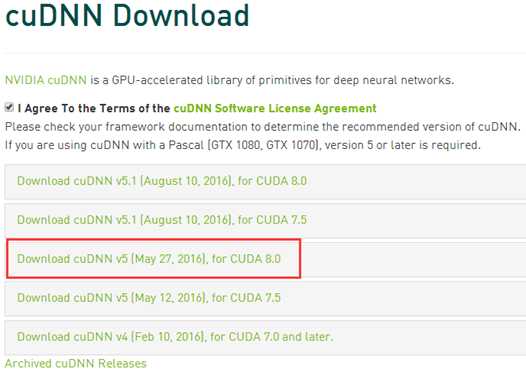
由于cuDNN源代码暂时未公开,下载需要确认适用CUDA Toolkit版本。我选择CuDNN v5 for CUDA 8.0。
2.下载完毕并解压后得到:
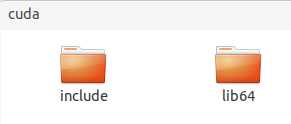

3.安装cuDNN
#只需要把头文件和动态库文件拷贝到系统中的CUDA Tookit安装目录的相应位置即可
cd /cuda
sudo cp ./lib64/* /usr/local/cuda/lib64/
sudo cp ./include/cudnn.h /usr/local/cuda/include/
sudo apt-get install nautilus-open-terminal
sudo apt-get install git git-gui
sudo apt-get install python-pip
$ sudo apt-get install python-numpy python-scipy python-matplotlib ipython ipython-notebook python-pandas python-sympy python-nose --fix-missing
|
numpy |
1.8.2 |
|
scipy |
0.18.1 |
|
matplotlib |
1.3.1 |
|
pandas |
0.13.1 |
|
sympy |
0.7.4.1 |
|
nose |
1.3.1 |
安装指定版本的numpy可以去(https://sourceforge.net/projects/numpy/files/ )下载源码包,然后执行指令:
sudo python setup.py install
Qt GUI框架
$ sudo apt-get install libqt4-dev libqt4-gui qt4-qtconfig libqt4-sql qt4-dev-tools qt4-doc qt4-demos qt4-designer –fix-missing
# libqt4-gui 安装出现错误 E: 无法定位软件包 libqt4-gui,可以去掉
# 这一步安装建议使用sudo aptitude install ...解决包间依赖问题
|
qt4-dev-tools |
包含了Qt Assistant及Qt Linguist等工具,因此不需要单独安装这两个工具。 |
|
qt4-doc |
是帮助文档,包含了Qt中各个类库的详细说明以及丰富的例子程序,可以使用Qt Assistant 工具来打开阅读。 |
|
qt4-qtconfig |
是配置Qt环境的一个对话框,一般默认就行了,很少有必要去更改。 |
|
qt4-demos |
包含很多可以运行起来的可执行文件以及源代码。 |
|
qt4-designer |
是用来设计GUI界面的设计器。 |
$ sudo apt-get install libqt4-sql-mysql
Qwt,全称是Qt Widgets for Technical Applications,是一个基于LGPL版权协议的开源项目, 可生成各种统计图。它为具有技术专业背景的程序提供GUI组件和一组实用类,其目标是以基于2D方式的窗体部件来显示数据, 数据源以数值,数组或一组浮点数等方式提供, 输出方式可以是Curves(曲线),Slider(滚动条),Dials(圆盘),Compasses(仪表盘)等等。该工具库基于Qt开发,所以也继承了Qt的跨平台特性。

$ sudo apt-get install libqwt5-qt4 libqwt5-qt4-dev
注:安装完这些后,打开Qt Designer,就会发现左边的Widget列表里面多了"Qwt Widget"这一组;
这个肯定是要装的可以方便的开发编译调试Qt程序
$ sudo apt-get install qdevelop
附:当然也可以通过官网(http://download.qt.io/archive/qt/ )下载源代码,编译安装。但做一般开发apt-get安装足够。
PyQt是Qt库的Python接口
$ sudo apt-get install libxext6 libxext-dev libqt4-dev libqt4-sql qt4-dev-tools qt4-doc qt4-designer qt4-qtconfig "python-qt4-*" python-qt4 --fix-missing
#绿色部分是Qt c++已安装的包
由于codeblocks的GUI界面使用的wxWidgets库所以要先安装这个库。尽量下载官方的最新稳定版本(官网http://www.wxwidgets.org/downloads/ 查看最新版本)
$ sudo apt-get install libwxbase2.8 libwxbase2.8-dev libwxgtk2.8-0 libwxgtk2.8-dev libgtk2.0 libgtk2.0-dev wx-common wx2.8-headers wx2.8-i18n wx2.8-examples wx2.8-doc –fix-missing
# 貌似2.8已经没有了
$ sudo apt-get install libwxbase3.0 libwxbase3.0-dev libwxgtk3.0 libwxgtk3.0-dev wx-common wx3.0-headers wx3.0-i18n wx3.0-examples wx3.0-doc --fix-missing
$ apt-cache search wxpython
$ sudo apt-get install python-wxgtk2.8 python-wxtools wx2.8-i18n libwxgtk2.8-dev libgtk2.0-dev --fix-missing
#绿色部分是wxWidgets c++已安装的包
sudo apt-get install python-wxgtk3.0 python-wxtools --fix-missing
wxformbuilder功能类似Qt Designer,均为可视化的窗口设计器,只是针对框架不同。
默认情况下,ubuntu 14.04/14.10 系统使用apt-get从系统的源或网易163的源默认安装的是libwxgtk2.8, wxformbuild3.0,安装之后是不能支持生成Python代码的,需要添加新的源才能解决此问题:
sudo add-apt-repository -y ppa:wxformbuilder/wxwidgets
sudo add-apt-repository -y ppa:wxformbuilder/release
sudo apt-get update
sudo apt-get install wxformbuilder
wine是一个在linux系统安装exe安装包的工具
$sudo apt-get install wine
#安装中途问你是否安装一个licence,选择OK即可
sudo apt-get install build-essential
sudo apt-get install gdb
直接使用apt-get是不能安装codeblocks最新版本的,所以需要更新来源使用ppa安装
sudo add-apt-repository ppa:damien-moore/codeblocks-stable #添加codeblocks的PPA源
sudo apt-get update #跟新系统的源
sudo apt-get install codeblocks codeblocks-contrib #安装codeblocks
终端输入:$ sudo gedit /usr/share/applications/Pycharm.desktop #创建快捷方式文件
粘贴模板:
[Desktop Entry]
Type=Application
Name=Pycharm
GenericName=Pycharm3
Comment=Pycharm3:The Python IDE
Exec=sh /YOUR/PATH/TO/PYCHARM/bin/pycharm.sh
Icon=/YOUR/PATH/TO/PYCHARM/bin/pycharm.png
Terminal=pycharm
Categories=Pycharm;
专业版注册码
|
43B4A73YYJ-eyJsaWNlbnNlSWQiOiI0M0I0QTczWVlKIiwibGljZW5zZWVOYW1lIjoibGFuIHl1IiwiYXNza |
从网盘上下载安装包以及Crack (https://pan.baidu.com/s/1gf9IeCN ), password: 4gj3
Crack中包含license和破解文件
$ sudo mkdir /home/下载/temp_matlab (此文件夹用于临时存放挂载后的iso文件)
$ sudo mount -o loop /home/yangzheng/下载/Matlab/MATHWORKS_R2014A.iso /home/yangzheng/下载/temp_matlab (path为我们存放iso的路径)
$ cd /home/yangzheng/下载/temp_matlab
$ sudo ./install
选择不联网安装
安装路径使用默认路径,否则编译opencv,caffe时候找不到。
安装过程中使用序列号
12345-67890-12345-67890
安装完成之后选择Crack下的license_405329_R2014a.lic文件进行激活
由于/usr/local/MATLAB只有只读的权限, 所以先要将其权限修改为"可写"
$ sudo chmod -R a+w /usr/local/MATLAB
将Crack/Linux下的libmwservices.so 复制到 /usr/local/MATLAB/R2014a/bin/glnxa64
$ sudo cp /home/yangzheng/下载/Matlab/Crack/Linux/libmwservices.so /usr/local/MATLAB/R2014a/bin/glnxa64
将先前挂载的iso卸载
$ sudo umount /home/yangzheng/下载/temp_matlab
$ sudo matlab
我在Ubuntu下是用的默认安装的,路径为/usr/local/MATLAB/R2010b
$ sudo gedit /usr/share/applications/Matlab.desktop
写入以下内容
[Desktop Entry]
Type=Application
Name=Matlab
GenericName=Matlab 2010b
Comment=Matlab:The Language of Technical Computing
Exec=sh /usr/local/MATLAB/R2014a/bin/matlab -desktop
Icon=/usr/local/MATLAB/Matlab.png #图标图片需自行下载,拷贝到根目录下
Terminal=false
Categories=Development;Matlab;
图片
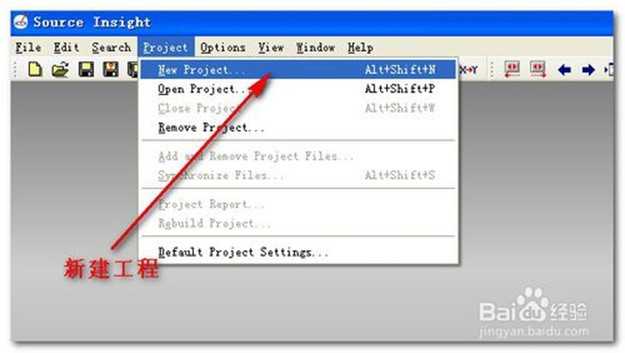
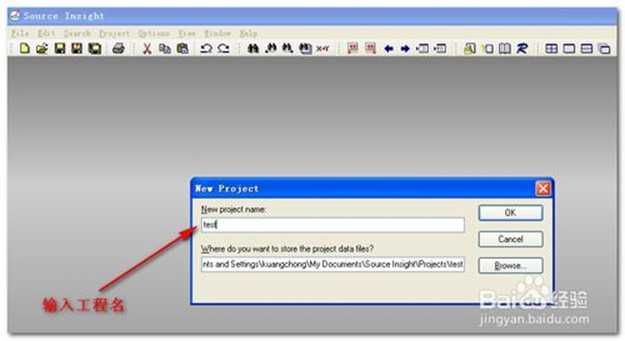
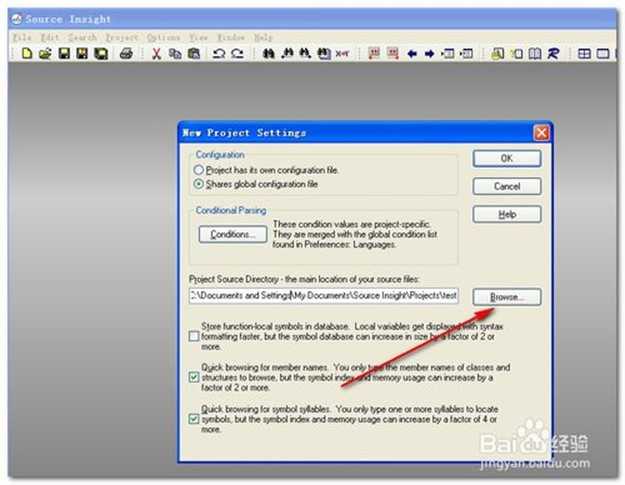
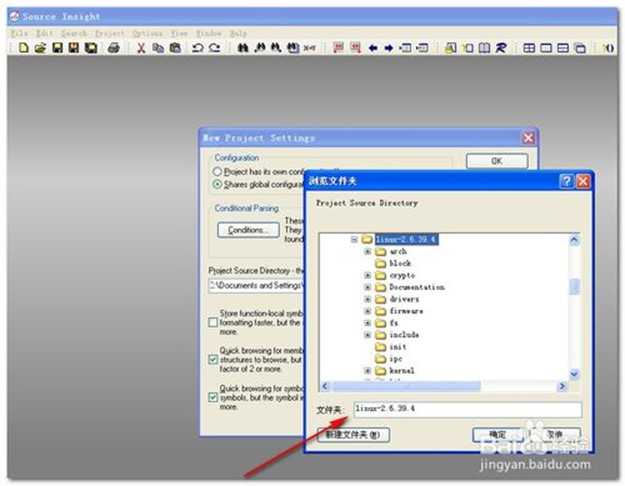
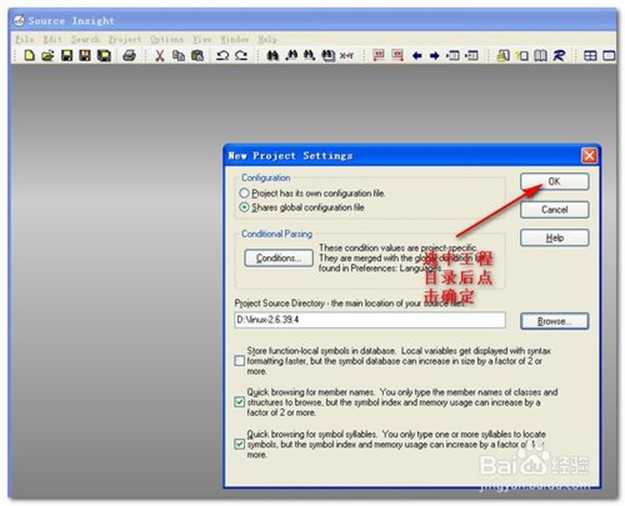
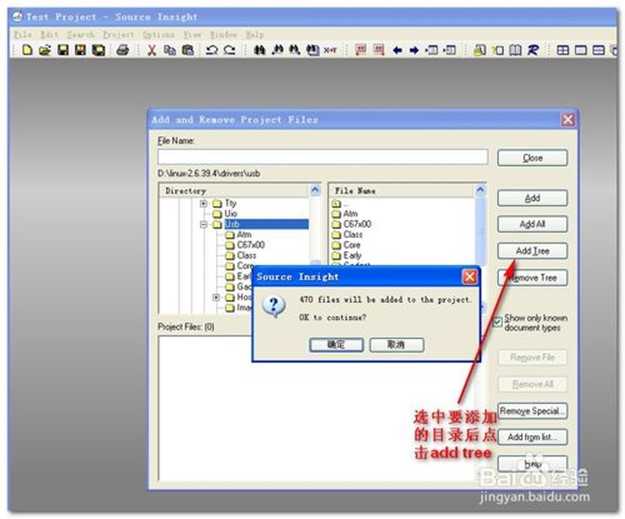
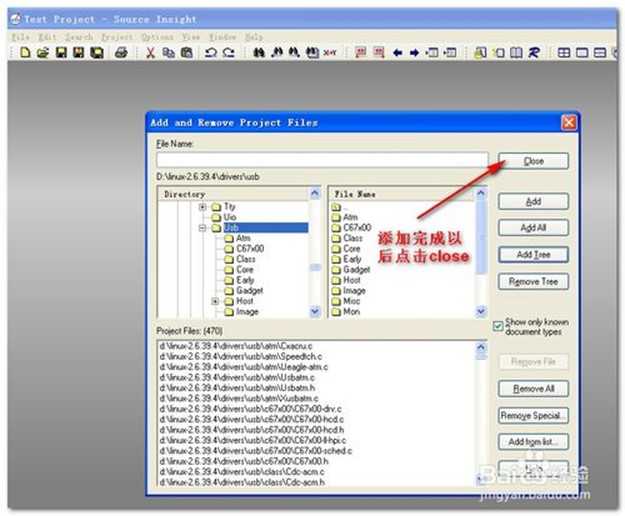
Source insight是一款windows下的工程源代码管理软件。非常好用,特别是在学习某些第三方库的源代码时,能够很方便的搜索和查看函数,对象等的实现代码。
cd到安装包目录下在终端中输入以下命令:
$ wine ./InsightSetup.exe
直接使用apt-get命令安装的cmake版本太低,在生成编译脚本是可能出现一些莫名其妙的问题。比如在ubuntu14.04下Configure opencv3.1.0就会一直定位不到python lib路径,导致python-opencv无法正常编译。所以添加ppa源安装最新版本的cmake。
sudo add-apt-repository ppa:george-edison55/cmake-3.x
sudo apt-get update
sudo apt-get install cmake cmake-gui
也是最简单的:进入linux系统后,输入
$ sudo apt-cache search boost
你将看到很多文件信息,你会看到其中一个文件叫 libboost-dev, 直接安装此文件即可:
$ sudo apt-get install libboost-dev libboost-dbg libboost-all-dev
这样就安装成功了。这个速度很快,是因为直接拷贝了lib文件到系统。
可以使用本文最后代码测试安装成功与否。
直接apt-get安装版本为(1.54.0)
$ ./bootstrap.sh #这个命令配好编译环境,为下一步编译做准备
$ ./bjam #这里需要十几分钟编译源文件,完成后就代表安装成功了。
|
#include <boost/lexical_cast.hpp> #include <iostream> int main() { using boost::lexical_cast; int a = lexical_cast<int>("123"); double b = lexical_cast<double>("123.12"); std::cout<<a<<std::endl; std::cout<<b<<std::endl; return 0; } |
运行命令:
$ g++ test.cpp -o test
$ ./test
得到输出结果为:123, 123.12
代表boost安装成功
注:编译安装有个问题是,环境变量的配置。如果配置不得当,可能使得caffe,或者其他依赖他的库在配置编译文件时找不到boost。所以简单使用的话经量使用apt-get安装即可。
什么事BLAS:BLAS,即基础线性代数子程序库,里面拥有大量已经编写好的关于线性代数运算的程序。全称Basic Linear Algebra Subprograms。这里可以选择(ATLAS,MKL或者OpenBLAS)
从性能上看:MKL > OpenBLAS > ATLAS
下载链接是:https://software.intel.com/en-us/intel-education-offerings,可以下载Student版的,先申请,然后会立马收到一个邮件(里面有安装序列号),打开照着下载就行了。下载完之后,要把文件解压到home文件夹(或直接把tar.gz文件拷贝到home文件夹,为了节省空间,安装完记得把压缩文件给删除喔~),或者其他的ext4的文件系统中。
$ tar zxvf cpp_studio_xe_2013_sp1_update3.tar.gz #如果你是直接拷贝压缩文件过来的
$ chmod a+x /home/username/cpp_studio_xe_2013_sp1_update3 -R
$ sudo ./install_GUI.sh
#新建intel_mkl.conf,并编辑
$ cd /etc/ld.so.conf.d
$ sudo touch intel_mkl.conf
$ sudo vi intel_mkl.conf
/opt/intel/lib/intel64
/opt/intel/mkl/lib/intel64
$ sudo apt-get install libopenblas-dev
附:也可以到官网下载源码编译安装
$ sudo apt-get install libatlas-base-dev
opencv是机器视觉库。要启用CUDA加速模块,Qt支持模块,Matlab支持模块必须手动编译源代码。
# 官网列出的依赖库
[compiler] $ sudo apt-get install build-essential
[required] $ sudo apt-get install cmake git libgtk2.0-dev pkg-config libavcodec-dev libavformat-dev libswscale-dev
[optional] $ sudo apt-get install python-dev python-numpy libtbb2 libtbb-dev libjpeg-dev libpng-dev libtiff-dev libjasper-dev libdc1394-22-dev
# 还有一些系统可能缺失的包,否则编译时可能出错,或者编译完成后程序启动出错。绿色部分是安装Qt4已在前面安装完成,可以去掉。
$ sudo apt-get install libopencv-dev libdc1394-22 libdc1394-22-dev yasm libpng12-dev libtiff5-dev libjasper-dev libavcodec-dev libavformat-dev libswscale-dev libxine2-dev libgstreamer0.10-dev libgstreamer-plugins-base0.10-dev libv4l-dev libfaac-dev libmp3lame-dev libopencore-amrnb-dev libopencore-amrwb-dev libtheora-dev libvorbis-dev libxvidcore-dev x264 v4l-utils
FFmpeg是一套可以用来记录、转换数字音频、视频,并能将其转化为流的开源计算机程序。要处理视频流则可以选装,并在cmake中配置。

$ sudo add-apt-repository ppa:mc3man/trusty-media
$ sudo apt-get update
$ sudo apt-get install ffmpeg gstreamer
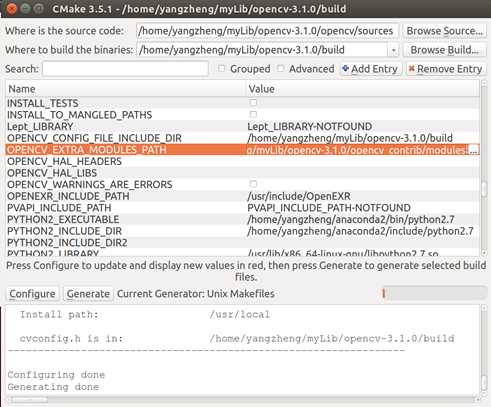

首先要启用CUDA加速必须勾选WITH_CUDA标志

注:BUILD_CUDA_STUBS不能勾选,没有cuda核心又需要编译的人才需要勾选。

注:主要是看cmake能不能自动搜索到CUDA的include文件和libs文件路径。如果CUDA Toolkit安装没有问题应该是能够自动识别的。

注:需要使用CUBLAS则需要勾选WITH_CUBLAS,需要使用opencv dnn且需要BLAS加速则要勾选opencv_dnn_BLAS

编译配置选择完毕后,点击Configure完成配置,没报错的话点击Generate按钮在build文件夹产生Makefile文件。
|
#以下是截取的部分感兴趣的配置结果 GUI: QT 4.x: YES (ver 4.8.6 EDITION = OpenSource) QT OpenGL support: NO OpenGL support: NO VTK support: NO
Other third-party libraries: Use IPP Async: NO Use VA: NO Use Intel VA-API/OpenCL: NO Use Eigen: NO Use Cuda: YES (ver 8.0) Use OpenCL: YES Use custom HAL: NO
NVIDIA CUDA Use CUFFT: YES Use CUBLAS: NO USE NVCUVID: NO NVIDIA GPU arch: 20 21 30 35 NVIDIA PTX archs: 30 Use fast math: YES
Python 2: Interpreter: /usr/bin/python2.7 (ver 2.7.6) Libraries: /usr/lib/x86_64-linux-gnu/libpython2.7.so (ver 2.7.6) numpy: /usr/local/lib/python2.7/dist-packages/numpy/core/include (ver 1.12.0rc1) packages path: lib/python2.7/dist-packages
Python (for build): /usr/bin/python2.7
Matlab: mex: /usr/local/MATLAB/R2014a/bin/mex Compiler/generator: Working
Install path: /usr/local ----------------------------------------------------------------- Configuring done |
编译源文件:
$ cd YOUR/PATH/build
$ make -j8 #opencv 要编译的源文件太多,时间大概30分钟
$ sudo make install
$ sudo gedit /etc/ld.so.conf.d/opencv.conf
写入/usr/local/lib
更新库目录
$ sudo ldconfig
下面两个添加环境变量
打开文件profile
$ sudo gedit /etc/profile
加入下面两行:
export PKG_CONFIG_PATH=$PKG_CONFIG_PATH:/usr/local/lib/pkgconfig
export LD_LIBRARY_PATH=$LD_LIBRARY_PATH:/usr/local/lib
(ubuntu 16.04 LTS和ubuntu 14.04 LTS 安装opencv-3.1.0)
按照这篇文章安装http://blog.csdn.net/dengshuai_super/article/details/51394118 出现了下面的错误.
|
g++ example.cpp -o example `pkg-config --libs --cflags opencv` /usr/bin/ld: 找不到 -lippicv collect2: error: ld returned 1 exit status |
https://github.com/opencv/opencv/issues/5852这篇文章中也遇到了这个错误. 可以在cmake时加上"cmake -DINSTALL_CREATE_DISTRIB=ON" 这句,就不会有这个错误了.
可以完整参照http://blog.csdn.net/frosero/article/details/50742400这篇文章安装.
总结安装步骤:
ubuntu16.04 安装opencv3.1.0
|
cd 到opencv-3.1.0 cmake -DINSTALL_CREATE_DISTRIB=ON make sudo make install
gedit /etc/profile 加入下面两行保存 export PKG_CONFIG_PATH=$PKG_CONFIG_PATH:/usr/local/lib/pkgconfig export LD_LIBRARY_PATH=$LD_LIBRARY_PATH:/usr/local/lib source /etc/profile
sudo ldconfig |

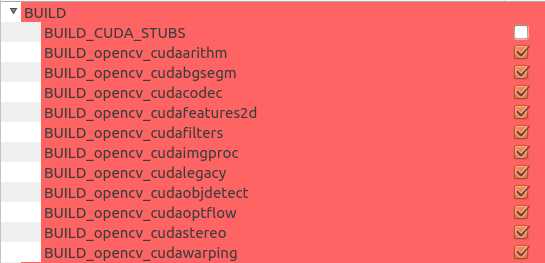
编译之前勾选此选项
如果不想重新安装可以用此方案。在终端输入
|
$ pkg-config --libs opencv -L/usr/local/lib -lopencv_shape -lopencv_stitching -lopencv_objdetect -lopencv_superres -lopencv_videostab -lippicv -lopencv_calib3d -lopencv_features2d -lopencv_highgui -lopencv_videoio -lopencv_imgcodecs -lopencv_video -lopencv_photo -lopencv_ml -lopencv_imgproc -lopencv_flann -lopencv_core |
|
$ pkg-config --cflags opencv -I/usr/local/include/opencv -I/usr/local/include |
使用 pkg-config 的 - -cflags 参数可以给出在编译时所需要的选项,而 - -libs 参数可以给出连接时的选项。
可以看到:由于使用了 pkg-config 工具来获得库的选项,所以不论库安装在什么目录下,都可以使用相同的编译和连接命令,带来了编译和连接界面的统一。
使用 pkg-config 工具提取库的编译和连接参数有两个基本的前提:
库本身在安装的时候必须提供一个相应的 .pc 文件(不这样做的库说明不支持 pkg-config 工具的使用)。
pkg-config 必须知道要到哪里去寻找此 .pc 文件。
GTK+ 及其依赖库支持使用 pkg-config 工具,所以剩下的问题就是如何告诉 pkg-config 到哪里去寻找库对应的 .pc 文件,这也是通过设置搜索路径来解决的。
对于支持 pkg-config 工具的 GTK+ 及其依赖库来说,库的头文件的搜索路径的设置变成了对 .pc 文件搜索路径的设置。.pc 文件的搜索路径是通过环境变量 PKG_CONFIG_PATH 来设置的,pkg-config 将按照设置路径的先后顺序进行搜索,直到找到指定的 .pc 文件为止。
因此安装时在/etc/profile 中添加
export PKG_CONFIG_PATH=/usr/local/lib/pkgconfig:$PKG_CONFIG_PATH
是为了告诉pkg-config,opencv库指定的.pc文件在/usr/local/lib/pkgconfig这个路径下。也就是opencv.pc这个文件,内容如下:
|
# Package Information for pkg-config prefix=/usr/local exec_prefix=${prefix} libdir=${exec_prefix}/lib includedir_old=${prefix}/include/opencv includedir_new=${prefix}/include
Name: OpenCV Description: Open Source Computer Vision Library Version: 3.1.0 Libs: -L${exec_prefix}/lib -lopencv_shape -lopencv_stitching -lopencv_objdetect -lopencv_superres -lopencv_videostab -lippicv -lopencv_calib3d -lopencv_features2d -lopencv_highgui -lopencv_videoio -lopencv_imgcodecs -lopencv_video -lopencv_photo -lopencv_ml -lopencv_imgproc -lopencv_flann -lopencv_core Libs.private: -L/usr/lib/x86_64-linux-gnu -lpng -lz -lgtk-3 -lgdk-3 -lpangocairo-1.0 -lpango-1.0 -latk-1.0 -lcairo-gobject -lcairo -lgdk_pixbuf-2.0 -lgio-2.0 -lgobject-2.0 -lgthread-2.0 -lglib-2.0 -lavcodec-ffmpeg -lavformat-ffmpeg -lavutil-ffmpeg -lswscale-ffmpeg -ldl -lm -lpthread -lrt Cflags: -I${includedir_old} -I${includedir_new} |
(把opencv.pc备份一下)可以看到库里面有-lippicv这个选项,把-lippicv删掉即可。
从opencv.pc中可以看出,pkg-config加载库的路径是/usr/local/lib,我们去这这个路径下看看,发现没有-lippicv对应的库,别的选项都有对应的库,然后我们把-lippicv对应的库(libippicv.a)放到这个路径下就好啦了。
我的liboppicv.a在/home/ds/opencv-3.1.0/3rdparty/ippicv/unpack/ippicv_lnx/lib/intel64这个路径下。你的也在你自己opencv文件夹的对应路径下。
先cd 到上面这个路径下,然后cp liboppicv.a /usr/local/lib 将这个库文件复制到/usr/local/lib下就好了。
需要升级cmake(参看前文)
另外cmake在configure的时候提示no modular named numpy主要是没有安装python3.0的numpy包原因,可以忽略
2)执行sudo make时,可能出现 opencv_cudalegacy编译失败
make[2]: *** [modules/cudalegacy/CMakeFiles/opencv_cudalegacy.dir/src/graphcuts.cpp.o] Error 1
make[1]: *** [modules/cudalegacy/CMakeFiles/opencv_cudalegacy.dir/all] Error 2
make: *** [all] Error 2的错误。
那是因为 cuda-8.0与OpenCV 3.1.0发生了冲突。解决方法:修改openCV 3.1.0源码,使其兼容cuda-8.0
$ sudo vi opencv-3.1.0/modules/cudalegacy/src/graphcuts.cpp
将第四十五行位置的
#if !defined (HAVE_CUDA) || defined (CUDA_DISABLER)
改为
#if !defined(HAVE_CUDA)||defined(CUDA_DISABLER)||(CUDART_VERSION>=8000)
然后重新执行
$ sudo make -j4 #-j4为开四个线程,加快编译速度
什么是PyCUDA: PyCUDA lets you access Nvidia‘s CUDA parallel computation API from Python. CUDA Toolkit的Python接口。安装2016.2.1版本
$ sudo apt-get install build-essential gcc
$ sudo apt-get install libboost-all-dev
$ sudo apt-get install python-numpy –y
$ sudo apt-get install build-essential python-dev python-setuptools libboost-python-dev libboost-thread-dev –y
(https://pypi.python.org/pypi/pycuda )
$ tar xzvf pycuda-VERSION.tar.gz
$ cd pycuda-VERSION
$ ./configure.py --cuda-root=/usr/local/cuda --cudadrv-lib-dir=/usr/lib --boost-inc-dir=/usr/include --boost-lib-dir=/usr/lib --boost-python-libname=boost_python-py27 --boost-thread-libname=boost_thread
$ make -j 4
$ sudo python setup.py install
$ sudo pip install .
# 安装gfortran
$ sudo apt-get install gfortran
# 安装blas,Ubuntu下对应的是libopenblas,其它操作系统可能需要安装其它版本的blas——这是个OS相关的。
$ sudo apt-get install libopenblas-dev
# 安装lapack,Ubuntu下对应的是liblapack-dev,和OS相关。
$ sudo apt-get install liblapack-dev
# 安装atlas,Ubuntu下对应的是libatlas-base-dev,和OS相关。
$ sudo apt-get install libatlas-base-dev
#安装 nose
$ sudo apt-get install python-nose
# 安装pip
$ sudo apt-get install python-pip
$ sudo apt-get install python-dev
$ sudo apt-get install g++
$ sudo apt-get install git
$ sudo apt-get install python-numpy
$ sudo apt-get install python-scipy
$ sudo apt-get install python-sklearn
#安装成功测试:
$ python -c "import numpy;numpy.test()"
$ python -c "import scipy;scipy.test()"
参考前文
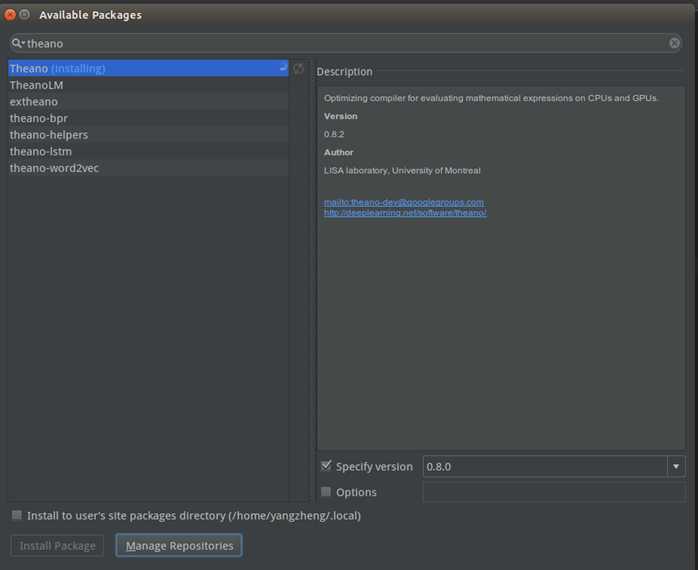
# 安装Theano
sudo pip install Theano
或者使用pycharm的包管理工具指定安装,由于之后我们要安装Lasagne-0.2.dev1,要求Theano==0.8.0
所以指定安装
安装完毕之后运行:
$ python "import theano;theano.test()"
#运行正常则说明theano安装正确,注theano.test()仅在使用CPU时有效
另外如果numpy版本过高或过低都会导致一个numpy init失败的动态错误。我安装的theano-0.8.0,测试的结果来看numpy- 1.11.1没出错,不过由于我的PyCUDA版本过高提示警告:
UserWarning: Your CuDNN version is more recent then Theano. If you see problems, try updating Theano or downgrading CuDNN to version 4.
? 在主目录下新建.theanorc文件
cd
gedit .theanorc
? 在.theanorc中输入下面的内容
[cuda]
root=/usr/local/cuda
[global]
floatX = float32
device = gpu0 #表示使用GPU加速计算
[nvcc]
fastmath = True
[mode]=FAST_RUN
?将下列python代码复制到useGPU.py,并运行。
|
from theano import function, config, shared, sandbox import theano.tensor as T import numpy import time
vlen = 10 * 30 * 768 # 10 x #cores x # threads per core iters = 1000
rng = numpy.random.RandomState(22) x = shared(numpy.asarray(rng.rand(vlen), config.floatX)) f = function([], T.exp(x)) print f.maker.fgraph.toposort() t0 = time.time() for i in xrange(iters): r = f() t1 = time.time() print ‘Looping %d times took‘ % iters, t1 - t0, ‘seconds‘ print ‘Result is‘, r if numpy.any([isinstance(x.op, T.Elemwise) for x in f.maker.fgraph.toposort()]): print ‘Used the cpu‘ else: print ‘Used the gpu‘ |
?假定上面已经设置文件.theanorc,运行命令如下所示:
python useGPU.py
$ sudo ldconfig /usr/local/cuda/lib64
注,以上是零时办法,每次重启计算机后都会再次出现,以下是永久解决方案:
ldconfig命令的功能是动态的链接一个库,就是说动态的将库的地址加入到系统的某个缓存以便当使用库的时候系统能够找到其位置。实际上为了永久的实现这个功能,我们可以在 /etc/ld.so.conf.d/目录下新建theano.conf 文件,并在中添加 /usr/local/cuda/lib64 这一句,这样就永久的在系统中加入了cuda库的地址。
lasagne是python开源神经网络的包。安装
|
Python >=2.7 or >=3.4 |
|
|
pip |
|
|
C compiler |
|
|
numpy >= 1.6.2 |
$ pip install numpy |
|
scipy >= 0.11 |
$ pip install scipy |
|
BLAS |
$ pip install libopenblas-dev (They will work fine without one, but a lot slower, so it is worth getting this right (but this is less important if you plan to use a GPU).) |
#选择安装稳定版
$ pip install Lasagne==0.1
开发者方式安装最新版0.2
git clone https://github.com/Lasagne/Lasagne.git
cd Lasagne
pip install -r requirements.txt #实际上就是需要安装theano 0.8.0
pip install --editable .
caffe是一个c++的深度学习框架。
#绿色部分前面已经装过
$ sudo apt-get install build-essential
$ sudo apt-get install libprotobuf-dev protobuf-compiler libsnappy-dev libopencv-dev libboost-all-dev
$ sudo apt-get install liblmdb-dev libleveldb-dev libhdf5-serial-dev libgflags-dev libgoogle-glog-dev
|
包名称 |
功能 |
|
libgoogle-glog-dev |
Google Logging Library. |
|
libprotobuf-dev |
Protocol buffers are a flexible, efficient, automated mechanism for serializing structured data - similar to XML, but smaller, faster, and simpler. caffe使用的配置文件全是.prototxt,框架通过使用这个库解析这些文件。 |
|
liblmdb-dev |
Lighting Memory-Mapped Database (LMDB) is an ultra-fast, ultra-compact key-value embedded data store developed for the OpenLDAP Project. caffe中的训练图片需要组织成lmdb,libhdf5,leveldb三种数据库文件格式中的一种才能训练。 |
|
libhdf5-serial-dev |
HDF5 is a file format and library for storing scientific data. |
|
libleveldb-dev |
LevelDB is a fast key-value storage library written at Google that provides an ordered mapping from string keys to string values. |
|
libgflags-dev |
gflags是google的一个开源的处理命令行参数的库,使用c++开发,具备python接口 |
(参考前文)
已安装nvidia-367驱动和CUDA Toolkit-8.0及对应cuDNN
(参考前文)
已安装 OpenBLAS 和 ATLAS
(参考前文)
已安装opencv-3.1.0
类似opencv,要启用caffe的功能必须手动编译源码安装。
下载地址:https://github.com/BVLC/caffe
或者执行Git命令:
$ git clone git://github.com/BVLC/caffe.git
$ cd YOUR/PATH/caffe
$ cp Makefile.config.example Makefile.config
配置一些引用文件(增加部分主要是解决新版本下,HDF5的路径问题)
|
CPU_ONLY := 1 |
#如果不使用GPU加速计算就选上这一项 |
|
USE_CUDNN := 1 |
#要使用CUDNN加速神经网络计算 |
|
OPENCV_VERSION := 3 |
#若使用opencv3.0.0以上版本 |
|
INCLUDE_DIRS := $(PYTHON_INCLUDE) /usr/lib/x86_64-linux-gnu/hdf5/serial/include |
添加HDFS的头文件和库文件路径 |
|
LIBRARY_DIRS := $(PYTHON_LIB) /usr/lib /usr/lib/x86_64-linux-gnu/hdf5/serial |
|
|
BLAS := atlas |
计算能力 mkl > openlas >atlas |
|
MATLAB_DIR := /usr/local/MATLAB/R2014a |
MATLAB directory should contain the mex binary in /bin. |
|
make all -j8 #编译源文件 make test -j8 #编译测试源文件 make runtest -j8 #测试 |
$ sudo apt-get install python-pip
for req in $(cat requirements.txt); do pip install $req; done
make pycaffe
当出现下面错误的时候修改
fatal error: numpy/arrayobject.h: No such file or directory.
|
PYTHON_INCLUDE := /usr/include/python2.7 /usr/lib/python2.7/dist-packages/numpy/core/include This is where our error is. So by changing this line to:
PYTHON_INCLUDE := /usr/include/python2.7 /usr/local/lib/python2.7/dist-packages/numpy/core/include # Our problem is gone. |
|
import sys sys.path.append("~/caffe/python") ‘‘‘ import caffe If the last import caffe doesn‘t pop out any error, congratulations, now you can use python to play with caffe! ‘‘‘ |
|
sudo gedit /etc/bash.bashrc sudo gedit /etc/profile
然后在最下面添加: # load caffe python package export PYTHONPATH=$PYTHONPATH:/home/yangzheng/myLibs/caffe/python |
./data/mnist/get_mnist.sh
./examples/mnist/create_mnist.sh
solver_mode: CPU
./examples/mnist/train_lenet.sh
# Ubuntu/Linux 64-bit, CPU only, Python 2.7
$ export TF_BINARY_URL=https://storage.googleapis.com/tensorflow/linux/cpu/tensorflow-0.12.1-cp27-none-linux_x86_64.whl
# Ubuntu/Linux 64-bit, GPU enabled, Python 2.7
# Requires CUDA toolkit 8.0 and CuDNN v5. For other versions, see "Installing from sources" below.
$ export TF_BINARY_URL=https://storage.googleapis.com/tensorflow/linux/gpu/tensorflow_gpu-0.12.1-cp27-none-linux_x86_64.whl
# 安装(Python 2.7)
$ sudo pip install --upgrade $TF_BINARY_URL
配置cuda环境变量:
|
# cuda export PATH=/usr/local/cuda/bin:$PATH export LD_LIBRARY_PATH="$LD_LIBRARY_PATH:/usr/local/cuda/lib64:/usr/local/cuda/extras/CUPTI/lib64" export CUDA_HOME=/usr/local/cuda |
成功启用cuda显示:
|
>>> import tensorflow I tensorflow/stream_executor/dso_loader.cc:128] successfully opened CUDA library libcublas.so locally I tensorflow/stream_executor/dso_loader.cc:128] successfully opened CUDA library libcudnn.so locally I tensorflow/stream_executor/dso_loader.cc:128] successfully opened CUDA library libcufft.so locally I tensorflow/stream_executor/dso_loader.cc:128] successfully opened CUDA library libcuda.so.1 locally I tensorflow/stream_executor/dso_loader.cc:128] successfully opened CUDA library libcurand.so locally |
错误:
Loaded CuDNN library: 5005 (compatibility version 5000) but source was compiled with library 5103 (compatibility version 5100)
这个错误提示cuDNN版本低
官方说是使用cuda8.0+cudnnV5,实际是使用cuda7.5+cudnnV5.1才行
Desktop Ubuntu 14.04LTS/16.04科学计算环境配置
原文:http://www.cnblogs.com/supersponge/p/6490931.html