项目用到的服务:
LAMP+nginx+squid+代理MYSQL+rsync
搭建LAMP平台,是目前非常流行的Web开发平台,成本低廉,扩展能力好,灵活,安全性高,
深受企业和管理人员的喜爱,容易形成整体的系统结构
nginx实现了整体网络的负载均衡,还以搭建存放一些静态网页,提高客户端对静态网页的访问请求时间
最后通过squid做整个网络的代理人,提高网站的访问都提高速度(缓冲服务),并且提高网络的安全性
myslq主主结构为整体网络数据作实时备份,然后通过myslq代理服务器为客户机请求做读写分离
整体上增加了网络的安全、稳定的运行、亢并发数和减少用户请求时间,还做到了数据的冗余。诸多好处不一一说明
系统平台:Red Hat Enterprise Linux 5.9 Red Hat Enterprise Linux 6.4
用到的源码包:httpd-2.2.25.tar.gz mysql-5.1.62.tar.gz php-5.4.19.tar.gz
Mysql软件包:perl-DBD-MySQL-4.013-3.el6.x86_64
MySQL-test-5.6.15-1.el6.x86_64
qt-mysql-4.6.2-25.el6.x86_64
MySQL-client-5.6.15-1.el6.x86_64
MySQL-shared-5.6.15-1.el6.x86_64
MySQL-devel-5.6.15-1.el6.x86_64
MySQL-shared-compat-5.6.15-1.el6.x86_64
MySQL-embedded-5.6.15-1.el6.x86_64
MySQL-server-5.6.15-1.el6.x86_64
mysql代理服务器:mysql-proxy-0.8.3-linux-rhel5-x86-64bit.tar.gz
nginx软件包:nginx-1.0.5.tar.gz
squid软件包(系统自带的软件包):squid-2.6.STABLE21-6.el5.x86_64.rpm
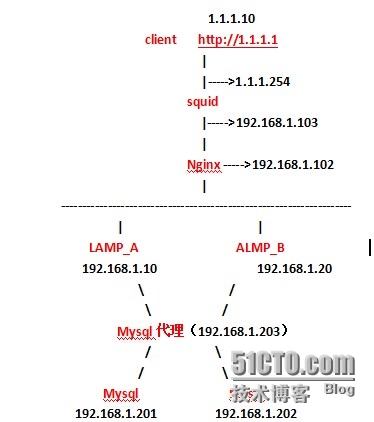
拓扑:

说明:web服务器分别假设架设在IP192.168.1.10,192.168.1.20上
在192.168.1.201,192.168.1.202做mysql主主结构(备份数据),通过myslq(192.168.1.103)
代理服务器为web服务做支持
Nginx(192.168.1.102)为web服务器做轮训
squit(192.168.1.103,1.1.1.254)为服务器做反向代理,并做缓存服务器
在服务器192.168.1.10(web)服务器搭建rsync服务,做到与192.168.1.20(web)进行实时同步数据
环境配置:yum库要配置好,安装gcc c++等
service iptables stop
关闭selinux
基本思路:
1、 卸载/移除系统本身自带的冲突软件包
2、 编译安装Apache HTTP Server MySQL
3、 编译安装PHP,注意连接A、M组件
4、 编译安装php
5、 LAMP协作配置
6、 安装mysql软件包
7、 在服务器上配置mysql主主结构服务器
8、 配置mysql代理服务器
9、 搭建nginx(192.168.1.102)为内网web服务做轮询处理
10、搭建squid缓存服务器
11、测试web服务能否和数据库连接成功
12、在web上(192.168.1.10)搭建rsync服务器 编写脚本实现自动备份192.168.1.10服务器上的网页
到192.168.1.20服务器上(做到实时更新)
13、为了保证数据库的冗余,每天半夜23点执行备份脚本mysqlbak.sh,对数据库服务器192.168.1.201做
增量备份,(脚本mysqlbak.sh的功能如下:备份每天新生成的binlog文件,把备份的文件打包并压缩到系统
的/dbbak/mysql目录下;
用系统日期做打包压缩文件名;然后把打包压缩的文件上传到代理服务器的/backup目录下)
14、 增加周期计划任务
每周一早上7点,对数据库服务(192.168.1.201)做完整备份;备份文件存放到本地的/bdbak里,并把文件
上传到代理服务器
每天半夜23点执行备份脚本mysqlbak.sh,对数据库服务器(192.168.1.201)做增量备份
总体搭建过程:
1、 移除冲突软件:卸载RHEL自带的LAMP组件,避免与编译安装版共存,易造成混淆。
[root@rh5_100 ~]# yum -y remove httpd mysql-server mysql php
2、 编译安装httpd
[root@rh5_100 ~]# tar -zxf httpd-2.2.25.tar.gz -C /usr/local/
[root@rh5_100 ~]# cd /usr/local/httpd-2.2.25/
[root@rh5_100 httpd-2.2.25]#./configure --prefix=/usr/local/httpd --enable-so --enable-rewrite --enable-cgi
--enable-ssl --enable-charset-lite //配置
//--enable-so 支持动态加载模块
//--enable-rewrite 支持网站地址重写
//--enable-cgi 支持CGI程序脚本
//--enable-ssl 支持SSL加密
//--enable-charset-lite 支持多语言编码
[root@rh5_100 httpd-2.2.25]# make && make install
[root@rh5_100 ~]# cp /usr/local/httpd/bin/apachectl /etc/init.d/myhttpd
[root@rh5_100 ~]# vim /etc/init.d/myhttpd 实现开机自启
#!/bin/sh
# chkconfig: 35 85 15
# description: Apache is a World Wide Web Server //添加这2行内容
……………….
[root@rh5_100 ~]# chkconfig --add httpd
[root@rh5_100 ~]# chkconfig --list httpd
[root@localhost ~]# vim /usr/local/httpd/conf/httpd.conf
……………….
98 ServerName bbs.baidu.com:80
……………
[root@rh5_100 ~]# tail -1 /etc/hosts
192.168.1.10 bbs.baidu.com bbs
[root@rh5_100 ~]# elinks --dump bbs.baidu.com
It works!
3、 编译安装mysql
[root@rh5_100 ~] # useradd -M -u 49 -s /sbin/nologin mysql
[root@rh5_100 ~] # yum -y install ncurses-devel libtermcap-devel
[root@rh5_100 ~]# tar -zxf mysql-5.1.62.tar.gz
[root@rh5_100 ~]# cd mysql-5.1.62
[root@rh5_100 mysql-5.1.62]# ./configure --prefix=/usr/local/mysql --with-charset=utf8 --with-collation=utf8_general_ci -- with-extra-charsets=gbk,gb2312
//--with-charset=utf8:指定默认字符集
//--with-collation=utf8_general_ci:指定默认的校对规则集
//--with-extra-charsets=gbk,gb2312:设置支持的其他字符集
//如果编译时报错对 “C++ 内建类型 ‘bool’ 的重声明“,就重新配置,添加:--with-unix-socket-path=/tmp/mysql.sock
[root@rh5_100 mysql-5.1.62]# make && make install
初始化设置
[root@rh5_100 mysql-5.1.62]# cd support-files/
[root@rh5_100 support-files]# mv my-medium.cnf /etc/my.cnf //复制配置文件模板
[root@rh5_100 support-files]# cd /usr/local/mysql/bin/
[root@rh5_100 support-files] # ./mysql_install_db --user=mysql //初始化库表权限调整及执行优化
[root@rh5_100 bin]# chown -R :mysql /usr/local/mysql/
[root@rh5_100 bin]# chown -R :mysql /usr/local/mysql/var/ //更改用户mysql权限
[root@rh5_100 bin]# ln -s /usr/local/mysql/bin/* /usr/local/bin/
[root@rh5_100 bin]# ln -s /usr/local//mysql/lib/mysql/* /usr/lib64/
[root@rh5_100 bin]# ln -s /usr/local/mysql/include/mysql/* /usr/include/
[root@rh5_100 bin]# cd /root/mysql-5.1.62/support-files/ //之前解压包路径
[root@rh5_100 support-files]# cp mysql.server /etc/init.d/mysqld
[root@rh5_100 support-files]# chmod +x /etc/init.d/mysqld
[root@rh5_100 support-files]# chkconfig --add mysqld
[root@rh5_100 support-files]# service mysqld restart ////若启动失败,先killall -9 mysqld
再service mysqld restart(可能是原有mysql占用端口)
[root@rh5_100 ~]# mysql -uroot –hlocalhost //登录
mysql> set password for root@"localhost"=password("123456"); //为登录mysql加密码
4、 编译安装php
[root@rh5_100 ~]# tar -zxf php-5.4.19.tar.gz -C ./
[root@rh5_100 ~]# cd php-5.4.19
[root@rh5_100 php-5.4.19]# yum -y install libxml2-devel
[root@rh5_100 php-5.4.19]#./configure --prefix=/usr/local/php --enable-mbstring --enable-sockets --with- apxs2=/usr/local/httpd/bin/apxs --with-mysql=/usr/local/mysql --with-config-file-path=/usr/local/php
//--prefix=:指定安装目录
//--enable-mbstring:支持多字节字符
//--with-apxs2:指定httpd的模块工具位置
//--with-mysql:指定mysql的安装位置
//--enable-sockets:启用套接字支持
// --with-config-file-path=:指定配置路径
[root@rh5_100 php-5.4.19]# make && make install
[root@rh5_100 php-5.4.19]# cp php.ini-development /usr/local/php/php.ini//复制模板
[root@rh5_100 php-5.4.19]# vim /usr/local/php/php.ini //有很多选项,有的是默认开启的,可以自定义
.. ..
692 default_charset = "UTF-8"//默认字符 集
672 post_max_size = 8M //最大POST 提交的容量
791 file_uploads = On // 允许上传
800 upload_max_filesize = 5M//可上传的 最大文件
….
LAMP协作配置
[root@rh5_100 php-5.4.19] # vim /usr/local/httpd/conf/httpd.conf
.. ..
LoadModule php5_module modules/libphp5.so
168 DirectoryIndex index.html index.php // 更改支持PHP首页
311 AddType application/x-httpd-php .php// 识别PHP网页类型(参考上一行,自己添加)
.. ..
[root@rh5_100 php-5.4.19]# service httpd restart
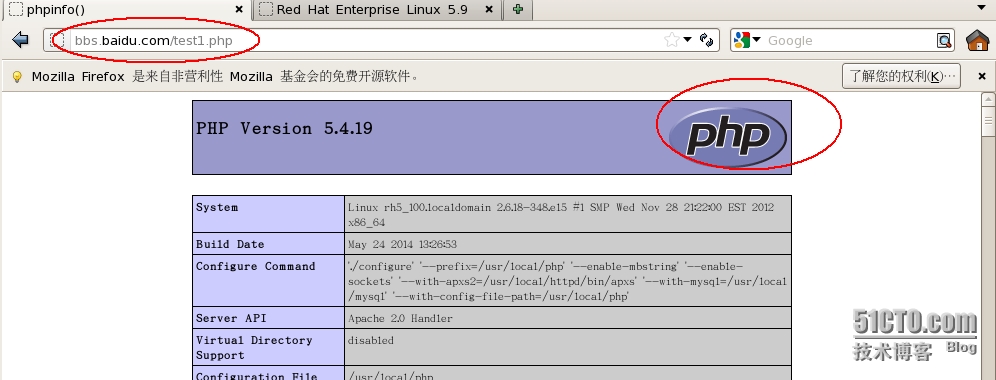
5、 协作测试:
[root@rh5_100 ~] # vim /usr/local/httpd/htdocs/test1.php //编写php测试网页
<?php
phpinfo();
?>

从第一步”移除冲突软件”到这里在另一台服务器192.168.1.20上做相同配置,注意路径和IP
6、安装mysql软件包
在192.168.10服务区安装mysql软件(并且也要在192.168.1.20服务器上安装mysql软件)
[root@rh6_201 ~]# yum -y remove mysql
[root@rh6_201 ~]# mv /etc/my.cnf /etc/my.cnf.old //卸载原有mysql软件,并移除配置文件(不移除也可 以,后面覆盖即可)
[root@rh6_201 ~]# cd /mysql/mysql/
[root@rh6_201 ~]# tar -xvf MySQL-5.6.15-1.el6.x86_64.rpm-bundle.tar -C /soft
[root@rh6_201 ~]# cd /soft/
[root@rh6_201 ~]# ll
MySQL-client-5.6.15-1.el6.x86_64.rpm
MySQL-devel-5.6.15-1.el6.x86_64.rpm
MySQL-embedded-5.6.15-1.el6.x86_64.rpm
MySQL-server-5.6.15-1.el6.x86_64.rpm
MySQL-shared-5.6.15-1.el6.x86_64.rpm
MySQL-shared-compat-5.6.15-1.el6.x86_64.rpm
MySQL-test-5.6.15-1.el6.x86_64.rpm
[root@rh6_201 ~]# rpm -Uvh MySQL-*.rpm
[root@rh6_201 ~]# cd /usr/share/mysql/my-default.cnf /etc/my.cnf //复制配置文件
[root@rh6_201 ~]# service mysqld restart
7、在服务器192.168.1.201,192.168.1.202上配置mysql主主结构服务器
在服务器192.168.1.201上配置流程:
[root@rh6_201 ~]# vim /etc/my.cnf
………..
7 [mysqld]
8 log_bin //启用binlog日志
9 server_id=201//ID标识,同一网段ID不能相同,建议以IP为值
…………….
[root@rh6_201 ~]# cat /root/.mysql_secret
# The random password set for the root user at Thu May 22 20:32:25 2014 (local time): Toa2Gk4s //获取mysql初始密码
[root@rh6_201 ~]# mysqp -hlocalhost -pToa2Gk4s
mysql> set password for root @"localhost"=password("123456"); //首次登录要修改密码
mysql> grant all on *.* to wgl@"192.168.1.203" identified by "123456"; //为代理服务器授权
mysql> grant replication slave on *.* to wgl@"192.168.1.202" identified by "123456";
//授权,允许从192.168.122.209登录,授权用户对所有库只有拷贝数据的权限
[root@rh6_201 ~]# service iptables stop
[root@rh6_201 ~]# chkconfig iptables off
在服务器192.168.1.202上配置流程:
[root@rh_202 ~]# vim /etc/my.cnf
………….
7 [mysqld]
8 log_bin
9 server_id=102
…………….
[root@rh_202 ~]# cat /root/.mysql_secret
# The random password set for the root user at Thu May 22 20:32:25 2014 (local time): Toa2Gk4s
[root@rh_202 ~]# mysql -uroot -hlocalhost -pToa2Gk4s
mysql> set passwd for root@"localhost"=password("123456");
mysql> grant all on *.*to wgl@"192.168.1.203" identified by "123456";
mysql> grant replication slave on *.*to wgl@"192.168.1.201" identified by "123456";
[root@rh_202 ~]# service iptables stop^C
[root@rh_202 ~]# chkconfig iptables off
[root@rh_202 ~]# mysql -uwgl -h192.168.1.201 -p123456//测试能否登陆192.168.1.201
mysql> exit
[root@rh_202 ~]# mysql -uroot -p123456

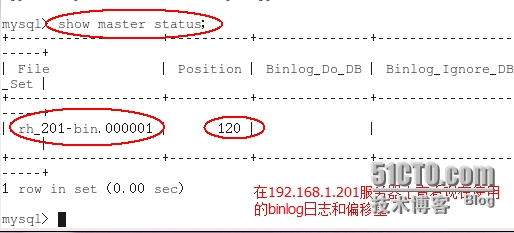
mysql> change master to
-> master_host="192.168.1.202",
-> master_user="wgl",
-> master_password="123456",
-> master_log_file="rh202-bin.000002",
-> master_log_pos=1301;
mysql> start slave;
mysql> show slave status\G

测试: 分别在2台服务器上插入不同的库(结果:2台服务器里有相同的库):
8、配置代理服务器
[root@rh_203 ~]# service iptables stop
[root@rh_203 ~]# chkconfig iptables off
[root@rh_203 ~]# mysql -uwgl -h192.168.1.201 -p123456 //测试能否登陆192.168.1.201
mysql> exit
[root@rh_203 ~]# mysql -uwgl -h192.168.1.202 -p123456//测试能否登陆192.168.1.202
mysql> exit
[root@rh_203 proxy]# service mysql stop//mysql代理服务器会占用3306端口,要释放3306端口,否则会冲突
[root@rh_203 proxy]# chkconfig mysql off
[root@rh_203 ~]# tar -zxf mysql-proxy-0.8.3-linux-rhel5-x86-64bit.tar.gz -C /usr/local/
[root@rh_203 ~]# cd /usr/local/
[root@rh_203 local]# mv mysql-proxy-0.8.3-linux-rhel5-x86-64bit/ proxy //为了管理方便,对此重命名
[root@rh_203 local]# cd /usr/local/proxy/
[root@rh_203 proxy]# chmod +x share/doc/mysql-proxy/rw-splitting.lua
[root@rh_203 proxy]# ./bin/mysql-proxy -P 192.168.1.203:3306 -r 192.168.122.201:3306 -b 192.168.122.202:3306 -s /usr/local/proxy/share/doc/mysql-proxy/rw-splitting.lua &
-p 指定代理监听的ip地址 端口
-r 指定读服务的ip地址 端口
-b 指定写服务器的ip地址 端口
-s 指定 lua 脚本文件的路径
编写脚本实现开机自动运行mysql-proxy
[root@rh_203 proxy]# vim /usr/local/proxy/proxy.sh
#!/bin/bash
/usr/local/proxy/bin/mysql-proxy -P 192.168.1.203:3306 -r 192.168.1.201:3306 -b 192.168.1.202:3306 -s /usr/local/proxy/share/doc/mysql-proxy/rw-splitting.lua &

[root@rh_203 proxy]# chmod +x /usr/local/proxy/proxy.sh
[root@rh_203 ~]# tail -1 /etc/rc.local
/usr/local/proxy/proxy.sh //在系统文件中添加此项实现开机自动运行脚本
检测代理数据库是否和web服务器连接正常
在装有LAMP平台的服务器192.168.1.10,192.168.1.20编写测试网页。
[root@localhost ~]# vim /usr/local/httpd/htdocs/test2.php
[root@rh5_100 ~]# vim /usr/local/httpd/htdocs/test2.php //检测能否连接到数据库
<?php
$link=mysql_connect(‘192.168.1.203‘,‘wgl‘,‘123456‘); //用户wgl,密码123456 ,登录192.168.1.203做测试
if($link) echo " 连接数据###########OK!!";
mysql_close();
?>
[root@rh5_100 ~]# elinks --dump bbs.baidu.com/test2.php
连接数据###########OK!! //显示这就OK,分别在2台服务器上做测试
9、搭建nginx(192.168.1.102)做轮巡处理
[root@rh5_102 ~]# tar -zxf nginx-1.0.5.tar.gz
[root@rh5_102 ~]# cd nginx-1.0.5
[root@rh5_102 nginx-1.0.5]# useradd -M -s /sbin/nologin nginx
[root@rh5_100 nginx-0.8.55]# ./configure // 配置时,如果提示缺少pcre-devel,pcre-devel模块,使用yum安装即可
--prefix=/usr/local/nginx
--user=nginx
--group=nginx
--with-http_stub_status_module
--with-http_ssl_module
Yum –y pcre-devel
[root@rh5_102 nginx-1.0.5]# make && make install
[root@rh5_102 nginx-1.0.5]# cd /usr/local/nginx/
[root@rh5_102 nginx]# vim conf/nginx.conf
44 server {
45 listen 8080;
46 server_name localhost;
134 upstream web{
135 server 192.168.1.10 weight=1;
136 server 192.168.1.20 weight=2;
//这些配置一定要写在http{} 这个容器里
137 }
138 server {
139 location / {
140 proxy_pass http://web;
141 }
142 }
[root@rh5_102 nginx]# ./sbin/nginx –t //如果80端口有服务在占用,要释放占用80端口服务
[root@rh5_102 nginx]# ./sbin/nginx -s stop
[root@rh5_102 nginx]# ./sbin/nginx
[root@rh5_102 nginx]# tail -1 /etc/hosts
192.168.1.102 bbs.baidu.com bbs
测试:[root@rh5_102 nginx]# elinks --dump 192.168.1.102
It works!
10、搭建squid(192.168.1.103)缓存服务器
[root@rh5_103 Server]# rpm -ivh squid-2.6.STABLE21-6.el5.x86_64.rpm
[root@rh5_103 Server]# vim /etc/squid/squid.conf
637 http_access allow all
778 reply_body_max_size 10240000 allow all //允许访问的最大对象
921 http_port 80 vhost
922 cache_peer 192.168.1.102 parent 80 0 originserver
1588 maximum_object_size_in_memory 10 KB 能够缓存的最大查询对象
1786 cache_dir ufs /var/spool/squid 100 16 256
100:缓存目录大小
16:缓存一级目录个数
256: 缓存二级目录个数
3004 visible_hostname rh5_103.localdomain
[root@rh5_103 ~]# hostname
rh5_103.localdomain
[root@rh5_103 Server]# tail -1 /etc/hosts
192.168.1.103 rh5_103.localdomain //增加现在主机名解析
[root@rh5_103 ~]# service iptables stop
[root@rh5_103 ~]# chkconfig iptables off
[root@rh5_103 Server]# service squid restart
[root@rh5_103 Server]# chkconfig squid on
11、测试nginx 能否为web服务器,做轮巡处理
在2台web服务器上编辑不同的网页
[root@rh5_100 ~]# cat /usr/local/httpd/htdocs/test3.php
<h2>
192.168.1.10
<h2>
[root@rh5_20 ~]# cat /usr/local/httpd/htdocs/test3.php
<h2>
192.168.1.20
<h2>
在客户机1.1.1.1上访问:
[root@localhost ~]# elinks --dump http://bbs.baidu.com/test3.php //访问网站一样,内容不一样
12、在192.168.10(web)上搭建rsync服务器
rsync:开源,快速,功能多,可增量,全量,本地或者远程镜像
支持:linux,win,unix
可增量备份,只同步变化的数据,因此传输速度快
支持匿名或者认证进程模式传输,可以实现方便或者安全的数据备份
使用服务器rh5自带的软件包
[root@rh5_10 ~]# rpm -qa | grep -i rsync
rsync-3.0.6-4.el5_7.1 //默认缺省安装
[root@rh5_10 ~]# touch /etc/rsyncd.conf //创建主配置文件(名字必须是rsyncd.conf)
[root@rh5_10 ~]# touch /etc/rsync_user //创建srync用户账户文件(名字随便起
但是得和rsync配置文件里相对应)
[root@rh5_10 ~]# chmod 600 /etc/rsync_user
[root@rh5_10 ~]# cat /etc/rsync_user
abc:123456 //冒号前面是用户名,后面是密码;如果有多行,就写多个
[root@rh5_10 ~]# cat /etc/rsyncd.conf
uid = boy //用户登录时会映射为boy用户
gid = boy
user chroot = yes
log file = /var/log/rsyncd.log //日志目录
pid file = /var/run/rsyncd.pid //pid文件目录
[aaa] //共享名
path = /usr/local/httpd/htdocs/ //共享目录
read only = yes //表示只读,如果将yes改为no,则表示不只读
auth users = abc //用户
secrets file = /etc/rsync_user //存放用户密码文件目录
[root@rh5_10 ~]# useradd -M -s /sbin/nologin boy //新建映射用户
[root@rh5_10 ~]# echo "123456" | passwd --stdin boy
[root@rh5_10 ~]# chkconfig rsync on
[root@rh5_10 ~]# service xinetd restart
[root@rh5_10 ~]# netstat -anput | grep :873 //查看xinetd超级管家是否启动
[root@rh5_10 ~]# rsync abc@192.168.1.10::aaa //验证查看共享
因Rsync只支持增量同步,无法做到实时更新同步,这里需要第三方软件(inotify-tools)提供实时更新同步
inotify-tools 是为linux下inotify文件监控工具提供的一套c的开发接口库函数,同时还提供了
一系列的命令行工具,
这些工具可以用来监控文件系统的事件。 inotify-tools是用c编写的,除了要求内核支持inotify外,不依赖于其他。
inotify-tools提供两种工具,一是inotifywait(实时监控所有事件,包括文件的访问,写入,修改,***等),它是用来
监控文件或目录的变化,二是inotifywatch(统计文件系统的事件),它是用来统计文件系统访问的次数。
如果列出的内核版本不低于 2.6.13,系统就支持 inotify。还可以检查机器的 /usr/include/sys/inotify.h 文件。如果它存在,表明内核支持 inotify。
在另一台web服务器(192.168.1.20)安装第三方软件(inotify-tools),并编写脚本
只要把文件上传到192.168.1.20上,rsync会自动同步到192.168.1.10上。
[root@rh5_20 ~]# uname -r
2.6.18-348.el5
[root@rh5_20 ~]# tar -zxf inotify-tools-3.14.tar.gz
[root@rh5_20 ~]# cd inotify-tools-3.14
[root@rh5_20 inotify-tools-3.14]# ./configure
[root@rh5_20 inotify-tools-3.14]# make && make install
[root@rh5_20 abc]# touch /bin/web.sh
[root@rh5_20 abc]# chmod +x /bin/web.sh
[root@rh5_20 html]# cat /etc/server.pass
123456 //新建存放同步rsync密码文件
[root@rh5_20 html]# chmod 600 /etc/server.pass //权限必须是600
[root@rh5_20 html]# cat /bin/web.sh
#!/bin/bash
ip=192.168.1.10
file=/usr/local/httpd/htdocs/
user=abc
file1=aaa
/usr/local/bin/inotifywait -mrq --timefmt ‘%d/%m/%y %H:%M‘ --format ‘%T %w%f%e‘ -e modify,delete,create,attrib $file | while read files
do
/usr/bin/rsync -az --delete --password-file\=/etc/server.pass $file $user@$ip::$file1
echo "${files} was rsynced" >>/tmp/rsync.log 2>&1
-m, –monitor //接收到一个事情而不退出,无限期地执行。默认的行为是接收到一个事情后立即退出
-r, –recursive //监视一个目录下的所有子目录
-q, –quiet //指定一次,不会输出详细信息,指定二次,除了致命错误,不会输出任何信息
–timefmt //指定时间格式,用于–format选项中的%T格式。
–format //指定输出格式。
%w 表示发生事件的目录
%f 表示发生事件的文件
%e 表示发生的事件
[root@rh5_20 html]# tail -1 /etc/rc.d/rc.local
/bin/web.sh &
该软件是触发型软件,必须对/usr/local/httpd/htdocs/下文件更改才会同步
13、编写备份脚本mysqlbak.sh,对数据库服务器192.168.1.201做增量备份。
编写备份脚本mysqlbakall.sh,对数据库服务器192.168.1.201做完整备份
安装提供expect交互式输入软件包(使用自带的yum源安装)
[root@rh6_201 ~]# yum -y install expect
[root@rh6_201 mysql]# yum -y install tcl // Expect使用Tcl作为语言核心
在代理服务器上新建文件和用户
[root@rh5_103 ~]# mkdir /bdbak/mysql
[root@rh5_103 ~]# useradd abc
[root@rh5_103 ~]# echo "123456" | passwd --stdin abc
[root@rh5_103 ~]# setfacl -m u:aaa:7 /bdbak/mysql
[root@rh6_201 ~]# cat mysqlbak.sh //增量备份脚本,并上传至服务器192.168.1.103
#!/bin/bash
name=`echo "$HOSTNAME" | awk -F "." ‘{print $1}‘`
date=`date +"%Y%m%d-%H"`
file=/var/lib/mysql
index="$name"-bin.index
lastlog=`tail -1 $file/$index | awk -F"/" ‘{print $2}‘`
present=/var/lib/mysql/present
dir=/bdbak
load=/bdbak/mysql
user=abc
ip=192.168.1.103
pass="123456"
[ -e "$dir" ]
if [ $? -ne 0 ];then
mkdir $dir
fi
[ -e "$present" ]
if [ $? -ne 0 ];then
mkdir $present
fi
[ -e "$file/log.txt" ]
if [ $? -ne 0 ];then
touch $file/log.txt
fi
for abc in `cat $file/$index | awk -F"/" ‘{print $2}‘`
do
cd $present
if [ "$lastlog" != "$abc" ];then
grep "$abc" $file/log.txt &> /dev/null
if [ $? -ne 0 ];then
echo "$abc" >> $file/log.txt
cp $file/$abc $present
tar -zcf $dir/${date}log.tar.gz *
fi
fi
done
rm -rf $present
expect << EOF
spawn scp "$dir/${date}log.tar.gz" $user@$ip:$load
expect "(yes/no)?" {
send "yes\r"
expect "password:"
send "$pass\r"
}
expect "password:"
send "$pass\r"
expect eof
EOF
~
~[root@rh6_201 ~]# cat mysqlbakall.sh //完整备份脚本
#!/bin/bash
name=`echo "$HOSTNAME" | awk -F "." ‘{print $1}‘`
date=`date +"%Y%m%d"`
file=/var/lib/mysql
index="$name"-bin.index
lastlog=`tail -1 $file/$index | awk -F"/" ‘{print $2}‘`
load=/bdbak/mysql
present=/var/lib/mysql/mysqlall
user=abc
ip=192.168.1.103
dir=/bdbak
pass="123456"
[ -e "$dir" ]
if [ $? -ne 0 ];then
mkdir $dir
fi
[ -e "$present" ]
if [ $? -ne 0 ];then
mkdir $present
fi
for abc in `cat $file/$index | awk -F"/" ‘{print $2}‘`
do
cd $present
if [ "$lastlog" != "$abc" ];then
cp $file/$abc $present
tar -zcf $dir/$date"all-log.tar.gz" *
fi
done
rm -rf $present
expect << EOF
spawn scp "$dir/${date}all-log.tar.gz" $user@$ip:$load
expect "(yes/no)?" {
send "yes\r"
expect "password:"
send "$pass\r"
}
expect "password:"
send "$pass\r"
expect eof
14、增加周期计划任务
[root@rh6_201 ~]# crontab -l
30 23 */1 * * /root/mysqlbak.sh &
* * * * 1 /root/mysqlbakall.sh &
总结:搭建LANP安装PHP源码包,注意:指定正确的mysql和httpd服务安装路径
每做完一步,都要检测配置是否达到预想的效果
写备份脚本时,要先写备份脚本,再接传递脚本,都没问了再想结合
在搭建服务中,严禁SSH别的服务器,检测,防止后面配置,配置成错误的服务器(导致和规划拓扑不一样结果可想而知,还得清处一系列多余的配置)。
本文出自 “linux网络服务搭建” 博客,谢绝转载!
项目实战,LANMP+NGINX+SQUID,布布扣,bubuko.com
原文:http://8824130.blog.51cto.com/8814130/1423562