Mutual SSL authentication or certificate based mutual authentication refers to two parties authenticating each other through verifying the provided digital certificate so that both parties are assured of the others‘ identity. In technology terms, it refers to a client (web browser or client application) authenticating themselves to a server (website or server application) and that server also authenticating itself to the client through verifying the public key certificate/digital certificate issued by the trusted Certificate Authorities (CAs). Because authentication relies on digital certificates, certification authorities such as Verisign or Microsoft Certificate Server are an important part of the mutual authentication process. From a high-level point of view, the process of authenticating and establishing an encrypted channel using certificate-based mutual authentication involves the following steps:
Mutual SSL authentication works similar to SSL (Secure Socket Layer) authentication, with the addition of client authentication using digital signatures. Thus, SSL authentication and Mutual SSL authentication also informally known as 1-way SSL authentication and 2-way SSL authentication, respectively. As a developer, if you‘re interested in developing or be able to debug the mutual SSL authentication effectively, it can be very useful to understand the intricacies of the handshake messages happening under the hood.
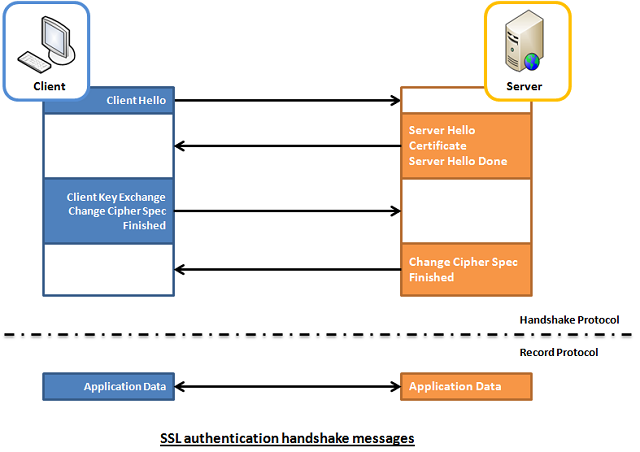
In SSL authentication, the client is presented with a server’s certificate, the client computer might try to match the server’s CA against the client’s list of trusted CAs. If the issuing CA is trusted, the client will verify that the certificate is authentic and has not been tampered with. In this aspect, both client and server use 9 handshake messages to establish the encrypted channel prior to message exchanging.
ClientHello message proposing SSL options. ServerHello message selecting the SSL options. Certificate message, which contains the server‘s certificate. ServerHelloDone message. ClientKeyExchange message. ChangeCipherSpec message to activate the negotiated options for all future messages it will send. Finished message to let the server check the newly activated options. ChangeCipherSpec message to activate the negotiated options for all future messages it will send. Finished message to let the client check the newly activated options. 
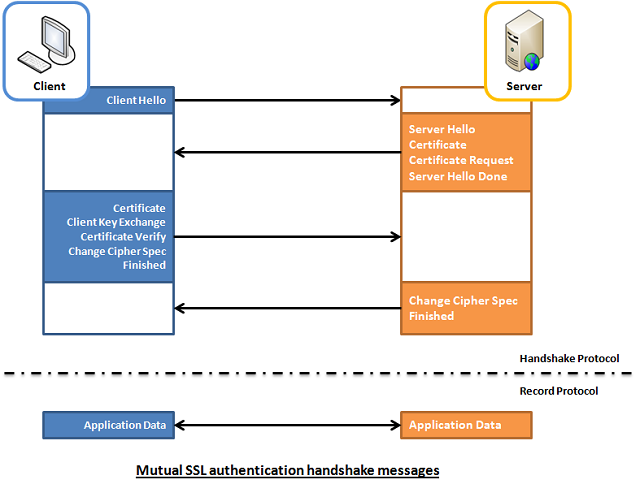
Whereas in mutual SSL authentication, both client and server authenticate each other through the digital certificate so that both parties are assured of the others‘ identity. In this aspect, both client and server use 12 handshake messages to establish the encrypted channel prior to message exchanging.
ClientHello message proposing SSL options. ServerHello message selecting the SSL options. Certificate message, which contains the server‘s certificate. CertificateRequest message, so that the connection can be mutually authenticated. ServerHelloDone message. Certificate message, which contains the client‘s certificate. ClientKeyExchange message. CertificateVerify message to let the server know it owns the sent certificate. ChangeCipherSpec message to activate the negotiated options for all future messages it will send. Finished message to let the server check the newly activated options. ChangeCipherSpec message to activate the negotiated options for all future messages it will send. Finished message to let the client check the newly activated options. 
To help readers better visualize what‘s happening under the hood, I‘ve enhanced a code example taken from the Microsoft website so that both client and server are capable of authenticating each other using the mutual SSL authentication. The code sample is very simple, and I won‘t illustrate much here. Basically, what it does is the client application sends a "Hello from the client." message to the server and the server application replies with a "Hello from the server." message, right after the mutual SSL authentication is completed successfully.
To capture the handshake messages transacted between the client and server, I use one of the popular and open-source packet analyzer tools called WireShark. It is a powerful and easy to use packet capture and analyzer tool, which can captures messages over a hundred of protocols. To learn more about how you can make use of this tool, please visit its website.
However, due to the lack of supported Loopback Interface in Windows operating system, I‘ve to setup the client and server application running on two different machines in order to use Wireshark to capture their handshake messages. The handshake messages captured while running the applications are shown in the screenshot below, and the IP address "10.5.3.28" and "10.5.3.18" in the Source or Destination columns represents "The Client" and "The Server", respectively.
For analysis and verifying purposes, the handshake messages that we‘re concerned about are summarized and listed below:
No.30, 31 and 32 are the TCP (Transmission Control Protocol) handshake messages.
No.33 - Corresponding to Section 2.2 - Item 1.
No.35 - It contains 4 messages, which are:
No.38 - It contains 5 messages, which are
No.41 - It contains 2 messages, which are
Messages from No.81 onwards are application data messages exchange between the client and server.
The demo project included in this article, which is available for download at the top of this article, is intended to be run locally as opposed to the captured one shown above. This is because the certificates included in the demo project are generated for "localhost" use only. If you would like to try it out, please follow the steps outlined below to get it up and running on your workstation.
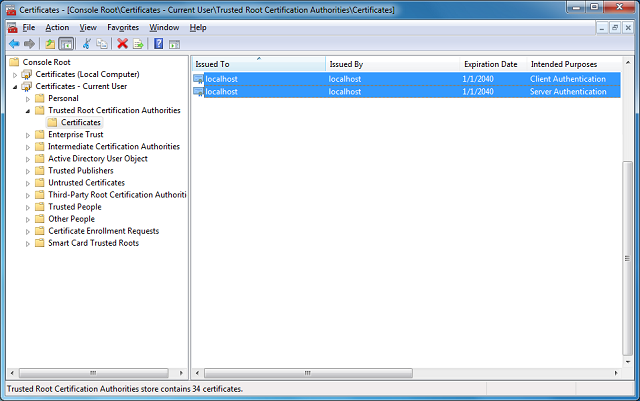
Follow the steps outlined below to install the client and server certificates into the Windows certificate store:


Of course, you can switch between the Mutual SSL authentication and SSL authentication behavior in the demo project (MyServer) by setting the argument "clientCertificateRequired" of the SslStream.AuthenticateAsServer function to true and false, respectively.
![]() Collapse | Copy Code
Collapse | Copy Code
// Mutual SSL authentication (requires client certificate)
   sslStream.AuthenticateAsServer(certificate, true, SslProtocols.Default, true);
// SSL authentication only (do not require client certificate)
   sslStream.AuthenticateAsServer(certificate, false, SslProtocols.Default, true);
[转] An Introduction to Mutual SSL Authentication,布布扣,bubuko.com
[转] An Introduction to Mutual SSL Authentication
原文:http://www.cnblogs.com/popsuper1982/p/3800569.html