转自:http://www.cnblogs.com/sihaixuan/p/4852974.html
原文:How to distribute your own Android library through jCenter and Maven Central from Android Studio
转自:翻译 http://www.jcodecraeer.com/a/anzhuokaifa/androidkaifa/2015/0623/3097.html
博客:http://blog.csdn.net/jinyp/article/details/55095310
首先在maven上添加一个jcenter库。
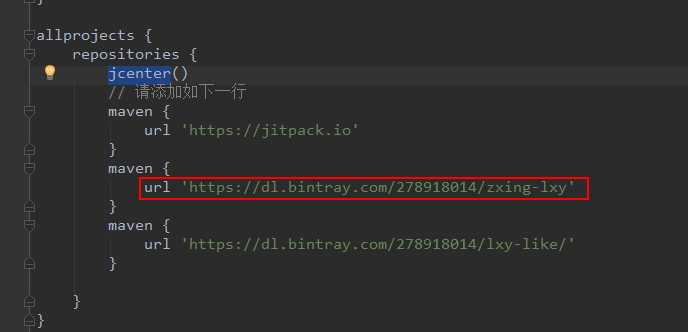
如果你想在Android Studio中引入一个library到你的项目,你只需添加如下的一行代码到模块的build.gradle文件中。

这样就可以使用maven库上的library了。
1.我们需要把本地的library上传到jcenter服务器上,才可以使用maven.
2,开始上传首先我们在build.gradle上面添加两行代码:
buildscript {
    repositories {
        jcenter()
    }
    dependencies {
        classpath ‘com.android.tools.build:gradle:2.3.0‘

        // NOTE: Do not place your application dependencies here; they belong
        // in the individual module build.gradle files
        // 添加下面两行代码即可。
        classpath ‘com.github.dcendents:android-maven-gradle-plugin:1.5‘
        classpath ‘com.jfrog.bintray.gradle:gradle-bintray-plugin:1.4‘
    }
}
3.配置library里面的build.gradle
apply plugin: ‘com.android.library‘
// 这里添加下面两行代码。
apply plugin: ‘com.github.dcendents.android-maven‘
apply plugin: ‘com.jfrog.bintray‘
// 项目引用的版本号,比如compile ‘com.yanzhenjie:andserver:1.0.1‘中的1.0.1就是这里配置的。
version = "1.1.1"
// 定义两个链接,下面会用到。
def siteUrl = ‘https://gitee.com/lixiangyang8080/zxing_lxy_module‘ // 项目主页。
def gitUrl = ‘https://gitee.com/lixiangyang8080/zxing_lxy_module.git‘ // Git仓库的url。
// 唯一包名,比如compile ‘com.yanzhenjie:andserver:1.0.1‘中的com.yanzhenjie就是这里配置的。
group = "com.example.lenovo.zxing_lxy"
android {
compileSdkVersion 26
buildToolsVersion "26.0.1"
defaultConfig {
minSdkVersion 15
targetSdkVersion 26
versionCode 1
versionName "1.0"
testInstrumentationRunner "android.support.test.runner.AndroidJUnitRunner"
}
buildTypes {
release {
minifyEnabled false
proguardFiles getDefaultProguardFile(‘proguard-android.txt‘), ‘proguard-rules.pro‘
}
}
}
dependencies {
compile fileTree(include: [‘*.jar‘], dir: ‘libs‘)
androidTestCompile(‘com.android.support.test.espresso:espresso-core:2.2.2‘, {
exclude group: ‘com.android.support‘, module: ‘support-annotations‘
})
compile ‘com.android.support:appcompat-v7:26.+‘
testCompile ‘junit:junit:4.12‘
compile files(‘libs/zxing-core-3.3.0.jar‘)
}
install {
repositories.mavenInstaller {
// 生成pom.xml和参数
pom {
project {
packaging ‘aar‘
// 项目描述,复制我的话,这里需要修改。
name ‘zxing For Android‘// 可选,项目名称。
description ‘The Android build the framework of the Http server.‘// 可选,项目描述。
url siteUrl // 项目主页,这里是引用上面定义好。
// 软件开源协议,现在一般都是Apache License2.0吧,复制我的,这里不需要修改。
licenses {
license {
name ‘The Apache Software License, Version 2.0‘
url ‘http://www.apache.org/licenses/LICENSE-2.0.txt‘
}
}
//填写开发者基本信息,复制我的,这里需要修改。
developers {
developer {
id ‘278918014‘ // 开发者的id。
name ‘巷阳‘ // 开发者名字。
email ‘[lixiangyang8080@gmail.com]‘ // 开发者邮箱。
}
}
// SCM,复制我的,这里不需要修改。
scm {
connection gitUrl // Git仓库地址。
developerConnection gitUrl // Git仓库地址。
url siteUrl // 项目主页。
}
}
}
}
}
// 生成jar包的task,不需要修改。
task sourcesJar(type: Jar) {
from android.sourceSets.main.java.srcDirs
classifier = ‘sources‘
}
// 生成jarDoc的task,不需要修改。
task javadoc(type: Javadoc) {
source = android.sourceSets.main.java.srcDirs
classpath += project.files(android.getBootClasspath().join(File.pathSeparator))
// destinationDir = file("../javadoc/")
failOnError false // 忽略注释语法错误,如果用jdk1.8你的注释写的不规范就编译不过。
}
// 生成javaDoc的jar,不需要修改。
task javadocJar(type: Jar, dependsOn: javadoc) {
classifier = ‘javadoc‘
from javadoc.destinationDir
}
artifacts {
archives javadocJar
archives sourcesJar
}
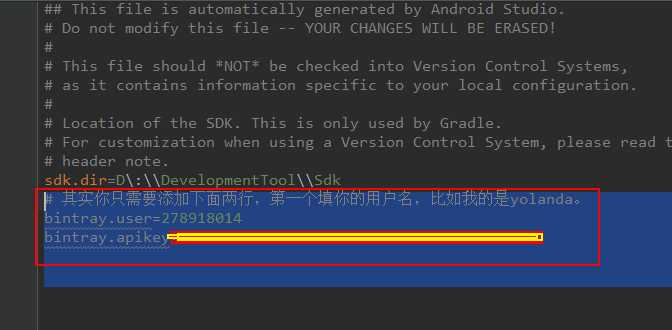
// 这里是读取Bintray相关的信息,我们上传项目到github上的时候会把gradle文件传上去,所以不要把帐号密码的信息直接写在这里,写在local.properties中,这里动态读取。
Properties properties = new Properties()
properties.load(project.rootProject.file(‘local.properties‘).newDataInputStream())
bintray {
user = properties.getProperty("bintray.user") // Bintray的用户名。
key = properties.getProperty("bintray.apikey") // Bintray刚才保存的ApiKey。
configurations = [‘archives‘]
pkg {
repo = "lxy-like" // 上传到maven库。(这里要特别注意,如果写了maven报404错误,请在bintray创建一个仓库,这里填改成你创建的仓库的名字,如何创建请看下图。)
name = "zxing-lxy" // 发布到Bintray上的项目名字,这里的名字不是compile ‘com.yanzhenjie:andserver:1.0.1‘中的andserver。
userOrg = ‘278918014‘ // Bintray的用户名,2016年11月更新。
websiteUrl = siteUrl
vcsUrl = gitUrl
licenses = ["Apache-2.0"]
publish = true // 是否是公开项目。
}
}
4.配置local.properties
5.配置,上传。
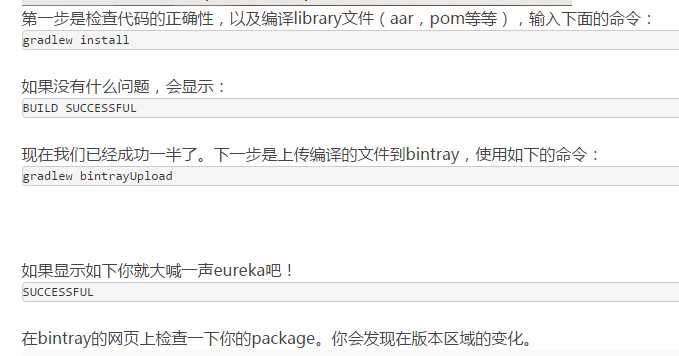
6.在bintray的网页上检查一下你的package。你会发现在版本区域的变化。
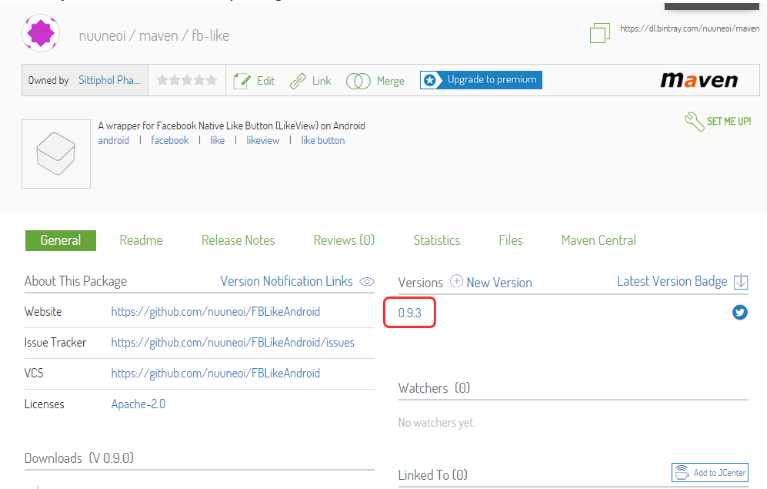
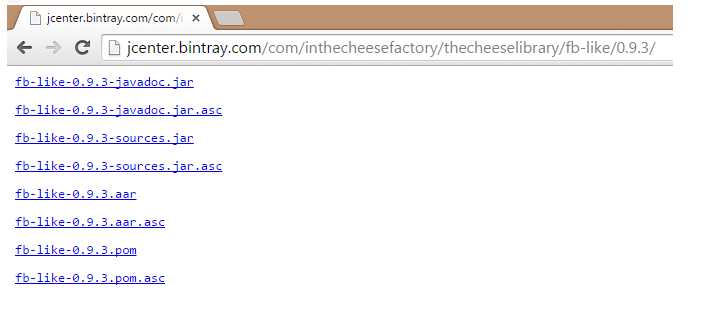
7.点击进去,进入Files选项卡,你会看见那里有我们所上传的library文件。
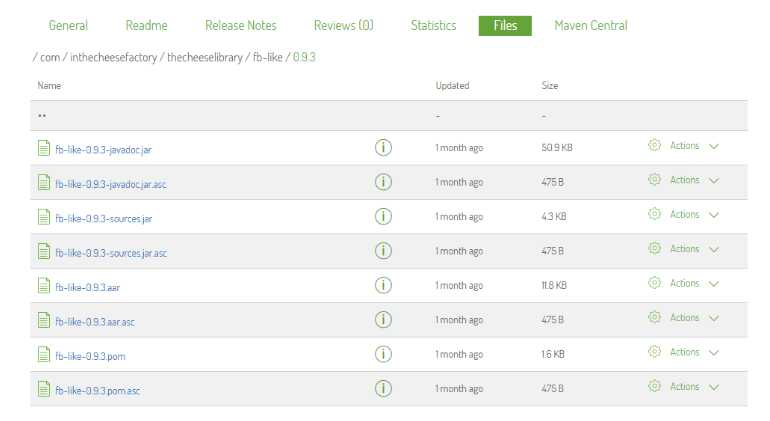
恭喜,你的library终于放在了互联网上,任何人都可以使用了!
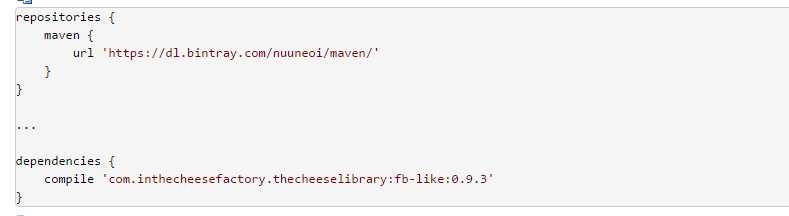
不过也别高兴过头,library现在仍然只是在你自己的Maven仓库,而不是在jcenter上。如果有人想使用你的library,他必须定义仓库的url,如下:
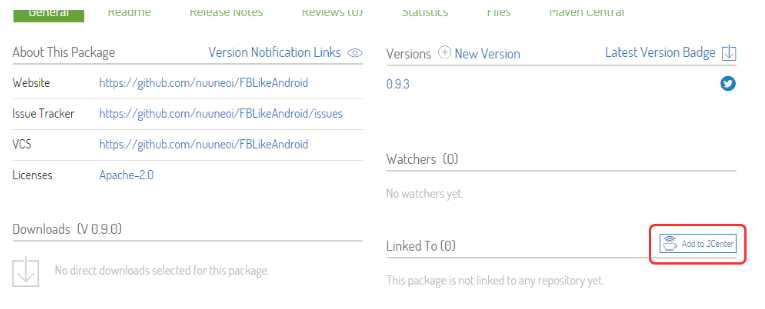
8.同步bintray用户仓库到jcenter
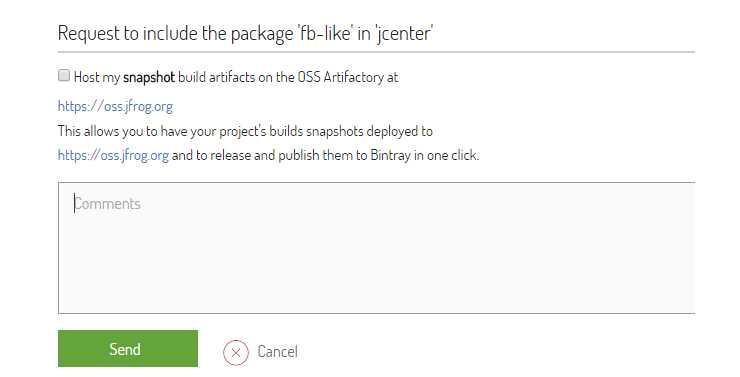
9.什么也不做直接点击Send。
现在我们所能做的就是等待bintray团队审核我们的请求,大概2-3个小时。一旦同步的请求审核通过,你会收到一封确认此更改的邮件。现在我们去网页上确认,你会在 Linked To 部分看到一些变化。

10.搞定。
原文:http://www.cnblogs.com/lixiangyang521/p/7760754.html