首先在路由字典中,接收值的组件中加上:/:id

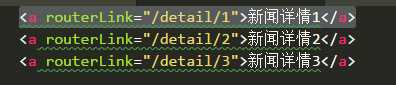
在发送值的组件中,发送值的方式有几种。
第一种:<a routerLink="/detail/1">新闻详情1</a>
利用routerLink,在跳转的组件后加上要传过去的值
接着在接收值的组件中,也就是detail组件里,引入ActivatedRoute,并实例化
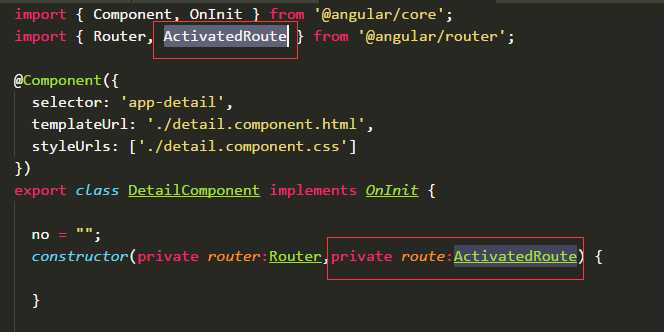
然后需要使用route,就能获取传过的值

1.以根路由跳转/login
|
1
|
this.router.navigate([‘login‘]); |
2.设置relativeTo相对当前路由跳转,route是ActivatedRoute的实例,使用需要导入ActivatedRoute
|
1
|
this.router.navigate([‘login‘, 1],{relativeTo: route}); |
3.路由中传参数 /login?name=1
|
1
|
this.router.navigate([‘login‘, 1],{ queryParams: { name: 1 } }); |
4.preserveQueryParams默认值为false,设为true,保留之前路由中的查询参数/login?name=1 to /home?name=1
|
1
|
this.router.navigate([‘home‘], { preserveQueryParams: true }); |
5.路由中锚点跳转 /home#top
|
1
|
this.router.navigate([‘home‘],{ fragment: ‘top‘ }); |
6.preserveFragment默认为false,设为true,保留之前路由中的锚点/home#top to /role#top
|
1
|
this.router.navigate([‘/role‘], { preserveFragment: true }); |
7.skipLocationChange默认为false,设为true,路由跳转时浏览器中的url会保持不变,但是传入的参数依然有效
|
1
|
this.router.navigate([‘/home‘], { skipLocationChange: true }); |
8.replaceUrl默认为true,设为false,路由不会进行跳转
|
1
|
this.router.navigate([‘/home‘], { replaceUrl: true }); |
原文:https://www.cnblogs.com/Ivan-JIANG/p/8966838.html