环境: PHP5.2 以上版本
先去官网下载smarty模版引擎的库文件到你的电脑或服务器上
smarty官方网站库文件下载地址: https://www.smarty.net/download
下载完成后解压到本地

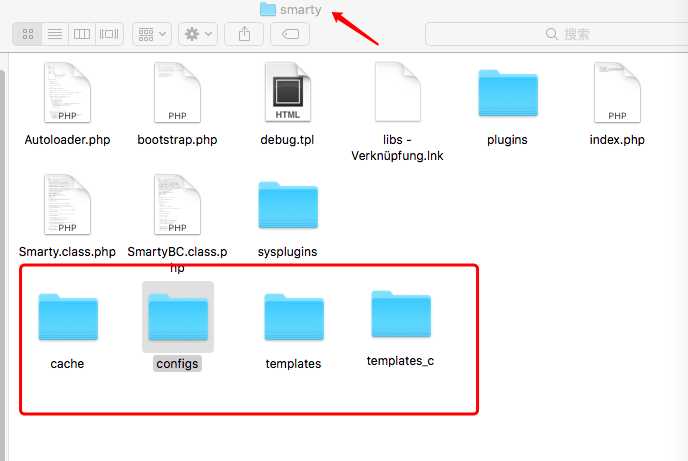
有用的是libs文件夹里面的文件,在你的www目录下新建一个smarty目录,将libs目录拷贝进smarty目录中,
特别需要注意你的templates_c文件夹必须要有可写的权限,如果实在不行,可以在本地设置为777,
chmod 777 templates_c
然后你还需要在smarty目录中创建四个文件夹templates、templates_c、cache、configs
然后在你的smarty目录下的index.php(没有的话就自己新建一个)输入如下代码:
<?php
    require(‘Smarty.class.php‘);
    $smarty = new Smarty;
    $smarty->assign(‘name‘,‘Ryan‘);
    $smarty->display(‘index.tpl‘);
接着在templates目录下创建index.tpl文件,这个文件的后缀名称没有固定,你可以按你的项目进行命名.
在templates/index.tpl中输入如下代码:
<html>
  <head>
    <title>Smarty</title>
  </head>
  <body>
    Hello, {$name}!
  </body>
</html>
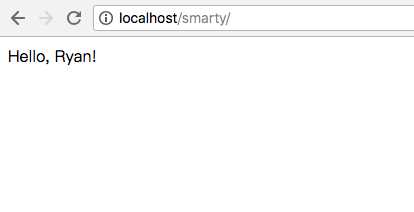
打开浏览器,输入localhost/smarty/index.php看到如下结果表示安装成功。
原文:https://www.cnblogs.com/ryanzheng/p/9114548.html