这几天抽空搞了下spring cloud 1.x(2.0目前应该来说还不成熟),因为之前项目中使用dubbo以及自研的rpc框架,所以总体下来还是比较顺利,加上spring boot,不算笔记整理,三天不到一点围绕spring boot reference和spring microservice in action主要章节都看完并完整的搭建了spring cloud环境,同时仔细的思考并解决了一些spring cloud和书籍作者理想化假设的问题,有些在网上和官方文档中没有明确的答案,比如spring cloud sleuth如何使用log4j 2同时保留MDC。本文还会列出spring cloud和dubbo的一些异同和各自优劣势总结,两者应该来说各有优劣势,理想的架构如果各方面条件允许的话,其实可以结合spring cloud+dubbo或者自研的rpc。当然本文不会完完整整的讲解spring cloud整个技术栈的详细细节,但是对于核心要点以及关键的特性/逻辑组件会更多的评述组件的设计是否合理,如何解决,必要的会引述第三方资源,这和其他系列如出一辙。
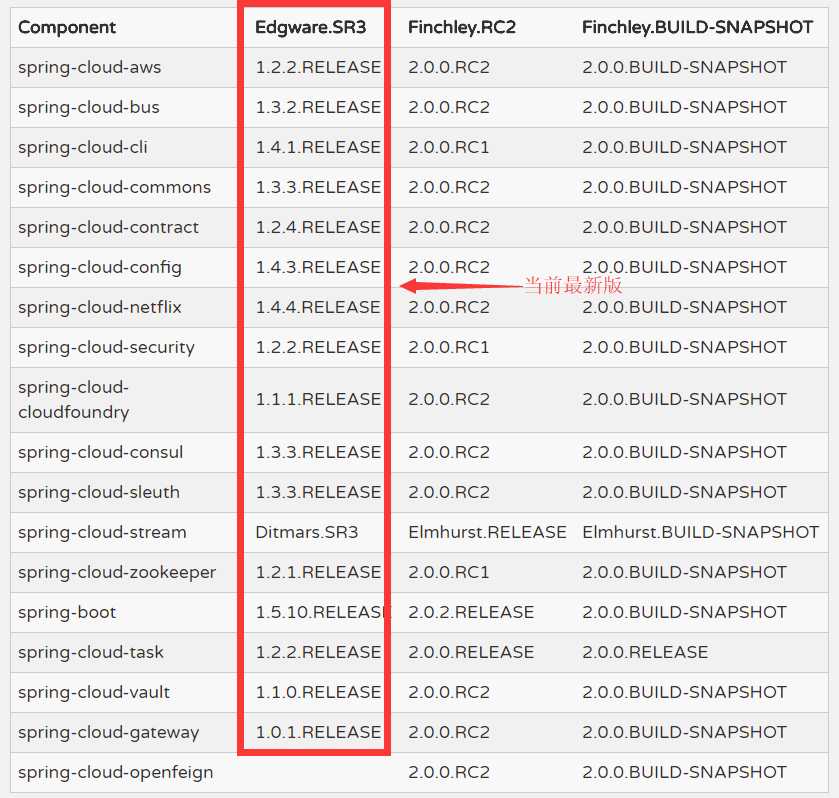
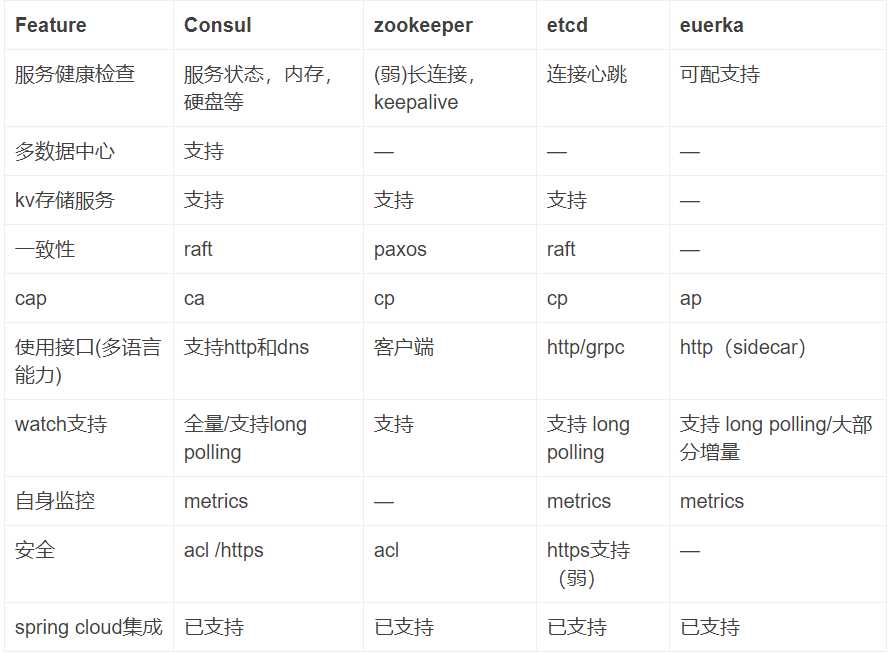
在开始介绍spring cloud的架构之前,笔者打算先梳理下spring cloud生态的各个组件,因为对于很多新人甚至老鸟来说,初看起来,spring cloud的组件以及版本很乱,查看官方文档https://projects.spring.io/spring-cloud/(http://cloud.spring.io/spring-cloud-static/Edgware.SR3/single/spring-cloud.html,注:spring 5.0出来之后,pdf就没有了:(),我们可以发现如下:
相对于spring framework来说,spring cloud的组织更像是spring template各系列,独立发展,除了核心部分外,几乎各组件没有关联或者关联性很弱,他们只是基于这个框架,除非应用架构需要其特性,否则都不需要关心这些组件。对于微服务架构(假设使用 spring cloud的rpc)来说,只有两个必备:
除了这两个核心组件外,下列组件通常在大型系统中会一起使用(中小型系统可能不会采用):
在开始正式讲解spring cloud前,还不得不提下spring cloud组件的版本,由于spring cloud组件众多,且由不同的社区主导开发,因此spring cloud的版本命名跟eclipse类似,不是使用数字递增,而是采用城市名命名,每个spring cloud包含一系列的组件,通过查看spring-cloud-dependencies maven构件的定义,我们知道各自的版本。例如Edgware.SR3版本依赖的各组件版本如下:
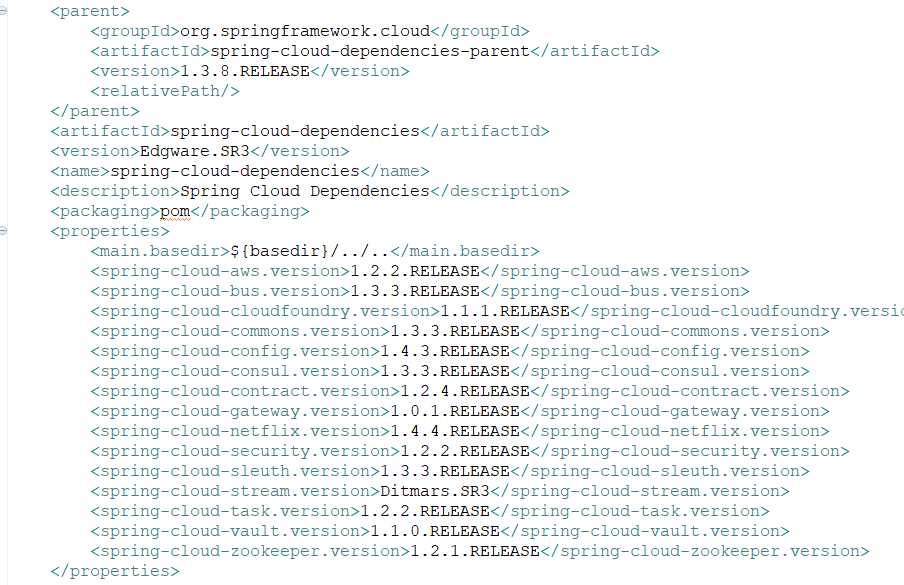
注:spring-cloud-dependencies是个应用一定会引入到dependencyManagement的依赖,它包含了特定版本的spring cloud组件的版本管理,直接引入可以省事很多。
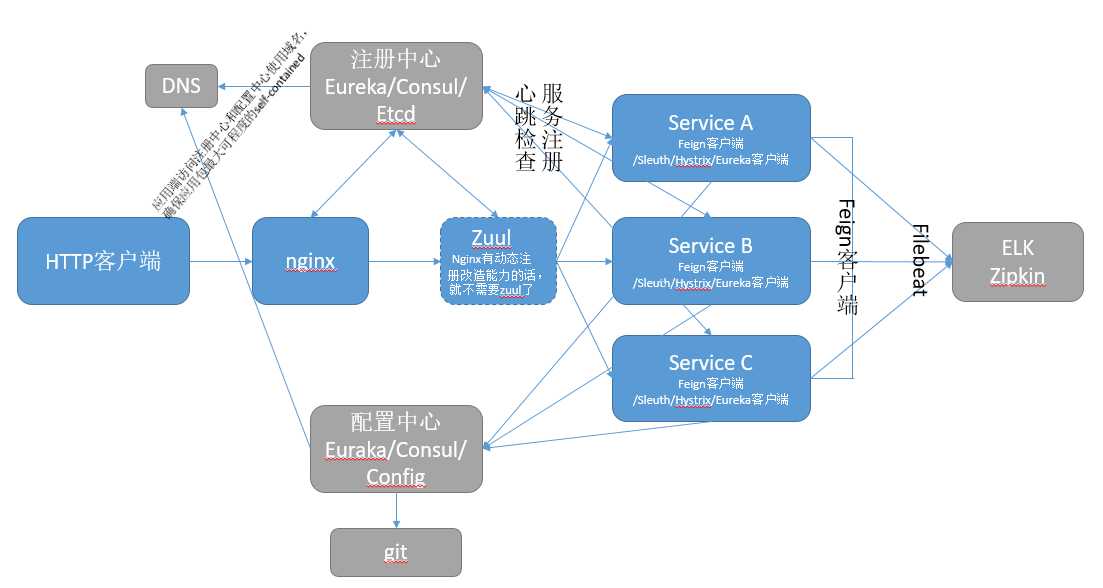
从上述对spring cloud各组件的梳理,我们可以知道完整的spring cloud架构如下:
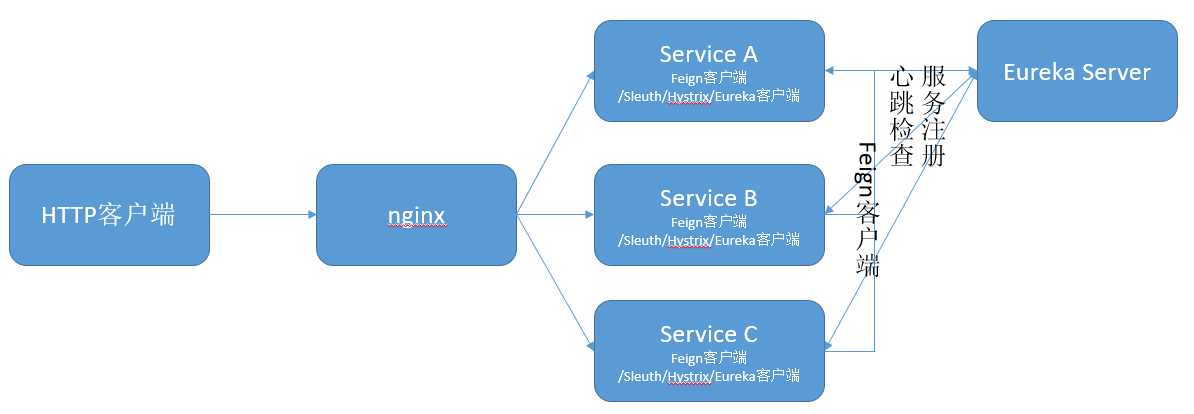
最简的spring cloud架构如下:
现在,我们来看下spring cloud的主要组件的核心功能以及dubbo中对应的特性。
=====================================
再重复一遍,spring cloud依赖于spring boot,所以不熟悉spring boot的同学,先掌握下spring boot,可参考笔者的写给大忙人spring boot 1.x学习指南。
有些书籍一开始就讲spring cloud config,有些书籍则几乎可以认为把官方文档翻译一遍 ,官方文档很多情况下对某些假设是很理想化的,所以,个人觉得有些时候就该有得放矢,不要追求大而全,很简单的就不要大谈特谈了。
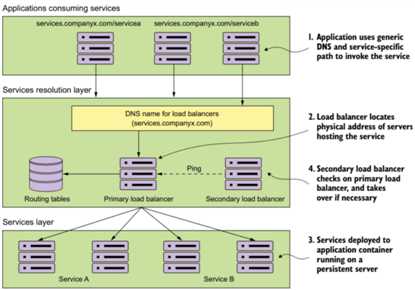
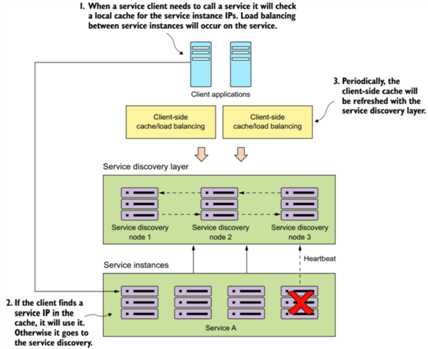
现在来看下服务的注册和调用。
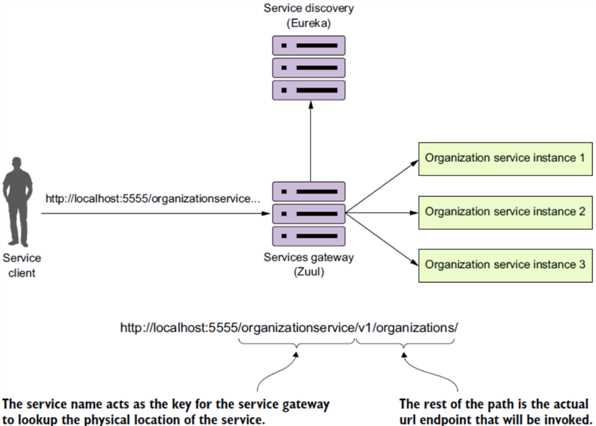
由于在实际开发中,我们基本上使用Feign开发,所以,这里我们重点看Feign方式的RPC调用。
package com.thoughtmechanix.org.api;

import org.springframework.cloud.netflix.feign.FeignClient;
import org.springframework.web.bind.annotation.PathVariable;
import org.springframework.web.bind.annotation.RequestMapping;
import org.springframework.web.bind.annotation.RequestMethod;

@FeignClient("organizationservice")
public interface OrganizationService {
    @RequestMapping(value="/v1/organizations/{organizationId}",method = RequestMethod.GET)
    public Organization getOrganization( @PathVariable("organizationId") String organizationId);
}
然后OrganizationService就可以被当做正常的spring bean使用了,如下:
package com.thoughtmechanix.licenses.controllers;

import org.slf4j.Logger;
import org.slf4j.LoggerFactory;
import org.springframework.beans.factory.annotation.Autowired;
import org.springframework.beans.factory.annotation.Value;
import org.springframework.web.bind.annotation.PathVariable;
import org.springframework.web.bind.annotation.RestController;

import com.thoughtmechanix.licenses.model.License;
import com.thoughtmechanix.org.api.Organization;
import com.thoughtmechanix.org.api.OrganizationService;

@RestController
public class LicenseServiceController implements LicenseService {

    private static final Logger logger = LoggerFactory.getLogger(LicenseServiceController.class);

    @Autowired
    private OrganizationService organizationService;

    @Override
    @RequestMapping(value = "/v2/organizations/{organizationId}/licenses/{licenseId}", method = RequestMethod.GET)
    public Organization getLicensesInterface(@PathVariable("organizationId")String organizationId, @PathVariable("licenseId")String licenseId) {
        logger.info("调用远程Eureka服务!");
        return organizationService.getOrganization(organizationId);
    }
}
package com.thoughtmechanix.licenses;

import org.springframework.boot.SpringApplication;
import org.springframework.boot.autoconfigure.SpringBootApplication;
import org.springframework.cloud.client.circuitbreaker.EnableCircuitBreaker;
import org.springframework.cloud.context.config.annotation.RefreshScope;
import org.springframework.cloud.netflix.eureka.EnableEurekaClient;
import org.springframework.cloud.netflix.feign.EnableFeignClients;
import org.springframework.context.annotation.ComponentScan;

@RefreshScope
@EnableFeignClients("com.thoughtmechanix.org.api")
@EnableEurekaClient
@SpringBootApplication
@EnableCircuitBreaker
@ComponentScan({"com.thoughtmechanix.licenses","com.thoughtmechanix.xyz.api"})
public class Application {
    public static void main(String[] args) {
        SpringApplication.run(Application.class, args);
    }
}
注:这里有个特殊点,Feign的接口扫描路径定义在@EnableFeignClients注解的beanPackage属性上,而不是@ComponentScan注解上,否则如果Feign的接口不在主应用类所在的包或者子包下,就在启动时包bean找不到,如下所示:
Description:

Field organizationService in com.thoughtmechanix.licenses.controllers.LicenseServiceController required a bean of type ‘com.thoughtmechanix.org.api.OrganizationService‘ that could not be found.


Action:

Consider defining a bean of type ‘com.thoughtmechanix.org.api.OrganizationService‘ in your configuration.

[WARNING]
java.lang.reflect.InvocationTargetException
	at sun.reflect.NativeMethodAccessorImpl.invoke0(Native Method)
	at sun.reflect.NativeMethodAccessorImpl.invoke(NativeMethodAccessorImpl.java:62)
	at sun.reflect.DelegatingMethodAccessorImpl.invoke(DelegatingMethodAccessorImpl.java:43)
	at java.lang.reflect.Method.invoke(Method.java:498)
	at org.springframework.boot.maven.AbstractRunMojo$LaunchRunner.run(AbstractRunMojo.java:527)
	at java.lang.Thread.run(Thread.java:745)
Caused by: org.springframework.beans.factory.UnsatisfiedDependencyException: Error creating bean with name ‘licenseServiceController‘: Unsatisfied dependency expressed through field ‘organizationService‘; nested exception is org.springframework.beans.factory.NoSuchBeanDefinitionException: No qualifying bean of type ‘com.thoughtmechanix.org.api.OrganizationService‘ available: expected at least 1 bean which qualifies as autowire candidate. Dependency annotations: {@org.springframework.beans.factory.annotation.Autowired(required=true)}
	at org.springframework.beans.factory.annotation.AutowiredAnnotationBeanPostProcessor$AutowiredFieldElement.inject(AutowiredAnnotationBeanPostProcessor.java:588)
	at org.springframework.beans.factory.annotation.InjectionMetadata.inject(InjectionMetadata.java:88)
	at org.springframework.beans.factory.annotation.AutowiredAnnotationBeanPostProcessor.postProcessPropertyValues(AutowiredAnnotationBeanPostProcessor.java:366)
	at org.springframework.beans.factory.support.AbstractAutowireCapableBeanFactory.populateBean(AbstractAutowireCapableBeanFactory.java:1264)
	at org.springframework.beans.factory.support.AbstractAutowireCapableBeanFactory.doCreateBean(AbstractAutowireCapableBeanFactory.java:553)
	at org.springframework.beans.factory.support.AbstractAutowireCapableBeanFactory.createBean(AbstractAutowireCapableBeanFactory.java:483)
	at org.springframework.beans.factory.support.AbstractBeanFactory$1.getObject(AbstractBeanFactory.java:306)
	at org.springframework.beans.factory.support.DefaultSingletonBeanRegistry.getSingleton(DefaultSingletonBeanRegistry.java:230)
	at org.springframework.beans.factory.support.AbstractBeanFactory.doGetBean(AbstractBeanFactory.java:302)
	at org.springframework.beans.factory.support.AbstractBeanFactory.getBean(AbstractBeanFactory.java:197)
	at org.springframework.beans.factory.support.DefaultListableBeanFactory.preInstantiateSingletons(DefaultListableBeanFactory.java:761)
	at org.springframework.context.support.AbstractApplicationContext.finishBeanFactoryInitialization(AbstractApplicationContext.java:867)
	at org.springframework.context.support.AbstractApplicationContext.refresh(AbstractApplicationContext.java:543)
	at org.springframework.boot.context.embedded.EmbeddedWebApplicationContext.refresh(EmbeddedWebApplicationContext.java:122)
	at org.springframework.boot.SpringApplication.refresh(SpringApplication.java:693)
	at org.springframework.boot.SpringApplication.refreshContext(SpringApplication.java:360)
	at org.springframework.boot.SpringApplication.run(SpringApplication.java:303)
	at org.springframework.boot.SpringApplication.run(SpringApplication.java:1118)
	at org.springframework.boot.SpringApplication.run(SpringApplication.java:1107)
	at com.thoughtmechanix.licenses.Application.main(Application.java:19)
	... 6 more
Caused by: org.springframework.beans.factory.NoSuchBeanDefinitionException: No qualifying bean of type ‘com.thoughtmechanix.org.api.OrganizationService‘ available: expected at least 1 bean which qualifies as autowire candidate. Dependency annotations: {@org.springframework.beans.factory.annotation.Autowired(required=true)}
	at org.springframework.beans.factory.support.DefaultListableBeanFactory.raiseNoMatchingBeanFound(DefaultListableBeanFactory.java:1493)
	at org.springframework.beans.factory.support.DefaultListableBeanFactory.doResolveDependency(DefaultListableBeanFactory.java:1104)
	at org.springframework.beans.factory.support.DefaultListableBeanFactory.resolveDependency(DefaultListableBeanFactory.java:1066)
	at org.springframework.beans.factory.annotation.AutowiredAnnotationBeanPostProcessor$AutowiredFieldElement.inject(AutowiredAnnotationBeanPostProcessor.java:585)
	... 25 more
通过为controller定义要实现的接口,就做到了一次定义,多次引用(这和我们使用传统的spring mvc开发不同,建议把RequestMapper定义在接口上)。
所以,从使用上来说,Feign很简单,对于有过其他RPC开发经验的同学来说,就是换个注解而已。
我记得dubbo和其他rpc在这一块做的不是特别好,虽然spring cloud提供了该特性、而且很灵活,但是它有个关键设计很鸡肋,后面会讲到。
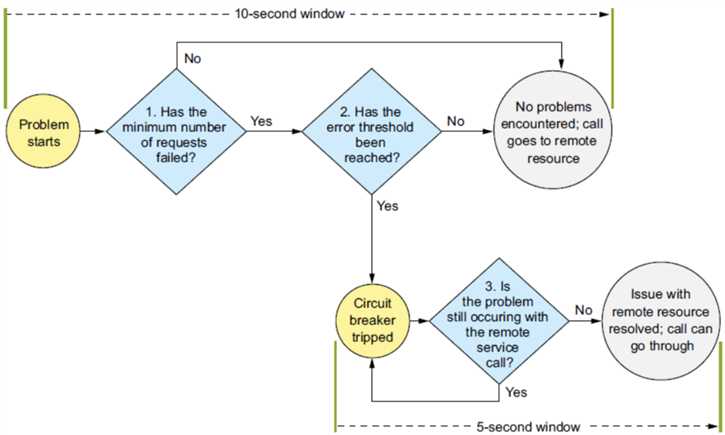
在spring cloud的微服务架构中,一个请求调用经过的节点内关键步骤如下:
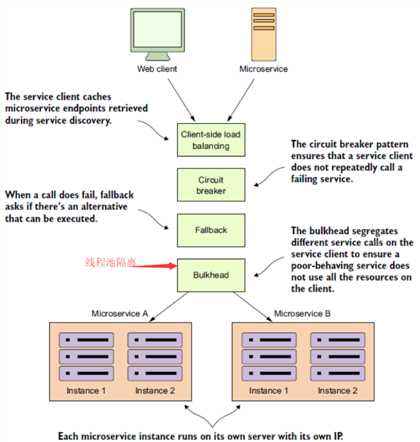
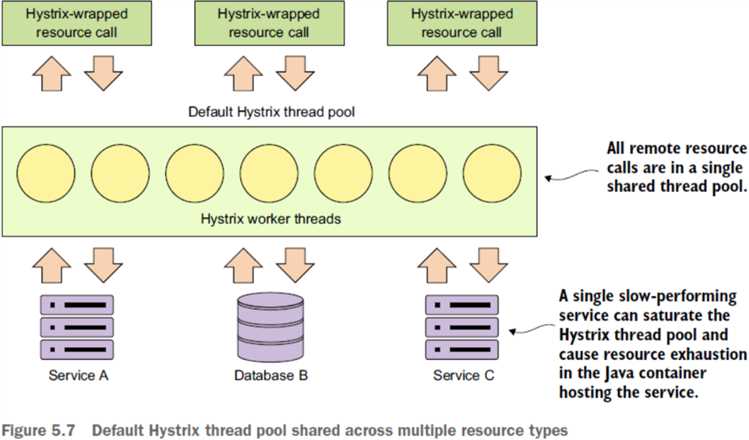
合理的隔离机制应该是可以自定义线程池数量,以及哪些服务放在哪个线程池。如下:
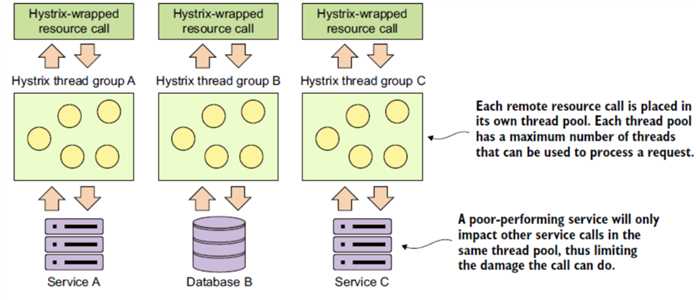
自然,Hystrix提供了按需配置线程池的接口。@HystrixCommand注解的threadPoolKey和threadPoolProperties属性就是用来指定线程池的,包括线程池名称、大小、队列长度(就线程池而言,最重要的就是名称,核心大小,最大大小,队列长度)。如下:
@HystrixCommand(fallbackMethod = "buildFallbackLicenseList",
          threadPoolKey = "licenseByOrgThreadPool",
          threadPoolProperties = {
            @HystrixProperty(name = "coreSize",value="30"),
            @HystrixProperty(name="maxQueueSize", value="10")
          })
public List<License> getLicensesByOrg(String organizationId){
  return licenseRepository.findByOrganizationId(organizationId);
)
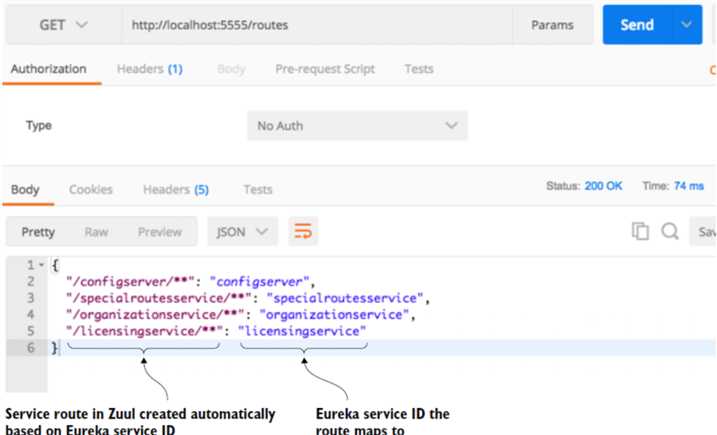
<dependency>
  <groupId>org.springframework.cloud</groupId>
  <artifactId>spring-cloud-starter-zuul</artifactId>
</dependency>
@SpringBootApplication
@EnableZuulProxy
public class ZuulServerApplication {
  public static void main(String[] args) {
    SpringApplication.run(ZuulServerApplication.class,args);
  }
}
eureka:
  instance:
    preferIpAddress: true
  client:
    registerWithEureka: true
    fetchRegistry: true
  serviceUrl:
    defaultZone: http://localhost:8761/eureka/
要启用Spring Cloud sleuth,只要在pom文件中包含下列依赖即可:
<dependency>
  <groupId>org.springframework.cloud</groupId>
  <artifactId>spring-cloud-starter-sleuth</artifactId>
</dependency>


        <dependency>
            <groupId>org.springframework.cloud</groupId>
            <artifactId>spring-cloud-starter-config</artifactId>
        </dependency>
        <dependency>
            <groupId>org.springframework.cloud</groupId>
            <artifactId>spring-cloud-config-server</artifactId>
        </dependency>
package com.thoughtmechanix.confsvr;

import org.springframework.boot.SpringApplication;
import org.springframework.boot.autoconfigure.SpringBootApplication;
import org.springframework.cloud.config.server.EnableConfigServer;

@SpringBootApplication
@EnableConfigServer
public class ConfigServerApplication {
    public static void main(String[] args) {
        SpringApplication.run(ConfigServerApplication.class, args);
    }
}
然后在application.yml中设置存储信息,如下:
server:
  port: 8888
spring:
  profiles:
    active: native
  cloud:
    config:
      server:
        native:
          searchLocations: file:///D:/spring-cloud-example/config/
这样运行spring-boot:run就可以启动配置中心服务了。
注意,这里需要注意点的是,路径大小写敏感,否则可能出现一直访问不到配置文件,但是没有报错信息。
D:/spring-cloud-example/config/下包含如下配置文件:
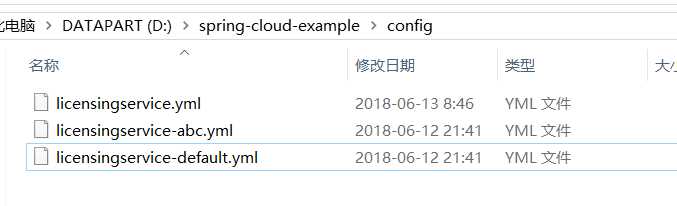
tracer.property: "I AM THE DEFAULT FROM CONFIG CENTER"
spring.jpa.database: "POSTGRESQL"
spring.datasource.platform: "postgres"
spring.jpa.show-sql: "true"
spring.database.driverClassName: "org.postgresql.Driver"
spring.datasource.url: "jdbc:postgresql://database:5432/eagle_eye_local"
spring.datasource.username: "postgres"
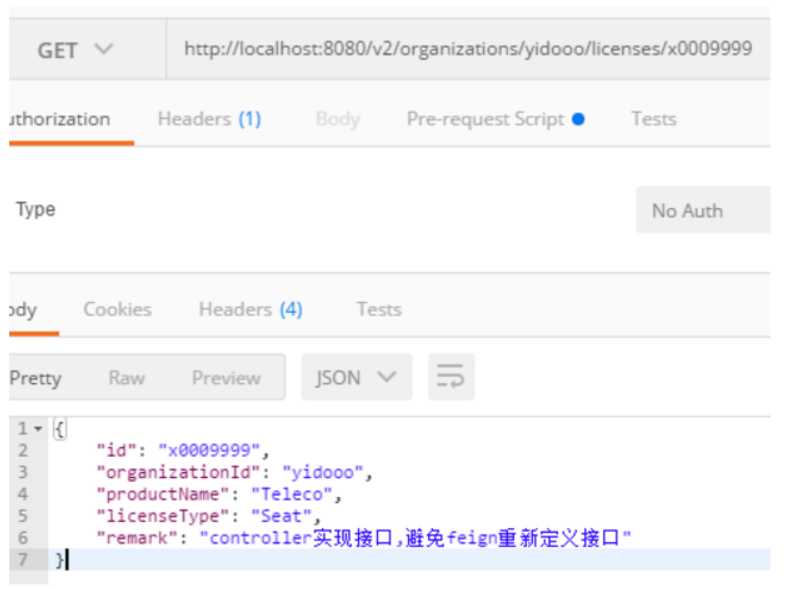
我们可以使用postman访问如下:
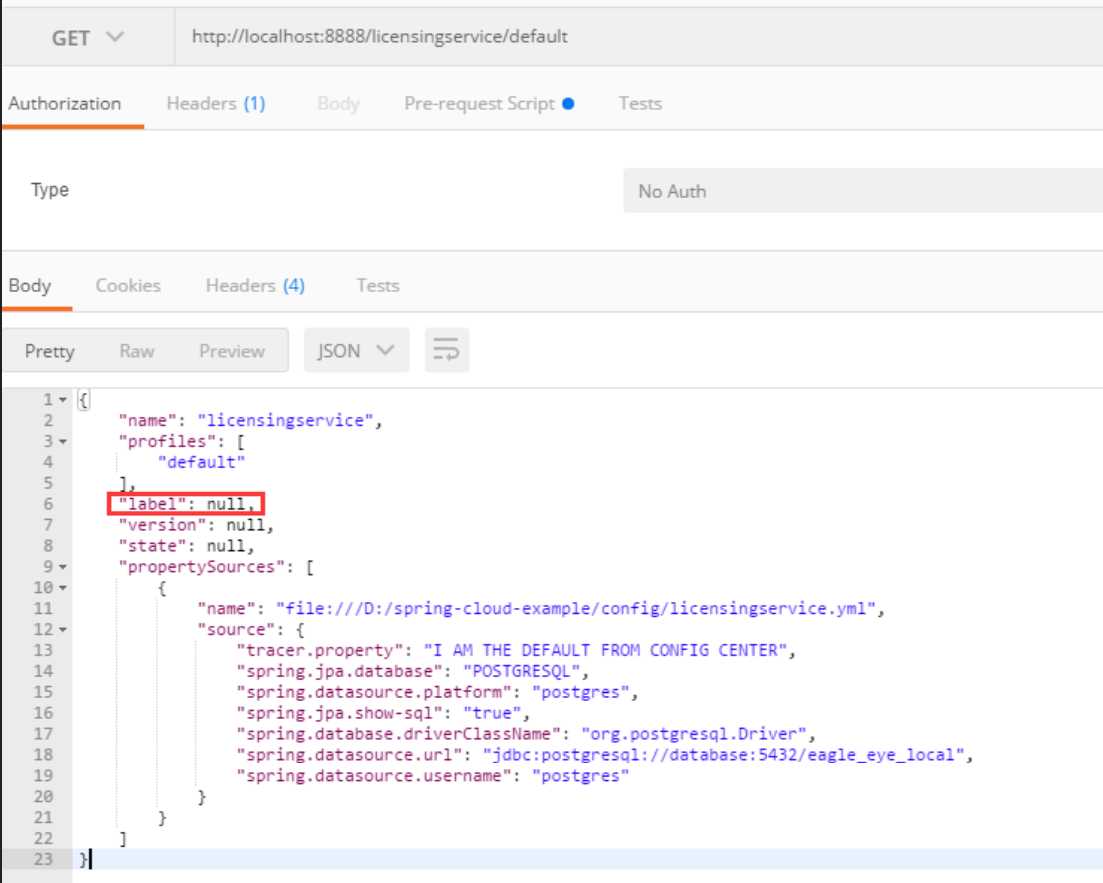
这样,基于文件存储的配置中心就搭建好了。
目前,spring cloud config支持使用文件系统和git作为存储,git的配置可以参考官方文档。
        <dependency>
            <groupId>org.springframework.cloud</groupId>
            <artifactId>spring-cloud-starter-config</artifactId>
        </dependency>
因为所有的配置信息都不在本地,所以我们需要一种机制告诉spring boot去哪里找配置中心,因此spring boot提供了一个bootstrap.yml配置文件,其中定义了使用哪个应用、哪个profile的配置,以及服务器地址。如下所示:
spring:
 application:
   name: licensingservice
 profiles:
  active: default
 cloud:
   config:
     uri: http://localhost:8888
在spring boot应用启动的时候,在执行任何bean的初始化前,会先加载bootstrap.yml文件,读取配置,然后再进行其他初始化和加载工作。
这样配置中心的配置就和原来properties中一样,被加载到Environment中了,@Value就可以正常注入了。
@SpringBootApplication
@RefreshScope
public class Application {
  public static void main(String[] args) {
    SpringApplication.run(Application.class, args);
  }
}
management:
 security:
  enabled: false
原文:https://www.cnblogs.com/zhjh256/p/9183865.html