<% if (page.type === "tags") { %>
<% } else if (page.type === ‘categories‘) { %>
<% } else { %>
<% if (post.excerpt && index){ %>
<%- post.excerpt %>
<% } else { %>
<%- post.content %>
<% } %>
<% } %>
```
## Setp4:修改样式
以“material-flow”主题为例,打开文件“themes/material-flow/source/less/_article.less”添加下面样式,到文件最底部:
```
/*tag-cloud*/
.tag-cloud {
text-align: center;
margin-top: 50px;
}
.tag-cloud a {
display: inline-block;
margin: 10px;
}
.tag-cloud-title {
font-weight: 700;
font-size: 24px;
}
.tag-cloud-tags {
margin-top: 15px;
a {
display: inline-block;
text-decoration: none;
font-weight: normal;
font-size: 10px;
color: #fff;
line-height: normal;
padding: 5px 5px 5px 10px;
position: relative;
border-radius: 0 5px 5px 0;
font-family: Menlo, Monaco, "Andale Mono", "lucida console", "Courier New", monospace;
&:hover {
opacity: 0.8;
}
&:before {
content: " ";
width: 0;
height: 0;
position: absolute;
top: 0;
left: -18px;
border: 9px solid transparent;
}
&:after {
content: " ";
width: 4px;
height: 4px;
background-color: #fff;
border-radius: 4px;
box-shadow: 0 0 0 1px rgba(0, 0, 0, .3);
position: absolute;
top: 7px;
left: 2px;
}
}
a.color1 {
background: #FF945C;
&:before {
border-right-color: #FF945C;
}
}
a.color2 {
background: #F5C7B7;
&:before {
border-right-color: #F5C7B7;
}
}
a.color3 {
background: #BA8F6C;
&:before {
border-right-color: #BA8F6C;
}
}
a.color4 {
background: #CFB7C4;
&:before {
border-right-color: #CFB7C4;
}
}
a.color5 {
background: #7B5D5F;
&:before {
border-right-color: #7B5D5F;
}
}
}
/*category-all-page*/
.category-all-page {
margin-top: 50px;
.category-all-title {
font-weight: 700;
font-size: 24px;
text-align: center;
}
.category-list-item:after {
content: ‘‘;
clear: both;
display: table;
}
.category-list-count {
float: right;
margin-left: 5px;
}
.category-list-count:before {
content: ‘一共 ‘;
}
.category-list-count:after {
content: ‘ 篇文章‘;
}
}
```
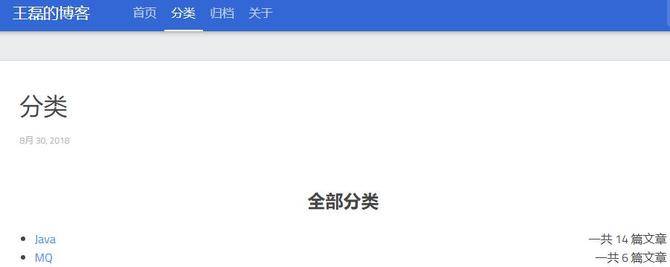
效果如下图:

如上的配置设置完之后,还差一步给文章设置了分类之后,才会显示出来。
## Setp5:设置文章属性
添加如下属性在MD的开头:
```
---
title: RabbitMQ在Ubuntu上的环境搭建
date: 2018-06-02
tag: "rabbitmq"
categories:
- [Java]
- [MQ]
---
```
其中:
- title 文章标题
- date 文章发布日期
- tag 文章标签
- categories 文章分类,多个独立的分类使用上面代码的格式
设置了文章分类之后,所有文章的分类就会自动显示出来了。
# 六、添加评论功能
本文对接的评论为畅言,畅言微微SOHU出品的,在行业里面使用的很广泛,比如17173,人民网,中国新闻网等调用的畅言,优点是对接简单,国内的速度快,不需要FQ,缺点是嵌套的域名需要备案。
## Setp1:注册畅言账号
访问:https://changyan.kuaizhan.com/ 注册账号,安装畅言的引导注册应用,获取评论安装代码,每个应用的都不一样,其中appid和conf是独立的,复制畅言评论安装代码。
## Setp2:修改主题配置
找到主题下的`_config.yml`在底部添加:
```
changyan:
on: true
```
## Setp3:修改代码
打开文件“material-flow\layout\_partial\article.ejs”替换代码:
```
<% if (post.comments && config.disqus_shortname){ %>
<%- _p(‘counter.tag_cloud‘, site.tags.length) %>
<%- _p(‘全部分类‘, site.categories.length) %>
<%- list_categories() %>
原文:http://blog.51cto.com/2188001/2171784
