转载: http://www.codingsoho.com/zh/course/5/article/194
版权声明: 转载请注明出处 http://www.codingsoho.com/
做外贸的朋友有个需求,打算去亚马逊网站上爬取一点信息用于商业,利用学到的爬虫技术,小帮忙一下
需求:按指定链接(品种)爬虫相应的图片和介绍,避免一个个点进去看耗费时间
在这一节我们将爬虫功能进行类封装
定义类amazon_dynamic,实现构造函数如下
class amazon_dynamic():
    def __init__(self, result_path, img_path):
        self.result_path = result_path
        self.img_path = img_path
        self.driver = chrome()
self.next_page_flag = "" def open_web(self, url):
try:
self.driver.get(url)
WebDriverWait(self.driver, 60).until(EC.presence_of_element_located((By.ID, "pagnNextString")))
except:
print "open page failure"两个函数解释一下,这个再前一节中都已用到
driver.get获取网页内容WebDriverWait,等待指定的内容出现,设置超时时间60秒这也是个基本功能,往往一页是不能列出所有产品的
同样,等待指定的内容出现之后,模拟点击“下一页”按钮
    def next_page(self):
        try:
            WebDriverWait(self.driver, 60).until(EC.presence_of_element_located((By.ID, "pagnNextString")))
            self.driver.find_element_by_xpath(‘//span[@class="srSprite pagnNextArrow"]‘).click()
        except:
print "open the next page failure %s" %self.driver.current_url任务完成后,关闭页面
    def page_close(self):
self.driver.close() def get_info(self, max_num_to_extract):
# extacted result
product_pic_url_lst = []
product_info_lst = []
# find the product infor
while True:
info_of_all = self.driver.find_elements_by_xpath(‘//ul[@id="s-results-list-atf"]/li‘)
if len(info_of_all) >= max_num_to_extract:
break
sleep(1)
# get the specific information
for info in info_of_all[0:10]:
li_ID = info.get_attribute(‘id‘)
try:
product_pic = self.driver.find_element_by_xpath(‘//li[@id="%s"]//img[@class="s-access-image cfMarker"]‘ % li_ID)
product_infos = self.driver.find_element_by_xpath(‘//li[@id="%s"]//div[1]/div[3]/div[1]/a‘ % li_ID)
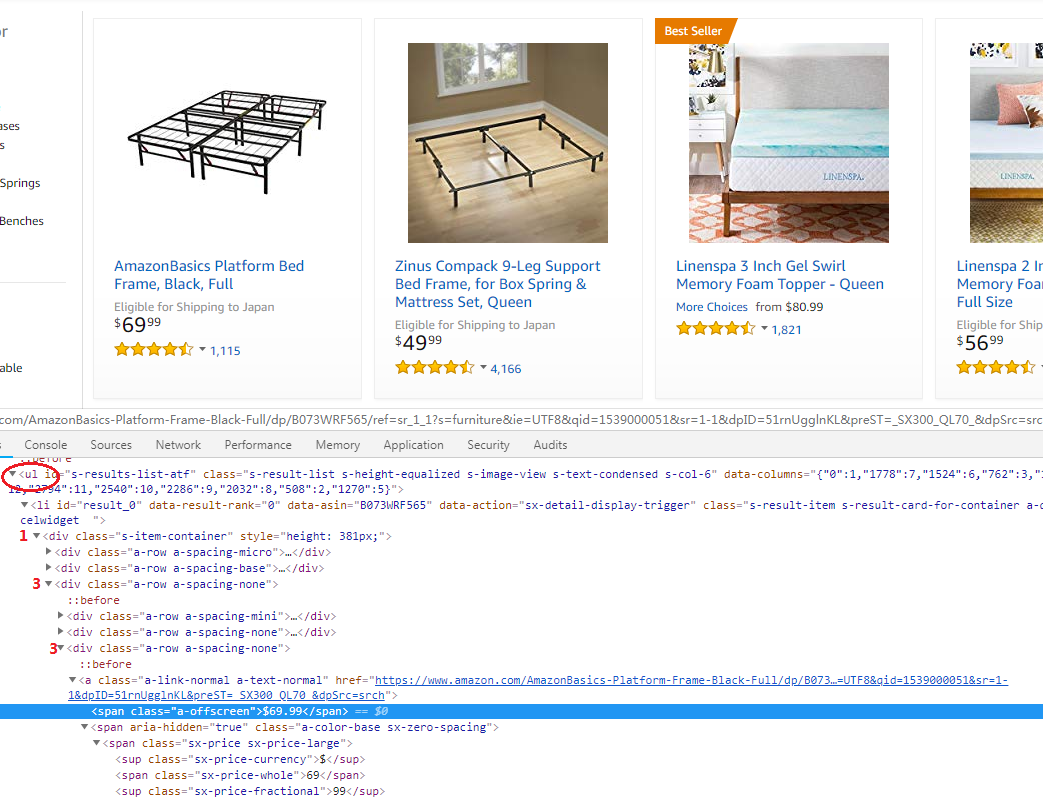
product_price = self.driver.find_elements_by_xpath(‘//li[@id="%s"]//div[1]/div[3]/div[3]/a/span[@class="a-offscreen"]‘ % li_ID)
except Exception as e:
print "get_info error {}".format(e)
continue
# src
pic_url = product_pic.get_attribute(‘src‘)
# title
product_name = product_infos.get_attribute(‘title‘)
# href
product_url = product_infos.get_attribute(‘href‘)
# price
if len(product_price) == 1:
product_price = product_price[0].get_attribute(‘aria-label‘)
elif len(product_price) >= 2:
product_price = product_price[1].text
else:
product_price = "No price"
# save to list
if pic_url and product_name and product_url:
product_pic_url_lst.append(pic_url)
product_info_lst.append([product_name, product_price, product_url])
else:
print now_time(), "ERROR:couldn‘t get all information of it, and will skip"
return product_info_lst, product_pic_url_lst上面这段程序主要是从获取的网页内容中查找指定内容,官方网站的布局一直是变化的,所以这段代码在实际过程中也一直要更新。
上面的代码更新到2018/10/8,大部分内容都适配了,除了价格部分。这个大家自己去练习吧。
self.driver.find_elements_by_xpath(‘//ul[@id="s-results-list-atf"]/li‘)获取搜索结果的整段内容,对应的结构如下,这里我们用到了find_elements_by_xpath方法,通过id定位ul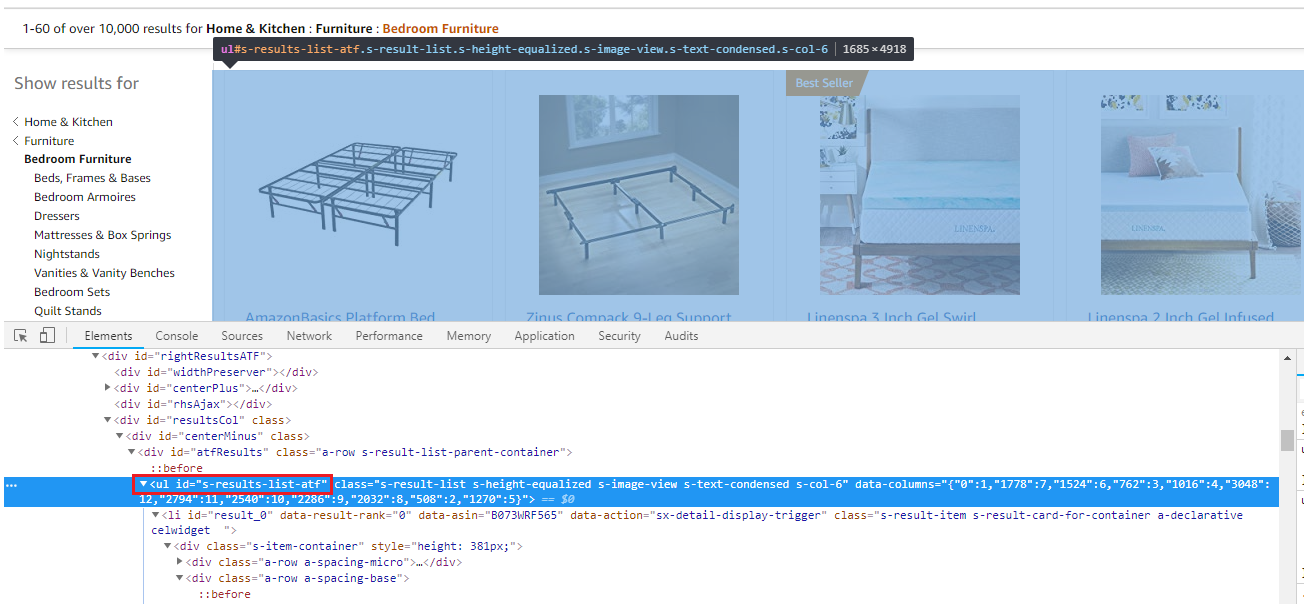
li,获取这个li的ID用于进一步定位各个图片self.driver.find_element_by_xpath(‘//li[@id="%s"]//img[@class="s-access-image cfMarker"]‘ % li_ID),它是通过img的class来定位的self.driver.find_element_by_xpath(‘//li[@id="%s"]//div[1]/div[3]/div[1]/a‘ % li_ID),得到的是<a>,然后进一步通过get_attribute(‘title‘)获取它的标题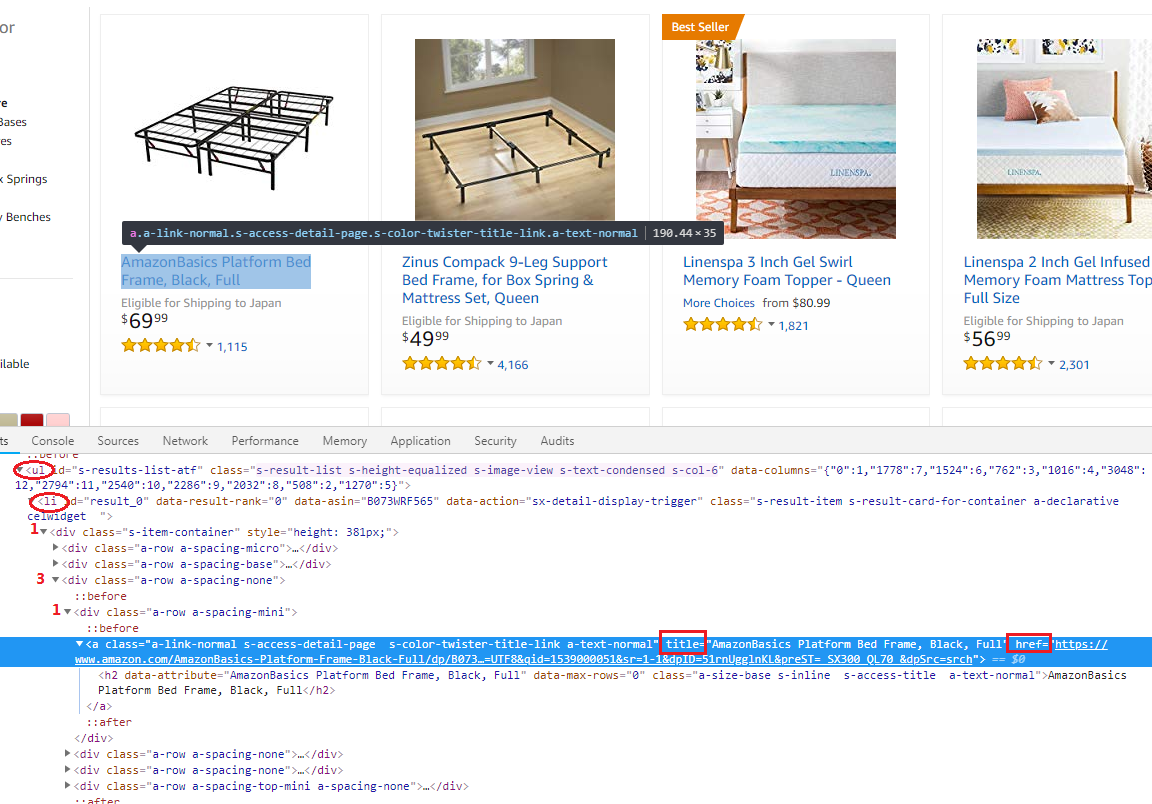
上一步中,我们仅仅获取了图片的链接,有的时候我们需要存储图片,可以通过下面代码实现
def web_static(url):
    try:
        return requests.get(url, proxies=proxies, stream=True)
    except Exception as e:
        print "web_static :: url request get failure {} for url {}".format(e, url)
        return False

def saveImg_sub(name, url, path):
    img = web_static(url.strip())
    try:
        with open(name, ‘wb‘) as p:
            shutil.copyfileobj(img.raw, p)
            del img
    except:
        img = os.path.join(path,"downloadfailure.jpg")
        os.system(‘cp  %s  %s‘ % (img, name))

def saveImg(product_pic_url, path):
    pics_path = []
    len_lst = len(product_pic_url)
    for pic_url in product_pic_url:
        len_lst -= 1
        name = os.path.join(path, pic_url.split(‘/‘)[-1])
        pics_path.append(name)
        if os.path.exists(name):
            continue
        t = Thread(target=saveImg_sub,args=(name, pic_url, path))
        t.start()

return pics_pathweb_static用于获取网页内容,这里用requests实现的,你可以用你熟悉的方法saveImg根据图片的链接生成本地文件的名字和路径,然后保存到本地,为了提高效率,使用了多线程技术。页面获取和存储过程通过子线程saveImg_sub来实现with方法,这样你不需要自己去操心文件关闭shutil.copyfileobj,有的时候也可以用write函数os.system(‘cp %s %s‘ % (img, name))这条语句可以调用系统命令这些内容我们可以把它写道一个文件里,前面介绍过写道txt文件的方式,本节我们介绍如何写到excel里
首先安装XlsxWriter
pip install XlsxWriter
代码如下
from xlsxwriter import Workbook

def write_data_excel(data1, data2, path):
    name = path.split(‘/‘)[-1]
    create_time = time.strftime(‘%Y-%m-%d-%H-%M‘, time.localtime(time.time()))
    pure_name = ‘%s_%s.xlsx‘ % (name, create_time)
    file_name = os.path.join(path , pure_name)
    new_f = Workbook(file_name)
    sheet1 = new_f.add_worksheet(create_time)
    sheet1_format = new_f.add_format({})
    sheet1_format.set_text_wrap()
    sheet1.set_column(0, 0, 25)
    sheet1.set_column(1, 4, 60)
    for i in range(len(data1)):
        if i:
            sheet1.set_row(i, 125)
            sheet1.insert_image(i, 0, data2[i])
        for j in range(len(data1[i])):
            if i == 0:
                sheet1.set_row(0, 18)
                headers = [‘PRODUCE NAME‘, ‘PRODUCE PRICE‘, ‘THE LINK‘]
                sheet1.write(0, j + 1, headers[j])
            else:
                try:
                    sheet1.write(i, (j + 1), data1[i][j], sheet1_format)
                except:
                    pass
    new_f.close()

    return file_name
几个命令介绍
Workbookadd_worksheetinsert_image效果图如下

最后,我们可以将生成的文件直接上传到百度云
import subprocess

subprocess.call([‘bypy‘, ‘upload‘, str(result_file), "/upload/to/"])这个不是本文重点,不做详细解释,可参考文档https://github.com/houtianze/bypy
原文:https://www.cnblogs.com/2dogslife/p/9757503.html