centos 7.5
kernel 4.18.7-1.el7.elrepo.x86_64

docker 18.06

kubernetes v1.12.2
    kubeadm部署:
        网络: canal
        DNS: coredns
    集群成员:
    192.168.1.1 kube-master
    192.168.1.2 kube-node1
    192.168.1.3 kube-node2
    192.168.1.4 kube-node3
    192.168.1.5 kube-node4

所有node节点准备一块200G的磁盘:/dev/sdb

cat <<EOF >  /etc/sysctl.d/ceph.conf
net.ipv4.ip_forward = 1
net.bridge.bridge-nf-call-ip6tables = 1
net.bridge.bridge-nf-call-iptables = 1
EOF
sysctl --system
#无另外说明,全部操作都在master操作

cd $HOME
git clone https://github.com/rook/rook.git

cd rook
cd cluster/examples/kubernetes/ceph
kubectl apply -f operator.yaml
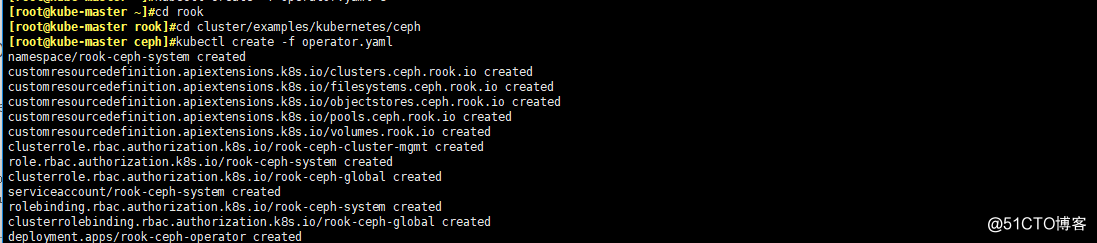
#执行apply之后稍等一会。
#operator会在集群内的每个主机创建两个pod:rook-discover,rook-ceph-agent
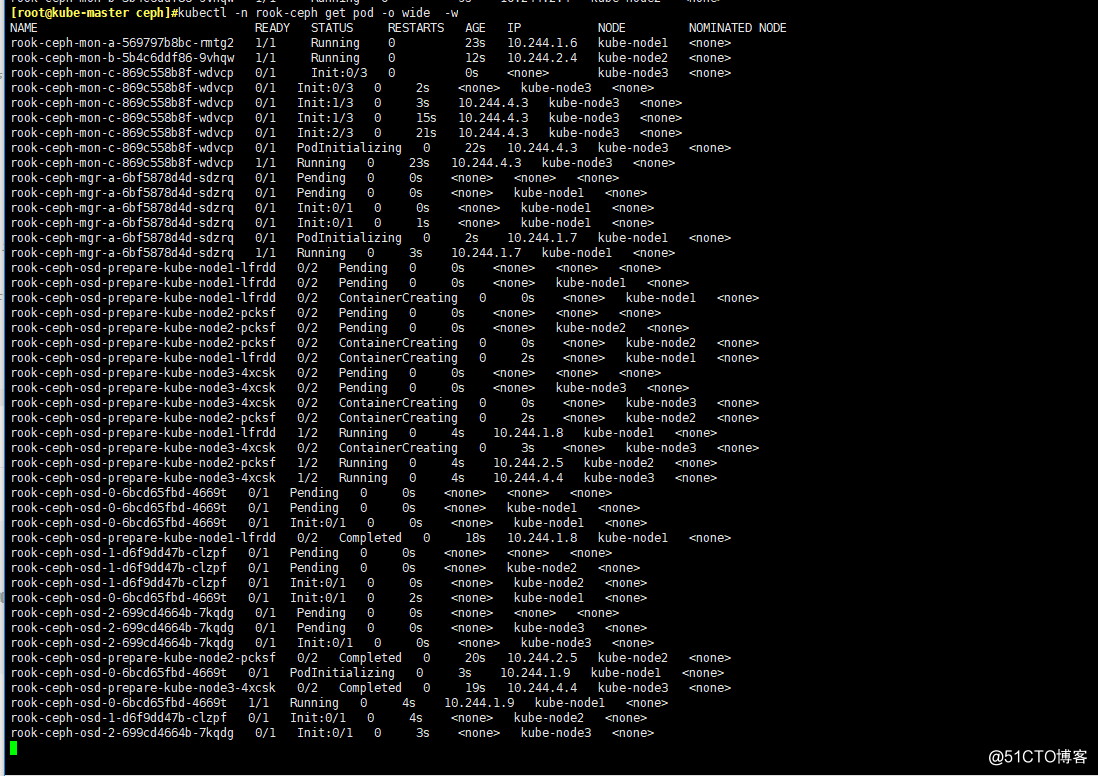
kubectl -n rook-ceph-system get pod -o wide

kubectl label nodes {kube-node1,kube-node2,kube-node3} ceph-mon=enabled
kubectl label nodes {kube-node1,kube-node2,kube-node3} ceph-osd=enabled
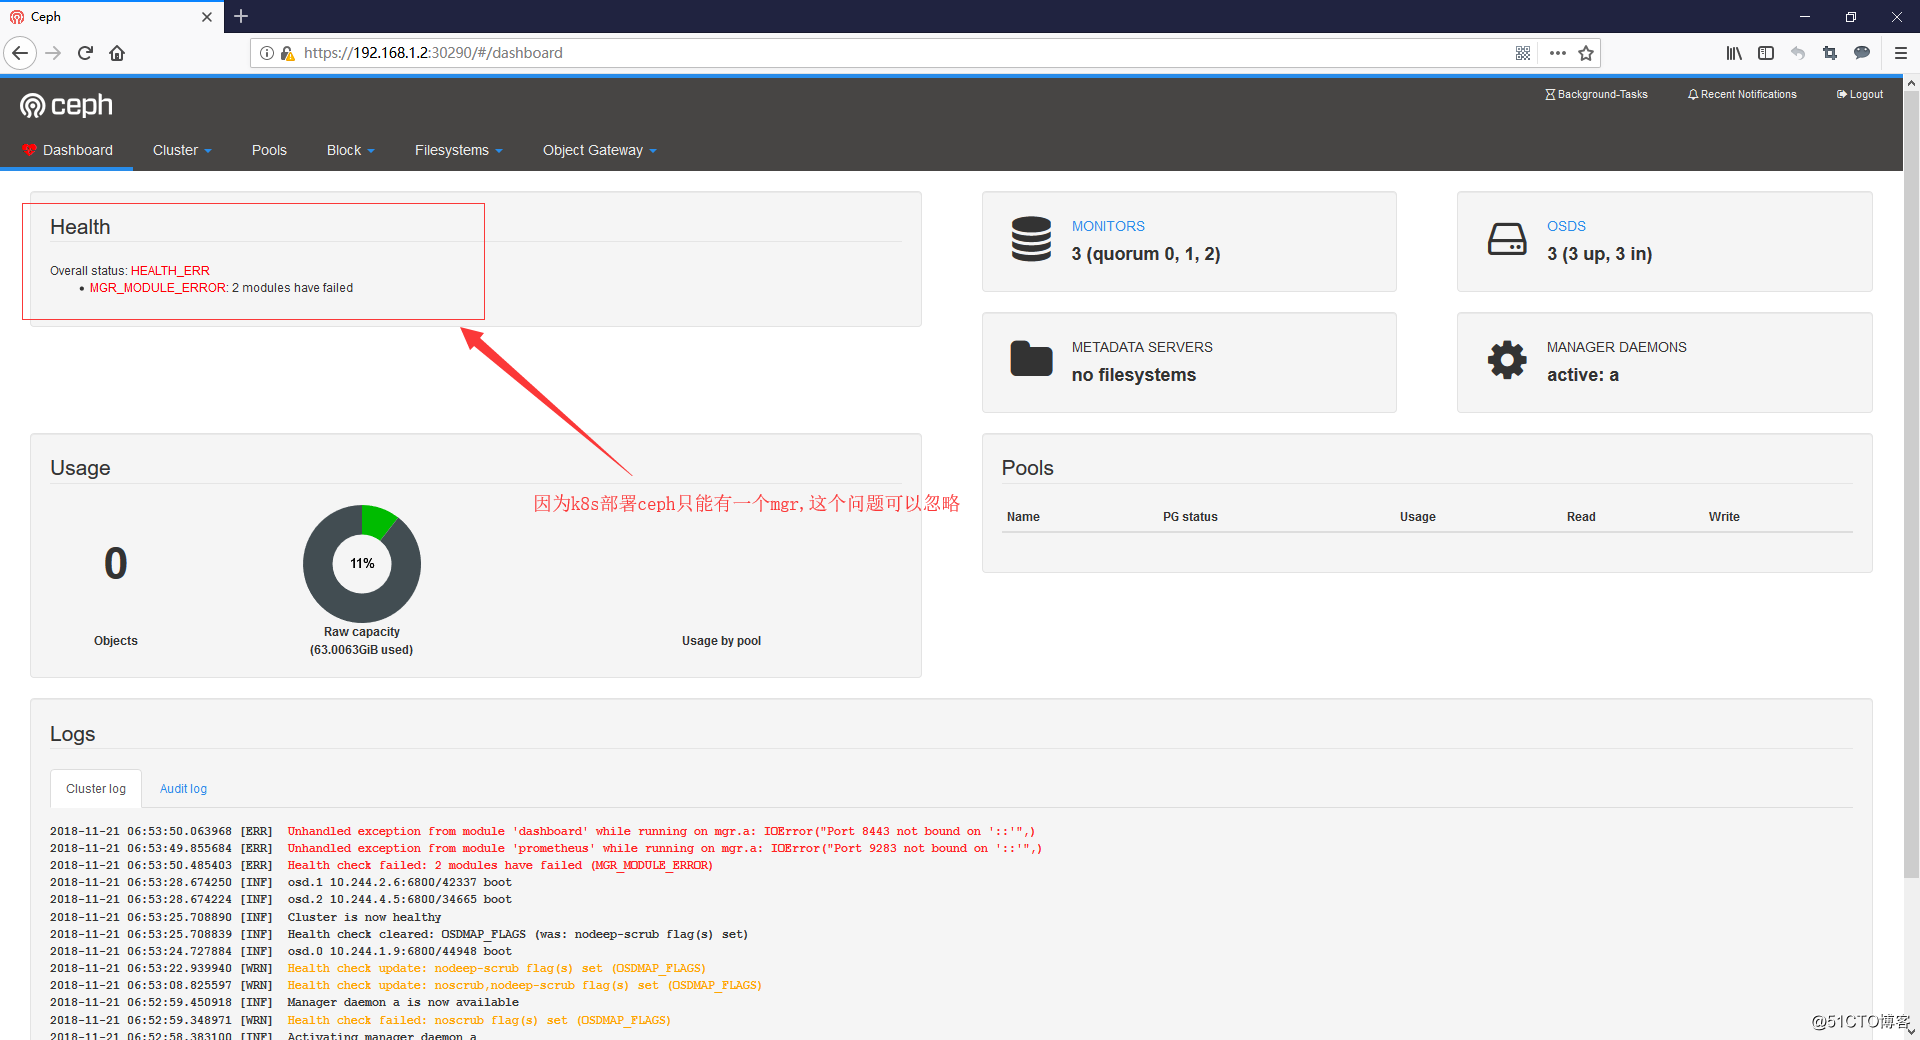
#mgr只能支持一个节点运行,这是ceph跑k8s里的局限
kubectl label nodes kube-node1 ceph-mgr=enabled
官方配置文件详解:https://rook.io/docs/rook/v0.8/ceph-cluster-crd.html
文件中有几个地方要注意:
apiVersion: v1
kind: Namespace
metadata:
name: rook-ceph
---
apiVersion: v1
kind: ServiceAccount
metadata:
name: rook-ceph-cluster
namespace: rook-ceph
---
kind: Role
apiVersion: rbac.authorization.k8s.io/v1beta1
metadata:
name: rook-ceph-cluster
namespace: rook-ceph
rules:
- apiGroups: [""]
resources: ["configmaps"]
verbs: [ "get", "list", "watch", "create", "update", "delete" ]
---
# Allow the operator to create resources in this cluster‘s namespace
kind: RoleBinding
apiVersion: rbac.authorization.k8s.io/v1beta1
metadata:
name: rook-ceph-cluster-mgmt
namespace: rook-ceph
roleRef:
apiGroup: rbac.authorization.k8s.io
kind: ClusterRole
name: rook-ceph-cluster-mgmt
subjects:
- kind: ServiceAccount
name: rook-ceph-system
namespace: rook-ceph-system
---
# Allow the pods in this namespace to work with configmaps
kind: RoleBinding
apiVersion: rbac.authorization.k8s.io/v1beta1
metadata:
name: rook-ceph-cluster
namespace: rook-ceph
roleRef:
apiGroup: rbac.authorization.k8s.io
kind: Role
name: rook-ceph-cluster
subjects:
- kind: ServiceAccount
name: rook-ceph-cluster
namespace: rook-ceph
---
apiVersion: ceph.rook.io/v1beta1
kind: Cluster
metadata:
name: rook-ceph
namespace: rook-ceph
spec:
cephVersion:
# The container image used to launch the Ceph daemon pods (mon, mgr, osd, mds, rgw).
# v12 is luminous, v13 is mimic, and v14 is nautilus.
# RECOMMENDATION: In production, use a specific version tag instead of the general v13 flag, which pulls the latest release and could result in different
# versions running within the cluster. See tags available at https://hub.docker.com/r/ceph/ceph/tags/.
image: ceph/ceph:v13
# Whether to allow unsupported versions of Ceph. Currently only luminous and mimic are supported.
# After nautilus is released, Rook will be updated to support nautilus.
# Do not set to true in production.
allowUnsupported: false
# The path on the host where configuration files will be persisted. If not specified, a kubernetes emptyDir will be created (not recommended).
# Important: if you reinstall the cluster, make sure you delete this directory from each host or else the mons will fail to start on the new cluster.
# In Minikube, the ‘/data‘ directory is configured to persist across reboots. Use "/data/rook" in Minikube environment.
dataDirHostPath: /var/lib/rook
# The service account under which to run the daemon pods in this cluster if the default account is not sufficient (OSDs)
serviceAccount: rook-ceph-cluster
# set the amount of mons to be started
# count可以定义ceph-mon运行的数量,这里默认三个就行了
mon:
count: 3
allowMultiplePerNode: true
# enable the ceph dashboard for viewing cluster status
# 开启ceph资源面板
dashboard:
enabled: true
# serve the dashboard under a subpath (useful when you are accessing the dashboard via a reverse proxy)
# urlPrefix: /ceph-dashboard
network:
# toggle to use hostNetwork
# 使用宿主机的网络进行通讯
# 使用宿主机的网络貌似可以让集群外的主机挂载ceph
# 但是我没试过,有兴趣的兄弟可以试试改成true
# 反正这里只是集群内用,我就不改了
hostNetwork: false
# To control where various services will be scheduled by kubernetes, use the placement configuration sections below.
# The example under ‘all‘ would have all services scheduled on kubernetes nodes labeled with ‘role=storage-node‘ and
# tolerate taints with a key of ‘storage-node‘.
placement:
# all:
# nodeAffinity:
# requiredDuringSchedulingIgnoredDuringExecution:
# nodeSelectorTerms:
# - matchExpressions:
# - key: role
# operator: In
# values:
# - storage-node
# podAffinity:
# podAntiAffinity:
# tolerations:
# - key: storage-node
# operator: Exists
# The above placement information can also be specified for mon, osd, and mgr components
# mon:
# osd:
# mgr:
# nodeAffinity:通过选择标签的方式,可以限制pod被调度到特定的节点上
# 建议限制一下,为了让这几个pod不乱跑
mon:
nodeAffinity:
requiredDuringSchedulingIgnoredDuringExecution:
nodeSelectorTerms:
- matchExpressions:
- key: ceph-mon
operator: In
values:
- enabled
osd:
nodeAffinity:
requiredDuringSchedulingIgnoredDuringExecution:
nodeSelectorTerms:
- matchExpressions:
- key: ceph-osd
operator: In
values:
- enabled
mgr:
nodeAffinity:
requiredDuringSchedulingIgnoredDuringExecution:
nodeSelectorTerms:
- matchExpressions:
- key: ceph-mgr
operator: In
values:
- enabled
resources:
# The requests and limits set here, allow the mgr pod to use half of one CPU core and 1 gigabyte of memory
# mgr:
# limits:
# cpu: "500m"
# memory: "1024Mi"
# requests:
# cpu: "500m"
# memory: "1024Mi"
# The above example requests/limits can also be added to the mon and osd components
# mon:
# osd:
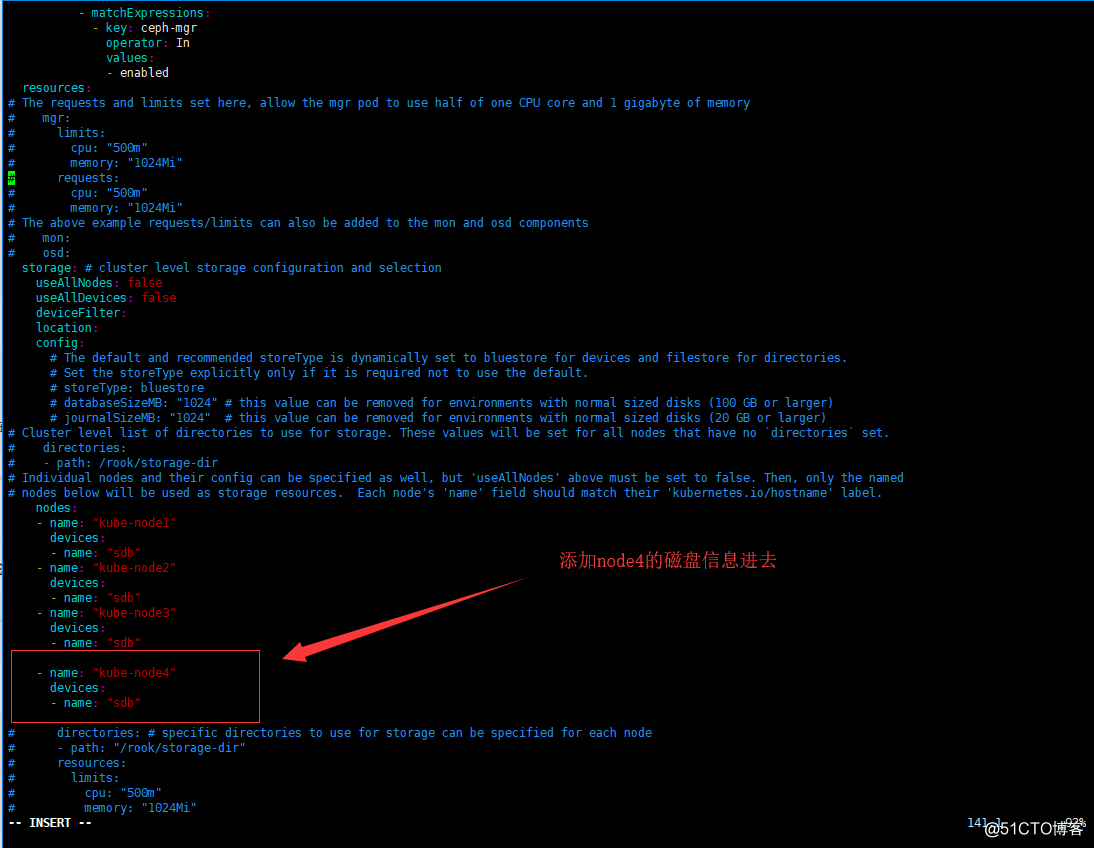
storage: # cluster level storage configuration and selection
useAllNodes: false
useAllDevices: false
deviceFilter:
location:
config:
# The default and recommended storeType is dynamically set to bluestore for devices and filestore for directories.
# Set the storeType explicitly only if it is required not to use the default.
# storeType: bluestore
# databaseSizeMB: "1024" # this value can be removed for environments with normal sized disks (100 GB or larger)
# journalSizeMB: "1024" # this value can be removed for environments with normal sized disks (20 GB or larger)
# Cluster level list of directories to use for storage. These values will be set for all nodes that have no `directories` set.
# directories:
# - path: /rook/storage-dir
# Individual nodes and their config can be specified as well, but ‘useAllNodes‘ above must be set to false. Then, only the named
# nodes below will be used as storage resources. Each node‘s ‘name‘ field should match their ‘kubernetes.io/hostname‘ label.
#建议磁盘配置方式如下:
#name: 选择一个节点,节点名字为kubernetes.io/hostname的标签,也就是kubectl get nodes看到的名字
#devices: 选择磁盘设置为OSD
# - name: "sdb":将/dev/sdb设置为osd
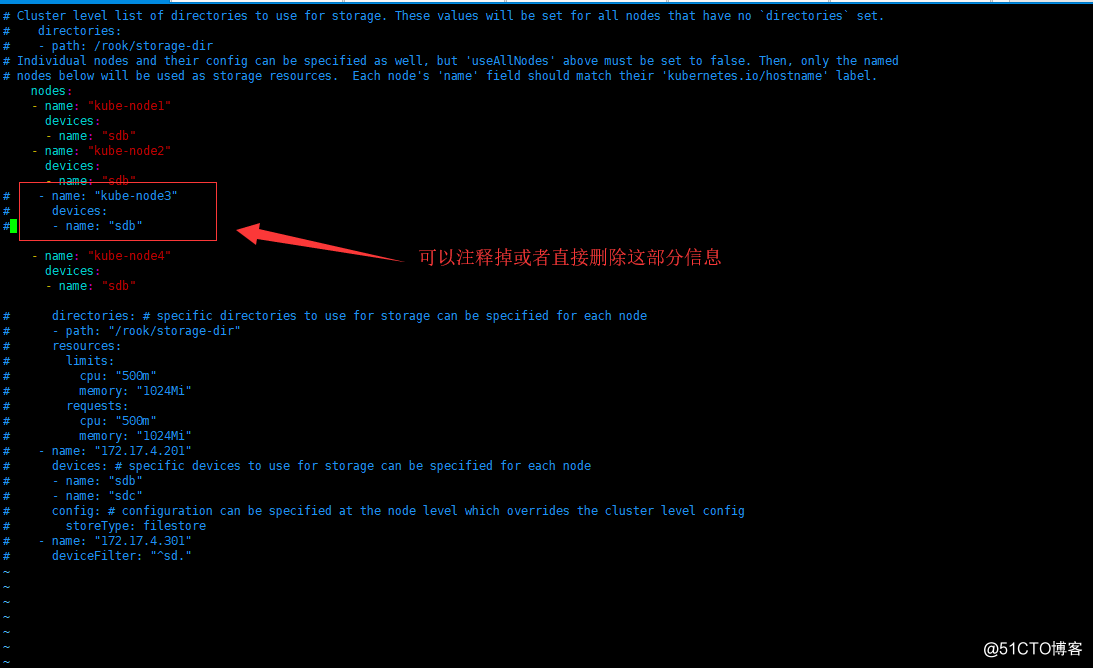
nodes:
- name: "kube-node1"
devices:
- name: "sdb"
- name: "kube-node2"
devices:
- name: "sdb"
- name: "kube-node3"
devices:
- name: "sdb"
# directories: # specific directories to use for storage can be specified for each node
# - path: "/rook/storage-dir"
# resources:
# limits:
# cpu: "500m"
# memory: "1024Mi"
# requests:
# cpu: "500m"
# memory: "1024Mi"
# - name: "172.17.4.201"
# devices: # specific devices to use for storage can be specified for each node
# - name: "sdb"
# - name: "sdc"
# config: # configuration can be specified at the node level which overrides the cluster level config
# storeType: filestore
# - name: "172.17.4.301"
# deviceFilter: "^sd."
kubectl apply -f cluster.yaml

# cluster会在rook-ceph这个namesapce创建资源
# 盯着这个namesapce的pod你就会发现,它在按照顺序创建Pod

kubectl -n rook-ceph get pod -o wide  -w

# 看到所有的pod都Running就行了
# 注意看一下pod分布的宿主机,跟我们打标签的主机是一致的

kubectl -n rook-ceph get pod -o wide

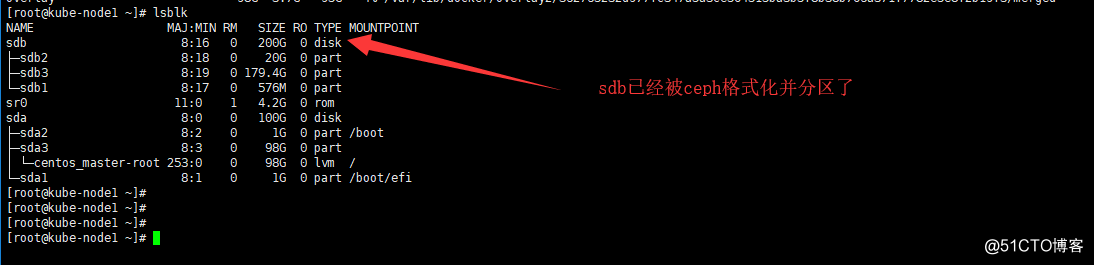
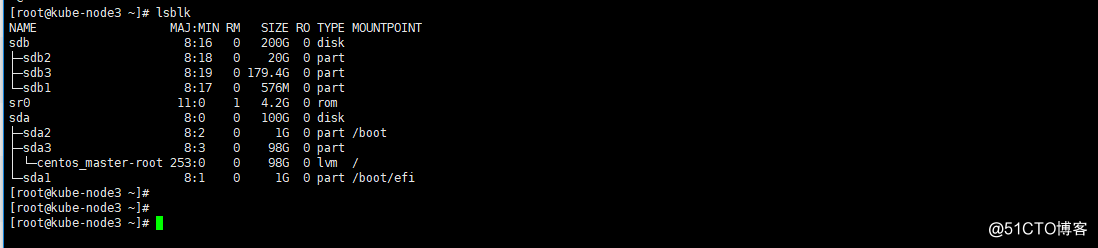
切换到其他主机看一下磁盘
lsblk
lsblk
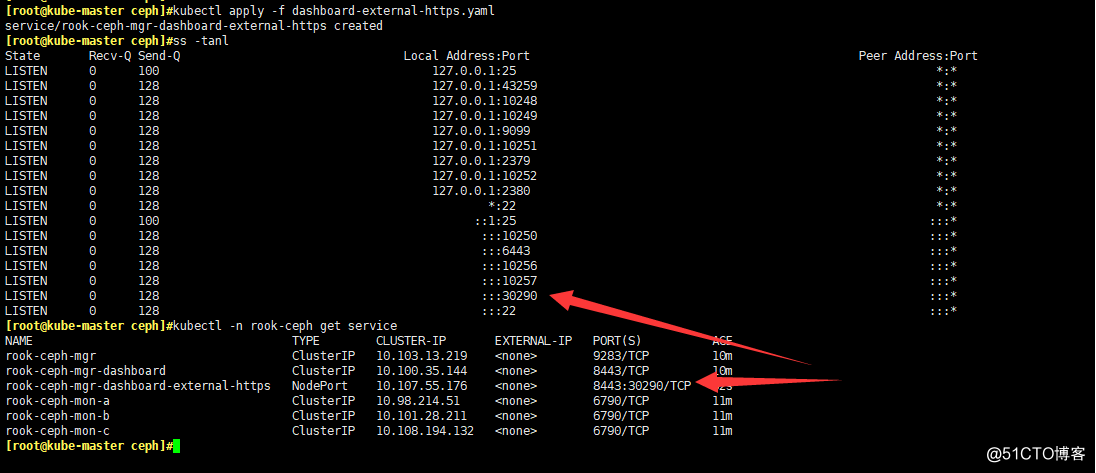
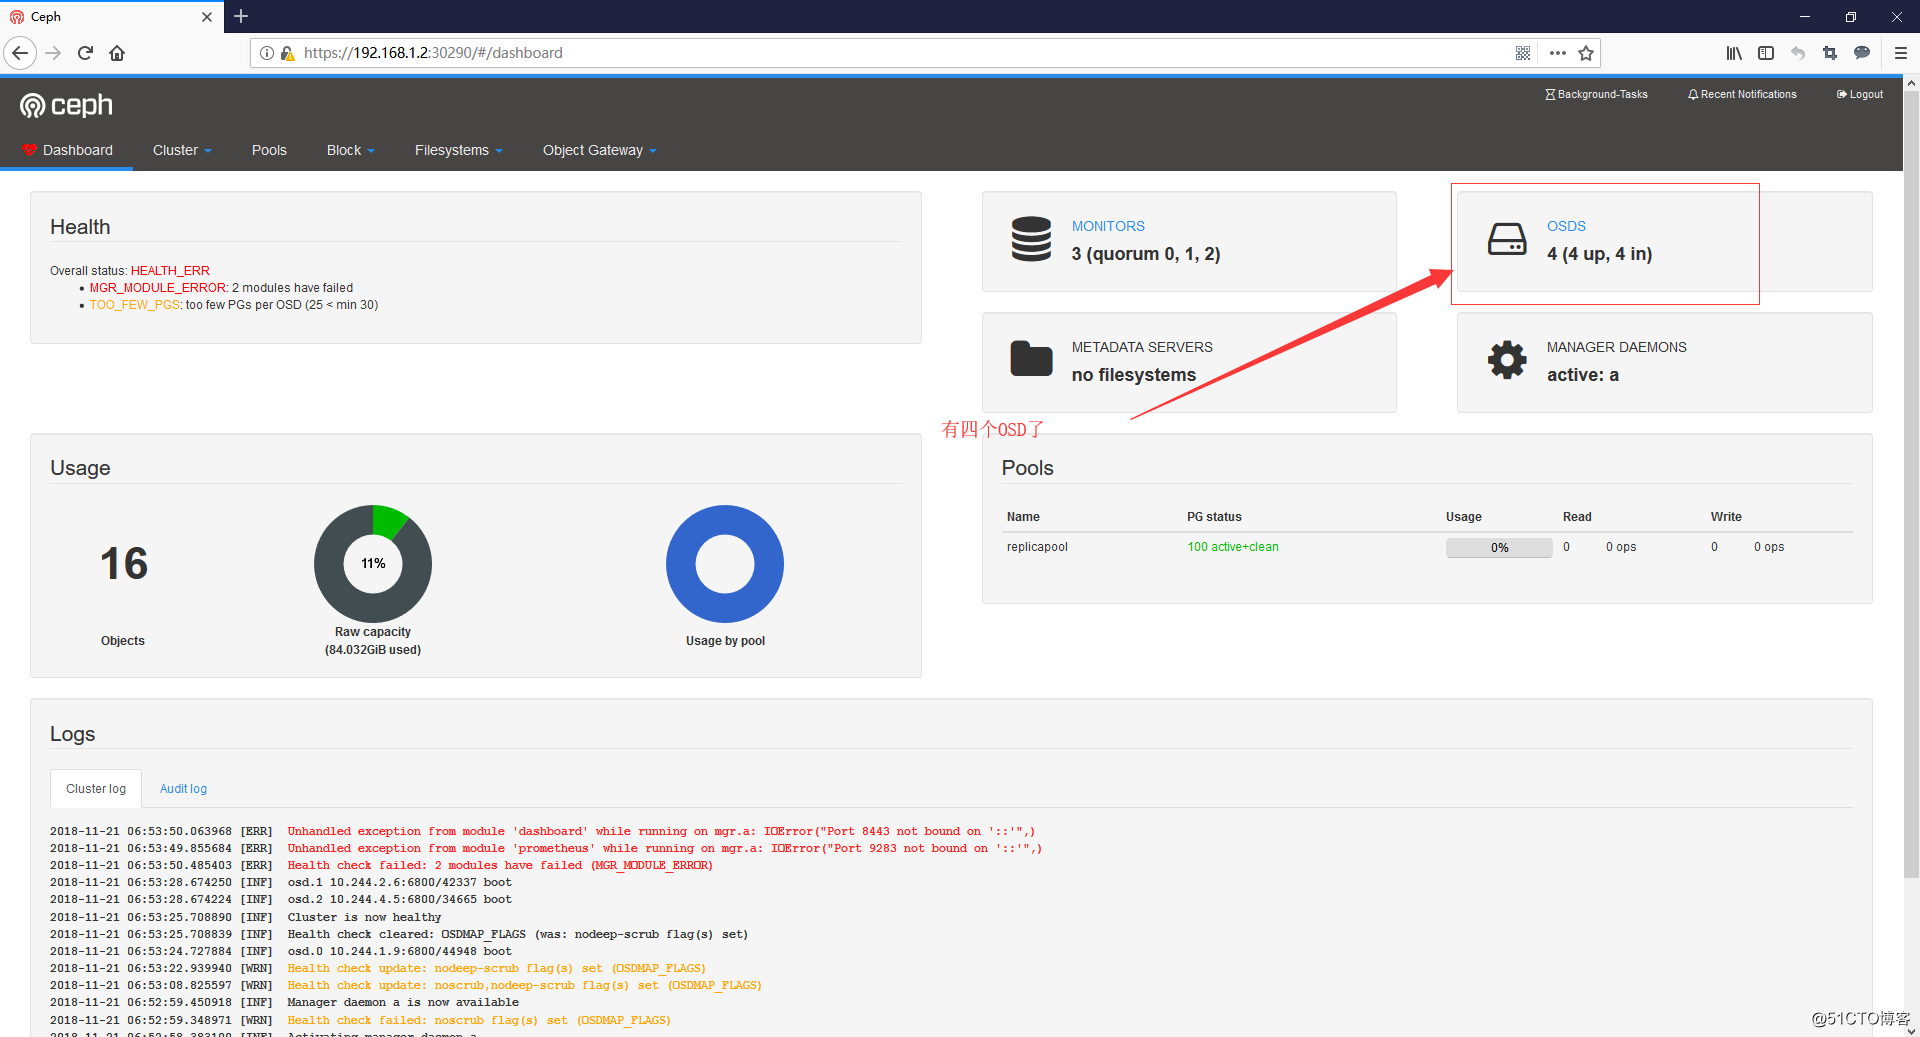
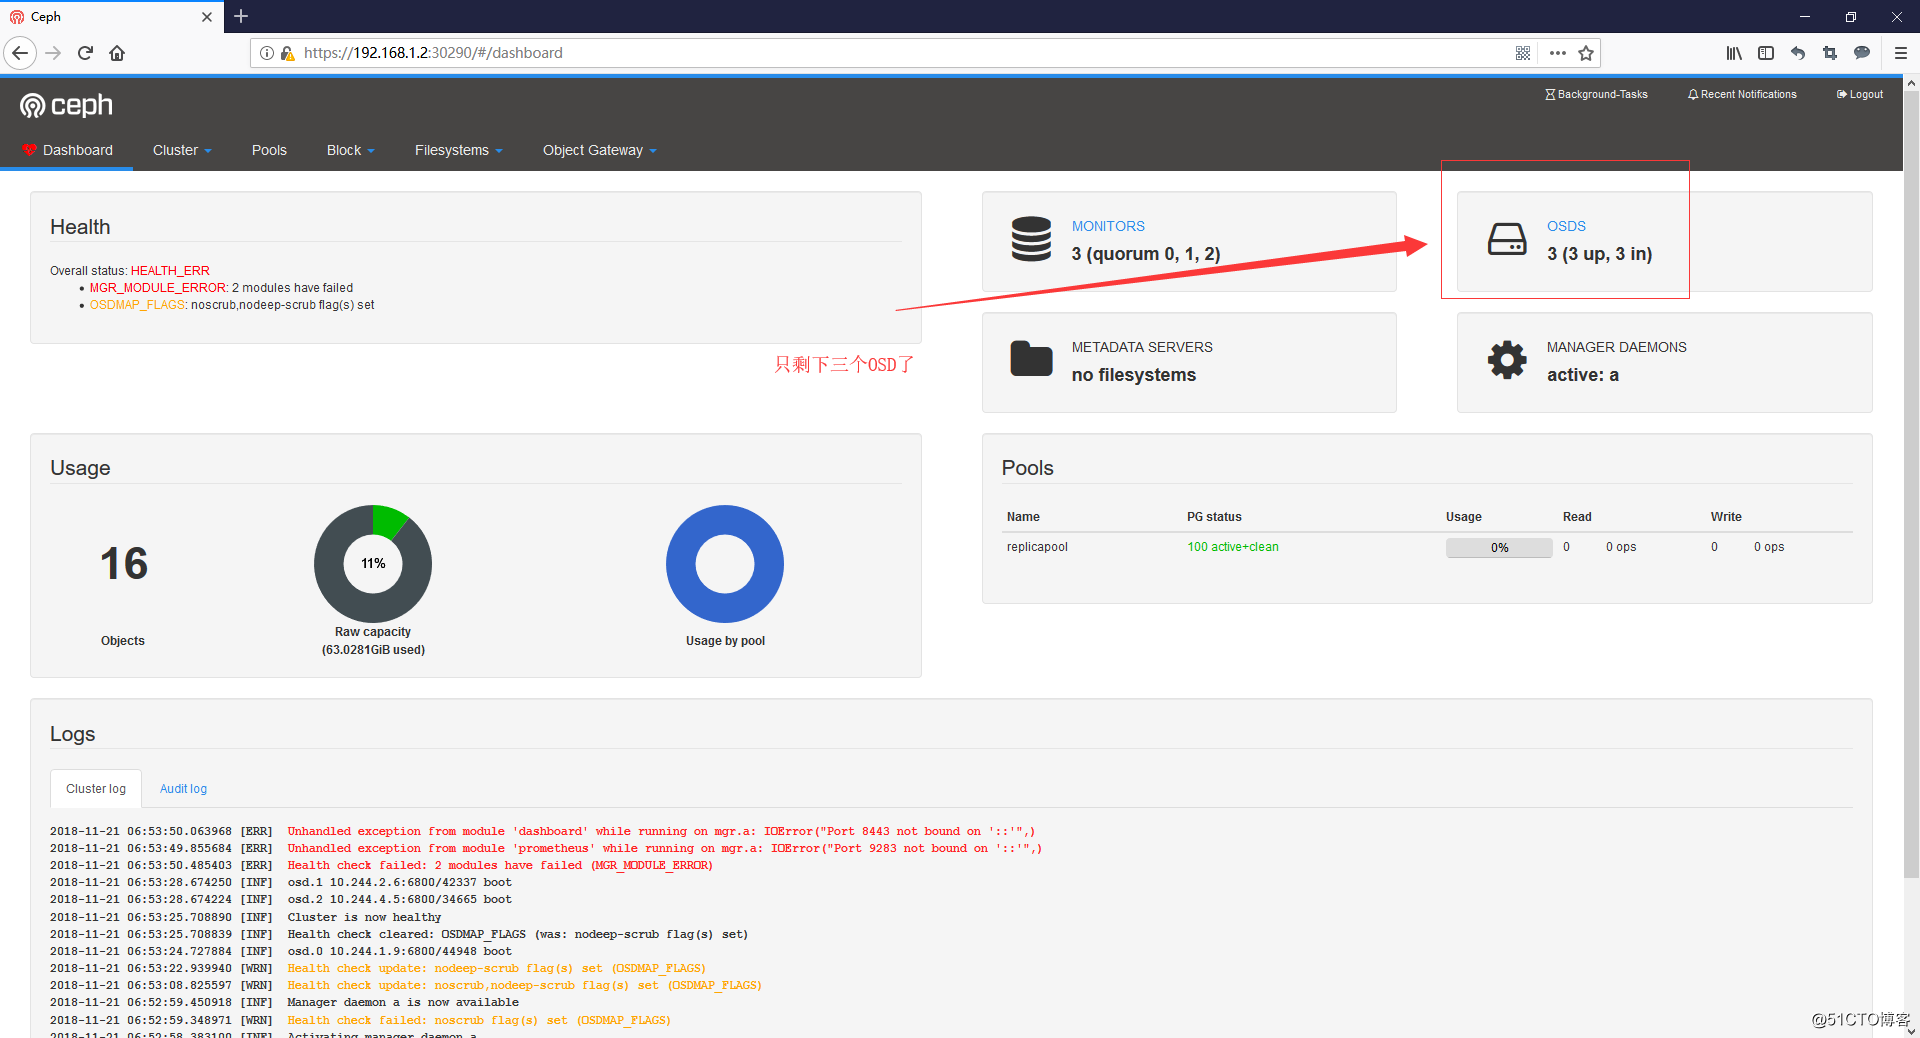
kubectl -n rook-ceph get service
#可以看到dashboard监听了8443端口
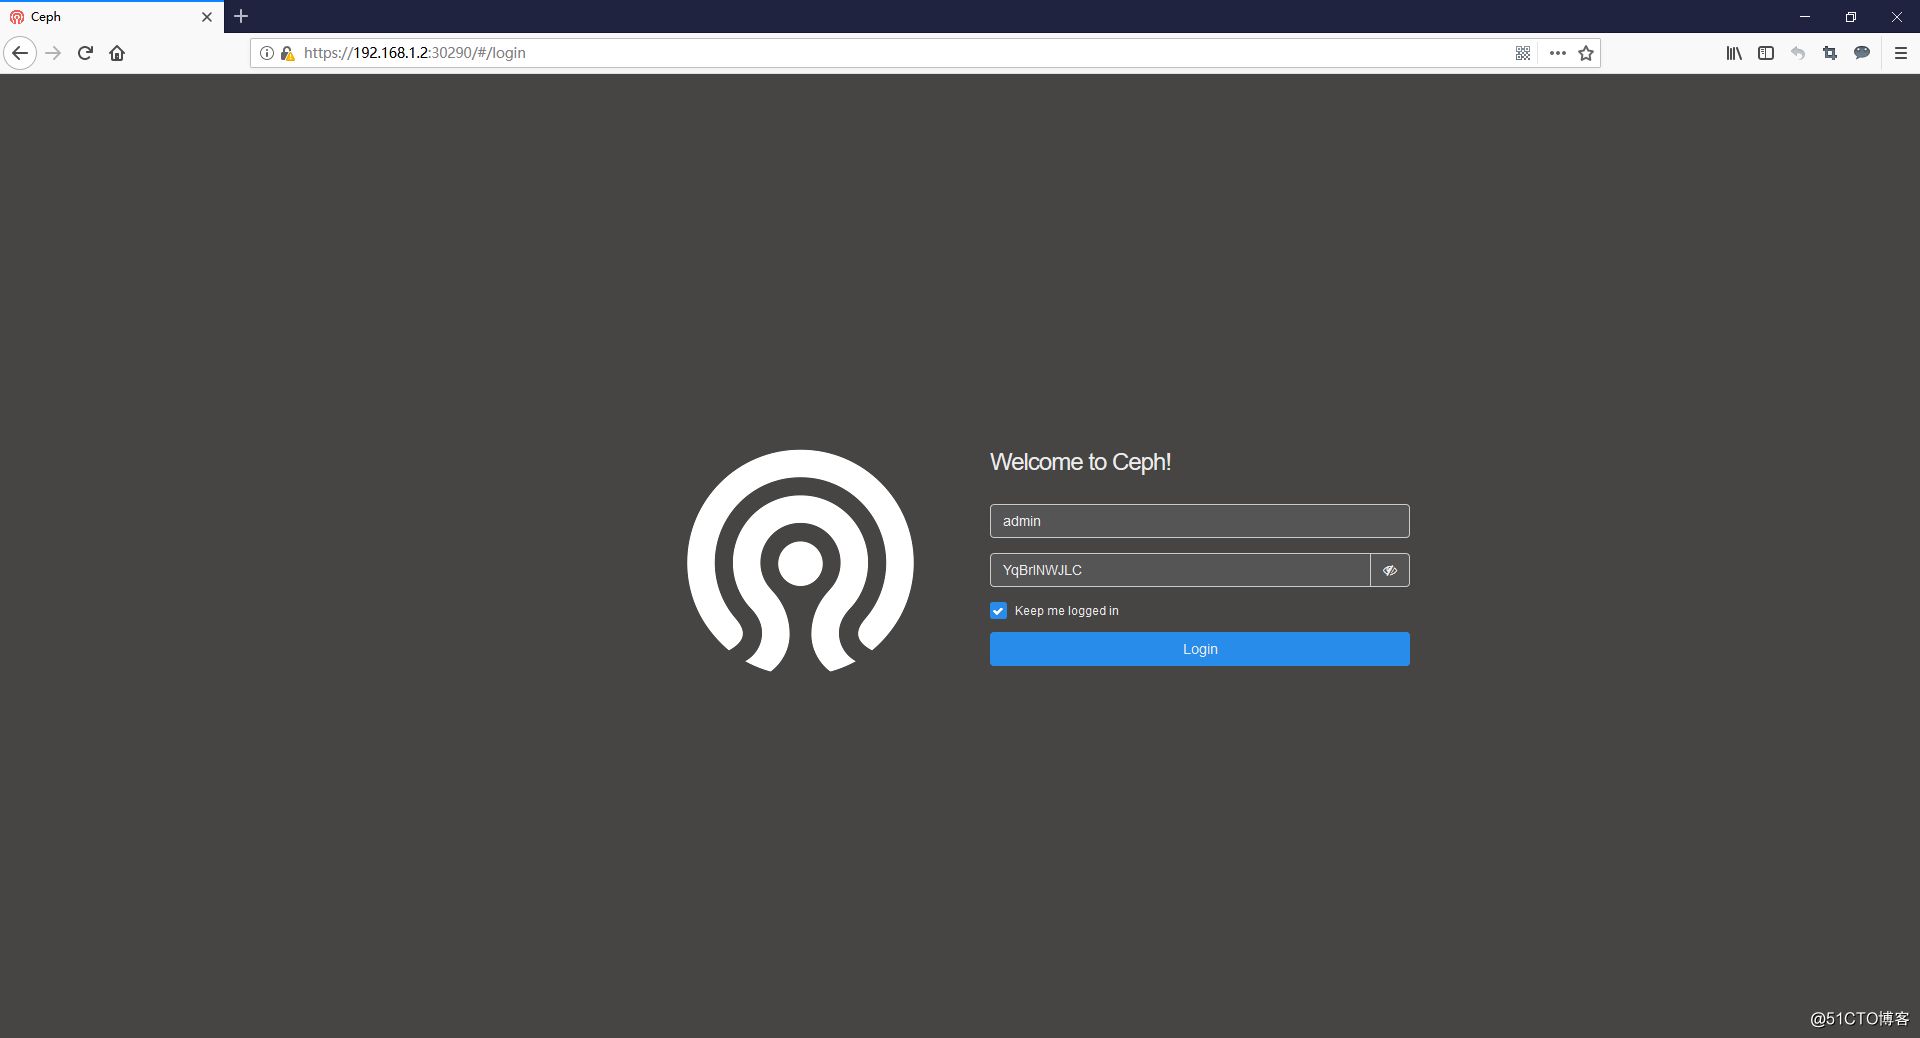
kubectl apply -f dashboard-external-https.yaml

# 查看一下nodeport在哪个端口
ss -tanl
kubectl -n rook-ceph get service
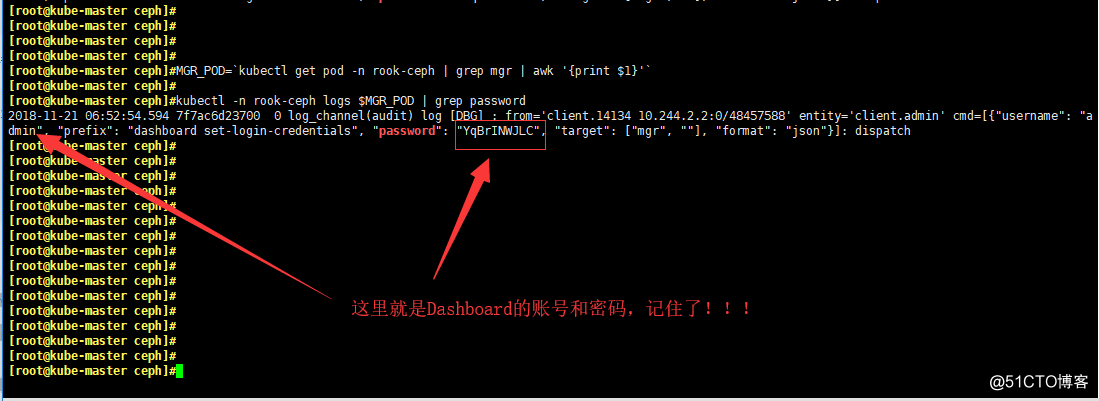
MGR_POD=`kubectl get pod -n rook-ceph | grep mgr | awk ‘{print $1}‘`

kubectl -n rook-ceph logs $MGR_POD | grep password
apiVersion: ceph.rook.io/v1beta1
kind: Pool
metadata:
  #这个name就是创建成ceph pool之后的pool名字
  name: replicapool
  namespace: rook-ceph
spec:
  replicated:
    size: 1
  # size 池中数据的副本数,1就是不保存任何副本
  failureDomain: osd
  #  failureDomain:数据块的故障域,
  #  值为host时,每个数据块将放置在不同的主机上
  #  值为osd时,每个数据块将放置在不同的osd上
---
apiVersion: storage.k8s.io/v1
kind: StorageClass
metadata:
   name: ceph
   # StorageClass的名字,pvc调用时填的名字
provisioner: ceph.rook.io/block
parameters:
  pool: replicapool
  # Specify the namespace of the rook cluster from which to create volumes.
  # If not specified, it will use `rook` as the default namespace of the cluster.
  # This is also the namespace where the cluster will be
  clusterNamespace: rook-ceph
  # Specify the filesystem type of the volume. If not specified, it will use `ext4`.
  fstype: xfs
# 设置回收策略默认为:Retain
reclaimPolicy: Retain
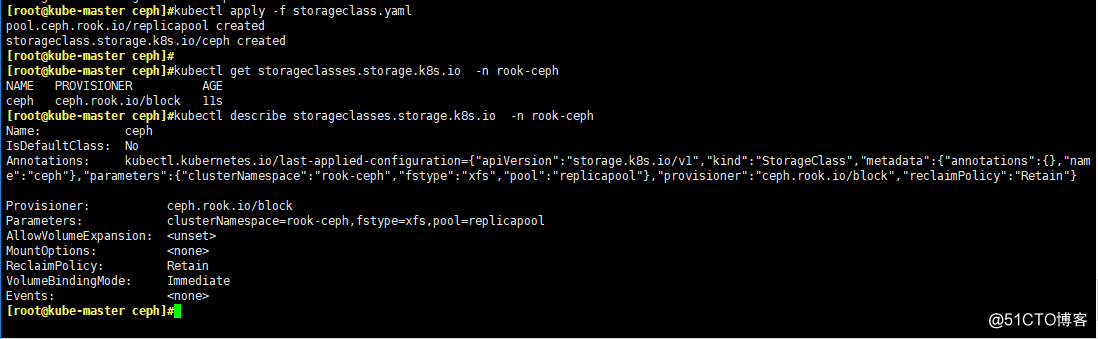
kubectl apply -f storageclass.yaml
kubectl get storageclasses.storage.k8s.io  -n rook-ceph
kubectl describe storageclasses.storage.k8s.io  -n rook-ceph
cat << EOF > nginx.yaml
---
apiVersion: v1
kind: PersistentVolumeClaim
metadata:
name: nginx-pvc
spec:
accessModes:
- ReadWriteMany
resources:
requests:
storage: 1Gi
storageClassName: ceph
---
apiVersion: v1
kind: Service
metadata:
name: nginx
spec:
selector:
app: nginx
ports:
- port: 80
name: nginx-port
targetPort: 80
protocol: TCP
---
apiVersion: apps/v1
kind: Deployment
metadata:
name: nginx
spec:
replicas: 1
selector:
matchLabels:
app: nginx
template:
metadata:
name: nginx
labels:
app: nginx
spec:
containers:
- name: nginx
image: nginx
ports:
- containerPort: 80
volumeMounts:
- mountPath: /html
name: http-file
volumes:
- name: http-file
persistentVolumeClaim:
claimName: nginx-pvc
EOF
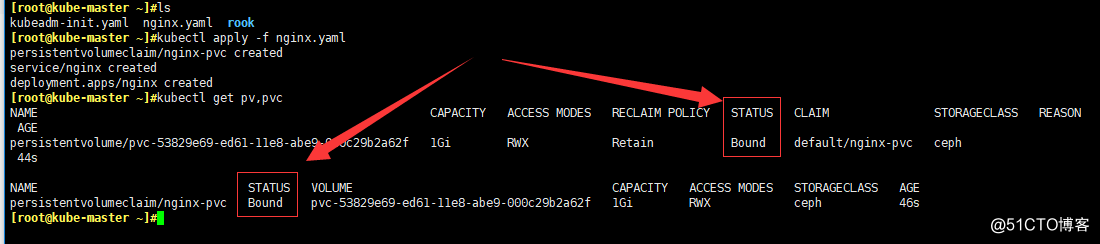
kubectl apply -f nginx.yaml
kubectl get pv,pvc

# 看一下nginx这个pod也运行了
kubectl get pod
kubectl delete -f nginx.yaml

kubectl get pv,pvc
# 可以看到,pod和pvc都已经被删除了,但是pv还在!!!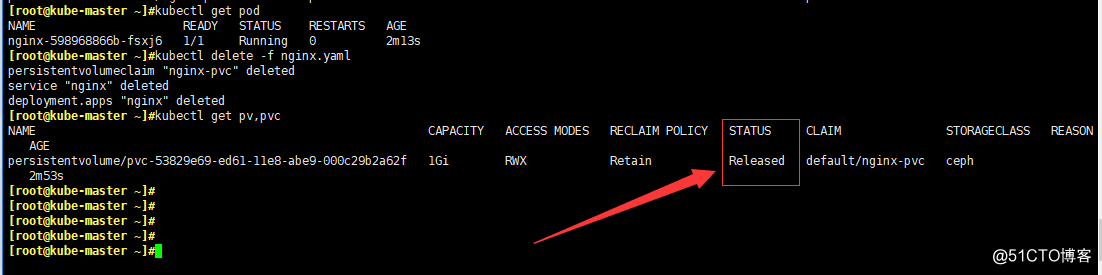
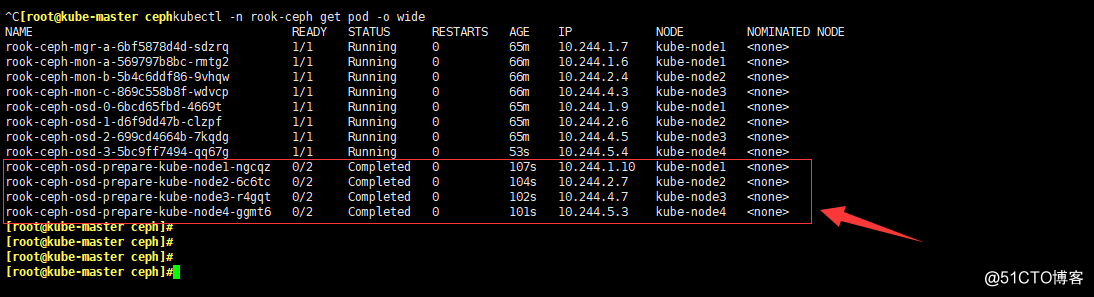
kubectl label nodes kube-node4 ceph-osd=enabled
# 原来的基础上添加node4的信息

cd $HOME/rook/cluster/examples/kubernetes/ceph/
vi cluster.yam
kubectl apply -f cluster.yaml

# 盯着rook-ceph名称空间,集群会自动添加node4进来

kubectl -n rook-ceph get pod -o wide -w
kubectl -n rook-ceph get pod -o wide

lsblk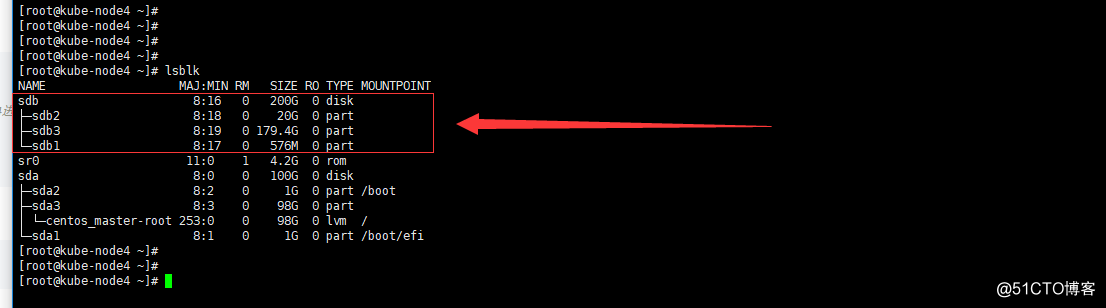
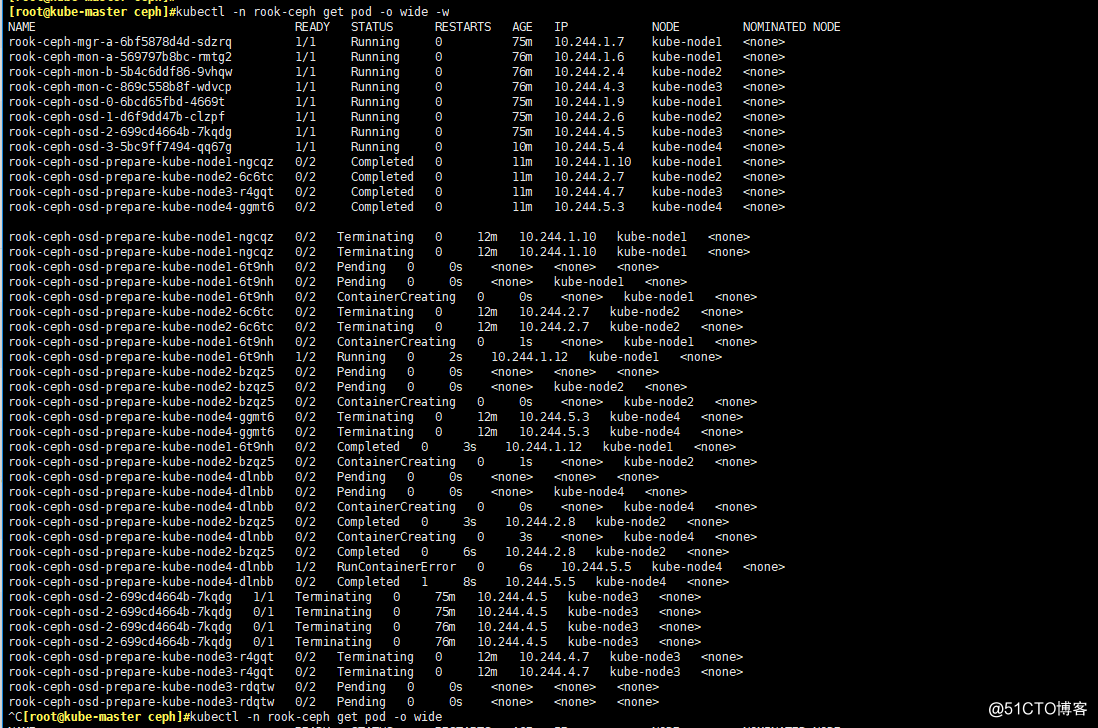
kubectl label nodes kube-node3 ceph-osd-
# 删除node3的信息

cd $HOME/rook/cluster/examples/kubernetes/ceph/
vi cluster.yam
kubectl apply -f cluster.yaml
# 盯着rook-ceph名称空间
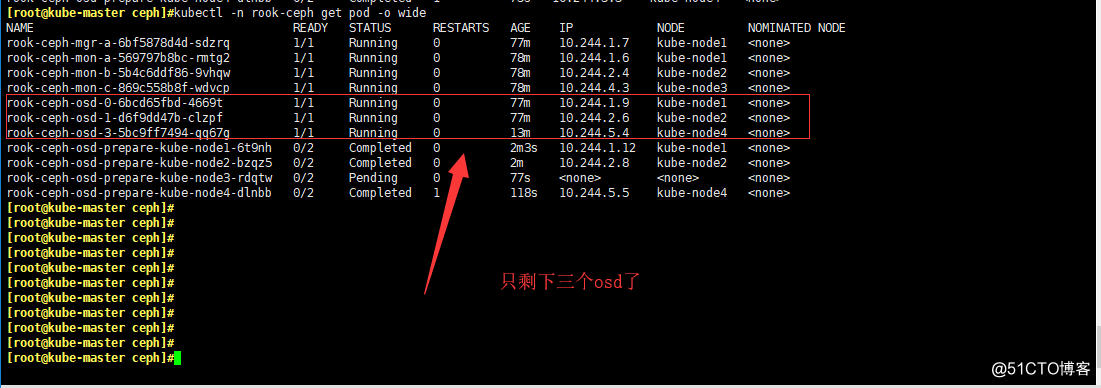
kubectl -n rook-ceph get pod -o wide -w
kubectl -n rook-ceph get pod -o wide
# 最后记得删除宿主机的/var/lib/rook文件夹
#解决办法:

# 标记节点为 drain 状态
kubectl drain <node-name> --ignore-daemonsets --delete-local-data

# 然后再恢复
kubectl uncordon <node-name>
原文:http://blog.51cto.com/bigboss/2320016