结合实践、收集各种场景、常见问题,讲解Nginx中最实用的Webserver场景,提供一套整体的搭建配置方式
Nginx中间件,不局限于业务逻辑,有效独立于后台开发框架(不论后端是Java开发、PHP开发、或者其他语言框架)都能做到平台通用
不仅重实践、也会结合原理(如:Http协议、操作系统),让你理解背后的原理更有利于你解决实际问题(如:bug解决、二次开发等)
yum -y install gcc gcc-c++ autoconf pcre pcre-devel make automake
yum -y install wget httpd-tools vim
cd /opt;mkdir app download logs work backup# 查看
iptables -L
# 关闭
iptables -F
# 查看
iptables -t nat -L
# 关闭
iptables -t nat -F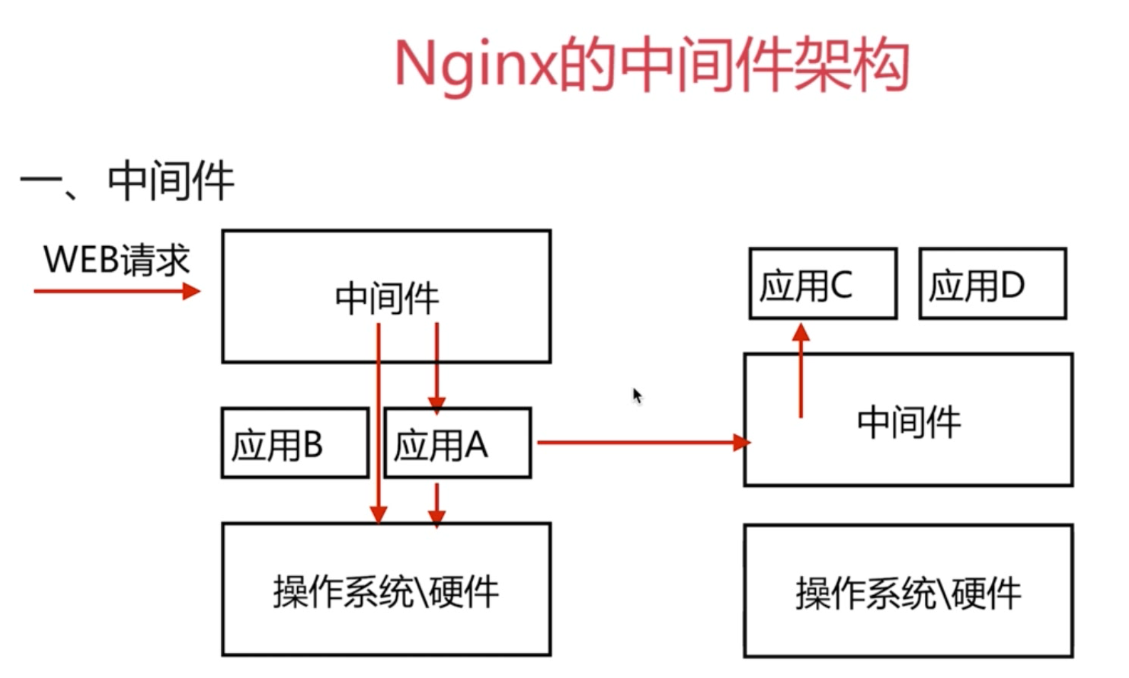
http://nginx.org/en/linux_packages.html#stable
vim /etc/yum.repos.d/nginx.repo 内容如下S
[nginx]
name=nginx repo
baseurl=http://nginx.org/packages/centos/7/$basearch/
gpgcheck=0
enabled=1
yum install nginx# 查看版本
nginx -v
# 查看安装编译参数
nginx -Vrpm -ql nginx
| 路径 | 类型 | 作用 |
|---|---|---|
| /etc/logrotate.d/nginx | 配置文件 | nginx日志轮转,用于logrotate服务的日志切割 |
| /etc/nginx /etc/nginx/nginx.confd /etc/nginx/conf.d /etc/nginx/conf.d/default.conf |
目录,配置文件 | nginx主配置文件 |
| /etc/nginx/scgi_params /etc/nginx/uwsgi_params /etc/nginx/fastcgi_params |
配置文件 | cgi配置相关,fastcgi配置 |
| /etc/nginx/koi-utf /etc/nginx/koi-win /etc/nginx/win-utf |
配置文件 | 编码转换映射转化文件 |
| /etc/nginx/mime.types | 配置文件 | 设置http协议的Content-Type与扩展名对应关系 |
| /usr/lib/systemd/system/nginx-debug.service /usr/lib/systemd/system/nginx.service /etc/sysconfig/nginx /etc/sysconfig/nginx-debug |
配置文件 | 用于配置出系统守护进程管理器管理方式 |
| /usr/lib64/nginx/modules /etc/nginx/modules |
目录 | nginx模块目录 |
| /usr/sbin/nginx /usr/sbin/nginx-debug |
命令 | nginx服务的启动管理的终端命令 |
| /usr/share/doc/nginx-1.14.2 /usr/share/doc/nginx-1.14.2/COPYRIGHT /usr/share/man/man8/nginx.8.gz |
文件, 目录 | nginx的手册和帮助文件 |
| /var/cache/nginx | 目录 | nginx的缓存目录 |
| /var/log/nginx | 目录 | nginx的日志目录 |
nginx -V
| 编译选项 | 作用 |
|---|---|
| --prefix=/etc/nginx --sbin-path=/usr/sbin/nginx --modules-path=/usr/lib64/nginx/modules --conf-path=/etc/nginx/nginx.conf --error-log-path=/var/log/nginx/error.log --http-log-path=/var/log/nginx/access.log --pid-path=/var/run/nginx.pid --lock-path=/var/run/nginx.lock |
安装目的目录或路径 |
| --http-client-body-temp-path=/var/cache/nginx/client_temp --http-proxy-temp-path=/var/cache/nginx/proxy_temp --http-fastcgi-temp-path=/var/cache/nginx/fastcgi_temp --http-uwsgi-temp-path=/var/cache/nginx/uwsgi_temp --http-scgi-temp-path=/var/cache/nginx/scgi_temp |
执行对应模块时,nginx所保留的临时性文件 |
| --user=nginx --group=nginx |
设定nginx进程启动的用户和组用户 |
| --with-cc-opt=parameters | 设置额外的参数将被添加到CFLAGS变量 |
| --with-ld-opt=parameters | 设置附加的参数,链接系统库 |
| - | - | - |
|---|---|---|
| user | 设置nginx服务的系统使用用户 | |
| worker_processes | 工作进程数 | |
| error_log | nginx的错误日志 | |
| pid | nginx服务启动时候pid | |
| events | worker_connections use |
每个进程允许最大连接数 工作进程数 |
http://nginx.org/en/docs/http/ngx_http_log_module.html
错误日志,格式如下
2018/12/11 15:51:32 [error] 5809#5809: *37 open() "/usr/share/nginx/html/favicon.ico" failed (2: No such file or directory), client: 120.194.101.83, server: _, request: "GET /favicon.ico HTTP/1.1", host: "120.79.65.88", referrer: "http://120.79.65.88/"error_log /var/log/nginx/error.log warn;
日志存放位置/var/log/nginx/error.log
级别warn
access_log 记录了哪些用户,哪些页面以及用户浏览器、ip和其他的访问信息,形式如下
222.88.236.165 - - [11/Dec/2018:16:38:42 +0800] "GET /static/js/login.js HTTP/1.1" 200 14459 "http://mxonline.iceflower.xyz:8081/login/?next=/course/info/6/" "Mozilla/5.0 (Windows NT 10.0; Win64; x64) AppleWebKit/537.36 (KHTML, like Gecko) Chrome/70.0.3538.67 Safari/537.36" "-"格式设置
    log_format  main  ‘$remote_addr - $remote_user [$time_local] "$request" ‘
                      ‘$status $body_bytes_sent "$http_referer" ‘
                      ‘"$http_user_agent" "$http_x_forwarded_for"‘;

    access_log  /var/log/nginx/access.log  main;
具体的设置可以在官网中找到,可进行自定制
http://nginx.org/ru/docs/http/ngx_http_stub_status_module.html
--with-http_stub_status_module nginx的客户端状态
配置nginx文件,写在server中
location = /mystatus {
    stub_status;
}重启nginx,浏览器访问IP+/mystatus,格式如下
Active connections: 1
server accepts handled requests
 43 43 79
Reading: 0 Writing: 1 Waiting: 0
Active connections
当前活动客户端连接数,包括Waiting连接数。
accepts
已接受的客户端连接总数。
handled
处理的连接总数。通常,参数值与accepts 除非已达到某些资源限制(例如, worker_connections限制)相同。
requests
客户端请求的总数。
Reading
nginx正在读取请求标头的当前连接数。
Writing
nginx将响应写回客户端的当前连接数。
Waiting
当前等待请求的空闲客户端连接数。
http://nginx.org/en/docs/http/ngx_http_random_index_module.html
--with-http_random_index_module 目录中选择一个随机主页
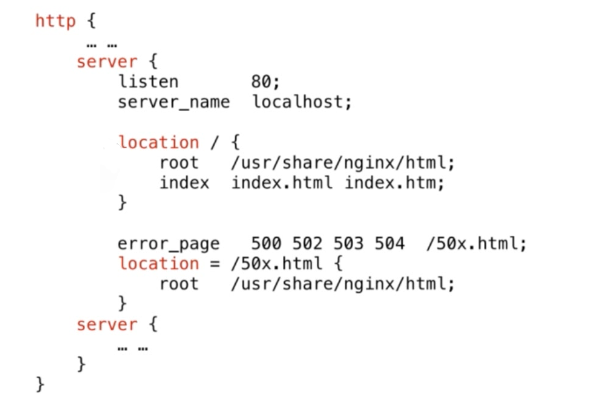
location / {
    root /opt/app/code/html;
    random_index on;
}
root 后面是主页面存放位置
不会选择隐藏文件作为主页面
http://nginx.org/en/docs/http/ngx_http_sub_module.html
--with-http_sub_module HTTP内容替换
location / {
    sub_filter ‘<a href="http://127.0.0.1:8080/‘  ‘<a href="https://$host/‘;
    sub_filter ‘<img src="http://127.0.0.1:8080/‘ ‘<img src="https://$host/‘;
    sub_filter_once on;
}
敏感词,流媒体替换
limit_conn_module 连接频率限制
http://nginx.org/en/docs/http/ngx_http_limit_conn_module.html
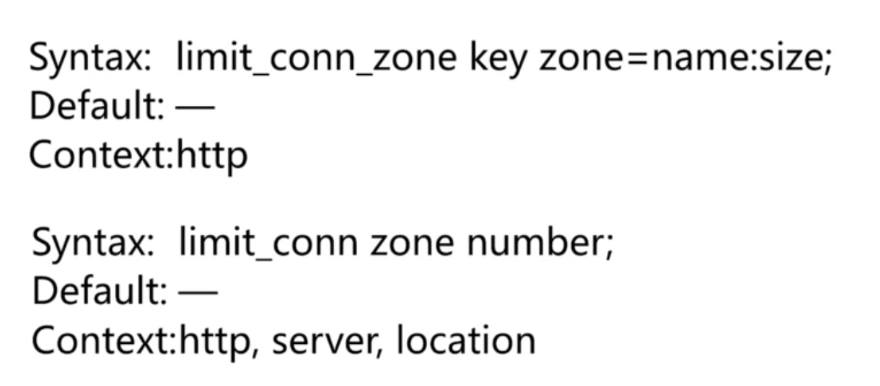
http {
    limit_conn_zone $binary_remote_addr zone=addr:10m;

    ...

    server {

        ...

        location /api/ {
            limit_conn addr 10;
            limit_conn_status 503;
        }
    }
}
示例中定义key(zone=addr)为addr,分配内存大小为10m(zone=addr:10m)(如果限制域的存储空间耗尽了,对于后续所有请求,服务器都会返回503),同一个ip($binary_remote_addr)和服务器连接超过10个(limit_conn addr 10)将会被拦截并返回503(limit_conn_status 503)错误码
limit_conn_zone
语法: limit_conn_zone key zone=name:size;(设置限制规则、区域名称及分配的内存大小)
可配置区域: http
key: 必选项;设置限制规则;取值可以是text文本、nginx变量或两者的组合;实例中使用的nginx变量$binary_remote_addr表示根据每个ip限制并发
name: 必选项; 自定义一个区域名称; 任意字符串
size: 分配内存的大小
limit_conn
语法: limit_conn zone number; (使用由limit_conn_zone定义的拦截规则, 并设置具体的限制连接数量)
可配置区域: http, server, location
zone: 必选项; 由limit_conn_zone(zone=name)定义的名称; 表示使用定义的哪个限制规则
number: 必选项; 正整数; 表示具体的限制连接数量
limit_conn_status
语法: limit_conn_status code;
默认值: 503
可配置区域: http, server, location
表示超出limit_req配置的请求数量后返回给客户端的错误码使用该指令
limit_conn_log_level
语法: limit_conn_log_level info | notice | warn | error;
默认值: limit_conn_log_level error;
可配置区域: http, server, location
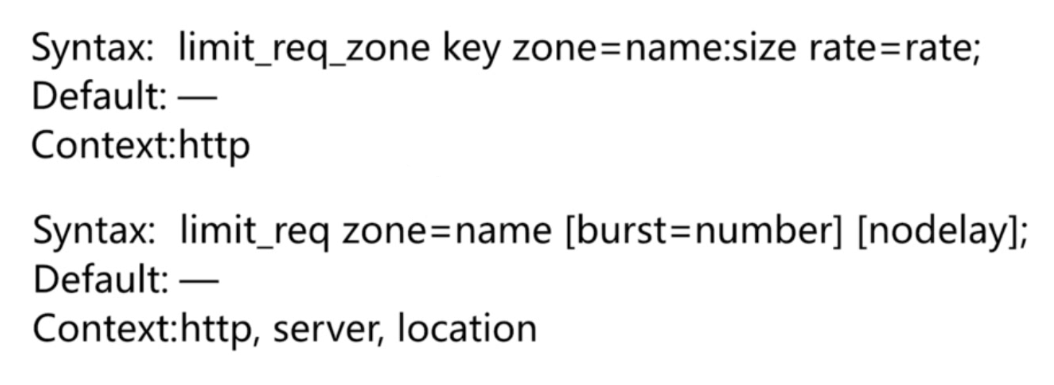
当服务器拒绝处理由于速率超过或延迟请求处理而拒绝处理请求时,设置所需的日志记录级别。limit_req_module 请求频率限制
http://nginx.org/en/docs/http/ngx_http_limit_req_module.html
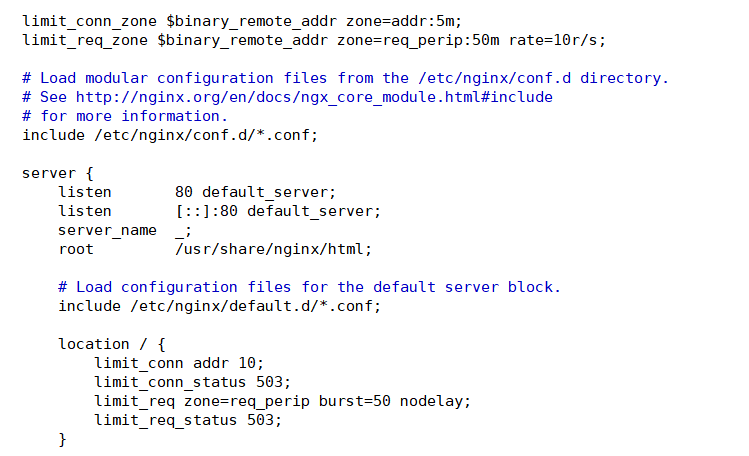
http {
    limit_req_zone $binary_remote_addr zone=req_perip:50m rate=10r/s;

    ...

    server {

        ...

        location /api/ {
                limit_req zone=req_perip burst=50 nodelay;
                limit_req_status 503;
        }
    }
}
示例中定义的区域名称为req_perip(zone=req_perip),分配内存大小为50m(如果限制域的存储空间耗尽了,对于后续所有请求,服务器都会返回503),同一个ip($binary_remote_addr)平均处理的请求频率不能超过每秒10次(rate=10r/s); 如果超过每秒10次但超过的请求数量小于等于50(burst=50)时,会延迟请求。如果超过每秒的请求数超过50,则立即返回503(limit_req_status 503)给客户端
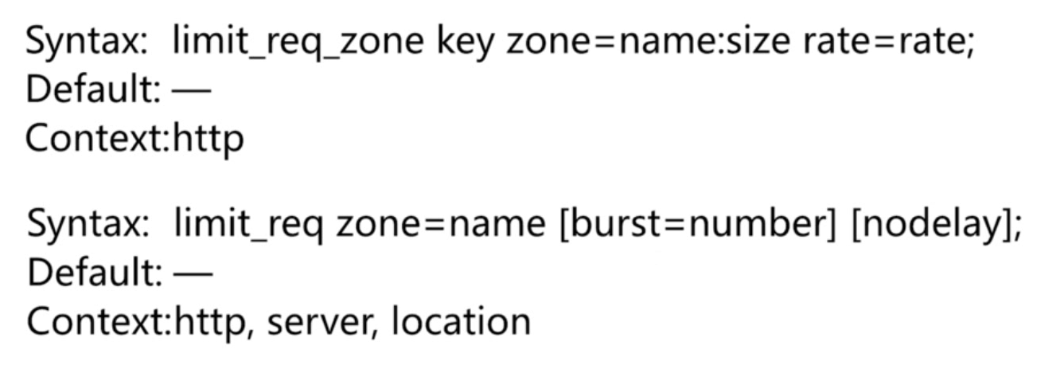
limit_req_zone
语法: limit_req_zone key zone=name:size rate=rate;(可理解为该指令用来定义限制请求频率)
可配置区域: http
key: 必选项;取值范围: 1,text(文本); 2,nginx变量;3,text和nginx变量的组合; name: 必选项;自定义字符串
size: 必选项;分配内存大小,用来保存键值的状态参数
rate: 必选项;每秒可请求的频率(r/s), 或每分钟可请求的频率(r/m)


limit_req
语法: limit_req zone=name [burst=number] [nodelay]; (可理解为使用定义的限制请求频率,一定是先定义后使用!也就是一定要有limit_req_zone指令的配置后才能使用该配置)
可配置区域: http, server, location
name: 必选项;自定义字符串, 名字必须与limit_req_zone中zone=name这个名字一致
number: 必选项;正整数数字, 平均每秒允许不超过limit_req_zone指令中rate规定的请求数,并且不会超过该值所指定数量的请求,可延迟请求的数量
nodelay: 可选配置,表示请求频率超过rate规定值后又超过burst规定值后立即返回客户端503(可设置返回code)


limit_req_status
语法: limit_req_status code;
默认值: 503
可配置区域: http, server, location
表示超出limit_req配置的请求数量后返回给客户端的错误码使用该指令


limit_req_log_level
语法: limit_req_log_level info | notice | warn | error;
默认值: limit_req_log_level error;
可配置区域: http, server, location
当服务器拒绝处理由于速率超过或延迟请求处理而拒绝处理请求时,设置所需的日志记录级别。
$binary_remote_addr是$remote_addr(客户端IP)的二进制格式,固定占用4个字节。而$remote_addr按照字符串存储,占用7-15个字节。用$binary_remote_addr可以节省空间。
http_access_module 基于IP的访问控制
http://nginx.org/en/docs/http/ngx_http_access_module.html

location / {
    deny  192.168.1.1;  # 拒绝访问
    allow 192.168.1.0/24;   # 允许访问
    allow 10.1.1.0/16;
    allow 2001:0db8::/32;   # IPV6
    deny  all;
}
局限性
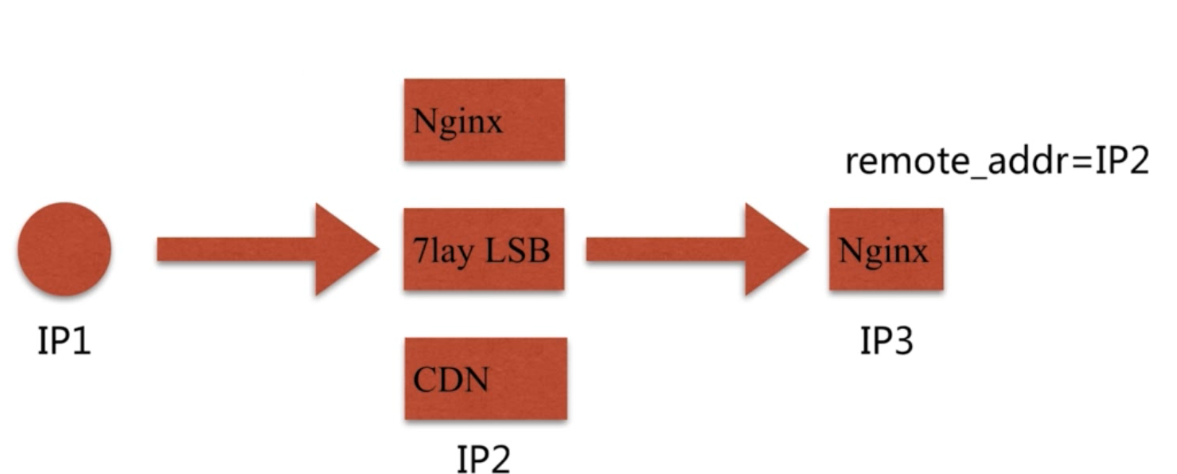
IP1 客户端
IP2 代理服务器
IP3 服务器
基于客户端的IP,但是对于Nginx来说,它不会管你哪个是真正的客户端,如果我们的访问不是客户端与服务端直接连接,而是通过了一层代理,比如它的代理可以负载均衡、CDN的这种代理实现,也就是我们的访问不是客户端直接访问的服务端,而是通过其他的中间件访问服务端,这时候会出现一个问题,因为Nginx的access_module它是基于remote_addr这个变量来识别客户端的IP的,那么如果一个ip通过中间件访问服务端,那么Nginx认为访问的ip就是中间件的IP,那么我们在基于IP做限制的时候,那么其实是没有作用的。所以这样的话,准确性是不高的,所以就是利用nginx的access_module有局限性。
解决办法
使用http_x_forwarded_for来解决这个问题
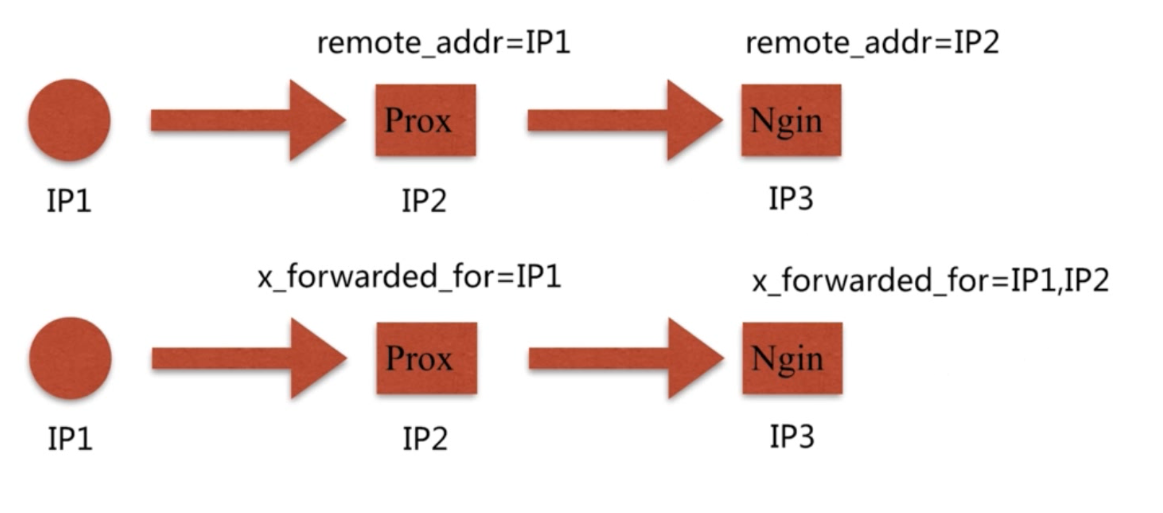
但是http_x_forwarded_for进行访问控制会存在问题,因为是一个协议要求的,并不是所有的cdn和代理厂商它会按照要求来做,甚至x_forwarded_for存在被修改的可能,因为只是一个头信息,所以最终还是不真实。
http_x_forwardded_for也是Nginx的http头变量的一个常用的变量,它和remote_addr是有区别的。不同的是,x_forwarded_for是http协议中规定头中要携带的,所以在客户端访问中间件,再访问服务端的时候,那么服务端通过Nginx会记录真实IP和中间件的IP。
格式:http_x_forwarded_for = 客户端ip,第一台代理ip,第二台代理ip,第N台代理ip....,所以http_x_forwarded_for是由一连串以逗号分隔的ip组成的。
通过HTTP自定义变量传递
http_auth_basic_module 基于用户的信任登录
http://nginx.org/en/docs/http/ngx_http_auth_basic_module.html
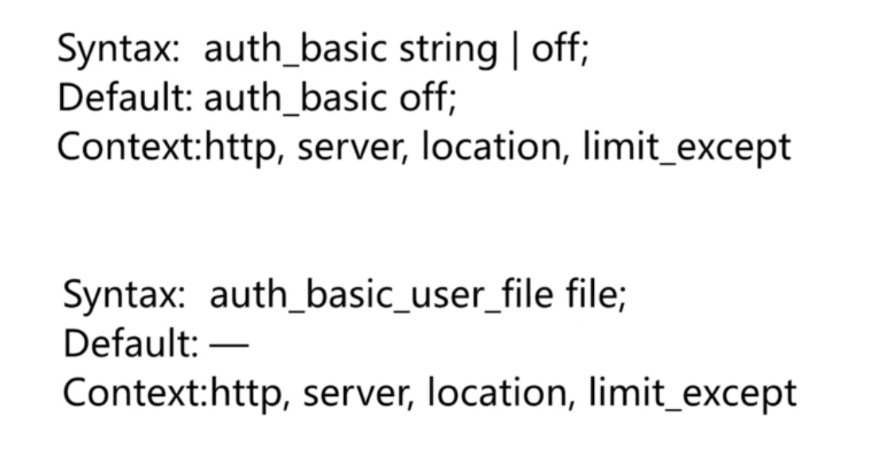
location / {
    auth_basic           "输入密码";
    auth_basic_user_file user_passwd;
}
htpasswd安装
yum install httpd-tools -y
首次创建并加入
htpasswd -c ./user_passwd admin
[root@GYJ nginx]# cd /etc/nginx/
[root@GYJ nginx]# ls
conf.d     fastcgi_params  koi-win     modules     nginx.conf.rpmnew  uwsgi_params
default.d  koi-utf         mime.types  nginx.conf  scgi_params        win-utf
[root@GYJ nginx]# htpasswd -c ./user_passwd admin
New password:
Re-type new password:
Adding password for user admin
[root@GYJ nginx]# ls
conf.d     fastcgi_params  koi-win     modules     nginx.conf.rpmnew  user_passwd   win-utf
default.d  koi-utf         mime.types  nginx.conf  scgi_params        uwsgi_params
[root@GYJ nginx]# vim user_passwd
[root@GYJ nginx]# cat user_passwd
admin:$apr1$I04BhX5R$9JexKOl2aYCe.Tww67XMu0
[root@GYJ nginx]#
http_auth_basic_module局限性
用户信息依赖文件方式,管理操作机械,效率不高
解决方法:
Nginx结合LUA实现高效验证
Nginx结合LDAP,利用nginx_auth_ldap模块
原文:https://www.cnblogs.com/gaoyongjian/p/10105368.html