1,安装NODE,
2,安装webpack
1 npm install -g webpack
3,配置淘宝镜像
使用淘宝定制的 cnpm (gzip 压缩支持) 命令行工具代替默认的 npm
1 npm install -g cnpm --registry=https://registry.npm.taobao.org
2 npm config set registry https://registry.npm.taobao.org
4,安装create-react-app
1 cnpm install -g create-react-app
1 create-react-app my-project//创建项目
2 cd my-project/
6,本地服务启动
1 npm run start//启动本地server用于开发
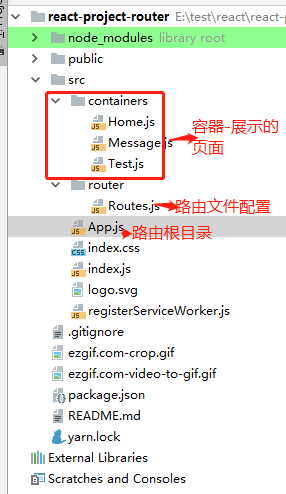
React Router 是一个基于 React 之上的强大路由库,它可以让你向应用中快速地添加视图和数据流,同时保持页面与 URL 间的同步。react-router
1 npm install react-router@4.3.1 --save

 1  render(){
 2         return (
 3             <Router>
 4                 <div>
 5                     <ul>
 6                         <li><Link to="/home">首页</Link></li>
 7                         <li><Link to="/other">其他页</Link></li>
 8                     </ul>
 9                     <Route path="/home" component={Home}/>
10                     <Route path="/other" component={Other}/>
11                 </div>
12             </Router>
13         )
14 }
路由支持嵌套,代码如下:
 1 const Root = () => (
 2    <div>
 3       <Switch>
 4          <Route
 5             path="/"
 6             render={props => (
 7                <App>
 8                   <Switch>
 9                      <Route path="/" exact component={Home} />
10                      <Route path="/home" component={Home} />
11                      <Route path="/test" component={Test} />
12                      <Route path="/message/:id/:TestId" component={Message} />
13                       {/*路由不正确时,默认跳回home页面*/}
14                      <Route render={() => <Redirect to="/" />} />
15                   </Switch>
16                </App>
17             )}
18          />
19       </Switch>
20    </div>
21 );
22
23 export default Root;
React是单向数据流,所以有些情况下单单依赖React自身无法实现组件之间的通信,故此需要redux
需要安装Redux相关依赖,由于不同版本之间可能存在兼容性问题,所以安装的时候最好制定版本:
1 npm install redux@3.7.2 --save
2 npm install redux-thunk@2.1.0 --save
3 npm install react-redux@5.0.6 --save
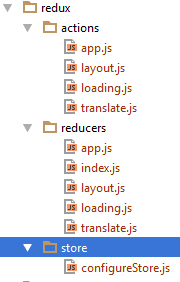
然后就可以在项目中引入redux了,可以像如下方式组织目录结构:
关于请求数据有很多种方式,这里采用的是fetch
1 npm install fetch --save
可以简单封装一下,如下:
 1 import ‘whatwg-fetch‘
 2 import loggerService from ‘./logger‘
 3
 4 let notAuthorizedCounter = 0;
 5 let fetchService = {
 6     fetch: (url, method, header, body) => {
 7         if (!header) {
 8             header = {}
 9         }
10
11         return fetchService[method.toLowerCase()](url, header, body).catch(function(exception) {
12             loggerService.log(‘fetchService failed:‘, exception);
13
14             // token过期,重新获取token并发起请求
15             if (exception.code === ‘401‘ || exception.code === ‘403‘) {
16                 notAuthorizedCounter++;
17                 // 最多重试3次
18                 if (notAuthorizedCounter > 2) {
19                     notAuthorizedCounter = 0;
20                     loggerService.warn("401 or 403 received. Max attemps reached.");
21                     return;
22                 } else {
23                     return fetchService.fetch(url, method, header, body);
24                 }
25             }
26         });
27     },
28     get: (url, header) => {
29         return fetch(url, {
30             method: ‘GET‘,
31             headers: header
32         }).then((response) => {
33             return response.json();
34         });
35     },
36     post: (url, header, body) => {
37         header[‘Content-Type‘] = ‘application/json‘;
38         return fetch(url, {
39             method: ‘POST‘,
40             headers: header,
41             body: JSON.stringify(body)
42         }).then((response) => {
43             return response.json();
44         });
45     }
46 };
47 export default fetchService;
基于React的UI组件在这里推荐两个,一个是蚂蚁金服的Ant Design;另外一个是Material-UI。
两个都很不错,这里使用的是Ant Design。
1 npm install antd --save
请注意 react >= 16.6.3和react-dom >= 16.6.3 是对等依赖
1 npm install @material-ui/core
采用的是常用的react-intl
1 npm install react-intl --save
首先对项目进行打包。
1 npm run build
通过以下命令可以在本地环境运行打包后的项目。
1 serve -s build
PropTypes 的使用
JavaScript 是弱类型语言,所以请尽量声明 propTypes 对 props 进行校验,以减少不必要的问题。
 1 import React from ‘react‘;
 2 import PropTypes from ‘prop-types‘
 3
 4 class PropTypesList extends React.Component {
 5     static propTypes = {//校验
 6        title: PropTypes.string,
 7     };
 8     static defaultProps = {//设置默认值
 9         title:"PropTypes 的应用实例"//添加默认值
10     };
11     constructor(props) {
12         super(props);
13         this.state = {
14
15         }
16     }
17     render() {
18         const { title} = this.props
19         return (
20             <div>
21                 <p>{title}</p>
22             </div>
23         );
24     }
25 }
26
27 export default PropTypesList ;
内置的 prop type 有:
原文:https://www.cnblogs.com/Leo_wl/p/10273567.html