索引
一、富文本编辑器
借助富文本编辑器,网站的编辑人员能够像使用offfice一样编写出漂亮的、所见即所得的页面。此处以tinymce为例,其它富文本编辑器的使用也是类似的。
在虚拟环境中安装包。
pip install django-tinymce
安装完成后,可以使用在Admin管理中,也可以自定义表单使用。
示例
1)在项目的settings.py中为INSTALLED_APPS添加编辑器应用。

INSTALLED_APPS = (
    ...
    ‘tinymce‘,
)
2)在项目的settings.py中添加编辑器配置。
TINYMCE_DEFAULT_CONFIG = {
    ‘theme‘: ‘advanced‘,
    ‘width‘: 600,
    ‘height‘: 400,
}
3)在项目的urls.py中配置编辑器url。
urlpatterns = [
    ...
    url(r‘^tinymce/‘, include(‘tinymce.urls‘)),
]
接下来介绍在Admin页面、自定义表单页面的使用方式。
1.1 在Admin中使用
1)在booktest/models.py中,定义模型的属性为HTMLField()类型。
from django.db import models
from tinymce.models import HTMLField

class GoodsInfo(models.Model):
    gcontent=HTMLField()
2)生成迁移文件,执行迁移。
python manage.py makemigrations
python manage.py migrate
3)在booktest/admin.py中注册模型类GoodsInfo
from django.contrib import admin
from booktest.models import *
class GoodsInfoAdmin(admin.ModelAdmin):
    list_display = [‘id‘]

admin.site.register(GoodsInfo,GoodsInfoAdmin)
4)运行服务器,进入admin后台管理,点击GoodsInfo的添加,效果如下图

在编辑器中编辑内容后保存。
1.2 自定义使用
1)在booktest/views.py中定义视图editor,用于显示编辑器。
def editor(request):
    return render(request, ‘booktest/editor.html‘)
2)在booktest/urls.py中配置url。
url(r‘^editor/‘,views.editor),
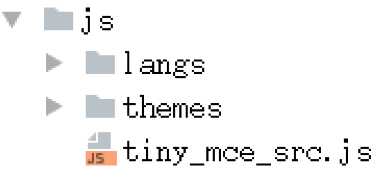
3)在项目目录下创建静态文件目录如下图:

4)找到安装的tinymce的目录。
5)拷贝tiny_mce_src.js文件、langs文件夹以及themes文件夹拷贝到项目目录下的static/js/目录下。
6)在项目的settings.py中配置静态文件查找路径。
STATICFILES_DIRS=[
    os.path.join(BASE_DIR,‘static‘),
]
7)在templates/booktest/目录下创建editor.html模板。
<html>
<head>
<title>自定义使用tinymce</title>
<script type="text/javascript" src=‘/static/js/tiny_mce.js‘></script>
<script type="text/javascript">
tinyMCE.init({
‘mode‘:‘textareas‘,
‘theme‘:‘advanced‘,
‘width‘:400,
‘height‘:100
});
</script>
</head>
<body>
<form method="post" action="#">
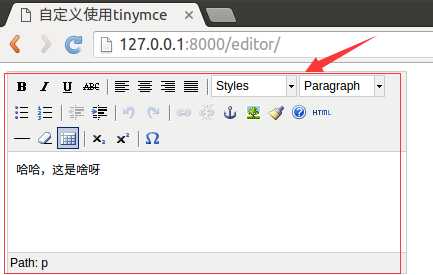
<textarea name=‘gcontent‘>哈哈,这是啥呀</textarea>
</form>
</body>
</html>
8)运行服务器,访问网址,效果如下图:
1.3 显示
通过富文本编辑器产生的字符串是包含html的。 在数据库中查询如下图:

在模板中显示字符串时,默认会进行html转义,如果想正常显示需要关闭转义。
在模板中关闭转义
1)在booktest/views.py中定义视图show,用于显示富文本编辑器的内容。
from booktest.models import *
...
def show(request):
    goods=GoodsInfo.objects.get(pk=1)
    context={‘g‘:goods}
    return render(request,‘booktest/show.html‘,context)
2)在booktest/urls.py中配置url。
url(r‘^show/‘, views.show),
3)在templates/booktest/目录下创建show.html模板。
<html>
<head>
    <title>展示富文本编辑器内容</title>
</head>
<body>
id:{{g.id}}
<hr>
{%autoescape off%}
{{g.gcontent}}
{%endautoescape%}
<hr>
{{g.gcontent|safe}}
</body>
</html>
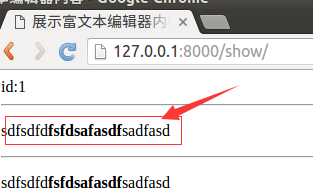
4)运行服务器,在浏览器中访问网址,效果如下图:
二、全文检索
全文检索不同于特定字段的模糊查询,使用全文检索的效率更高,并且能够对于中文进行分词处理。
1)在环境中依次安装需要的包。
pip install django-haystack
pip install whoosh
pip install jieba
2)修改项目的settings.py文件,安装应用haystack。
INSTALLED_APPS = (
    ...
    ‘haystack‘,
)
3)在项目的settings.py文件中配置搜索引擎。
HAYSTACK_CONNECTIONS = {
    ‘default‘: {
        #使用whoosh引擎
        ‘ENGINE‘: ‘haystack.backends.whoosh_cn_backend.WhooshEngine‘,
        #索引文件路径
        ‘PATH‘: os.path.join(BASE_DIR, ‘whoosh_index‘),
    }
}

#当添加、修改、删除数据时,自动生成索引
HAYSTACK_SIGNAL_PROCESSOR = ‘haystack.signals.RealtimeSignalProcessor‘
4)在项目的urls.py中添加搜索的配置。
url(r‘^search/‘, include(‘haystack.urls‘)),
2.1 创建引擎及索引
1)在booktest目录下创建search_indexes.py文件。
from haystack import indexes
from booktest.models import GoodsInfo
#指定对于某个类的某些数据建立索引
class GoodsInfoIndex(indexes.SearchIndex, indexes.Indexable):
    text = indexes.CharField(document=True, use_template=True)

    def get_model(self):
        return GoodsInfo

    def index_queryset(self, using=None):
        return self.get_model().objects.all()
2)在templates目录下创建"search/indexes/booktest/"目录。

3)在上面的目录中创建"goodsinfo_text.txt"文件。
#指定索引的属性
{{object.gcontent}}
4)找到安装的haystack目录,在目录中创建ChineseAnalyzer.py文件。
import jieba
from whoosh.analysis import Tokenizer, Token

class ChineseTokenizer(Tokenizer):
    def __call__(self, value, positions=False, chars=False,
                 keeporiginal=False, removestops=True,
                 start_pos=0, start_char=0, mode=‘‘, **kwargs):
        t = Token(positions, chars, removestops=removestops, mode=mode,
                  **kwargs)
        seglist = jieba.cut(value, cut_all=True)
        for w in seglist:
            t.original = t.text = w
            t.boost = 1.0
            if positions:
                t.pos = start_pos + value.find(w)
            if chars:
                t.startchar = start_char + value.find(w)
                t.endchar = start_char + value.find(w) + len(w)
            yield t

def ChineseAnalyzer():
    return ChineseTokenizer()
5)复制whoosh_backend.py文件,改为如下名称:
注意:复制出来的文件名,末尾会有一个空格,记得要删除这个空格。
whoosh_cn_backend.py
6)打开复制出来的新文件,引入中文分析类,内部采用jieba分词。
from .ChineseAnalyzer import ChineseAnalyzer
7)更改词语分析类。
查找
analyzer=StemmingAnalyzer()
改为
analyzer=ChineseAnalyzer()
8)初始化索引数据。
python manage.py rebuild_index
9)按提示输入y后回车,生成索引。
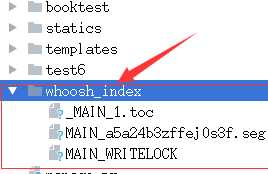
10)索引生成后目录结构如下图:
2.2 使用
按照配置,在admin管理中添加数据后,会自动为数据创建索引,可以直接进行搜索,可以先创建一些测试数据。
1)在booktest/views.py中定义视图query。
def query(request):
    return render(request,‘booktest/query.html‘)
2)在booktest/urls.py中配置。
url(r‘^query/‘, views.query),
3)在templates/booktest/目录中创建模板query.html。
参数q表示搜索内容,传递到模板中的数据为query。
<html>
<head>
    <title>全文检索</title>
</head>
<body>
<form method=‘get‘ action="/search/" target="_blank">
    <input type="text" name="q">
    <br>
    <input type="submit" value="查询">
</form>
</body>
</html>
4)自定义搜索结果模板:在templates/search/目录下创建search.html。
搜索结果进行分页,视图向模板中传递的上下文如下:
视图接收的参数如下:
<html>
<head>
<title>全文检索--结果页</title>
</head>
<body>
<h1>搜索 <b>{{query}}</b> 结果如下:</h1>
<ul>
{%for item in page%}
<li>{{item.object.id}}--{{item.object.gcontent|safe}}</li>
{%empty%}
<li>啥也没找到</li>
{%endfor%}
</ul>
<hr>
{%for pindex in page.paginator.page_range%}
{%if pindex == page.number%}
{{pindex}}
{%else%}
<a href="?q={{query}}&page={{pindex}}">{{pindex}}</a>
{%endif%}
{%endfor%}
</body>
</html>
5)运行服务器,访问网址,进行搜索测试。
三、发送邮件
Django中内置了邮件发送功能,被定义在django.core.mail模块中。发送邮件需要使用SMTP服务器,常用的免费服务器有:163、126、QQ,下面以163邮件为例。
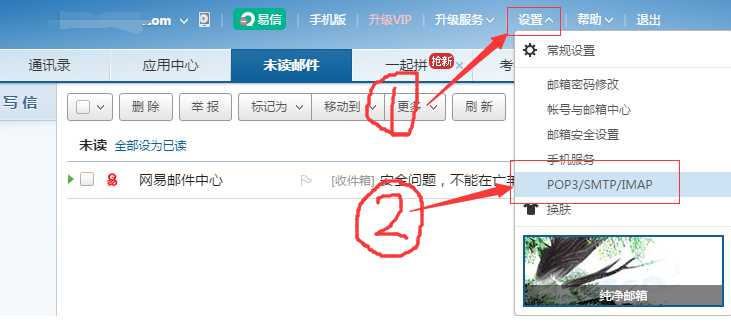
1)登录设置。
2)在新页面中点击“客户端授权密码”,勾选“开启”,弹出新窗口填写手机验证码。
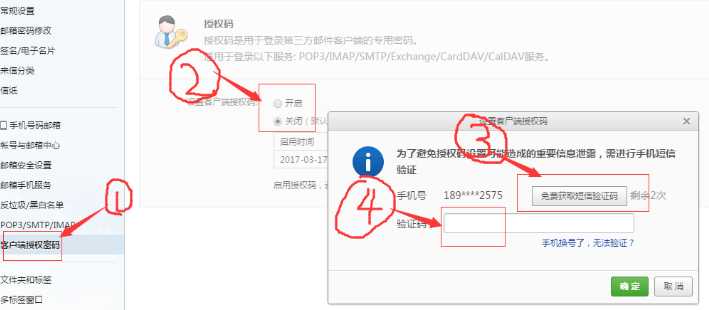
3)填写授权码。

4)提示开启成功。
5)打开项目的settings.py文件,配置。
EMAIL_BACKEND = ‘django.core.mail.backends.smtp.EmailBackend‘
EMAIL_HOST = ‘smtp.163.com‘
EMAIL_PORT = 25
#发送邮件的邮箱
EMAIL_HOST_USER = ‘xxxxxx@163.com‘
#在邮箱中设置的客户端授权密码
EMAIL_HOST_PASSWORD = ‘xxxxxxx‘
#收件人看到的发件人
EMAIL_FROM = ‘python<xxxxxx@163.com>‘
6)在booktest/views.py文件中新建视图send。
from django.conf import settings
from django.core.mail import send_mail
from django.http import HttpResponse
...
def send(request):
    msg=‘<a href="xxxxxxxxx" target="_blank">点击激活</a>‘
    send_mail(‘注册激活‘,‘‘,settings.EMAIL_FROM,
              [‘xxxxxx@163.com‘],
              html_message=msg)
    return HttpResponse(‘ok‘)
7)在booktest/urls.py文件中配置。
url(r‘^send/$‘,views.send),
8)启动服务器,在浏览器访问地址,去邮箱查看邮件。
原文:https://www.cnblogs.com/ForT/p/10726221.html
