一、认识
Spring Boot是由Pivotal团队提供的全新框架,其设计目的是用来简化Spring应用的初始搭建以及开发过程。 -使用springboot以后,搭建一个spring应用和开发变得很简单.
Springboot就是一些写好了maven的模块,我们在使用SPring就不需以传统的方式来用,只需要以maven导入对应的springboot模块,就能完成一大堆操作。简单的说,它使用maven的方式对Spring应用开发进行进一步封装和简化。
Spring Boot使编码更简单,使配置更简单,使部署更简单,使监控更简单。Springboot就是为了简化spring应用搭建,开发,部署,监控的开发工具。
二、入门准备
开发环境JDK 1.8
项目管理工具( Maven )
开发工具(Eclipse/idea)
1.创建普通 maven项目 springboot_parent
2.配置pom.xml
 1 <!--
 2         spring boot 父节点依赖,引入这个之后相关的引入
 3         就不需要添加version配置,
 4         spring boot会自动选择最合适的版本进行添加。
 5     -->
 6     <parent>
 7         <groupId>org.springframework.boot</groupId>
 8         <artifactId>spring-boot-starter-parent</artifactId>
 9         <version>2.0.5.RELEASE</version>
10     </parent>
11
12     <dependencyManagement>
13         <dependencies>
14             <!--springboot版本管理-->
15             <dependency>
16                 <groupId>org.springframework.boot</groupId>
17                 <artifactId>spring-boot-dependencies</artifactId>
18                 <version>2.0.5.RELEASE</version>
19                 <type>pom</type>
20                 <scope>import</scope>
21             </dependency>
22         </dependencies>
23     </dependencyManagement>
三、springBoot+springMVC
1.通过maven创建一个web模块
2.配置pom.xml
 1    <!-- tomcat和springMVC-->
 2     <dependencies>
 3         <dependency>
 4             <groupId>org.springframework.boot</groupId>
 5             <artifactId>spring-boot-starter-web</artifactId>
 6         </dependency>
 7         <!-- 热部署 ctrl+f9-->
 8         <dependency>
 9             <groupId>org.springframework.boot</groupId>
10             <artifactId>spring-boot-devtools</artifactId>
11             <optional>true</optional>
12             <scope>true</scope>
13         </dependency>
14     </dependencies>
15
16     <build>
17         <plugins>
18             <plugin>
19                 <groupId>org.springframework.boot</groupId>
20                 <artifactId>spring-boot-maven-plugin</artifactId>
21                 <configuration>
22                     <!--fork :  如果没有该项配置,可能devtools不会起作用,即应用不会restart -->
23                     <fork>true</fork>
24                 </configuration>
25             </plugin>
26         </plugins>
27     </build>
3.准备tomcat启动类
1 @SpringBootApplication
2 public class MVCApp {
3
4     public static void main(String[] args) {
5         SpringApplication.run(MVCApp.class);
6     }
7 }
4.通过controller层进行访问
1 @RestController//包含JSON格式和controller
2 public class MvcController {
3
4     @RequestMapping("/hello")
5     public String index(){
6         return "suSu";
7     }
8 }
四、springBoot+jsp跳转
1.通过maven创建一个web模块
2.配置pom.xml
 1     <properties>
 2         <project.build.sourceEncoding>UTF-8</project.build.sourceEncoding>
 3         <maven.compiler.source>1.8</maven.compiler.source>
 4         <maven.compiler.target>1.8</maven.compiler.target>
 5     </properties>
 6
 7     <dependencies>
 8         <dependency>
 9             <groupId>junit</groupId>
10             <artifactId>junit</artifactId>
11             <version>4.11</version>
12             <scope>test</scope>
13         </dependency>
14         <!-- web支持: 1、web mvc; 2、restful; 3、jackjson支持; 4、aop ........ -->
15         <dependency>
16             <groupId>org.springframework.boot</groupId>
17             <artifactId>spring-boot-starter-web</artifactId>
18         </dependency>
19
20         <!-- servlet 依赖. -->
21         <dependency>
22             <groupId>javax.servlet</groupId>
23             <artifactId>javax.servlet-api</artifactId>
24         </dependency>
25
26         <dependency>
27             <groupId>javax.servlet</groupId>
28             <artifactId>jstl</artifactId>
29         </dependency>
30
31         <!-- tomcat 的支持. -->
32         <dependency>
33             <groupId>org.springframework.boot</groupId>
34             <artifactId>spring-boot-starter-tomcat</artifactId>
35         </dependency>
36         <dependency>
37             <groupId>org.apache.tomcat.embed</groupId>
38             <artifactId>tomcat-embed-jasper</artifactId>
39         </dependency>
40     </dependencies>
41
42     <build>
43         <finalName>springboot_jsp</finalName>
44         <pluginManagement><!-- lock down plugins versions to avoid using Maven defaults (may be moved to parent pom) -->
45             <plugins>
46                 <plugin>
47                     <artifactId>maven-clean-plugin</artifactId>
48                     <version>3.1.0</version>
49                 </plugin>
50                 <!-- see http://maven.apache.org/ref/current/maven-core/default-bindings.html#Plugin_bindings_for_war_packaging -->
51                 <plugin>
52                     <artifactId>maven-resources-plugin</artifactId>
53                     <version>3.0.2</version>
54                 </plugin>
55                 <plugin>
56                     <artifactId>maven-compiler-plugin</artifactId>
57                     <version>3.8.0</version>
58                 </plugin>
59                 <plugin>
60                     <artifactId>maven-surefire-plugin</artifactId>
61                     <version>2.22.1</version>
62                 </plugin>
63                 <plugin>
64                     <artifactId>maven-war-plugin</artifactId>
65                     <version>3.2.2</version>
66                 </plugin>
67                 <plugin>
68                     <artifactId>maven-install-plugin</artifactId>
69                     <version>2.5.2</version>
70                 </plugin>
71                 <plugin>
72                     <artifactId>maven-deploy-plugin</artifactId>
73                     <version>2.8.2</version>
74                 </plugin>
75             </plugins>
76         </pluginManagement>
77     </build>
3.在resources中添加文件 application.properties 配置视图解析器
1 # 页面默认前缀目录
2 spring.mvc.view.prefix=/WEB-INF/jsp/
3 # 响应页面默认后缀
4 spring.mvc.view.suffix=.jsp
4.通过controller层访问
1 @Controller
2 public class JspController {
3
4     @RequestMapping("/index")
5     public String index(){
6         return "index";
7     }
8 }
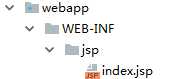
5.webapp
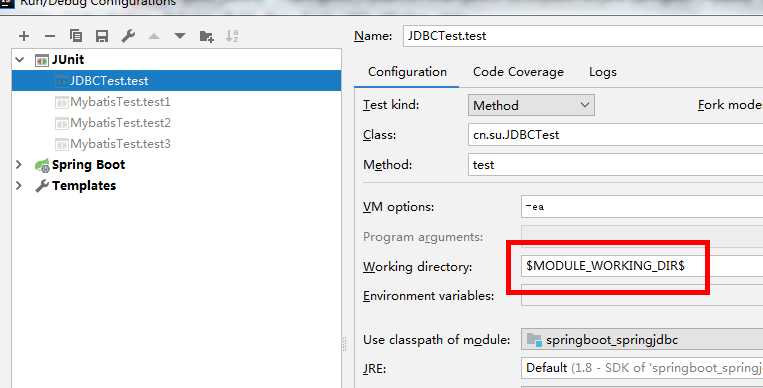
6.修改 working directory配置
五、springBoot+freemarker模板技术
1.利用maven构建webapp模块
2.配置pom.xml 注意修改mainClass路径
 1 <properties>
 2         <project.build.sourceEncoding>UTF-8</project.build.sourceEncoding>
 3         <maven.compiler.source>1.8</maven.compiler.source>
 4         <maven.compiler.target>1.8</maven.compiler.target>
 5     </properties>
 6
 7     <dependencies>
 8         <dependency>
 9             <groupId>junit</groupId>
10             <artifactId>junit</artifactId>
11             <version>4.11</version>
12             <scope>test</scope>
13         </dependency>
14         <dependency>
15             <groupId>org.springframework.boot</groupId>
16             <artifactId>spring-boot-starter-web</artifactId>
17         </dependency>
18         <!-- 对freemark的支持-->
19         <dependency>
20             <groupId>org.springframework.boot</groupId>
21             <artifactId>spring-boot-starter-freemarker</artifactId>
22         </dependency>
23     </dependencies>
24
25     <build>
26         <plugins>
27             <plugin>
28                 <groupId>org.apache.maven.plugins</groupId>
29                 <artifactId>maven-compiler-plugin</artifactId>
30                 <configuration>
31                     <source>1.8</source>
32                     <target>1.8</target>
33                     <encoding>utf-8</encoding>
34                 </configuration>
35             </plugin>
36             <plugin>
37                 <groupId>org.springframework.boot</groupId>
38                 <artifactId>spring-boot-maven-plugin</artifactId>
39                 <configuration>
40                     <mainClass>cn.su.FreemarkApp</mainClass> <!--主类 包含main-->
41                     <layout>JAR</layout>
42                 </configuration>
43             </plugin>
44         </plugins>
45     </build>
3.在 main/resources/templates 中建立 index.ftl模板 注意templates 有 s
 1 <!DOCTYPE html>
 2 <html xmlns="http://www.w3.org/1999/xhtml"xmlns:th="http://www.thymeleaf.org"
 3       xmlns:sec="http://www.thymeleaf.org/thymeleaf-extras-springsecurity3">
 4 <head>
 5     <title>Hello World!</title>
 6 </head>
 7 <body>
 8 <h1>Hello , ${msg}</h1>
 9 </body>
10 </html>
4.为模板配置属性文件 application.properties
 1 # FreeeMarker 模板引擎配置
 2 #       设定ftl文件路径   注意templates有 s
 3 spring.freemarker.tempalte-loader-path=classpath:/templates
 4 #        关闭缓存,及时刷新,上线生产环境需要修改为true
 5 spring.freemarker.cache=false
 6 spring.freemarker.charset=UTF-8
 7 spring.freemarker.check-template-location=true
 8 spring.freemarker.content-type=text/html
 9 spring.freemarker.expose-request-attributes=true
10 spring.freemarker.expose-session-attributes=true
11 spring.freemarker.request-context-attribute=request
12 spring.freemarker.suffix=.ftl
5.启动类和controller
 1 @SpringBootApplication
 2 public class FreemarkApp {
 3
 4     public static void main(String[] args) {
 5         SpringApplication.run(FreemarkApp.class);
 6     }
 7 }
 8
 9
10 @Controller
11 public class IndexController {
12
13     @RequestMapping("/index")
14     public String index(Model model){
15         model.addAttribute("msg", "suSu");
16         return "index";
17     }
18 }
6.也可以支持返回JSON格式 时间格式在get上配置 @JsonFormat(pattern = "yyyy-MM-dd",timezone = "GTM+8")
 1 @Controller
 2 public class JsonController {
 3
 4     @RequestMapping("/user")
 5     @ResponseBody
 6     public List<User> list(){
 7         List<User> users = Arrays.asList(new User(1L, "s", new Date()),
 8                 new User(2L, "u", new Date()),
 9                 new User(3L, "q", new Date()));
10         return users;
11     }
12 }
六、支持yaml
YAML是便于人阅读基于unicode编码的各种语言的序列号标准。它的用途广泛,用于配置文件,日志文件,跨语言数据共享,对象持久化,复杂的数据结构。
原则:
1、大小写敏感
2、使用缩进表示层级关系
4、缩进长度没有限制,只要元素对齐就表示这些元素属于一个层级。
5、使用#表示注释
6、字符串可以不用引号标注
语法:
使用 :表示键值对 age :18
七、springBoot+springJDBC
1.利用maven构建webapp项目
2.配置pom.xml
 1 <properties>
 2         <project.build.sourceEncoding>UTF-8</project.build.sourceEncoding>
 3         <maven.compiler.source>1.8</maven.compiler.source>
 4         <maven.compiler.target>1.8</maven.compiler.target>
 5     </properties>
 6
 7     <dependencies>
 8         <dependency>
 9             <groupId>junit</groupId>
10             <artifactId>junit</artifactId>
11             <version>4.12</version>
12         </dependency>
13         <!-- web test springjdbc mysql-->
14         <dependency>
15             <groupId>org.springframework.boot</groupId>
16             <artifactId>spring-boot-starter-web</artifactId>
17         </dependency>
18         <dependency>
19             <groupId>org.springframework.boot</groupId>
20             <artifactId>spring-boot-starter-test</artifactId>
21         </dependency>
22
23         <dependency>
24             <groupId>mysql</groupId>
25             <artifactId>mysql-connector-java</artifactId>
26         </dependency>
27         <dependency>
28             <groupId>org.springframework.boot</groupId>
29             <artifactId>spring-boot-starter-jdbc</artifactId>
30         </dependency>
31     </dependencies>
32
33     <build>
34         <finalName>springboot_springjdbc</finalName>
35         <pluginManagement><!-- lock down plugins versions to avoid using Maven defaults (may be moved to parent pom) -->
36             <plugins>
37                 <plugin>
38                     <artifactId>maven-clean-plugin</artifactId>
39                     <version>3.1.0</version>
40                 </plugin>
41                 <!-- see http://maven.apache.org/ref/current/maven-core/default-bindings.html#Plugin_bindings_for_war_packaging -->
42                 <plugin>
43                     <artifactId>maven-resources-plugin</artifactId>
44                     <version>3.0.2</version>
45                 </plugin>
46                 <plugin>
47                     <artifactId>maven-compiler-plugin</artifactId>
48                     <version>3.8.0</version>
49                 </plugin>
50                 <plugin>
51                     <artifactId>maven-surefire-plugin</artifactId>
52                     <version>2.22.1</version>
53                 </plugin>
54                 <plugin>
55                     <artifactId>maven-war-plugin</artifactId>
56                     <version>3.2.2</version>
57                 </plugin>
58                 <plugin>
59                     <artifactId>maven-install-plugin</artifactId>
60                     <version>2.5.2</version>
61                 </plugin>
62                 <plugin>
63                     <artifactId>maven-deploy-plugin</artifactId>
64                     <version>2.8.2</version>
65                 </plugin>
66             </plugins>
67         </pluginManagement>
68     </build>
3.利用application.properties连接数据库
1 spring.datasource.url = jdbc:mysql://localhost:3306/shop
2 spring.datasource.username = root
3 spring.datasource.password = 000000
4 spring.datasource.driverClassName = com.mysql.jdbc.Driver
5 spring.datasource.max-active=20
6 spring.datasource.max-idle=8
7 spring.datasource.min-idle=8
8 spring.datasource.initial-size=10
4.接着就是我们熟悉的domain、dao、service(事物只用配置注解 @Transactional)、controller层
5.启动项和SpringBoot测试类,注意需要与domain写在同一层 ,否则需要做些其他配置
 1 //启动
 2 @SpringBootApplication
 3 public class JDBCApp {
 4     public static void main(String[] args) {
 5         SpringApplication.run(JDBCApp.class);
 6     }
 7 }
 8
 9 //测试
10 @RunWith(SpringRunner.class)
11 @SpringBootTest(classes = JDBCApp.class)
12 public class JDBCTest {
13
14     @Autowired
15     private IUserService userService;
16
17     @Test
18     public void test() throws Exception{
19         userService.save(new User(1L,"su"));
20     }
21 }
八、springBoot+mybatis及pageHelper分页
1.利用maven构建webapp模块
2.配置pom.xml
 1 <properties>
 2         <project.build.sourceEncoding>UTF-8</project.build.sourceEncoding>
 3         <maven.compiler.source>1.8</maven.compiler.source>
 4         <maven.compiler.target>1.8</maven.compiler.target>
 5     </properties>
 6
 7     <dependencies>
 8         <dependency>
 9             <groupId>org.springframework.boot</groupId>
10             <artifactId>spring-boot-starter-web</artifactId>
11         </dependency>
12         <dependency>
13             <groupId>org.springframework.boot</groupId>
14             <artifactId>spring-boot-starter-test</artifactId>
15         </dependency>
16         <dependency>
17             <groupId>junit</groupId>
18             <artifactId>junit</artifactId>
19             <version>4.12</version>
20         </dependency>
21         <!-- mysql 数据库驱动. -->
22         <dependency>
23             <groupId>mysql</groupId>
24             <artifactId>mysql-connector-java</artifactId>
25         </dependency>
26         <!--
27                     spring-boot mybatis依赖:
28
29                     请不要使用1.0.0版本,因为还不支持拦截器插件,
30                 1.1.1 是博主写帖子时候的版本,大家使用最新版本即可
31                  -->
32         <dependency>
33             <groupId>org.mybatis.spring.boot</groupId>
34             <artifactId>mybatis-spring-boot-starter</artifactId>
35             <version>1.1.1</version>
36         </dependency>
37         <!--
38             MyBatis提供了拦截器接口,我们可以实现自己的拦截器,
39             将其作为一个plugin装入到SqlSessionFactory中。
40                 Github上有位开发者写了一个分页插件,我觉得使用起来还可以,挺方便的。
41                 Github项目地址: https://github.com/pagehelper/Mybatis-PageHelper
42              -->
43         <dependency>
44             <groupId>com.github.pagehelper</groupId>
45             <artifactId>pagehelper</artifactId>
46             <version>4.1.0</version>
47         </dependency>
48     </dependencies>
49
50     <build>
51         <finalName>springboot_mybatis</finalName>
52         <pluginManagement><!-- lock down plugins versions to avoid using Maven defaults (may be moved to parent pom) -->
53             <plugins>
54                 <plugin>
55                     <artifactId>maven-clean-plugin</artifactId>
56                     <version>3.1.0</version>
57                 </plugin>
58                 <!-- see http://maven.apache.org/ref/current/maven-core/default-bindings.html#Plugin_bindings_for_war_packaging -->
59                 <plugin>
60                     <artifactId>maven-resources-plugin</artifactId>
61                     <version>3.0.2</version>
62                 </plugin>
63                 <plugin>
64                     <artifactId>maven-compiler-plugin</artifactId>
65                     <version>3.8.0</version>
66                 </plugin>
67                 <plugin>
68                     <artifactId>maven-surefire-plugin</artifactId>
69                     <version>2.22.1</version>
70                 </plugin>
71                 <plugin>
72                     <artifactId>maven-war-plugin</artifactId>
73                     <version>3.2.2</version>
74                 </plugin>
75                 <plugin>
76                     <artifactId>maven-install-plugin</artifactId>
77                     <version>2.5.2</version>
78                 </plugin>
79                 <plugin>
80                     <artifactId>maven-deploy-plugin</artifactId>
81                     <version>2.8.2</version>
82                 </plugin>
83             </plugins>
84         </pluginManagement>
85     </build>
3.连接数据库配置 application.properties
 1 spring.datasource.url = jdbc:mysql://localhost:3306/shop
 2 spring.datasource.username = root
 3 spring.datasource.password = 000000
 4 spring.datasource.driverClassName = com.mysql.jdbc.Driver
 5 spring.datasource.max-active=20
 6 spring.datasource.max-idle=8
 7 spring.datasource.min-idle=8
 8 spring.datasource.initial-size=10
 9 #为mapper使用domain配置别名
10 mybatis.type-aliases-package=cn.su.domain
4.省略domain、mapper、service、controller层
注意mapper的java文件与resources下的mapper的配置文件需要完全对应
5.配置分页插件和使用
 1 @Configuration //相当于application-Xxx.xml
 2 public class MyBatisConfiguration {
 3     //相当于配置文件里面配置<bean>
 4     @Bean
 5     public PageHelper pageHelper(){
 6         PageHelper pageHelper = new PageHelper();
 7         Properties p = new Properties();
 8         //配置分页的参数设置
 9         //和startPage中的pageNum效果一样
10         p.setProperty("offsetAsPageNum", "true");
11         //设置为true时,使用RowBounds分页会进行count查询
12         p.setProperty("rowBoundsWithCount", "true");
13         // 启用合理化时,如果pageNum<1会查询第一页,如果pageNum>pages会查询最后一页
14         p.setProperty("reasonable", "true");
15         pageHelper.setProperties(p);
16         return pageHelper;
17     }
18 }
19
20
21 //使用
22 //1表示当前页  2表示条数
23  PageHelper.startPage(1, 2);
6.启动类和测试
 1 //启动  需要扫描mapper
 2 @SpringBootApplication
 3 @MapperScan(value = "cn.su.mapper")
 4 public class MyBatisApp {
 5
 6     public static void main(String[] args) {
 7         SpringApplication.run(MyBatisApp.class);
 8     }
 9 }
10
11
12 //测试
13 @RunWith(SpringRunner.class)
14 @SpringBootTest(classes = MyBatisApp.class)
15 public class MybatisTest {
16
17     @Autowired
18     private IUserService userService;
19
20     @Test
21     public void test1() throws Exception{
22         userService.saveByInsert(new User(2L,"W"));
23     }
24     @Test
25     public void test2() throws Exception{
26         userService.saveByXml(new User(3L,"Q"));
27     }
28     @Test
29     public void test3() throws Exception{
30         List<User> users = userService.findByQuery();
31         users.forEach(e->{
32             System.out.println(e);
33         });
34     }
35 }
原文:https://www.cnblogs.com/guangbin0125/p/10786193.html