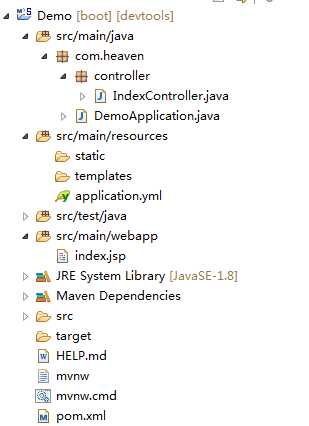
一、项目结构如下
二、在pom.xml文件中添加相关依赖
                <!-- 使jsp页面生效(解析jsp) -->
        <dependency>
            <groupId>org.apache.tomcat.embed</groupId>
            <artifactId>tomcat-embed-jasper</artifactId>
            <scope>provided</scope>
        </dependency>
        <!-- 使用jstl表达式 -->
        <dependency>
            <groupId>javax.servlet</groupId>
            <artifactId>jstl</artifactId>
        </dependency>
三、在application.xml或application.properties中配置视图解析路径
spring:
  mvc:
    view:
      prefix: /
      suffix: .jsp
四、编写controller
package com.heaven.controller;

import java.util.Map;

import org.springframework.web.bind.annotation.GetMapping;
import org.springframework.web.bind.annotation.RestController;
import org.springframework.web.servlet.ModelAndView;

@RestController
public class IndexController {

    @GetMapping("/index")
    public ModelAndView index(Map<String,Object> map){
        map.put("name", "小宝宝");
        return new ModelAndView("index",map);
    }
}
五、手动创建webapp目录,src/main/webapp,并创建jsp页面
<%@ page language="java" contentType="text/html; charset=UTF-8"
    pageEncoding="UTF-8"%>
<%
    String path = request.getContextPath();
    String basePath = request.getScheme()+"://"+request.getServerName()+":"+request.getServerPort()+path+"/";
%>
<!DOCTYPE html PUBLIC "-//W3C//DTD HTML 4.01 Transitional//EN" "http://www.w3.org/TR/html4/loose.dtd">
<html>
<base href="<%=basePath %>">
<head>
<meta http-equiv="Content-Type" content="text/html; charset=UTF-8">
<title>Insert title here</title>
</head>
<body>
    Name:${name}
</body>
</html>
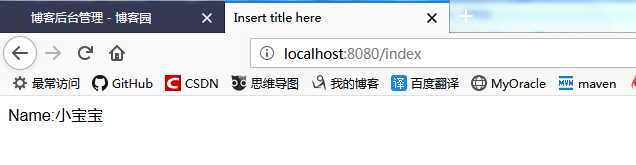
六、启动项目,在浏览器中访问相应的url:http://localhost:8080/index
原文:https://www.cnblogs.com/heavenplus/p/10793447.html