1.jdbc概述
问题:实际开发中,不可能用工具或者命令行操作数据库,数据库表中的数据最终要使用Java程序来操作,那么Java中如何操作数据库中的数据呢?
答 : 在Java语言中,有一个专门连接数据库的规范(JDBC),专门负责连接数据库进行数据操作的规范
JDBC只是SUN编写的一堆接口(规范的体现),SUN公司自己并没有实现
问题 : 为什么SUN只定义一个JDBC规范,而不实现呢?
答 : 因为市面上的数据库很多,每个数据库内部接口不会向外暴露,而且即便是暴露让SUN去实现,市面上很多数据库全部要SUN来实现不现实
实际中哪个数据库需要支持JAVA语言,就需要自己实现Java的JDBC规范,因为实现了JDBC很多接口,那么就会有很多实现类,而很多实现类在java中会使用一个专门的包封装起来,叫做jar包(在JDBC中叫做驱动包),各大数据库产商实现JDBC规范以后都会把他们jar包放在官网上以供开发者下载使用
DBC(Java DataBase Connectivity):是一种用于执行SQL语句的Java API,可以为多种关系数据库提供统一访问,它由一组用Java语言编写的类和接口组成。JDBC提供了一种基
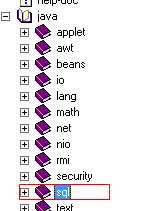
JDBC规范对应的api包
2. 入门案例
1)连接数据库
案例使用JDBC操作MySQL数据库
2)创建普通java项目


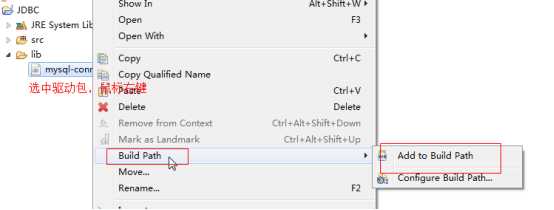
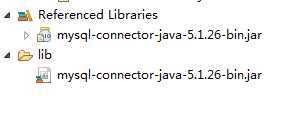
4) 将MySQL驱动包拷贝到项目中并添加依赖
5) 获取数据库连接对象
准备:
1.拷贝MySQL的驱动包到项目中去:mysql-connector-java-5.1.x-bin.jar
2.build path,告速项目去哪里去找字节码文件.
--------------------------------------------------------------------------------
操作JDBC的第一步,获取JDBC的连接对象.:Connection.
步骤:
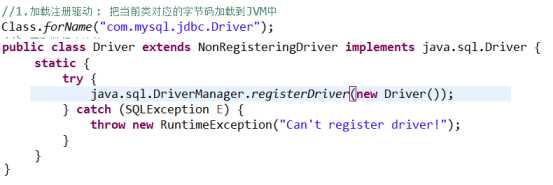
1.加载注册驱动.
就是把驱动中的Driver字节码加载到JVM中.
Class.forName("com.mysql.jdbc.Driver");
为什么这句话就可以加载注册驱动?
第一步:把com.mysql.jdbc.Driver.class这份字节码加载到JVM中.
第二步:当一份字节码被加载进JVM,马上就会执行该字节码中的静态代码块.
第三步:该静态代码中,就在完成,先创建驱动对象,再注册.
2.通过DriverManager获取连接对象.
public static Connection getConnection(String url,String user,String password)
Connection conn = DriverManager.getConnection("jdbc:mysql://localhost:3306/dbName","root","admin");
jdbc:mysql://localhost:3306/dbName
jdbc:mysql:// :连接MySQL数据库的协议,不同数据库协议不一样
localhost:3306 :数据库软件的主机和端口
dbName : 具体要连接数据库
若数据库安装在本机,并且端口是默认的3306,则可以简写:
Connection conn = DriverManager.getConnection("jdbc:mysql:///dbName","root","admin");
验证已经获取连接:可以在MySQL控制台,使用命令:show processlist; 查看MySQL运行进程.
 1 public class GetConnectionDemo {
 2
 3 public static void main(String[] args) throws Exception {
 4
 5
 6
 7 //1.加载注册驱动 : 把当前类对应的字节码加载到JVM中
 8
 9 Class.forName("com.mysql.jdbc.Driver");
10
11 //2.获取数据库连接
12
13 Connection conn = DriverManager.getConnection("jdbc:mysql://localhost:3306/jdbcdemo", "root", "root");
14
15 System.out.println(conn);
16
17
18
19 }
20
21 }
在其他操作之间先要把数据库表要创建出来
|
创建一张t_student表: id: name: age: |
 1 /*
 2
 3  *
 4
 5  * 创建表操作
 6
 7  * SQL : create table t_student (id int primary key auto_increment,name varchar(50),age int)
 8
 9  */
10
11
12
13 public static void main(String[] args) throws Exception {
14
15 String sql = "create table t_student (id int primary key auto_increment,name varchar(50),age int)";
16
17 //贾琏欲执事
18
19 //1,加载注册驱动
20
21 Class.forName("com.mysql.jdbc.Driver");
22
23 //2,获取数据库连接
24
25 Connection conn = DriverManager.getConnection("jdbc:mysql://localhost:3306/jdbcdemo", "root", "root");
26
27 //3,创建语句对象(用于执行SQL语句的对象)
28
29 Statement st = conn.createStatement();
30
31 //4, 执行SQL语句
32
33 //int rows = st.executeUpdate(String sql);执行DDL和DML语句,放回的是受影响的行数
34
35 //ResultSet res = st.executeQuery(String sql);执行DQL查询语句,返回的结果集对象
36
37 st.executeUpdate(sql);
38
39 //5,释放资源(先开后关)
40
41 st.close();
42
43 conn.close();
44
45 }
  1 //DML : 对表数据的增删改操作
  2
  3 public class DMLDemo {
  4
  5
  6
  7 /*
  8
  9  * 向 t_student表中插入一条数据
 10
 11  * sql : insert into t_student(name,age) values (‘乔峰‘,30)
 12
 13  */
 14
 15 @Test
 16
 17 public void testInsert() throws Exception {
 18
 19 String sql = "insert into t_student(name,age) values (‘乔峰‘,30)";
 20
 21
 22
 23 // 1.加载注册驱动
 24
 25 Class.forName("com.mysql.jdbc.Driver");
 26
 27
 28
 29 // 2.获取数据库连接对象
 30
 31 Connection conn = DriverManager.getConnection("jdbc:mysql://localhost:3306/jdbcdemo", "root", "root");
 32
 33 // 3.创建语句对象
 34
 35 Statement st = conn.createStatement();
 36
 37
 38
 39 // 4.执行SQL语句
 40
 41 // int rows = st.executeUpdate(String sql);执行DDL和DML语句,放回的是受影响的行数
 42
 43 // ResultSet res = st.executeQuery(String sql);执行DQL查询语句,返回的结果集对象
 44
 45 int rows = st.executeUpdate(sql);
 46
 47 System.out.println(rows);
 48
 49 //5.释放资源(先开后关)
 50
 51 st.close();
 52
 53 conn.close();
 54
 55
 56
 57 }
 58
 59 /*
 60
 61  * 删除操作: 删除t_student表中的某一条数据
 62
 63  * SQL :delete from t_student where id = 2
 64
 65  */
 66
 67 @Test
 68
 69 public void testDelete() throws Exception {
 70
 71 String sql = "delete from t_student where id = 2";
 72
 73
 74
 75 // 1.加载注册驱动
 76
 77 Class.forName("com.mysql.jdbc.Driver");
 78
 79
 80
 81 // 2.获取数据库连接对象
 82
 83 Connection conn = DriverManager.getConnection("jdbc:mysql://localhost:3306/jdbcdemo", "root", "root");
 84
 85 // 3.创建语句对象
 86
 87 Statement st = conn.createStatement();
 88
 89
 90
 91 // 4.执行SQL语句
 92
 93 // int rows = st.executeUpdate(String sql);执行DDL和DML语句,放回的是受影响的行数
 94
 95 // ResultSet res = st.executeQuery(String sql);执行DQL查询语句,返回的结果集对象
 96
 97 int rows = st.executeUpdate(sql);
 98
 99 System.out.println(rows);
100
101 //5.释放资源(先开后关)
102
103 st.close();
104
105 conn.close();
106
107 }
108
109 /*
110
111  * 修改操作 : 修改t_student表中的某一条数据
112
113  * SQL : update t_student set name = ‘虚竹‘,age = 50 where id = 3
114
115  */
116
117 @Test
118
119 public void testUpdate() throws Exception {
120
121 String sql = "update t_student set name = ‘虚竹‘,age = 50 where id = 3";
122
123
124
125 // 1.加载注册驱动
126
127 Class.forName("com.mysql.jdbc.Driver");
128
129
130
131 // 2.获取数据库连接对象
132
133 Connection conn = DriverManager.getConnection("jdbc:mysql://localhost:3306/jdbcdemo", "root", "root");
134
135 // 3.创建语句对象
136
137 Statement st = conn.createStatement();
138
139
140
141 // 4.执行SQL语句
142
143 // int rows = st.executeUpdate(String sql);执行DDL和DML语句,放回的是受影响的行数
144
145 // ResultSet res = st.executeQuery(String sql);执行DQL查询语句,返回的结果集对象
146
147 int rows = st.executeUpdate(sql);
148
149 System.out.println(rows);
150
151 //5.释放资源(先开后关)
152
153 st.close();
154
155 conn.close();
156
157 }
158
159 }
5.DQL操作-查询操作
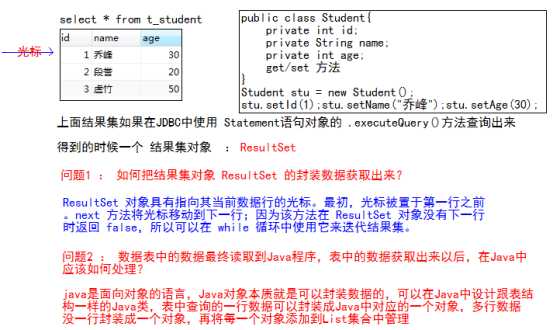
2)查询具体操作
结果集的列的位置

使用 rs.next() 偏移光标,循环指定具体的某一行
获取数据的具体方法
|
getObject(int columnIndex) |
|
|
getObject(String columnLabel) |
  1 package cn.sxt.jdbc._01connection;
  2
  3
  4
  5
  6
  7 import java.sql.Connection;
  8
  9 import java.sql.DriverManager;
 10
 11 import java.sql.ResultSet;
 12
 13 import java.sql.Statement;
 14
 15 import java.util.ArrayList;
 16
 17 import java.util.List;
 18
 19
 20
 21 import org.junit.Test;
 22
 23
 24
 25 //DQL :查询操作
 26
 27 public class D_DQLDemo {
 28
 29
 30
 31 /*
 32
 33  * 多行查询 :查询t_student表中的所有数据
 34
 35  * SQL : select * from t_student
 36
 37  */
 38
 39 @Test
 40
 41 public void testList() throws Exception {
 42
 43 String sql = "select * from t_student";
 44
 45
 46
 47 // 1.加载注册驱动
 48
 49 Class.forName("com.mysql.jdbc.Driver");
 50
 51
 52
 53 // 2.获取数据库连接对象
 54
 55 Connection conn = DriverManager.getConnection("jdbc:mysql://localhost:3306/jdbcdemo", "root", "root");
 56
 57 // 3.创建语句对象
 58
 59 Statement st = conn.createStatement();
 60
 61
 62
 63 // 4.执行SQL语句
 64
 65 // int rows = st.executeUpdate(String sql);执行DDL和DML语句,放回的是受影响的行数
 66
 67 // ResultSet res = st.executeQuery(String sql);执行DQL查询语句,返回的结果集对象
 68
 69 ResultSet rs = st.executeQuery(sql);
 70
 71
 72
 73
 74
 75 //创建list集合用于封装Student对象
 76
 77 List<Student> stus = new ArrayList<>();
 78
 79
 80
 81 while(rs.next()) {
 82
 83 //1.通过结果集的位置获取对应的数
 84
 85 /*Object id = rs.getObject(1);
 86
 87 Object name = rs.getObject(2);
 88
 89 Object age = rs.getObject(3);*/
 90
 91
 92
 93 //2.通过结果集的 列名获取对应的数据
 94
 95 /*Object id = rs.getObject("id");
 96
 97 Object name = rs.getObject("name");
 98
 99 Object age = rs.getObject("age");*/
100
101 //3.通过数据库数据和Java对应的数据类型获取对应的只
102
103 int id = rs.getInt("id");
104
105 String name = rs.getString("name");
106
107 int age = rs.getInt("age");
108
109 //System.out.println(id+","+name+","+age);
110
111
112
113 //将获取的数据封装成对应的Student对象
114
115 Student stu = new  Student(id, name, age);
116
117
118
119 //将一个个Student对象添加到list集合中
120
121 stus.add(stu);
122
123 }
124
125
126
127 for (Student student : stus) {
128
129 System.out.println(student);
130
131 }
132
133 //5.释放资源(先开后关)
134
135 rs.close();
136
137 st.close();
138
139 conn.close();
140
141 }
142
143
144
145
146
147 /*
148
149  * 单行查询: 查询出t_student 指定id的信息
150
151  * SQL : select * from t_student where id = 1;
152
153  */
154
155 @Test
156
157 public void testGetOne() throws Exception {
158
159 String sql = "select * from t_student where id = 2";
160
161
162
163 // 1.加载注册驱动
164
165 Class.forName("com.mysql.jdbc.Driver");
166
167
168
169 // 2.获取数据库连接对象
170
171 Connection conn = DriverManager.getConnection("jdbc:mysql://localhost:3306/jdbcdemo", "root", "root");
172
173 // 3.创建语句对象
174
175 Statement st = conn.createStatement();
176
177
178
179 // 4.执行SQL语句
180
181 // int rows = st.executeUpdate(String sql);执行DDL和DML语句,放回的是受影响的行数
182
183 // ResultSet res = st.executeQuery(String sql);执行DQL查询语句,返回的结果集对象
184
185 ResultSet rs = st.executeQuery(sql);
186
187
188
189 if(rs.next()) {
190
191 //1.通过结果集的位置获取对应的数
192
193 /*Object id = rs.getObject(1);
194
195 Object name = rs.getObject(2);
196
197 Object age = rs.getObject(3);*/
198
199
200
201 //2.通过结果集的 列名获取对应的数据
202
203 /*Object id = rs.getObject("id");
204
205 Object name = rs.getObject("name");
206
207 Object age = rs.getObject("age");*/
208
209 //3.通过数据库数据和Java对应的数据类型获取对应的只
210
211 int id = rs.getInt("id");
212
213 String name = rs.getString("name");
214
215 int age = rs.getInt("age");
216
217 //System.out.println(id+","+name+","+age);
218
219
220
221 //将获取的数据封装成对应的Student对象
222
223 Student stu = new  Student(id, name, age);
224
225 System.out.println(stu);
226
227 }
228
229 //5.释放资源(先开后关)
230
231 rs.close();
232
233 st.close();
234
235 conn.close();
236
237 }
238
239 }
6.预编译语句对象PreparedStatment
问题 : 我们有了Statment对象可以执行SQL,为什么还要使用PreparedStatment?
优势
1. SQL语句结构清晰,参数的设置和SQL语句分离
2. 性能更高
3. 防止SQL注入
|
Statement: 表示静态SQL语句对象. PreparedStatement:Statement的子接口,表示预编译SQL语句对象. 通过占位符(?)来拼SQL. |
创建语句对象 Statment
|
createStatement() |
创建预编译语句对象PreparedStatement
|
prepareStatement(String sql) |

2)执行SQL语句的方法
在执行SQL语句的时候回带上SQL语句
|
executeQuery(String sql) |
|
|
int |
executeUpdate(String sql) |
[2]PreparedStatement
在执行SQL语句的方法中不需要设置SQL语句
|
executeQuery() |
|
|
int |
executeUpdate() |
|
void setXxx(int parameterIndex,Xxx value):用于设置占位符参数, parameterIndex:第几个问号. 注意:从1开始. value:设置的真实值. Xxx:表示数据类型.String/int/long/Double |
  1 package cn.sxt.jdbc._01connection;
  2
  3
  4
  5 import static org.junit.Assert.*;
  6
  7
  8
  9 import java.sql.Connection;
 10
 11 import java.sql.DriverManager;
 12
 13 import java.sql.PreparedStatement;
 14
 15
 16
 17 import org.junit.Test;
 18
 19
 20
 21 //DML : 对表数据的增删改操作,使用预编译语句对象
 22
 23 public class E_DMLByPreparedStatmentDemo {
 24
 25
 26
 27 /*
 28
 29  * 向 t_student表中插入一条数据
 30
 31  * sql : insert into t_student(name,age) values (‘乔峰‘,30)
 32
 33  */
 34
 35 @Test
 36
 37 public void testInsert() throws Exception {
 38
 39 String sql = "insert into t_student(name,age) values (?,?)";
 40
 41
 42
 43 // 1.加载注册驱动
 44
 45 Class.forName("com.mysql.jdbc.Driver");
 46
 47
 48
 49 // 2.获取数据库连接对象
 50
 51 Connection conn = DriverManager.getConnection("jdbc:mysql://localhost:3306/jdbcdemo", "root", "root");
 52
 53 // 3.创建预编译语句对象
 54
 55 PreparedStatement ps = conn.prepareStatement(sql);
 56
 57 //3.1设置占位符参数
 58
 59 ps.setString(1, "东方姑娘");
 60
 61 ps.setInt(2, 18);
 62
 63
 64
 65 // 4.执行SQL语句:注意不要带SQL参数
 66
 67 ps.executeUpdate();
 68
 69 //5.释放资源(先开后关)
 70
 71 ps.close();
 72
 73 conn.close();
 74
 75
 76
 77 }
 78
 79 /*
 80
 81  * 删除操作: 删除t_student表中的某一条数据
 82
 83  * SQL :delete from t_student where id = 2
 84
 85  */
 86
 87 @Test
 88
 89 public void testDelete() throws Exception {
 90
 91 String sql = "delete from t_student where id = ?";
 92
 93
 94
 95 // 1.加载注册驱动
 96
 97 Class.forName("com.mysql.jdbc.Driver");
 98
 99
100
101 // 2.获取数据库连接对象
102
103 Connection conn = DriverManager.getConnection("jdbc:mysql://localhost:3306/jdbcdemo", "root", "root");
104
105 // 3.创建预编译语句对象
106
107 PreparedStatement ps = conn.prepareStatement(sql);
108
109 //3.1设置占位符对应的参数值
110
111 ps.setInt(1, 1);
112
113
114
115 // 4.执行SQL语句
116
117 int rows = ps.executeUpdate();
118
119 System.out.println(rows);
120
121 //5.释放资源(先开后关)
122
123 ps.close();
124
125 conn.close();
126
127 }
128
129 /*
130
131  * 修改操作 : 修改t_student表中的某一条数据
132
133  * SQL : update t_student set name = ‘虚竹‘,age = 50 where id = 3
134
135  */
136
137 @Test
138
139 public void testUpdate() throws Exception {
140
141 String sql = "update t_student set name = ?,age = ? where id = ?";
142
143
144
145 // 1.加载注册驱动
146
147 Class.forName("com.mysql.jdbc.Driver");
148
149
150
151 // 2.获取数据库连接对象
152
153 Connection conn = DriverManager.getConnection("jdbc:mysql://localhost:3306/jdbcdemo", "root", "root");
154
155 // 3.创建预编译语句对象
156
157 PreparedStatement ps = conn.prepareStatement(sql);
158
159 //3.1设置占位符参数对应的值
160
161 ps.setString(1, "西方失败");
162
163 ps.setInt(2, 40);
164
165 ps.setInt(3, 4);
166
167 // 4.执行SQL语句
168
169 int rows = ps.executeUpdate();
170
171 System.out.println(rows);
172
173 //5.释放资源(先开后关)
174
175 ps.close();
176
177 conn.close();
178
179 }
180
181 }
182
183
原文:https://www.cnblogs.com/qq2267711589/p/10887536.html