- Download Download source code, samples, and documentation - 2.47 MB
- Download latest version: full package - includes bin, source, samples, and documentation - 3.33 MB
Introduction
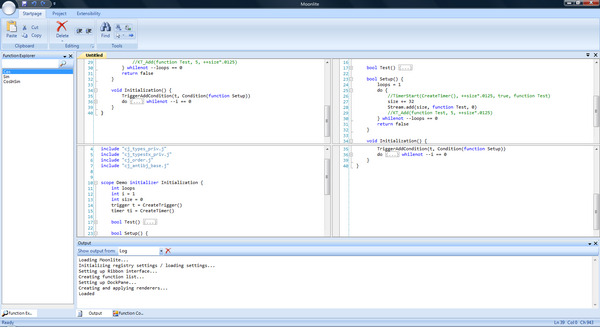
I‘m currently making an IDE application called Moonlite. When I started coding it, I looked for good, already existing code for creating IDEs. I found nothing. So, when I was almost done with it (I‘m not done with it yet, because of this framework taking all my time), I figured that I found it rather unfair that everyone should go through the same as I did for making such an application. (It took me 8 months of hard work - about 7 - 10 hours a day - to create this. Not because the main coding would‘ve taken that long, but because I had to figure out how to do it and what was the most efficient solution.) So I started Storm, and now that it is finished, I‘m going to present it to you! 
Notices
Please note that I did this of my own free will and my own free time. I would be happy if you could respect me and my work and leave me a comment on how to make it better, bug reports, and so on. Thank you for your time 
Using the Code
Using the code is a simple task; simply drag-drop from the toolbox when you have referenced the controls you want, and that should be it. However, for those who want a more in-depth tutorial, go to the folder "doc" in the package and open "index.htm".
How it Works
In this chapter, I will mostly cover docking, plug-ins, and TextEditor, since they are the most advanced ones. I will not cover Win32 and TabControl.
CodeCompletion
CodeCompletion relies on the TextEditor, and it really isn‘t as advanced as some may think. It‘s just a control containing a generic ListBox that can draw icons. The ListBox‘ items are managed by the CodeCompletion itself.CodeCompletion handles the TextEditor‘s KeyUp event, and in that, it displays the members of the ListBox depending on what the user has typed in the TextEditor.
Update: CodeCompletion is now contained in the TextEditor library!
Every time it registers a key press, it updates a string containing the currently typed string by calling a methodGetLastWord(), which returns the word that the user is currently on. How a string is split up in words is defined in the TextEditor as ‘separators‘. Every time GetLastWord() is called, CodeCompletion calls the native Win32 function ‘LockWindowUpdate‘ along with the parent TextEditor‘s handle to prevent flickering as the OS renderers the TextEditor/CodeCompletion.
Actually, CodeCompletion does this when it auto completes a selected item in the child GListBox, too. Every timeCodeCompletion registers a key that it doesn‘t recognize as a ‘valid‘ character (any non-letter/digit character that isn‘t _), it calls the method SelectItem() along with a specific CompleteType.
Now, what is a CompleteType? You see, CompleteType defines how the SelectItem() will act when auto completing a selected item in the GListBox. There are two modes - Normal and Parenthesis. When Normal is used, the SelectItem() method removes the whole currently typed word; Parenthesis, however, removes the whole currently typed word except the first letter. This might seem strange, but it is necessary when, for example, the user has typed a starting parenthesis. You might find yourself having a wrong auto completed word sometimes, too - this is where you should use Parenthesis instead of Normal as the CompleteType. (You are able to define a custom CompleteType when you add a member item to CodeCompletion.)
Since the users define the tooltips of member items themselves, it is rather easy to display the description of items. When a new item is selected in the GListBox, a method updates the currently displayed ToolTip to match the selected item‘s description/declaration fields. Since a normal TreeNode/ListBoxItem wouldn‘t be able to have multiple Tags, I created the GListBoxItem, which also contains an ImageIndex for the parent GListBox‘ImageList. The GListBoxItem contains a lot of values that are set by the user, either on initialization or through properties.
Each time the control itself or its tooltip is displayed, their positions are updated. The formula for the tooltip is this:Y = CaretPosition.Y + FontHeight * CaretIndex + Math.Ceiling(FontHeight + 2) for Y. The setting of X is simply CaretPositon.X + 100 + CodeCompletion.Width + 2. The formula for CodeCompletion‘s Y is the same as for the tooltip; however, X is different; X = CaretPosition.X + 100.
Docking
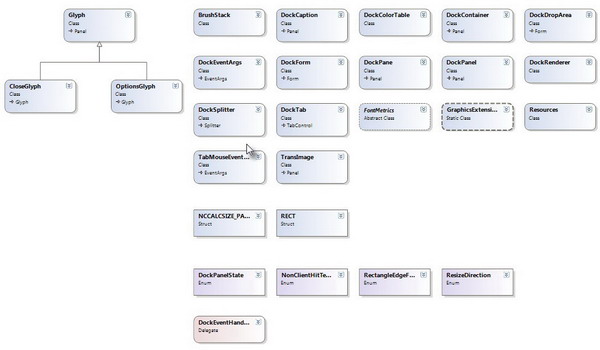
First, I will start out with a Class Diagram to help me out:
As you can see, there are a lot of classes. A DockPane can contain DockPanels, and DockPanels are the panels that are docked inside the DockPane. A DockPanel contains a Form, DockCaption, and DockTab. When aDockPanel‘s Form property is set, the DockPanel updates the Form to match the settings needed for it to act as a docked form.
A DockCaption is a custom drawn panel. It contains two Glyphs - OptionsGlyph and CloseGlyph - both inheriting the Glyph class, which contains the rendering logic for a general Glyph. The OptionsGlyph andCloseGlyph contain images that are supposed to have a transparent background. A lot of people use very complex solutions for this; however, I found a very, very simple and short solution:
/// <summary>
/// Represents an image with a transparent background.
/// </summary>
[ToolboxItem(false)]
public class TransImage
    : Panel
{
    #region Properties

    /// <summary>
    /// Gets or sets the image of the TransImage.
    /// </summary>
    public Image Image
    {
        get { return this.BackgroundImage; }
        set
        {
                if (value != null)
                {
                    Bitmap bitmap = new Bitmap(value);
                    bitmap.MakeTransparent();

                    this.BackgroundImage = bitmap;
                    Size = bitmap.Size;
                }
        }
        }

        #endregion

        /// <summary>

        /// Initializes a new instance of TransImage.
        /// </summary>
        /// <param name="image">Image that should
        ///        have a transparent background.</param>
        public TransImage(Image image)
        {
            // Set styles to enable transparent background
            this.SetStyle(ControlStyles.Selectable, false);
            this.SetStyle(ControlStyles.SupportsTransparentBackColor, true);

            this.BackColor = Color.Transparent;
            this.Image = image;
        }
    }
As simple as that. A basic panel with transparent background, and of course, an Image property -Bitmap.MakeTransparent() does the rest. Panel is indeed a lovable control. As we proceed in this article, you‘ll find that I base most of my controls on Panel.
Well, the DockCaption handles the undocking of the DockPanel and the moving of the DockForm. Yeah,DockForm. When a DockPanel is undocked from its DockPane container, a DockForm is created, and theDockPanel is added to it. The DockForm is a custom drawn form which can be resized and moved, and looks much like the Visual Studio 2010 Docking Form.
Since the caption bar has been removed from the DockForm, the DockCaption takes care of the moving. This is where Win32 gets into our way - SendMessage and ReleaseCapture are used to do this.
When a DockPanel is added to a DockPane, and there‘s already a DockPanel docked to the side that the user wants to dock the new DockPanel, the DockPane uses the already docked DockPanel‘s DockTab to add the newDockPanel as a TabPage. The user can then switch between DockPanels.
The DockTab inherits the normal TabControl, and overrides its drawing methods. This means that it is completely customizable for the user and very flexible for us to use.
Plug-ins
The plug-ins library is one of the shorter; however, it is probably the most complex too. Since the PluginManagerclass has to locate dynamic link libraries, we should check whether they are actual plug-ins, check if they use the optional plugin attribute, and if they do, store the found information in an IPlugin, and add the found plug-in to the form given by the user if it‘s a UserControl.
So basically, most of these processes happen in the LoadPlugins method. However, the LoadPlugins method is just a wrapper that calls LoadPluginsInDirectory with the PluginsPath set by the user. Now, theLoadPluginsInDirectory method loops through all the files in the specific folder, checks whether their file extension is ".dll" (which indicates that the file is a code library), and then starts the whole "check if library contains plug-ins and check if the plug-ins have any attributes"-process:
This is done with the Assembly class, located in the System.Reflection namespace:
Assembly a = Assembly.LoadFile(file);
Then, an array of System.Type is declared, which is set to a.GetTypes(). This gives us an array of all types (class, enums, interfaces, etc.) in the assembly. We can then loop through each Type in the Type array and check whether it is an actual plug-in, by using this little trick:
(t.IsSubclassOf(typeof(IPlugin)) == true ||
    t.GetInterfaces().Contains(typeof(IPlugin)) == true)
Yeah - simple - this simply can‘t go wrong. Well, we all know that interfaces can‘t get initialized like normal classes. So, instead, we use the System.Activator class‘ CreateInstance method:
IPlugin currentPlugin = (IPlugin)Activator.CreateInstance(t);
Boom. We just initialized an interface like we would with a normal class. Neat, huh? Now, we just need to setup the initialized interface‘s properties to match the options of the PluginManager and the current environment. This can by used by the creator of the plug-ins to create more interactive plug-ins. When we‘ve done this, we simply addIPlugin to the list of loaded plug-ins in the PluginManager.
However, the plug-ins loaded by the PluginManager aren‘t enabled by default. This is where the user has to do some action. The user has to loop through all the IPlugins in the PluginManager.LoadedPlugins list, and call the PluginManager.EnablePlugin(plugin) method on it.
Now, if you have, for example, a plug-in managing form in your application, like Firefox, for example, you can use the PluginManager.GetPluginAttribute method to get an attribute containing information about the plug-in, if provided by the creator of the plug-in.
The way this works, is by creating an object array and setting it to the System.Type method,GetCustomAttributes(). The variable "type" is set to be the plug-in‘s Type property, which is set in the loading of a plug-in.
object[] pAttributes = type.GetCustomAttributes(typeof(Plugin), false);
Add it to the list of plug-ins:
attributes.Add(pAttributes[0] as Plugin);
And, when we‘re done looping, we‘ll finally return the list of found attributes.
TextEditor
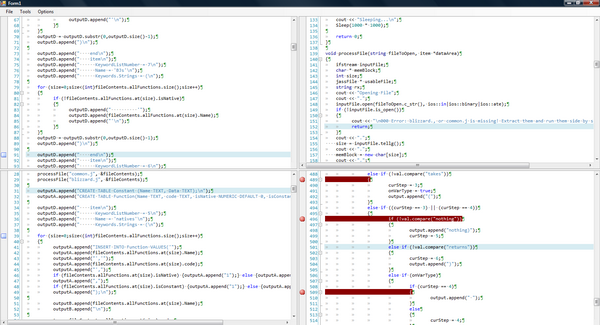
Since I love my TextEditor, I will give you a little preview of what it‘s capable of. And it‘s not a little 
As you might have pictured already, this library has incredibly many classes/enums/interfaces/namespaces. Actually, there‘s so many that I won‘t put up a class diagram or explain the links between all the classes.
The TextEditor is basically just a container of the class TextEditorBase; it is actually TextEditorBase that contains all the logic for doing whatever you do in the TextEditor. The TextEditor only manages its fourTextEditorBases along with splitters when you‘ve split up the TextEditor in two or more split views.
However, the TexteditorBase doesn‘t take care of the drawing; it simply contains a DefaultPainter field which contains the logic for rendering all the different stuff. Whenever drawing is needed, the TextEditorBase calls the appropriate rendering methods in the DefaultPainter. The DefaultPainter also contains a method namedRenderAll which, as you might‘ve thought about already, renders all the things that are supposed to be rendered in the TextEditor.
Since the different highlighting modes are defined in XML sheets, an XML sheet reader is required. TheLanguageReader parses a given XML sheet and tells the parser how to parse each token it finds in the typed text in the TextEditor. A user does not use the LanguageReader directly; the user can either use theSetHighlighting method of a TextEditor, which is a wrapper, or use theTextEditorSyntaxLoader.SetSyntax method.
Unfortunately, I can‘t take credit for it all. I based it on DotNetFireball‘s CodeEditor; however, the code was so ugly, inefficient, and unstructured that it would probably have taken me less time to remake it from scratch than fix all these things. The code still isn‘t really that nice; however, it is certainly better than before.
Update: Since I have now gone through all source code and documented and updated it to fit my standards, I claim this TextEditor my own work. However, the way I do things are still the same as the original, therefore I credit the original creators.
I should probably mention that DotNetFireball did not create the CodeEditor. They simply took another component, the SyntaxBox, and changed its name. Just for your information.
Conclusion
So, as you can see (or, I certainly hope you can), it is a gigantic project, which is hard to manage, and I have one advice to you: don‘t do this at home. It has taken so much of my time, not saying that I regret it, but really, if such a framework already exists, why not use it? Making your own would be lame.
Not saying this for my own fault, so I can get more users, I‘m saying this because I don‘t want you to go through the same things I did for such ‘basic‘ things. (Not really basic, but stuff that modern users require applications to have.)
So yeah, I suppose that this is it. The place where you say ‘enjoy‘ and leave the last notes, etc. Yeah, enjoy it, and make good use of it - and let me see some awesome applications made with this, please 


