首页 > 其他 > 详细

从FBV到CBV二(认证器)

时间:2019-06-08 18:04:55      阅读:149      评论:0      收藏:0      [点我收藏+]


上篇随笔中我们看到在restframework.views的dispatch是请求的处理入口,里面先是通过initialize_request将request进行封装,封装后的request不仅仅有原先的request,还有解析器,认证,以及渲染。
  • 认证
        authenticators=self.get_authenticators()
        看get_authenticators干了什么:        
技术分享图片
          明显的列表推导式 self.authentication_classes:
         技术分享图片
           这是APIView的属性,很熟悉吧?因为几乎使用restframework的项目中几乎都会在项目的setting.py文件中配置它,比如:
<wiz_code_mirror>


7


1
REST_FRAMEWORK = {
2
    ‘DEFAULT_AUTHENTICATION_CLASSES‘: (
3
        ‘rest_framework_jwt.authentication.JSONWebTokenAuthentication‘,
4
        ‘rest_framework.authentication.SessionAuthentication‘,
5
        ‘rest_framework.authentication.BasicAuthentication‘,
6
    )
7
}
 
 
        容易理解,默认是读取项目setting.py的文件,dispatch中initialize_request将找到的验证器封装到request对象中,接下来
        执行了initial方法
技术分享图片
       
技术分享图片
                     技术分享图片


      技术分享图片

        self.perform_authentication(request)  负责进行验证:
             技术分享图片
技术分享图片
        执行了request.user:
            技术分享图片 
       技术分享图片


    技术分享图片


技术分享图片
        这里我们看到实际调用了self._authenticate()
        技术分享图片


技术分享图片
            解释:
      • for authenticator in self.authenticators:          
                通过遍历找到我们的认证器
      • user_auth_tuple = authenticator.authenticate(self)   
                            执行认证器的authenticate(self)方法    所以在认证器中必须实现这个方法   返回值是一个元组
      • except exceptions.APIException:    self._not_authenticated()     raise
                             如果认证类出现异常,就抛出这个异常,认证失败
      •                  if user_auth_tuple is not None:
                                self._authenticator = authenticator
                                self.user, self.auth = user_auth_tuple
            
                            return    
                              验证通过,将user_auth_tuple的两个元素分别赋值给request的user和auth
      •  self._not_authenticated()
                        技术分享图片技术分享图片
                      如果所有的认证器都没抛出异常,且返回值都是None,就执行这个函数,也就也是匿名用户,可在seeting.py中配置    
 
     
        既然我们的CBV是继承于APIView,那自然就可以在函数中定义DEFAULT_AUTHENTICATION_CLASSES,并编写我们自己的认证方式:    


11


1
from rest_framework.exceptions import AuthenticationFailed
2
class MyAuthentication(object):
3
    # authenticate authenticate_header 两个方法是必须有的,authenticate用来写我们自己的认证方式,authenticate_header直接写pass就行,不写会抛错,缺少authenticate_header方法
4
    def authenticate(self, request):
5
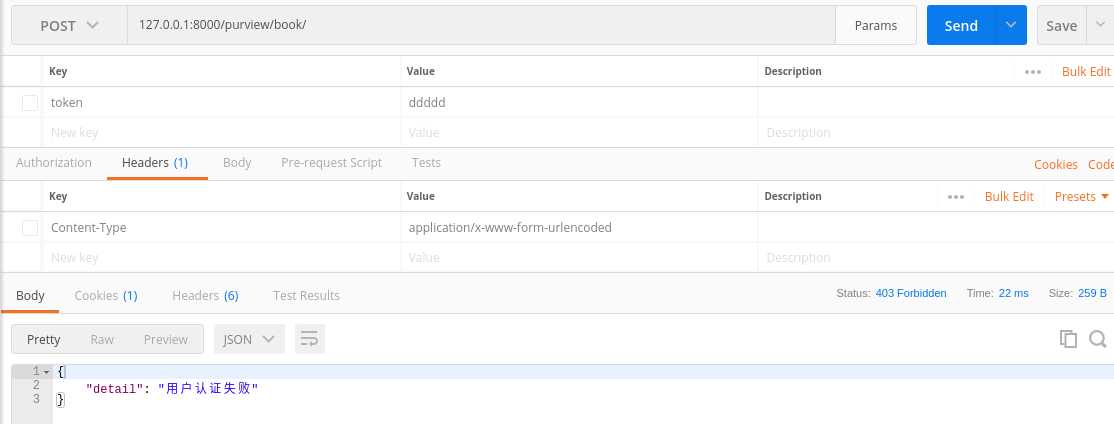
        self.token = request._request.GET.get(‘token‘)
6
        if not self.token:
7
            raise AuthenticationFailed(‘用户认证失败‘)   # 如果认证失败,就抛出一个AuthenticationFailed异常
8
        return (‘wbj‘, self.token)      # 如果认证通过,就行返回一个元组,第一个元素是用户身份(user),第二个是auth
9

10
    def authenticate_header(self, request):      
11
        pass
 
 
       使用MyAuthentication进行身份认证:


x


1
class Book(APIView):
2
    authentication_classes = [MyAuthentication, ]
3

4
    def dispatch(self, request, *args, **kwargs):
5
        return super().dispatch(request, *args, **kwargs)
6

7
    def get(self, request):
8
        # get a book
9
        return HttpResponse(json.dumps({‘code‘: ‘20000‘}))
10

11
    def post(self, request):
12
        return HttpResponse(json.dumps({‘code‘: ‘20000‘}))
13

14
    def put(self, request):
15
        # update a book
16
        return HttpResponse(json.dumps({‘code‘: ‘20000‘}))
17

18
    def delete(self, request):
19
        # delete a book
20
        return HttpResponse(json.dumps({‘code‘: ‘20000‘}))


   进行测试:
       
 
   带token请求        
      技术分享图片技术分享图片
 
        不带token请求
       技术分享图片


      技术分享图片


从FBV到CBV二(认证器)

原文:https://www.cnblogs.com/wangbaojun/p/10991052.html

(0)
(0)
   
举报
评论 一句话评论(0
关于我们 - 联系我们 - 留言反馈 - 联系我们:wmxa8@hotmail.com
© 2014 bubuko.com 版权所有
打开技术之扣,分享程序人生!