之前已经有一篇关于jquery.validate.js验证的文章,还不太理解的可以先看看:jQuery Validate 表单验证(这篇文章只是介绍了一下如何实现前台验证,并没有涉及后台验证remote方法)。
有时候我们不仅仅对表单所录入的信息进行验证还需要将录入的值与数据库进行比较,这时我们就需要借助remote方法来实现。这篇文章就是介绍 jquery.validate.js的后台验证的remote方法,准备工作,前台页面:
01 |
<!DOCTYPE html PUBLIC "-//W3C//DTD HTML 4.01 Transitional//EN" "http://www.w3.org/TR/html4/loose.dtd"> |
02 |
<html> |
03 |
<head> |
04 |
<meta http-equiv="Content-Type" content="text/html; charset=UTF-8"> |
05 |
<title>Insert title here</title> |
06 |
<style type="text/css"> |
07 |
form{max-width:800px; margin:0 auto;} |
08 |
form label{display:inline-block;width:150px; text-align:right;} |
09 |
fieldset{margin-bottom:25px;} |
10 |
legend { |
11 |
border: 1px solid #77848D; |
12 |
font-family: "Arial"; |
13 |
font-size: 14px; |
14 |
margin-left: 15px; |
15 |
padding: 5px; |
16 |
} |
17 |
em.error{font-weight:normal; color:red;} |
18 |
</style> |
19 |
<script src="test/jquery.js" type="text/javascript"></script> |
20 |
<script src="test/jquery.validate.js" type="text/javascript"></script> |
21 |
<script src="test/jquery.validate.message_cn.js" type="text/javascript"></script> |
22 |
23 |
</head> |
24 |
<body> |
25 |
<form name="test" id="testform" method="get" action="get.php"> |
26 |
<fieldset> |
27 |
<legend title="用户注册(User Register)">用户注册(User Login)</legend> |
28 |
<p> |
29 |
<label for="name">用户名:</label> |
30 |
<input id="name" name="name" type="text" /> |
31 |
</p> |
32 |
<p> |
33 |
<label for="mail">邮箱:</label> |
34 |
<input id="mail" name="mail" type="password" /> |
35 |
</p> |
36 |
<p> |
37 |
<label for="password">密码:</label> |
38 |
<input id="password" name="password" type="password" /> |
39 |
</p> |
40 |
<p> |
41 |
<label for="repassword">重复密码:</label> |
42 |
<input id="repassword" name="repassword" type="password" /> |
43 |
</p> |
44 |
<p> |
45 |
<label for="hash">邀请码:</label> |
46 |
<input id="hash" name="hash" type="text" /> |
47 |
</p> |
48 |
<p> |
49 |
<label for="sel">选择:</label> |
50 |
<select id="sel" name="sel"> |
51 |
<option value="">请选择</option> |
52 |
<option value="1">选择1</option> |
53 |
<option value="2">选择2</option> |
54 |
<option value="3">选择3</option> |
55 |
<option value="4">选择4</option> |
56 |
</select> |
57 |
</p> |
58 |
<p> |
59 |
<label for="type">用户类型:</label> |
60 |
<span><input name="type" type="radio" value="1" />类型1</span> |
61 |
<span><input name="type" type="radio" value="2" />类型2</span> |
62 |
<span><input name="type" type="radio" value="3" />类型3</span> |
63 |
</p> |
64 |
<p> |
65 |
<label for="submit"> </label> |
66 |
<input class="submit" type="submit" value="注册"/> |
67 |
</p> |
68 |
</fieldset> |
69 |
</form> |
70 |
</body> |
71 |
</html> |
要实现的效果:
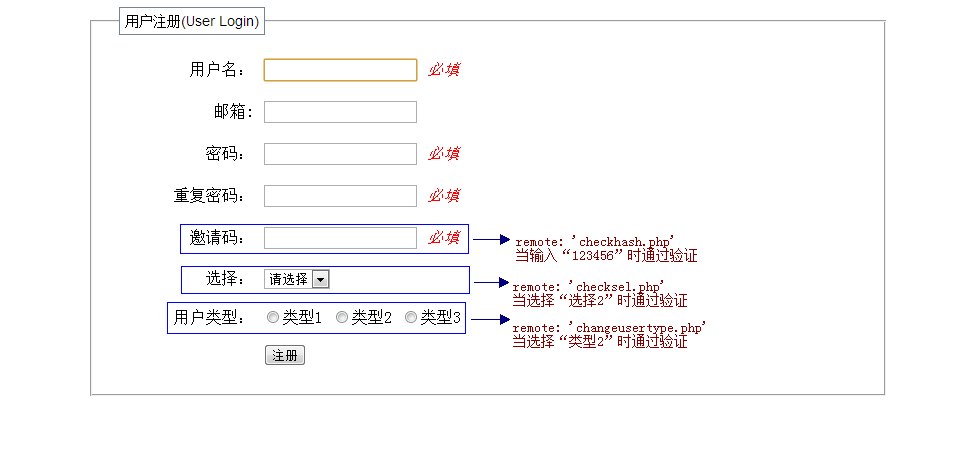
由图可知我们要准备三个远程验证的文件(这里只是做到这种效果,就不连接数据库查找数据了,如果要和数据库的数据进行匹配原理是一样的,在这里就不赘述查找数据的方法了,相信程序员们都该掌握数据库的操作才行。在这里我们直接定义一个变量来进行匹配):
1.checkhash.php
01 |
<?php |
02 |
if($_GET) |
03 |
{ |
04 |
$hash = $_GET[‘hash‘]; |
05 |
if($hash == ‘123456‘) |
06 |
{ |
07 |
echo ‘true‘; |
08 |
}else{ |
09 |
echo ‘false‘; |
10 |
} |
11 |
exit(); |
12 |
} |
2.checksel.php
01 |
<?php |
02 |
if($_GET) |
03 |
{ |
04 |
$sel = $_GET[‘sel‘]; |
05 |
if($sel == 2) |
06 |
{ |
07 |
echo ‘true‘; |
08 |
}else{ |
09 |
echo ‘false‘; |
10 |
} |
11 |
exit(); |
12 |
} |
3.changeusertype.php
01 |
<?php |
02 |
if($_GET) |
03 |
{ |
04 |
$type = $_GET[‘type‘]; |
05 |
if($type == 2) |
06 |
{ |
07 |
echo ‘true‘; |
08 |
}else{ |
09 |
echo ‘false‘; |
10 |
} |
11 |
exit(); |
12 |
} |
验证代码:
01 |
<script type="text/javascript"> |
02 |
$(function(){ |
03 |
$("#testform").validate({ |
04 |
rules : { |
05 |
name : { |
06 |
required : true |
07 |
}, |
08 |
password: { |
09 |
required: true, |
10 |
minlength: 5 |
11 |
}, |
12 |
repassword: { |
13 |
required: true, |
14 |
minlength: 5, |
15 |
equalTo: "#password" |
16 |
}, |
17 |
hash: { |
18 |
required: true, |
19 |
remote: ‘checkhash.php‘ |
20 |
}, |
21 |
sel: { |
22 |
remote: ‘checksel.php‘ |
23 |
}, |
24 |
type: { |
25 |
remote:{ |
26 |
url: "changeusertype.php", |
27 |
type: "get", |
28 |
dataType: ‘json‘, |
29 |
data: { |
30 |
‘type‘: function(){return $(‘input[name="type"]:checked‘).val();} |
31 |
} |
32 |
} |
33 |
<span></span>} |
34 |
}, |
35 |
messages : { |
36 |
name : { |
37 |
required : ‘必填‘ |
38 |
}, |
39 |
password: { |
40 |
required: ‘必填‘, |
41 |
minlength: ‘最少5个字符‘ |
42 |
}, |
43 |
repassword: { |
44 |
required: ‘必填‘, |
45 |
minlength: ‘最少5个字符‘, |
46 |
<span></span>equalTo: ‘两次输入的密码不一样‘ |
47 |
}, |
48 |
hash: { |
49 |
required: ‘必填‘, |
50 |
remote: ‘邀请码不正确‘ |
51 |
}, |
52 |
sel: { |
53 |
remote: ‘选择不正确‘ |
54 |
}, |
55 |
type: { |
56 |
remote: ‘类型不可更改‘ |
57 |
} |
58 |
}, |
59 |
focusInvalid: true, |
60 |
/*指定错误信息位置*/ |
61 |
errorPlacement: function (error, element) { |
62 |
error.appendTo(element.closest("p")); |
63 |
}, |
64 |
//设置错误信息存放标签 |
65 |
errorElement: "em", |
66 |
submitHandler: function(form) { |
67 |
} |
68 |
}); |
69 |
}) |
70 |
</script> |
预览效果是这样的:

这样似乎已经达到了要求,但是有一个小问题当我们输入正确的值里点击提交出现了这样的问题(邀请码和选择的验证没有问题,但是单选按钮的出现了问题):

这是为什么?查阅了一些资料,在验证时会判断之前有没有验证过,当有验证过并有previousValue值时它就会忽略再次提交的值而是取上一次验证结果显示,有很多解决方法都是说更改源码,其它可以不用,我们在提交表单之前先清空之前一次验证绑定的previousValue值,这样就解决问题了。我们在验证方法之前加一个清空previousValue值的函数:
1 |
function emptyValue() |
2 |
{ |
3 |
if($(‘input[name="type"]‘).data("previousValue")) |
4 |
$(‘input[name="type"]‘).data("previousValue").old = null; |
5 |
return true; |
6 |
} |
在提交表单之前调用这个方法:
1 |
<input class="submit" onclick="emptyValue()" type="submit" value="注册"/> |
现在应该是这样的效果了(选择正确的用户类型点击提交应该可以通过验证):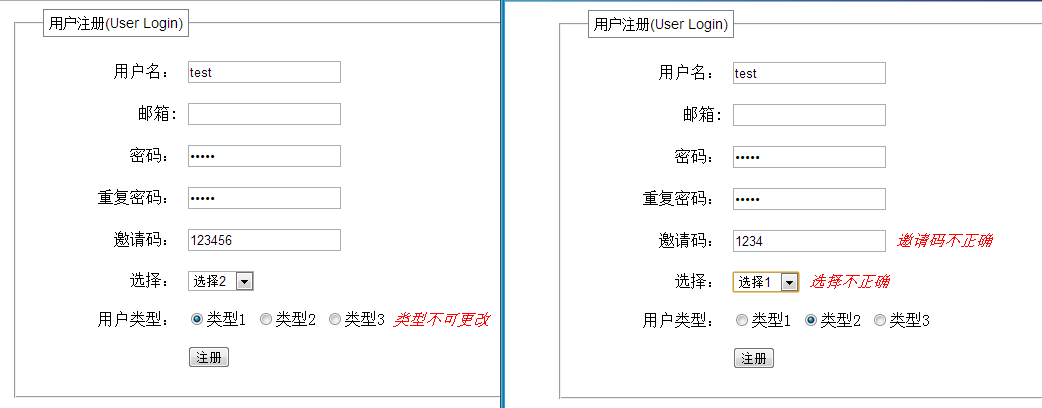
这个问题是在工作时碰到的,纠结了好久是改源码呢还是不改呢,最后找到了解决方法,在闲暇的时间整理了一下,现在贴出来以作参考,如果你有更好的方法也可以告诉我哦!
(转)jquery.validate.js 的 remote 后台验证
原文:http://www.cnblogs.com/wanshutao/p/3549815.html