Python的WEB框架有Django、Tornado、Flask 等多种,Django相较与其他WEB框架其优势为:大而全,框架本身集成了ORM、模型绑定、模板引擎、缓存、Session等诸多功能。今天就一起来学习下Django;
使用pip安装: pip install Django
1)创建django程序
a. 终端命令: django-admin startproject mysite , IDE创建django程序时,本质上都是自动执行上述命令
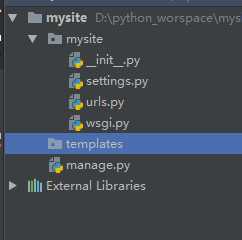
2)目录结构如下:
3)配置文件 -- (settings.py)
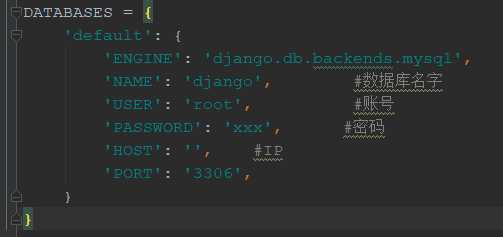
a. 数据库
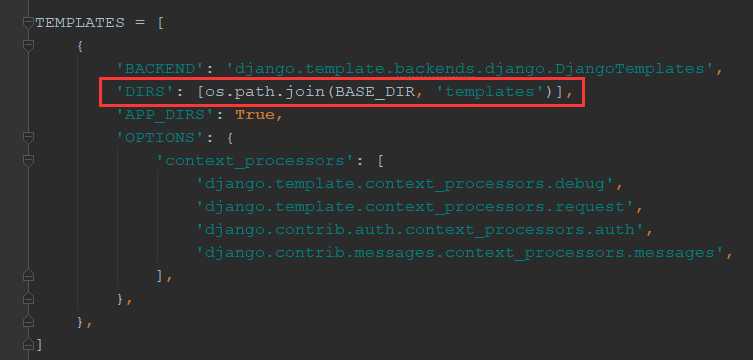
b. 模板
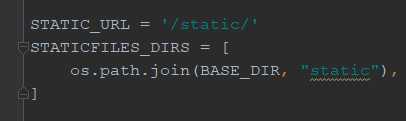
c. 静态文件
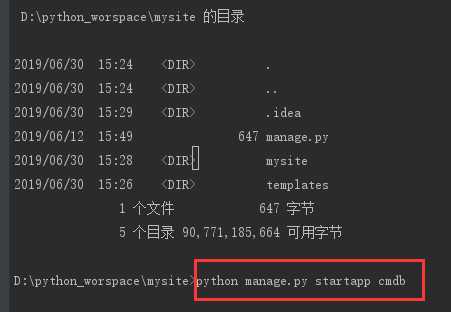
a. 命令
python manage.py startapp cmdb
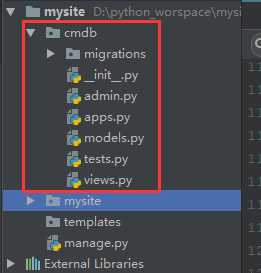
b. cmdb 目录结构如下:
4. 登录实例
a. templates目录下生成html文件,如login.html
<!DOCTYPE html>
<html lang="en">
<head>
    <meta charset="UTF-8">
    <title>登录</title>
</head>

<body>
    <form action=‘/login/‘ method=‘POST‘>
        <p>
            <input type="text" name="user" placeholder="用户名"/>
        </p>
        <p>
            <input type="password" name="pwd" placeholder="密码"/>
        </p>
        <p>
            男:<input type="radio" name="sex" value="男"/>
            女:<input type="radio" name="sex" value="女"/>
        </p>
        <p>
            <input type="submit" value="提交"/>
        </p>
    </form>

</body>
</html>
b. 修改url文件,定义路由规则
from django.contrib import admin
from django.conf.urls import url
from cmdb import views

urlpatterns = [
    url(r‘^admin/‘, admin.site.urls),
    url(r‘^login/‘, views.login),

]
c. 定义视图函数:app下views.py
from django.shortcuts import render
from django.shortcuts import HttpResponse
from django.shortcuts import redirect

# Create your views here.

USER_LIST = {}
def login(request):
    if request.method == ‘GET‘:    #判断请求方式
        return render(request, ‘login.html‘)
    elif request.method == ‘POST‘:
        user = request.POST.get(‘user‘)   #post请求,单选、输入框获取值
        pwd = request.POST.get(‘pwd‘)
        sex = request.POST.get(‘sex‘)
        if user and pwd:
            USER_LIST[‘name‘] = user
            USER_LIST[‘pwd‘] = pwd
            USER_LIST[‘sex‘] = sex
            return render(request, ‘success.html‘, {"user_list": USER_LIST})
        else:
            return HttpResponse(‘请求不能为空‘)
    else:
        return HttpResponse(‘请求方式不是get\post‘)   #HttpResponse("字符串")
d. 提交成功后,success.html页面 取值, hmtl模板获取 字典数据
<!DOCTYPE html>
<html lang="en">
<head>
    <meta charset="UTF-8">
    <title>登录成功页面</title>
</head>
<body>

  {{ user_list.name}}  #获取字典中某个key的值


  <ul>
      {% for k,v in user_list.items %}  #循环字典
          <li>{{ k }} : {{ v }}</li>
      {% endfor %}
  </ul>

</body>
</html>
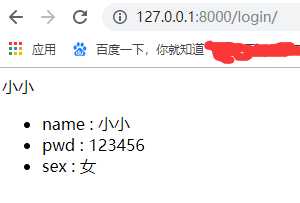
e. 通过浏览器访问: http://127.0.0.1:8000/login/ ,显示login.html登录页面,输入登录信息,登录成功后,获取的数据如下
总结:通过上面的例子,我们可以知道django的生命周期:
---->URL对应关系(匹配) --->视图函数 --->返回用户字符串
----> URL对应关系(匹配) --->视图函数 --->打开一个HTML文件,读取内容
5. 其他
request.GET.get(‘‘,None) #获取get请求发来的数据
request.POST.get(‘‘,None) #获取post请求发来的数据
return render(request, ‘HTML模板的路径‘)
return redirect(‘只能填写URL‘)
对应多选框、上传文件怎么获取值呢?
a. 多选框,html格式如下:
multiple="multiple" 表示多选
 <p>
        <select name="city" multiple="multiple">
             <option value="bj" >北京</option>
             <option value="sh" >上海</option>
             <option value="sz" >深圳</option>
          </select>
  </p>
views 视图页面:
city = request.POST.getlist(‘city‘)
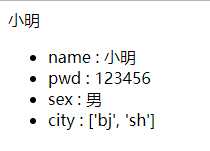
页面访问结果:
b. 上传文件
主要方法
文件对象 = request.FILES.get(‘xx‘)
文件名 = 文件对象.name
文件大小 = 文件对象.size
文件内容 = 文件对象.chunks()
html格式, form表单需要添加属性:
enctype="multipart/form-data"
<p>
       <input type="file" name="upload"/>
 </p>
views视图:
 # 上传文件
        upload_file_obj = request.FILES.get(‘upload‘)
        print(type(upload_file_obj), upload_file_obj)  #<class ‘django.core.files.uploadedfile.InMemoryUploadedFile‘> 2.jpg
        #保存上传的文件到upload目录
        upload_path = os.path.join(‘upload‘, upload_file_obj.name)
        fw = open(upload_path, ‘wb‘)

        for line in upload_file_obj.chunks(): #chunks表示所有的数据库,是个迭代器
            fw.write(line)
        fw.close()
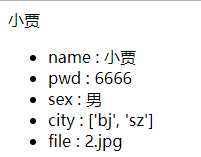
页面访问结果:
最终的views代码:
from django.shortcuts import render
from django.shortcuts import HttpResponse
from django.shortcuts import redirect
import os

# Create your views here.

USER_LIST = {}
def login(request):
    if request.method == ‘GET‘:    #判断请求方式
        return render(request, ‘login.html‘)
    elif request.method == ‘POST‘:
        user = request.POST.get(‘user‘)   #post请求,单选、输入框获取值
        pwd = request.POST.get(‘pwd‘)
        sex = request.POST.get(‘sex‘)
        #多选获取值
        city = request.POST.getlist(‘city‘)

        # 上传文件
        upload_file_obj = request.FILES.get(‘upload‘)
        print(type(upload_file_obj), upload_file_obj)  #<class ‘django.core.files.uploadedfile.InMemoryUploadedFile‘> 2.jpg
        #保存上传的文件到upload目录
        upload_path = os.path.join(‘upload‘, upload_file_obj.name)
        fw = open(upload_path, ‘wb‘)

        for line in upload_file_obj.chunks(): #chunks表示所有的数据库,是个迭代器
            fw.write(line)
        fw.close()

        if user and pwd:
            USER_LIST[‘name‘] = user
            USER_LIST[‘pwd‘] = pwd
            USER_LIST[‘sex‘] = sex
            USER_LIST[‘city‘] = city
            USER_LIST[‘file‘] = upload_file_obj.name
            return render(request, ‘success.html‘, {"user_list": USER_LIST})
        else:
            return HttpResponse(‘请求不能为空‘)
    else:
        return HttpResponse(‘请求方式不是get\post‘)   #HttpResponse("字符串")
原文:https://www.cnblogs.com/lhly/p/11109868.html