CentOS 7.
2 GB or more of RAM per machine (any less will leave little room for your apps).
2 CPUs or more.(CPU少于2个,会有错误提示,初始化时忽略就可以)
Full network connectivity between all machines in the cluster (public or private network is fine).
ip link or ifconfig -asudo cat /sys/class/dmi/id/product_uuidCertain ports are open on your machines.
Control-plane node(s)
| Protocol | Direction | Port Range | Purpose | Used By |
|---|---|---|---|---|
| TCP | Inbound | 6443 | Kubernetes API server | All |
| TCP | Inbound | 2379-2380 | etcd server client API | kube-apiserver, etcd |
| TCP | Inbound | 10250 | Kubelet API | Self, Control plane |
| TCP | Inbound | 10251 | kube-scheduler | Self |
| TCP | Inbound | 10252 | kube-controller-manager | Self |
Worker node(s)
| Protocol | Direction | Port Range | Purpose | Used By |
|---|---|---|---|---|
| TCP | Inbound | 10250 | Kubelet API | Self, Control plane |
| TCP | Inbound | 30000-32767 | NodePort Services | All |
Set SELinux in permissive mode (effectively disabling it).(我的云服务器默认已经是关闭状态了)
This is required to allow containers to access the host filesystem, which is needed by pod networks for example. You have to do this until SELinux support is improved in the kubelet.
setenforce 0
cp -p /etc/selinux/config /etc/selinux/config.bak$(date '+%Y%m%d%H%M%S')
sed -i "s/SELINUX=enforcing/SELINUX=disabled/g" /etc/selinux/config
Setup iptables (routing).
Some users on RHEL/CentOS 7 have reported issues with traffic being routed incorrectly due to iptables being bypassed.
cat <<EOF >  /etc/sysctl.d/k8s.conf
net.bridge.bridge-nf-call-ip6tables = 1
net.bridge.bridge-nf-call-iptables = 1
net.bridge.bridge-nf-call-arptables = 1
EOF
sysctl --system
Swap disabled. You MUST disable swap in order for the kubelet to work properly.
swapoff -a
cp -p /etc/fstab /etc/fstab.bak$(date '+%Y%m%d%H%M%S')
sed -i "s/\/dev\/mapper\/rhel-swap/\#\/dev\/mapper\/rhel-swap/g" /etc/fstab
sed -i "s/\/dev\/mapper\/centos-swap/\#\/dev\/mapper\/centos-swap/g" /etc/fstab
mount -a
free -m
cat /proc/swaps在CentOS7中使用yum安装方式如下:
# step 1: 安装必要的一些系统工具
sudo yum install -y yum-utils device-mapper-persistent-data lvm2
# Step 2: 添加软件源信息
sudo yum-config-manager --add-repo http://mirrors.aliyun.com/docker-ce/linux/centos/docker-ce.repo
# Step 3: 更新并安装 Docker-CE
sudo yum makecache fast
sudo yum install docker-ce-18.06.2.ce-3.el7
# Step 4: 开启Docker服务
sudo systemctl enable docker
sudo systemctl start docker
# Step 5: 配置镜像加速器
sudo mkdir -p /etc/docker
sudo tee /etc/docker/daemon.json <<-'EOF'
{
  "registry-mirrors": ["https://lnxo5xh2.mirror.aliyuncs.com"]
}
EOF
sudo systemctl daemon-reload
sudo systemctl restart docker# step 1: 添加软件源信息
cat <<EOF > /etc/yum.repos.d/kubernetes.repo
[kubernetes]
name=Kubernetes
baseurl=https://mirrors.aliyun.com/kubernetes/yum/repos/kubernetes-el7-x86_64/
enabled=1
gpgcheck=1
repo_gpgcheck=1
gpgkey=https://mirrors.aliyun.com/kubernetes/yum/doc/yum-key.gpg https://mirrors.aliyun.com/kubernetes/yum/doc/rpm-package-key.gpg
EOF
# Step 3: 更新并安装 kubelet kubeadm kubectl
yum clean all
yum makecache -y
yum repolist all
setenforce 0
yum install -y kubelet kubeadm kubectl
systemctl enable kubelet && systemctl start kubelet拉取初始化所需镜像(这些镜像我是通过在dockerhub上下载然后docker tag自己打的对应标签)
通过kubeadm config images list可以查看对应kubeadm版本的初始化镜像,我整理如下,其中最后一个镜像是用于通信的flannel插件
k8s.gcr.io/kube-apiserver:v1.15.0
k8s.gcr.io/kube-controller-manager:v1.15.0
k8s.gcr.io/kube-scheduler:v1.15.0
k8s.gcr.io/kube-proxy:v1.15.0
k8s.gcr.io/pause:3.1
k8s.gcr.io/etcd:3.3.10
k8s.gcr.io/coredns:1.3.1
quay.io/coreos/flannel:v0.11.0-amd64  #pod通信使用的插件
初始化控制平面节点
sudo kubeadm init --kubernetes-version=v1.15.0 --pod-network-cidr=10.244.0.0/16 --ignore-preflight-errors=NumCPU初始化成功后,最后会提示如下信息,方便普通用户使用kubernetes。同时kubeadm join处信息,可以添加node节点。
Your Kubernetes control-plane has initialized successfully!

To start using your cluster, you need to run the following as a regular user:

  mkdir -p $HOME/.kube
  sudo cp -i /etc/kubernetes/admin.conf $HOME/.kube/config
  sudo chown $(id -u):$(id -g) $HOME/.kube/config

You should now deploy a pod network to the cluster.
Run "kubectl apply -f [podnetwork].yaml" with one of the options listed at:
  https://kubernetes.io/docs/concepts/cluster-administration/addons/

Then you can join any number of worker nodes by running the following on each as root:
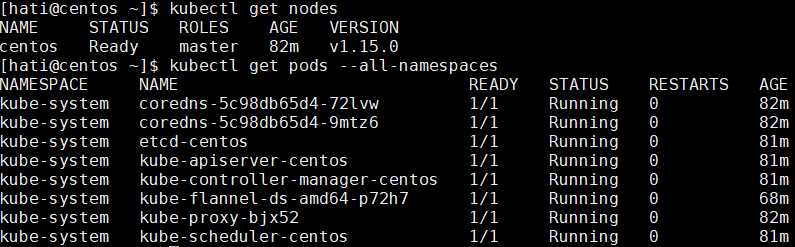
kubeadm join 172.17.17.59:6443 --token khk4ig.sjz142bi0xxxxxxx --discovery-token-ca-cert-hash sha256:1f6b9a1a675188cd76b97e9050f7343a361adxxxxxxxxxxxxxxxxkubectl apply -f https://raw.githubusercontent.com/coreos/flannel/62e44c867a2846fefb68bd5f178daf4da3095ccb/Documentation/kube-flannel.yml安装了pod网络后,您可以通过在`kubectl get pods --all-namespaces的输出中检查CoreDNS pod正在运行来确认它是否正常工作。一旦CoreDNS pod启动并运行,您可以继续加入您的节点。
控制平面节点加入工作节点中(默认master节点不参加工作负载。因为是自己玩,只有一个服务器,所以将master节点当作工作节点)
kubectl taint nodes --all node-role.kubernetes.io/master-有欠妥之处,欢迎交流讨论~~
原文:https://www.cnblogs.com/hati/p/11110249.html