1.创建web工程,不使用SpringMVC模板。
2、设置项目名称为SpringMVCDemo
3、导入jar包
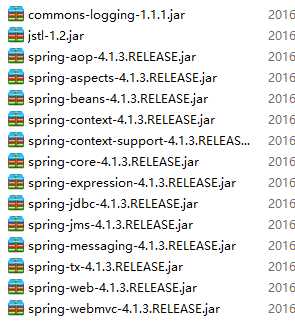
4、jar包引入到项目中。
5、在src下添加一个Spring配置文件,项目目录结构如下:
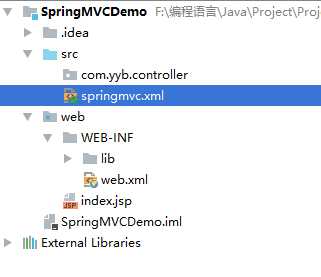
6、SpringMVC本身就是Spring的子项目,对Spring兼容性很好,不需要做很多配置。这里只配置一个Controller扫描就可以了,让Spring对页面控制层Controller进行管理。

<?xml version="1.0" encoding="UTF-8"?>
<beans xmlns="http://www.springframework.org/schema/beans"
       xmlns:xsi="http://www.w3.org/2001/XMLSchema-instance" xmlns:p="http://www.springframework.org/schema/p"
       xmlns:context="http://www.springframework.org/schema/context"
       xmlns:mvc="http://www.springframework.org/schema/mvc"
       xsi:schemaLocation="http://www.springframework.org/schema/beans http://www.springframework.org/schema/beans/spring-beans-4.0.xsd
        http://www.springframework.org/schema/mvc http://www.springframework.org/schema/mvc/spring-mvc-4.0.xsd
        http://www.springframework.org/schema/context http://www.springframework.org/schema/context/spring-context-4.0.xsd">

    <!-- 配置controller扫描包 -->
    <context:component-scan base-package="com.yyb.controller" />
</beans>
7、 配置前端控制器。配置SpringMVC的前端控制器DispatcherServlet。在web.xml中:
<?xml version="1.0" encoding="UTF-8"?>
<web-app xmlns="http://xmlns.jcp.org/xml/ns/javaee"
         xmlns:xsi="http://www.w3.org/2001/XMLSchema-instance"
         xsi:schemaLocation="http://xmlns.jcp.org/xml/ns/javaee http://xmlns.jcp.org/xml/ns/javaee/web-app_3_1.xsd"
         version="3.1">

    <!-- 配置SpringMVC前端控制器 -->
    <servlet>
        <servlet-name>springmvc-demo</servlet-name>
        <servlet-class>org.springframework.web.servlet.DispatcherServlet</servlet-class>
        <!-- 指定SpringMVC配置文件 -->
        <!-- SpringMVC的配置文件的默认路径是/WEB-INF/${servlet-name}-servlet.xml -->
        <init-param>
            <param-name>contextConfigLocation</param-name>
            <param-value>classpath:springmvc.xml</param-value>
        </init-param>
    </servlet>

    <servlet-mapping>
        <servlet-name>springmvc-demo</servlet-name>
        <!-- 设置所有以action结尾的请求进入SpringMVC -->
        <url-pattern>*.action</url-pattern>
    </servlet-mapping>
</web-app>
8、在index.jsp中添加以下代码:
<%@ page contentType="text/html;charset=UTF-8" language="java" %>
<%@ taglib prefix="c" uri="http://java.sun.com/jsp/jstl/core" %>
<%@ taglib uri="http://java.sun.com/jsp/jstl/fmt"  prefix="fmt"%>
<html>
  <head>
    <title>$Title$</title>
  </head>
  <body>
  <table width="100%" border=1>
      <tr>
          <td>商品名称</td>
          <td>商品价格</td>
          <td>生产日期</td>
          <td>商品描述</td>
      </tr>
    <c:forEach items="${list}" var="item">
      <tr>
        <td>${item.name }</td>
        <td>${item.price }</td>
        <td><fmt:formatDate value="${item.createtime}" pattern="yyyy-MM-dd HH:mm:ss"/></td>
        <td>${item.detail }</td>
      </tr>
    </c:forEach>
  </table>
  </body>
</html>
9、创建pojo,创建商品pojo:

package com.yyb.bean;

import java.util.Date;

/**
 * Created by yang on 2017/8/12.
 */
public class Item {
    // 商品id
    private int id;
    // 商品名称
    private String name;
    // 商品价格
    private double price;
    // 商品创建时间
    private Date createtime;
    // 商品描述
    private String detail;

    public Item() {}

    public Item(int id, String name, double price, Date createtime, String detail) {
        this.id = id;
        this.name = name;
        this.price = price;
        this.createtime = createtime;
        this.detail = detail;
    }

    public int getId() {
        return id;
    }

    public void setId(int id) {
        this.id = id;
    }

    public String getName() {
        return name;
    }

    public void setName(String name) {
        this.name = name;
    }

    public double getPrice() {
        return price;
    }

    public void setPrice(double price) {
        this.price = price;
    }

    public Date getCreatetime() {
        return createtime;
    }

    public void setCreatetime(Date createtime) {
        this.createtime = createtime;
    }

    public String getDetail() {
        return detail;
    }

    public void setDetail(String detail) {
        this.detail = detail;
    }
}
10、创建ItemController。ItemController是一个普通的java类,不需要实现任何接口。需要在类上添加@Controller注解,把Controller交由Spring管理,在方法上面添加@RequestMapping注解,里面指定请求的url。其中“.action”可以加也可以不加。
package com.yyb.controller;

import com.yyb.bean.Item;
import org.springframework.stereotype.Controller;
import org.springframework.web.bind.annotation.RequestMapping;
import org.springframework.web.servlet.ModelAndView;

import java.util.ArrayList;
import java.util.Date;
import java.util.List;

/**
 * Created by yang on 2017/8/12.
 */
@Controller
public class ItemController {
    // @RequestMapping:里面放的是请求的url,和用户请求的url进行匹配

// action可以写也可以不写

    @RequestMapping("/itemList.action")

    public ModelAndView queryItemList() {

// 创建页面需要显示的商品数据

        List<Item> list = new ArrayList<>();

        list.add(new Item(1, "1华为 荣耀8", 2399, new Date(), "质量好!1"));

        list.add(new Item(2, "2华为 荣耀8", 2399, new Date(), "质量好!2"));

        list.add(new Item(3, "3华为 荣耀8", 2399, new Date(), "质量好!3"));

        list.add(new Item(4, "4华为 荣耀8", 2399, new Date(), "质量好!4"));

        list.add(new Item(5, "5华为 荣耀8", 2399, new Date(), "质量好!5"));

        list.add(new Item(6, "6华为 荣耀8", 2399, new Date(), "质量好!6"));

// 创建ModelAndView,用来存放数据和视图
        ModelAndView modelAndView = new ModelAndView();
// 设置数据到模型中
        modelAndView.addObject("list", list);
// 设置视图jsp,需要设置视图的物理地址
        modelAndView.setViewName("index.jsp");

        return modelAndView;

    }
}
11、启动项目测试。启动项目,浏览器访问地址:http://localhost:8080/SpringMVCDemo/itemList.action
效果如下图:

框架结构如下图:
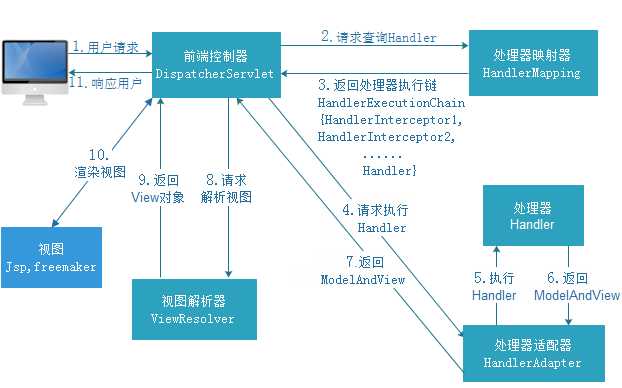
以下组件通常使用框架提供实现:
在springmvc的各个组件中,处理器映射器、处理器适配器、视图解析器称为springmvc的三大组件。需要用户开发的组件有handler、view。
我们没有做任何配置,就可以使用这些组件,因为框架已经默认加载这些组件了,配置文件位置如下图:
组件扫描器:
使用组件扫描器省去在spring容器配置每个Controller类的繁琐。使用<context:component-scan>自动扫描标记@Controller的控制器类,在springmvc.xml配置文件中配置如下:
<!-- 配置controller扫描包,多个包之间用,分隔 -->
<context:component-scan base-package="cn.itcast.springmvc.controller" />
1、配置处理器映射器
@RequestMapping:定义请求url到处理器功能方法的映射。
注解式处理器映射器,对类中标记了@ResquestMapping的方法进行映射。根据@ResquestMapping定义的url匹配@ResquestMapping标记的方法,匹配成功返回HandlerMethod对象给前端控制器。HandlerMethod对象中封装url对应的方法Method。从spring3.1版本开始,废除了DefaultAnnotationHandlerMapping的使用,推荐使用RequestMappingHandlerMapping完成注解式处理器映射。
在springmvc.xml配置文件中配置如下:
<!-- 配置处理器映射器 -->
<bean
    class="org.springframework.web.servlet.mvc.method.annotation.RequestMappingHandlerMapping" />
</bean>
2、配置处理器适配器
从spring3.1版本开始,废除了AnnotationMethodHandlerAdapter的使用,推荐使用RequestMappingHandlerAdapter完成注解式处理器适配。在springmvc.xml配置文件中配置如下:
<!-- 配置处理器适配器 -->

<bean
  class="org.springframework.web.servlet.mvc.method.annotation.RequestMappingHandlerAdapter" />
</bean>
3、注解驱动
上面的方式直接配置处理器映射器和处理器适配器比较麻烦,可以使用注解驱动来加载。SpringMVC使用<mvc:annotation-driven>自动加载RequestMappingHandlerMapping和RequestMappingHandlerAdapter。可以在springmvc.xml配置文件中使用<mvc:annotation-driven>替代注解处理器和适配器的配置。
<!-- 注解驱动 -->
<mvc:annotation-driven />
视图解析器使用SpringMVC框架默认的InternalResourceViewResolver,这个视图解析器支持JSP视图解析,在springmvc.xml配置文件中配置如下:
<!-- 配置视图解析器,不用每次都写前缀和后缀,比如:/WEB-INF/jsp/test.jsp -->

<bean
  class="org.springframework.web.servlet.view.InternalResourceViewResolver">
  <!-- 配置逻辑视图的前缀 -->
  <property name="prefix" value="/WEB-INF/jsp/" />
  <!-- 配置逻辑视图的后缀 -->
  <property name="suffix" value=".jsp" />
</bean>
逻辑视图名需要在controller中返回ModelAndView指定,最终jsp物理地址:前缀+逻辑视图名+后缀
// 设置视图jsp,需要设置视图的物理地址
// modelAndView.setViewName("/WEB-INF/jsp/itemList.jsp");
// 配置好视图解析器前缀和后缀,这里只需要设置逻辑视图就可以了。
// 视图解析器根据前缀+逻辑视图名+后缀拼接出来物理路径
modelAndView.setViewName("itemList");
web.xml配置时,是设置所有的请求都进入SpringMVC。但是SpringMVC无法处理css、js等静态资源,所以无法正常显示。
方式一:在springmvc.xml中配置:
 <!--对静态资源放行-->
    <!--**防止文件夹下又有文件夹-->
    <mvc:resources mapping="/css/**" location="/css/"></mvc:resources>
    <mvc:resources mapping="/fonts/**" location="/fonts/"></mvc:resources>
    <mvc:resources mapping="/js/**" location="/js/"></mvc:resources>
方式二:在springmvc.xml中配置:
    <!-- 解决静态资源无法被springMVC处理的问题 -->
    <mvc:default-servlet-handler />
原文:https://www.cnblogs.com/2019lgg/p/11190315.html