1. 描述GPT是什么,应怎么使用?
磁盘分区主要有MBR和GPT(GUID Partition Table)两种格式。GPT支持2T以上的分区。如果要使用GPT分区格式,开始安装Linux系统时,需要键入inst.gpt这个参数。
使用GPT分区,应使用gdisk工具
gdisk /dev/sda
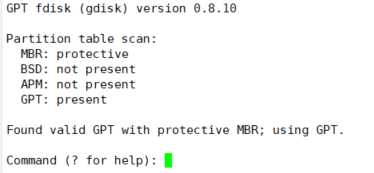
键入?获取帮助
Command (? for help): ?

b          back up GPT data to a file

c          change a partition‘s name

d          delete a partition

i          show detailed information on a partition

l          list known partition types

n          add a new partition

o          create a new empty GUID partition table (GPT)

p          print the partition table

q          quit without saving changes

r          recovery and transformation options (experts only)

s             sort partitions

t              change a partition‘s type code

v             verify disk

w            write table to disk and exit

x             extra functionality (experts only)

?             print this menu
gdisk里面的操作命令和fdisk相似,唯一的区别就是GPT分区里面没有主分区和扩展分区的概念,直接用n创建新分区即可。
2. 创建一个10G的分区,并格式化为ext4文件系统。要求:
(1)block大小为2048,预留空间20%,卷标为MYDATA,
(2)挂载至/mydata目录,要求挂载时禁止程序自动运行,且不更新文件的访问时间戳。
(3)可开机自动挂载。
此操作在GPT分区上实现,因虚拟机空间不足,这里使用1G代替操作
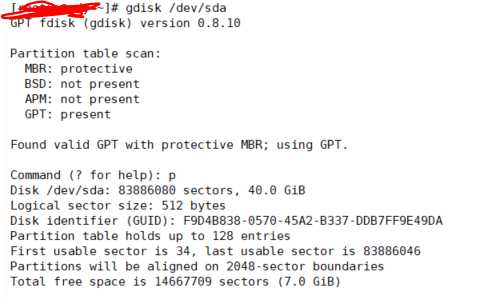
使用p命令查看此磁盘还有7G的剩余空间
使用 n 创建新的分区
Partition number (5-128, default 5): 5

First sector (34-83886046, default = 67123200) or {+-}size{KMGTP}:
这里默认即可
Last sector (67123200-83886046, default = 83886046) or {+-}size{KMGTP}: +1G
空间为1G
Current type is ‘Linux filesystem‘
默认为Linux filesystem,或者使用l看看使用哪种文件格式
使用w保存
Command (? for help): w
Final checks complete. About to write GPT data. THIS WILL OVERWRITE EXISTING
PARTITIONS!!
Do you want to proceed? (Y/N): y
OK; writing new GUID partition table (GPT) to /dev/sda.
Warning: The kernel is still using the old partition table.
The new table will be used at the next reboot.
The operation has completed successfully.
显示已经创建完毕
我们此时创建的新分区为/dev/sda5
将sda5设置为ext4文件系统,block大小为2048,预留空间20%,卷标为MYDATA
# mke2fs -t ext4 -b 2048 -L MYDATA -m 2 /dev/sda5

mke2fs 1.42.9 (28-Dec-2013)

Filesystem label=MYDATA

OS type: Linux

Block size=2048 (log=1)

Fragment size=2048 (log=1)

Stride=0 blocks, Stripe width=0 blocks

65536 inodes, 524288 blocks

10485 blocks (2.00%) reserved for the super user

First data block=0

Maximum filesystem blocks=268959744

32 block groups

16384 blocks per group, 16384 fragments per group

2048 inodes per group

Superblock backups stored on blocks:

       16384, 49152, 81920, 114688, 147456, 409600, 442368


Allocating group tables: done

Writing inode tables: done

Creating journal (16384 blocks): done

Writing superblocks and filesystem accounting information: done
挂载至/mydata目录,要求挂载时禁止程序自动运行,且不更新文件的访问时间戳
创建/mydata目录,然后挂载
mount -o noexec,noatime /dev/sda5 /MYDATA
使用mount命令查看
/dev/sda5 on /MYDATA type ext4 (rw,noexec,noatime,seclabel,data=ordered) [MYDATA]
显示已经挂载
设置开机自动挂载:
编辑/etc/fstab

3. 创建一个大小为1G的swap分区,并启用
首先创建一个swap分区, swap的id为8200 Linux swap
Partition number (6-128, default 6): 6
First sector (34-83886046, default = 69220352) or {+-}size{KMGTP}:
Last sector (69220352-83886046, default = 83886046) or {+-}size{KMGTP}: +1G
Current type is ‘Linux filesystem‘
Hex code or GUID (L to show codes, Enter = 8300): 8200
Changed type of partition to ‘Linux swap‘
Command (? for help): w
Final checks complete. About to write GPT data. THIS WILL OVERWRITE EXISTING
PARTITIONS!!
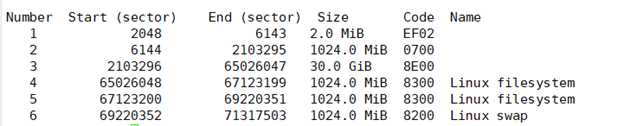
Command (? for help): p
Disk /dev/sda: 83886080 sectors, 40.0 GiB
Logical sector size: 512 bytes
Disk identifier (GUID): F9D4B838-0570-45A2-B337-DDB7FF9E49DA
Partition table holds up to 128 entries
First usable sector is 34, last usable sector is 83886046
Partitions will be aligned on 2048-sector boundaries
Total free space is 12570557 sectors (6.0 GiB)
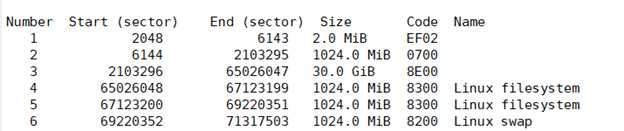
新的分区创建完毕
Number Start (sector) End (sector) Size Code Name
1 2048 6143 2.0 MiB EF02
2 6144 2103295 1024.0 MiB 0700
3 2103296 65026047 30.0 GiB 8E00
4 65026048 67123199 1024.0 MiB 8300 Linux filesystem
5 67123200 69220351 1024.0 MiB 8300 Linux filesystem
6 69220352 71317503 1024.0 MiB 8200 Linux swap
创新新的swap文件系统
mkswap /dev/sda6

Setting up swapspace version 1, size = 1048572 KiB

no label, UUID=100f6e29-caa2-4f7f-8eab-9e54b5fc9228
启用该swap
-----After creating the swap area, you need the swapon command to start using it.
swapon /dev/sda6
4. 编写脚本计算/etc/passwd文件中第10个用户和第20个用户id号之和
#!/bin/bash

# calculate the sum of 10th user‘s uid and 20th user‘s uid from /etc/passwd

user10_uid=$(head -10 /etc/passwd | tail -1 | cut -d : -f 3)

echo "user10 uid: $user10_uid"

user20_uid=$(head -20 /etc/passwd | tail -1 | cut -d : -f 3)

echo "user20_uid: $user20_uid"

sum_uid=$[$user10_uid+$user20_uid]

echo "the sum is $sum_uid"
执行这个shell脚本
bash /scripts/sum1020uid.sh
user10 uid: 10
user20_uid: 69
the sum is 79
#!/bin/bash

#change the hostname to www.magedu.com if the hostname is null or localhost.localdomain
hostName=$(hostname)
if [ -z "$hostName" -o "$hostName"=="localhost.localdomain" ];then
        hostname www.magedu.com
fi
hostname
执行前
# hostname
localhost.localdomain
执行后的情况
# hostname
6. 编写脚本,通过命令行参数传入一个名户名,判断id号是偶数还是奇数。
#!/bin/bash
#input a username from command, get its uid, then judge whether it is even or odd

if [ $# -eq 1 ]; then
    userid=$(id -u $1)
    if [ $[$userid%2] -eq 1 ];then
        echo "userid:$userid is odd"
    else
        echo "userid:$userid is even"
    fi
else
    echo "error"
fi

[donguser@study script]$ bash idorreven.sh testuser2

userid:5007 is odd

[donguser@study script]$ bash idorreven.sh testuser1

userid:5006 is even
7 lvm基本应用以及扩展缩减实现
lvm:logical volume manager, 特点是可以弹性的调整文件系统的容量。lVM将几个物理分区通过软件组合成一个独立的大磁盘(volume group), 然后将这块大磁盘划分成可用的分区(LV logical volume),最终挂载使用。几个概念:
PV:physical volume 物理卷 首先需要将分区的system id设置为8e,即LVM的标识符,然后通过pvcreate将其转化为PV
VG:volume group 许多PV组合成VG
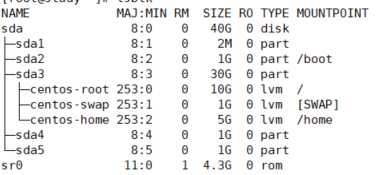
现有分区
将sda4 sda5转换为LVM格式
Command (? for help): t
Partition number (1-6): 4
Current type is ‘Linux filesystem‘
Hex code or GUID (L to show codes, Enter = 8300): 8e00
Changed type of partition to ‘Linux LVM‘
Command (? for help): t
Partition number (1-6): 5
Current type is ‘Linux filesystem‘
Hex code or GUID (L to show codes, Enter = 8300): 8e00
Changed type of partition to ‘Linux LVM‘
转换后的结果
将sda4,sda5创建为pv
# pvcreate /dev/sda[4,5]
查看现在pv分区

下一步创建V
# vgcreate myvg /dev/sda[4,5]
  Volume group "myvg" successfully created

# pvscan

  PV /dev/sda4   VG myvg            lvm2 [1020.00 MiB / 1020.00 MiB free]

  PV /dev/sda5   VG myvg            lvm2 [1020.00 MiB / 1020.00 MiB free]

  PV /dev/sda3   VG centos          lvm2 [30.00 GiB / 14.00 GiB free]

  Total: 3 [31.99 GiB] / in use: 3 [31.99 GiB] / in no VG: 0 [0   ]
可以看到sda4 sda5已经被划到myvg里面
显示myvg的情况
# vgdisplay myvg

  --- Volume group ---

  VG Name               myvg

  System ID

  Format                lvm2

  Metadata Areas        2

  Metadata Sequence No  1

  VG Access             read/write

  VG Status             resizable

  MAX LV                0

  Cur LV                0

  Open LV               0

  Max PV                0

  Cur PV                2

  Act PV                2

  VG Size               1.99 GiB

  PE Size               4.00 MiB

  Total PE              510

  Alloc PE / Size       0 / 0

  Free  PE / Size       510 / 1.99 GiB

  VG UUID               OOkTqc-AWUM-tIGq-Huig-7Av0-2pb6-YfEedA
查看myvg的情况,VG size为1.99G
如果想要扩展myvg的容量,例如增加1G
先创建一个新的1G分区
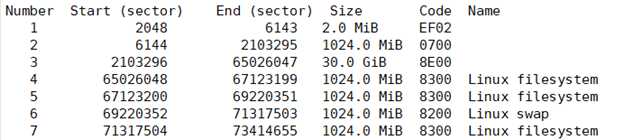
sda7为新创建的1G LVM分区
将sda7加到mygv里面
# vgextend myvg /dev/sda7

  Volume group "myvg" successfully extended

可以看到vg的容量增加到了2.99G
如果要在VG内删除一个PV,可以使用vgreduce命令
接下来就可以创建LV,例如在myvg里面创建一个1G的LV
# lvcreate -L 1G -n myfirstLV myvg

  Logical volume "myfirstLV" created.
# lvscan

  ACTIVE            ‘/dev/myvg/myfirstLV‘ [1.00 GiB] inherit

  ACTIVE            ‘/dev/centos/root‘ [10.00 GiB] inherit

  ACTIVE            ‘/dev/centos/home‘ [5.00 GiB] inherit

  ACTIVE            ‘/dev/centos/swap‘ [1.00 GiB] inherit
myfirstLV 已经创建完毕
现在就可以为此LV创建文件系统,例如创建为ext3
# mke2fs -t ext3 /dev/myvg/myfirstLV

mke2fs 1.42.9 (28-Dec-2013)

Filesystem label=

OS type: Linux

Block size=4096 (log=2)

Fragment size=4096 (log=2)

Stride=0 blocks, Stripe width=0 blocks

65536 inodes, 262144 blocks

13107 blocks (5.00%) reserved for the super user

First data block=0

Maximum filesystem blocks=268435456

8 block groups

32768 blocks per group, 32768 fragments per group

8192 inodes per group

Superblock backups stored on blocks:

               32768, 98304, 163840, 229376
最后将其挂载到某个文件系统上
# mount /dev/myvg/myfirstLV /MYDATA
/dev/mapper/myvg-myfirstLV on /MYDATA type ext3
如果要增加LV的容量,我们先查看VG是否有可用容量
# vgdisplay myvg

  --- Volume group ---

  VG Name               myvg

  System ID

  Format                lvm2

  Metadata Areas        3

  Metadata Sequence No  3

  VG Access             read/write

  VG Status             resizable

  MAX LV                0

  Cur LV                1

  Open LV               1

  Max PV                0

  Cur PV                3

  Act PV                3

  VG Size               <2.99 GiB

  PE Size               4.00 MiB

  Total PE              765

  Alloc PE / Size       256 / 1.00 GiB

  Free  PE / Size       509 / <1.99 GiB

  VG UUID               OOkTqc-AWUM-tIGq-Huig-7Av0-2pb6-YfEedA
显示还有约1.99G的空余容量
如果想增加1G,那么
# lvresize -L +1G /dev/myvg/myfirstLV

  Size of logical volume myvg/myfirstLV changed from 1.00 GiB (256 extents) to 2.00 GiB (512 extents).

  Logical volume myvg/myfirstLV successfully resized.
现在查看LV的情况
# lvscan

  ACTIVE            ‘/dev/myvg/myfirstLV‘ [2.00 GiB] inherit

  ACTIVE            ‘/dev/centos/root‘ [10.00 GiB] inherit

  ACTIVE            ‘/dev/centos/home‘ [5.00 GiB] inherit

  ACTIVE            ‘/dev/centos/swap‘ [1.00 GiB] inherit
其容量已经增加到2G
原文:https://www.cnblogs.com/nuanyangyang/p/11300726.html