常用的模块
commond 基础指令模块
用于远程执行命令
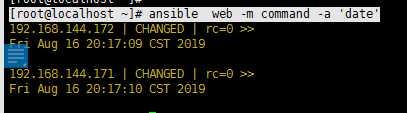
[root@localhost ~]# ansible  192.168.144.172 -m command -a ‘date‘
                                主机         参数  模块名 参数  指令
                                                     (模块的参数,用-a)

192.168.144.172 | CHANGED | rc=0 >>
Fri Aug 16 20:08:55 CST 2019
也可以使用组进行操作
[root@localhost ~]# ansible web -m command -a ‘date‘
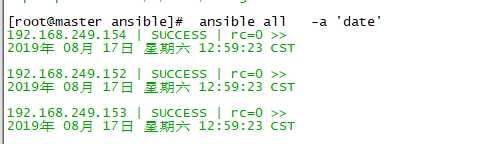
如果对所有的组进行操作,可以使会用all
ansible all -m command -a ‘date‘
command 是默认的模块,不指定的话。默认就是使用command的模块
ansible all -a ‘date‘
cron: 对远程主机进行计划任务。
可以使用
ansible-doc -s cron
查看参数
state 参数: present 安装 absent 移除
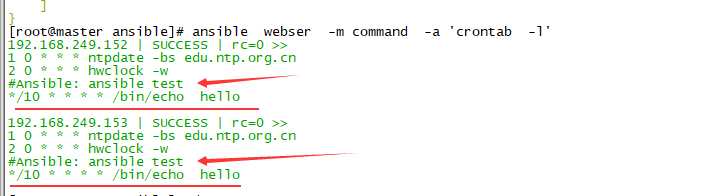
ansible  webser  -m cron    -a     ‘minute="*/10"        job="/bin/echo  hello"   name="ansible test"   state="present" ‘
          组名字     模块名  参数      执行时间(每10分钟执行一次)  执行的内容                任务的名字(必须写)     状态
                           这个的写法和 crontab一样。如果不在这边指明,默认就是*
看结果,已经成功了。同时我们可以看到 有任务名生成。。所以一定要个任务名。否则他无法生成。
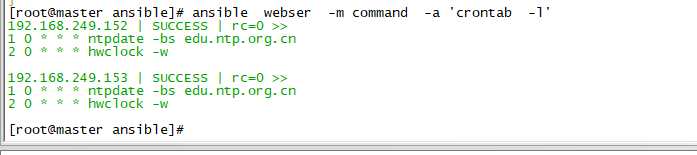
移除任务
ansible  webser  -m cron  -a ‘minute="*/10"    job="/bin/echo  hello" name="ansible test" state="absent" ‘
                                                                                            这边使用absent 即可
看结果,已经移除了
group 模块
查看,其实参数不多。
[root@master ~]# ansible-doc  -s   group
- name: Add or remove groups
  group:
      gid:                   # Optional `GID‘ to set for the group.
      name:                  # (required) Name of the group to manage.
      state:                 # Whether the group should be present or not on the remote host.
      system:                # If `yes‘, indicates that the group created is a system group.
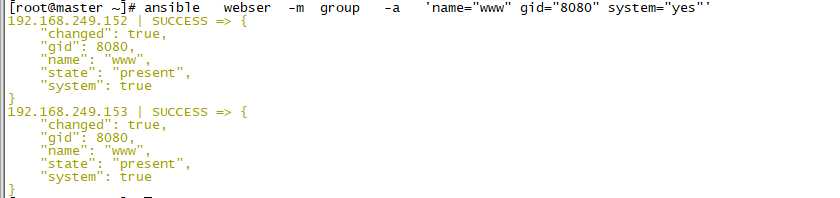
ansible   webser  -m  group   -a   ‘name="www" gid="8080" system="yes"‘
                                     组名         gid      是不是系统用户
查看信息,设置的东西。都反馈了 、
Use 模块
看下说明
ansible-doc -s user
可以和上面的group 模块配合
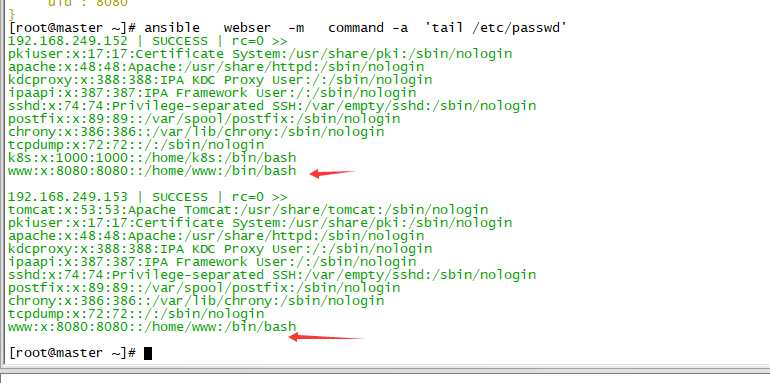
ansible   webser  -m  user   -a   ‘name="www" uid="8080" system="yes"  group="www"‘
                                    指定用户名    uid                     指定组
查看输出
[root@master ~]# ansible   webser  -m  user   -a   ‘name="www" uid="8080" system="yes"  group="www"‘
192.168.249.153 | SUCCESS => {
    "changed": true,
    "comment": "",
    "createhome": true,
    "group": 8080,                                        #组id
    "home": "/home/www",
    "name": "www",
    "shell": "/bin/bash",
    "state": "present",
    "system": true,                                       ## 系统用户
    "uid": 8080                                           ## uid

}
192.168.249.152 | SUCCESS => {
    "changed": true,
    "comment": "",
    "createhome": true,
    "group": 8080,
    "home": "/home/www",
    "name": "www",
    "shell": "/bin/bash",
    "state": "present",
    "system": true,
    "uid": 8080
}
查看结果, 有了
删除用户,就是加个state=absent 就行了。
ansible all -m user -a ‘name="user1" state="absent"‘
copy 模块
复制文件用的
查看参数
[root@master ~]# ansible-doc  -s copy
- name: Copies files to remote locations
  copy:
      attributes:            # Attributes the file or directory should have. To get supported flags look at the man page for `chattr‘ on the target system. This string should contain the attributes in the same order as the one
                               displayed by `lsattr‘.
      backup:                # Create a backup file including the timestamp information so you can get the original file back if you somehow clobbered it incorrectly.
      content:               # When used instead of `src‘, sets the contents of a file directly to the specified value. For anything advanced or with formatting also look at the template module.
      decrypt:               # This option controls the autodecryption of source files using vault.
      dest:                  # (required) Remote absolute path where the file should be copied to. If `src‘ is a directory, this must be a directory too. If `dest‘ is a nonexistent path and if either `dest‘ ends with "/" or `src‘ is a
                               directory, `dest‘ is created. If `src‘ and `dest‘ are files, the parent directory of `dest‘ isn‘t created: the task fails if it doesn‘t already exist.
      directory_mode:        # When doing a recursive copy set the mode for the directories. If this is not set we will use the system defaults. The mode is only set on directories which are newly created, and will not affect those
                               that already existed.
      follow:                # This flag indicates that filesystem links in the destination, if they exist, should be followed.
      force:                 # the default is `yes‘, which will replace the remote file when contents are different than the source. If `no‘, the file will only be transferred if the destination does not exist.
      group:                 # Name of the group that should own the file/directory, as would be fed to `chown‘.
      local_follow:          # This flag indicates that filesystem links in the source tree, if they exist, should be followed.
      mode:                  # Mode the file or directory should be. For those used to `/usr/bin/chmod‘ remember that modes are actually octal numbers (like 0644). Leaving off the leading zero will likely have unexpected results. As
                               of version 1.8, the mode may be specified as a symbolic mode (for example, `u+rwx‘ or `u=rw,g=r,o=r‘).
      owner:                 # Name of the user that should own the file/directory, as would be fed to `chown‘.
      remote_src:            # If `no‘, it will search for `src‘ at originating/master machine. If `yes‘ it will go to the remote/target machine for the `src‘. Default is `no‘. Currently `remote_src‘ does not support recursive
                               copying.
      selevel:               # Level part of the SELinux file context. This is the MLS/MCS attribute, sometimes known as the `range‘. `_default‘ feature works as for `seuser‘.
      serole:                # Role part of SELinux file context, `_default‘ feature works as for `seuser‘.
      setype:                # Type part of SELinux file context, `_default‘ feature works as for `seuser‘.
      seuser:                # User part of SELinux file context. Will default to system policy, if applicable. If set to `_default‘, it will use the `user‘ portion of the policy if available.
      src:                   # Local path to a file to copy to the remote server; can be absolute or relative. If path is a directory, it is copied recursively. In this case, if path ends with "/", only inside contents of that
                               directory are copied to destination. Otherwise, if it does not end with "/", the directory itself with all contents is copied. This behavior is similar to Rsync.
      unsafe_writes:         # Normally this module uses atomic operations to prevent data corruption or inconsistent reads from the target files, sometimes systems are configured or just broken in ways that prevent this. One example
                               are docker mounted files, they cannot be updated atomically and can only be done in an unsafe manner. This boolean option allows ansible to fall back to unsafe methods of
                               updating files for those cases in which you do not have any other choice. Be aware that this is subject to race conditions and can lead to data corruption.
      validate:              # The validation command to run before copying into place. The path to the file to validate is passed in via ‘%s‘ which must be present as in the example below. The command is passed securely so shell
                               features like expansion and pipes won‘t work.
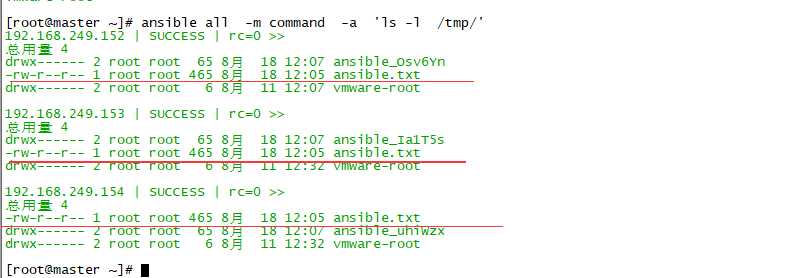
ansible all  -m copy  -a  ‘src=/etc/fstab  dest=/tmp/ansible.txt  owner=root mode=644 ‘
                            原始文件(绝对路劲)   目的文件(绝对路径)    所属用户    权限
验证查看,有了
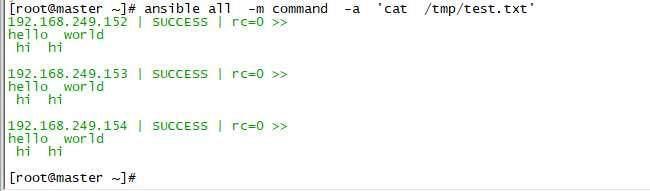
也可以直接使用content ,指定内容。
 ansible all  -m copy  -a  ‘content="hello  world\n hi  hi  "  dest=/tmp/test.txt  owner=root mode=644 ‘
                                   直接写内容,不指文件
查看结果, 已经有了。
原文:https://www.cnblogs.com/rockyricky/p/11371809.html