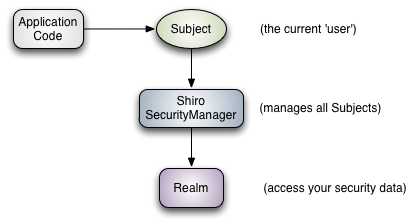
1.shiro介绍
shiro是一个Java的安全框架,功能强大且简单易用可执行登录认证、授权、会话管理和密码加密等,可用于保护任何应用程序--从命令行应用程序,移动应用程序到最大的Web和企业应用程序。
shiro有四个应用程序安全的四个基石:
同事shiro还提供了其他环境
Caching:缓存,确保安全操作保持快速高效。
web Support:web支持,可帮助轻松保护Web应用程序。
Concurrency:多线程、并发,支持多线程并发的应用程序。
Testing:测试,帮助编写单元和集成测试,并确保代码按预期受到保护。
Run as: 以某种身份运行,允许用户假定其他用户的身份的功能。
Remember Me:记住我,记住用户在会话中的身份,只需要在必要时登录
2.shiro流程分析
首先看一下官方给的图解:
大概过程就是:
这只是对shiro的一些简单分析,下面我将进一步对进行展开分析,包含部分代码。
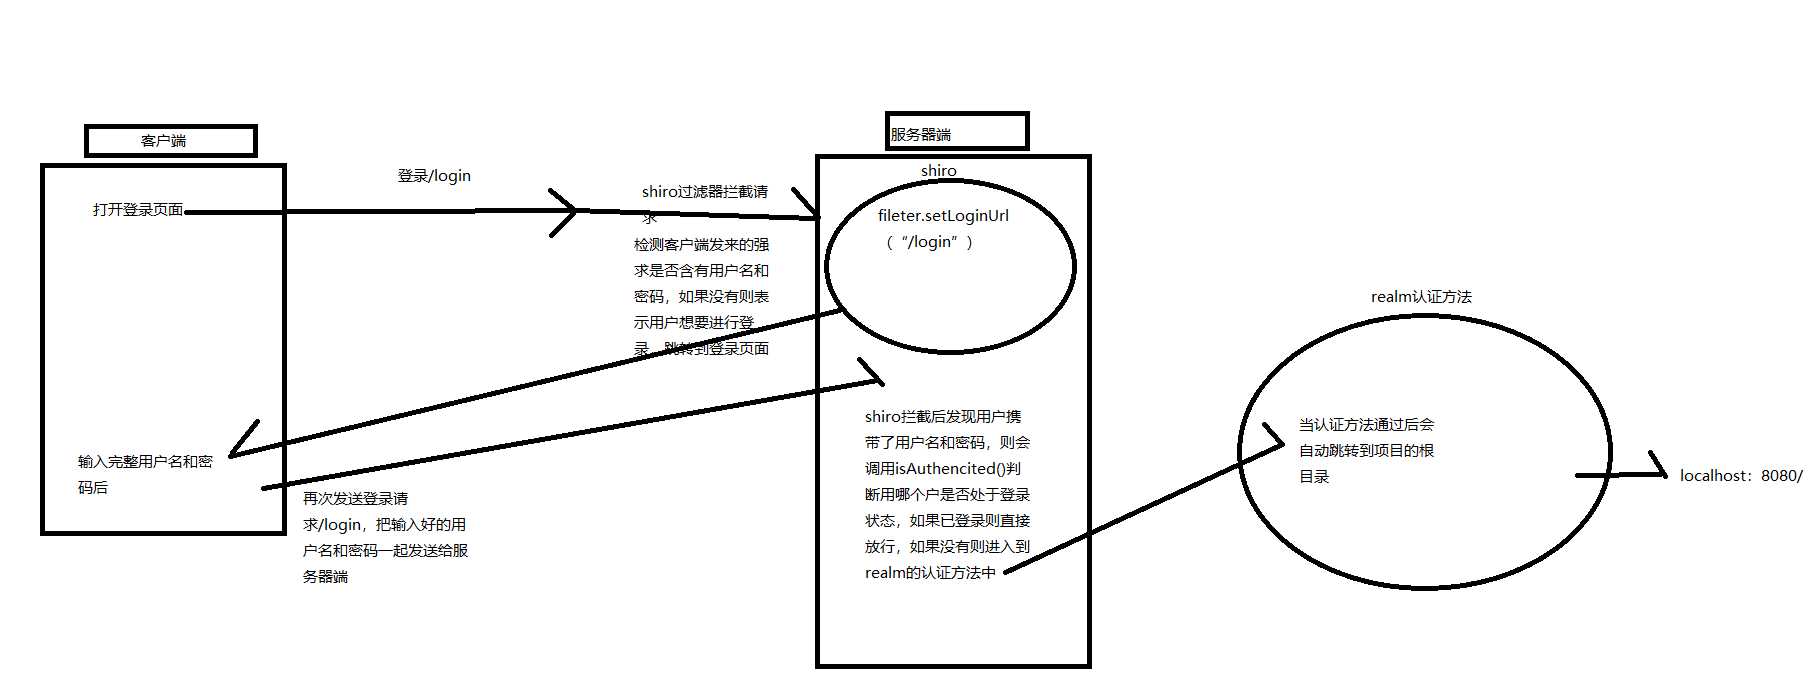
shiro的核心是过滤器,因此使用shiro进行功能实现时首先进行的应该是拦截。举个例子,当用户打开登录页面时会发送一个请求,此时的请求中没有用户名和密码,在进行认证前shiro会将此次请求拦截并检测请求是否携带用户名和密码,如果不带则跳转到登录页面让用户输入完整的用户名和密码,当用户输入完整的用户名和密码后发送登录请求,此时的请求中携带用户名和密码,当请求再次被shiro拦截时,shiro会检测到用户名和密码,然后shiro会调用isAuthencited()方法判断用户是否处于登录状态,如果是则直接放行,如果不是则会进入到realm认证方法中登录认证。下面是流程图:
接下来我们看看代码部分:
先创建一个的登录/login的控制器:
@Controller
public class LoginController {
    @RequestMapping("/login")
    public String login(){
        return "login";
    }
    @RequestMapping("/")
    public String home() {
        return "index";
    }
“/login”是我们拿到的登录路径用于跳转登录页面,“/”是根目录用于登陆成功后跳转测试展示页面(index),下面是用Java代码编写的shiro配置:
/**
 * @author :LXX
 * @description:
 */

@SpringBootConfiguration
public class ShiroConfig {
    /**
     * @description LifecycleBeanPostProcessor :表示把shiro的生命周期交给spring进行托管
     * 相当于在application.xml中配置的<bean id="lifecycleBeanProcessor" class="LifecycleProcessor></bean>
     * @return org.apache.shiro.spring.LifecycleBeanPostProcessor
     * @throws
     * @since
    */
    @Bean(name = "lifecycleBeanPostProcessor")
    public LifecycleBeanPostProcessor lifecycleBeanPostProcessor(){
        LifecycleBeanPostProcessor processor=new LifecycleBeanPostProcessor();
        return processor;
    }
    /**
     * @description
     * matcher.setHashAlgorithmName("MD5");根据名称设置密码的加密方式
     * matcher.setHashIterations(1024);设置加密次数
     * matcher.setStoredCredentialsHexEncoded(true);把用户所提交的密码转换成
16进制
     * @return org.apache.shiro.authc.credential.HashedCredentialsMatcher
     * @throws
     * @since
    */
    @Bean(name = "hashedCredentialsMatcher")
    public HashedCredentialsMatcher  hashedCredentialsMatcher(){
        HashedCredentialsMatcher matcher=new HashedCredentialsMatcher();
        matcher.setHashAlgorithmName("MD5");
        matcher.setHashIterations(1024);
        matcher.setStoredCredentialsHexEncoded(true);
        return matcher;
   }
   /**
    * @description
    * 配置了shiroRealm
    * 在application.xml中<bean id="密码加密"></bean>
    * @return com.lxx.shiro.realm.ShiroRealm
    * @throws
    * @since
   */
   @Bean(name="shiroRealm")
   @DependsOn("lifecycleBeanPostProcessor")
public ShiroRealm shiroRealm(){
        ShiroRealm shiroRealm=new ShiroRealm();
        //在shiro认证阶段,配置了密码加密
        shiroRealm.setCredentialsMatcher(hashedCredentialsMatcher());
        //在开发阶段不需要缓存
        //shiroRealm.setCacheManager(ehCacheManager());
        return shiroRealm;
}
/**
 * @description  配置shiro所使用的ehCacheManager
 * @return
 * @throws
 * @since
*/
@Bean(name="ehcacheManager")
@DependsOn("lifecycleBeanPostProcessor")
    public EhCacheManager ehCacheManager(){
       EhCacheManager ehCacheManager=new EhCacheManager();
       return ehCacheManager;
}
    /**
     * @description 创建securityManager对象 引入shiroRealm
     * @return org.apache.shiro.web.mgt.DefaultWebSecurityManager
     * @throws
     * @since
     */
@Bean(name = "securityManager")

    public DefaultWebSecurityManager securityManager(){
    DefaultWebSecurityManager securityManager=new DefaultWebSecurityManager();
    securityManager.setRealm(shiroRealm());
//    securityManager.setCacheManager(ehCacheManager());
return securityManager;
}
/**
 * @description shiro过滤器
 * @return
 * @throws
 * @since
*/
@Bean(name = "shiroFilter")
    public ShiroFilterFactoryBean shiroFilterFactoryBean(){
        ShiroFilterFactoryBean filterFactoryBean=new ShiroFilterFactoryBean();
        filterFactoryBean.setSecurityManager(securityManager());
        Map<String,String> filterChaubDefinitionMap=new LinkedHashMap<String, String>();
    /**
     *1.logout:退出当前登录用户
     * 2.anon:匿名可以访问
     * 3.authc:需要认证后所访问@ResquestMapping("/xxxx")
     *4.setLoginUrl():登陆的路径
     * 5.setSuccessUrl():登录成功后所需要跳转的路径
     * 6.setUnauthorizedUrl:没有权限所跳转的路径
     * 7./static/**=user:所有认证成功的用户可以访问的路径
     * 8./public/**=role["admin"]:当拥有admin角色的时候可以访问的路径
     * role["admin","user","book_manager"]:这三个要同时满足才可以访问
     * 9.permission
     */
    filterChaubDefinitionMap.put("/logout","logout");
    filterChaubDefinitionMap.put("/favicon.ico","anon");
    filterChaubDefinitionMap.put("/static/**","anon");
    filterChaubDefinitionMap.put("/**","authc");
    filterFactoryBean.setLoginUrl("/login");
    filterFactoryBean.setUnauthorizedUrl("/404");
    filterFactoryBean.setFilterChainDefinitionMap(filterChaubDefinitionMap);
    return filterFactoryBean;
}
/**
 * @description
 * @ConditionalOnMissingBean 条件注解 当找不到某一个bean的时候才会被加载
 * 在springboot的源码中拥有DefaultAdvisorAutoProxyCreator bean的配置
 * 在自己的配置中如果再次这个bean则会冲突报错利用这个注解可以避免冲突
 *
 * @return
 * @throws
 * @since
*/
@Bean
    @ConditionalOnMissingBean
    public DefaultAdvisorAutoProxyCreator defaultAdvisorAutoProxyCreator(){
    DefaultAdvisorAutoProxyCreator defaultAPP = new DefaultAdvisorAutoProxyCreator();
    defaultAPP.setProxyTargetClass(true);
    return defaultAPP;
}
/**
 * @description 授权源适配器
 * 源数据
 * @return
 * @throws
 * @since
*/
@Bean
    public AuthorizationAttributeSourceAdvisor authorizationAttributeSourceAdvisor(){
    AuthorizationAttributeSourceAdvisor aASA=new AuthorizationAttributeSourceAdvisor();
    aASA.setSecurityManager(securityManager());
    return aASA;
}
@Bean(name = "shiroDialect")
/**
 * @description thymeleaf所支持的shiro标签
 *  @return at.pollux.thymeleaf.shiro.dialect.ShiroDialect
 * @throws
 * @since
*/
    public ShiroDialect shiroDialect(){
    return new ShiroDialect();
}


}
接下来是realm的认证方法:
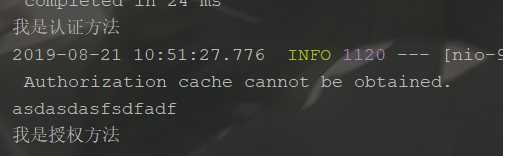
/**
 * @author :LXX
 * @description: 用户认证 授权
 * @modified By:
 * @version: $
 */

public class ShiroRealm extends AuthorizingRealm {
    @Autowired
    private UserService service;
    /**
 * @author LXX
 * @description 认证
 * @return org.apache.shiro.authc.AuthenticationInfo
 * @throws
 * @since
 */
@Override
protected AuthenticationInfo doGetAuthenticationInfo(AuthenticationToken token) throws AuthenticationException {
    System.out.println("我是认证方法");
    //1.获取用户信息(通过token获取)
   String username= (String) token.getPrincipal();
//   2.查询username是否存在
    Map<String, Object> resultMap =service.selectUsername(username);
//    3.判断是否查询到数据
    if(200 != (Integer) resultMap.get("code")){
        //从数据库并没有查到数据
//        4.抛出异常
throw new UnknownAccountException("用户不存在");
    }
    //5.从map中取出user对象
    User user = (User)resultMap.get("result");

    /**
     * SimpleAuthenticationInfo对象
     * 第一个参数 用户名/用户对象 username/user
     * 第二个参数:密码 password
     * 第三个参数 盐值 salt
     * 第四个参数 :当前realm的名字 this.getName
     *
     */
//    6.密码匹配
    SimpleAuthenticationInfo info=new SimpleAuthenticationInfo(user,user.getPassword(), ByteSource.Util.bytes(user.getSalt()+""),this.getName());
    Session session = SecurityUtils.getSubject().getSession();
//密码置空
    user.setPassword(null);
    session.setAttribute("user",user);
    return info;
}

@Override
    protected AuthorizationInfo doGetAuthorizationInfo(PrincipalCollection principal) {

    System.out.println("我是授权方法");
        return null;
    }
登录页面
<form action="login" method="post">
    username: <input type="text" name="username"/><br/>
    password: <input type="password" name="password"/><br/>
    <input type="submit" value="提交"/>
</form>
index页面
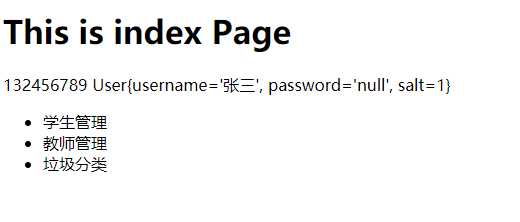
<!DOCTYPE html>
<html xmlns="http://www.w3.org/1999/xhtml"
      xmlns:th="http://www.thymeleaf.org"
      xmlns:sec="http://www.thymeleaf.org/thymeleaf-extras-springsecurity4"
      xmlns:shiro="http://www.pollix.at/thymeleaf/shiro">
<head>
    <meta charset="UTF-8">
    <title>index</title>
</head>
<body>
<h1>This is index Page</h1>
<shiro:guest>
    <h1>欢迎游客!</h1>
</shiro:guest>
<shiro:user>132456789</shiro:user>
<shiro:principal/>
<ul>

    <li>学生管理</li>
    <li>教师管理</li>
    <shiro:hasRole name="book_manager">
    <li>图书管理</li>
    </shiro:hasRole>
    <li>垃圾分类</li>
</ul>
</body>
</html>
然后运行项目入口类进行测试(数据库的密码应为加密过的),控制台结果如下:
页面结果如下:
到这里认证结束。下面是一些关于授权的:
从上边的index页面代码可以看到shiro标签,想要在html中使用这些标签需要在配置中开启thymeleaf支持,上稳定的代码中我们已经配置过:
shiro:guest 是游客登录后显示的界面。
shiro:user里边的的内容是登陆成功的用户都能看到的。
shiro:hasRole name=“roleName” 是拥有某个角色权限才能看到的内容,像我的登陆的是张三但是他没有book_manage这个角色,所以登陆成功后页面没有显示图书管理这个选项。
shiro:pincipal 在我写配置的时候有这样一行代码:
SimpleAuthenticationInfo info=new SimpleAuthenticationInfo(user,user.getPassword(), ByteSource.Util.bytes(user.getSalt()+""),this.getName());
可以看到SimpleAuthenticationnInfo有几个参数,如果第一个是user则标签显示的是整个user信息,这也是为什么需要密码置空的原因,如果将user替换为user.getUserName()则只显示当前登录的用户名;
原文:https://www.cnblogs.com/lxx61/p/11387630.html