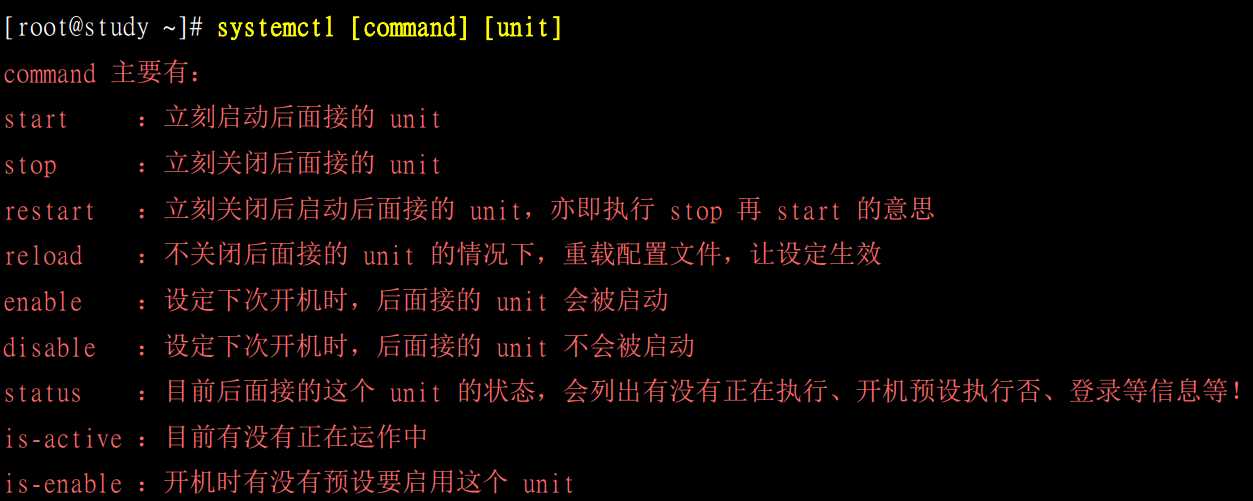
systemctl
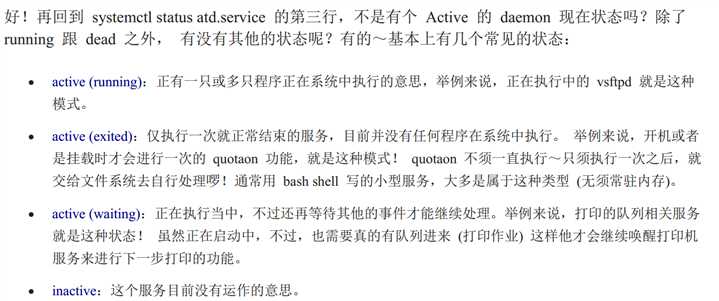
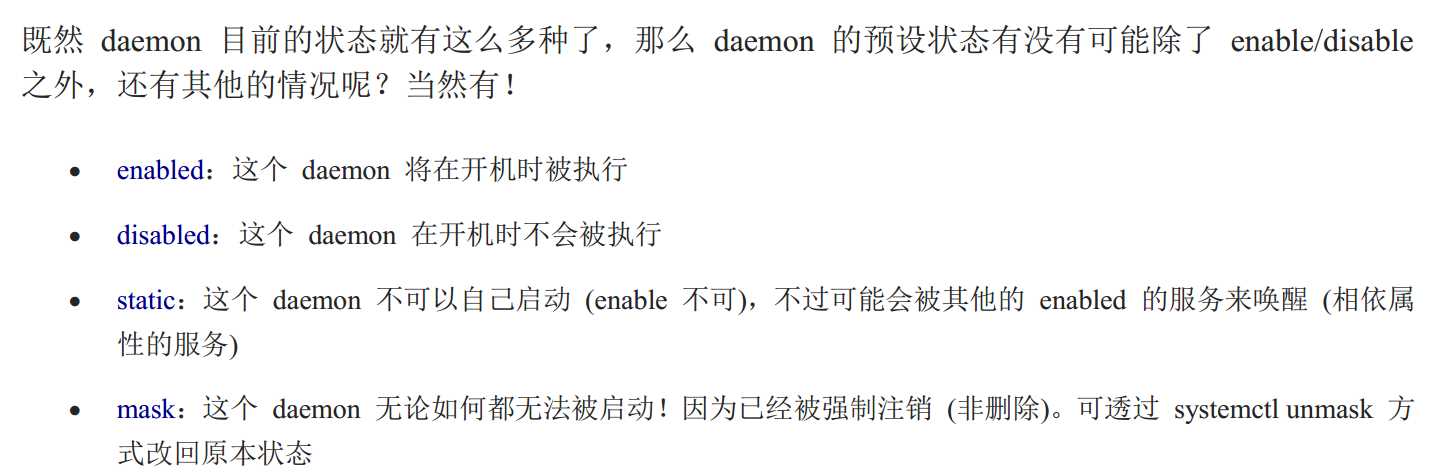
[root@localhost ~]# systemctl status atd.service                                                             #查询服务状态
● atd.service - Job spooling tools
   Loaded: loaded (/usr/lib/systemd/system/atd.service; enabled; vendor preset: enabled)
   Active: active (running) since 一 2019-08-26 09:40:41 CST; 2 days ago                      #服务状态是running
 Main PID: 49782 (atd)
    Tasks: 1
   CGroup: /system.slice/atd.service
           └─49782 /usr/sbin/atd -f

8月 26 09:40:41 localhost.localdomain systemd[1]: Started Job spooling tools.
8月 26 10:36:00 localhost.localdomain atd[53278]: Starting job 3 (a00003018e745c) for user ‘root‘ (0)
8月 26 10:54:42 localhost.localdomain atd[54730]: Starting job 4 (b00004018e7469) for user ‘root‘ (0)
[root@localhost ~]# systemctl stop atd.service                                      #关闭服务
[root@localhost ~]# systemctl status atd.service
● atd.service - Job spooling tools
   Loaded: loaded (/usr/lib/systemd/system/atd.service; enabled; vendor preset: enabled)
   Active: inactive (dead) since 三 2019-08-28 11:01:56 CST; 10s ago                         #服务状态为dead
  Process: 49782 ExecStart=/usr/sbin/atd -f $OPTS (code=exited, status=0/SUCCESS)
 Main PID: 49782 (code=exited, status=0/SUCCESS)

8月 26 09:40:41 localhost.localdomain systemd[1]: Started Job spooling tools.
8月 26 10:36:00 localhost.localdomain atd[53278]: Starting job 3 (a00003018e745c) for user ‘root‘ (0)
8月 26 10:54:42 localhost.localdomain atd[54730]: Starting job 4 (b00004018e7469) for user ‘root‘ (0)
8月 28 11:01:56 localhost.localdomain systemd[1]: Stopping Job spooling tools...
8月 28 11:01:56 localhost.localdomain systemd[1]: Stopped Job spooling tools.
[root@localhost ~]# systemctl start atd.service
[root@localhost ~]# systemctl status atd.service
● atd.service - Job spooling tools
   Loaded: loaded (/usr/lib/systemd/system/atd.service; enabled; vendor preset: enabled)
   Active: active (running) since 三 2019-08-28 11:02:26 CST; 8s ago
 Main PID: 92576 (atd)
    Tasks: 1
   CGroup: /system.slice/atd.service
           └─92576 /usr/sbin/atd -f

8月 28 11:02:26 localhost.localdomain systemd[1]: Started Job spooling tools.
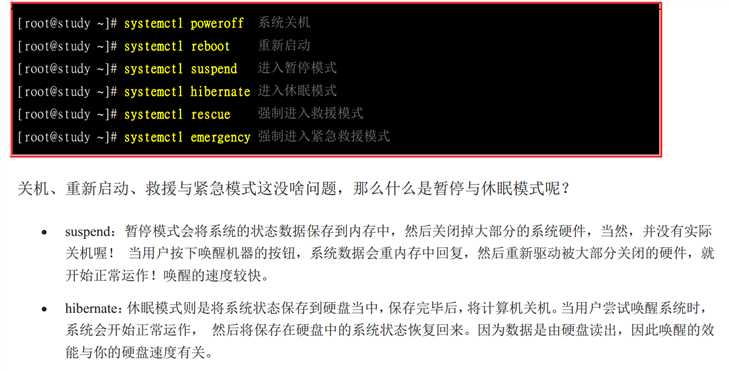
同时运行两个相同但不同端口的服务。该如何做?
鸟哥书中,用vsftpd来做例子。首先更改vsfptd的端口为555.这里我偷懒,前面的例子没有做。结果按照步骤来操作的时候,死活也弄不通,总是failed。。。。崩溃中,在看书,才发现,里面有一句,上一章我们将vsftpd的端口号改成555....好吧。。。去找前一章的相关例子
首先需要更改配置文件 /etc/vsftpd这个文件夹中 service服务在 /etc/systemd/system这个文件夹中
我们找到vsftpd.conf这个配置文件后,在后面加上了 listen_port=555这个端口号。但是我们restart提示,failed。。。。
[root@localhost ~]# systemctl restart vsftpd
Job for vsftpd.service failed because the control process exited with error code. See "systemctl status vsftpd.service" and "journalctl -xe" for details.
它让你查看 journalctl -xe这个命令来查看失败信息,如下(鸟哥文中,让你用/var/log/messages 来定位)
6985]: [system] Successfully activated service ‘org.fedoraproject.Setroubleshootd‘
ubleshoot[109349]: SELinux is preventing /usr/sbin/vsftpd from name_bind access on the
n[109349]: SELinux is preventing /usr/sbin/vsftpd from name_bind access on the tcp_sock
***** Plugin bind_ports (92.2 confidence) suggests ********************* #这就是建议,能解决的概率是92.2,肯定就是这个了
If you want to allow /usr/sbin/vsftpd to bind to network port 555
Then you need to modify the port type.
Do
# semanage port -a -t PORT_TYPE -p tcp 555 #这里截取的时候截取不全,就不弄了,就是列了很多type类型
where PORT_TYPE is one of the following: certmaster_port_t, cluster_por
***** Plugin catchall_boolean (7.83 confidence) suggests ***************
If you want to allow nis to enabled
Then you must tell SELinux about this by enabling the ‘nis_enabled‘ boolean
Do
setsebool -P nis_enabled 1
***** Plugin catchall (1.41 confidence) suggests ***********************
If you believe that vsftpd should be allowed name_bind access on the port 5
Then you should report this as a bug.
You can generate a local policy module to allow this access.
鸟哥的/messages定位
[root@localhost system]# grep sealert /var/log/messages     #首先通过messages找到编号,就是后面那一堆1ce60b58-bcbf-498f-ad42-8512d83f0e61
Aug 28 15:09:32 localhost setroubleshoot: SELinux is preventing /usr/sbin/vsftpd from name_bind access on the tcp_socket port 555. For complete SELinux messages run: sealert -l 1ce60b58-bcbf-498f-ad42-8512d83f0e61
Aug 28 15:13:49 localhost setroubleshoot: SELinux is preventing /usr/sbin/vsftpd from name_bind access on the tcp_socket port 555. For complete SELinux messages run: sealert -l 1ce60b58-bcbf-498f-ad42-8512d83f0e61
Aug 28 15:19:49 localhost setroubleshoot: SELinux is preventing /usr/sbin/vsftpd from name_bind access on the tcp_socket port 555. For complete SELinux messages run: sealert -l 1ce60b58-bcbf-498f-ad42-8512d83f0e61
Aug 28 15:23:37 localhost setroubleshoot: SELinux is preventing /usr/sbin/vsftpd from name_bind access on the tcp_socket port 555. For complete SELinux messages run: sealert -l 1ce60b58-bcbf-498f-ad42-8512d83f0e61
Aug 28 15:25:02 localhost setroubleshoot: SELinux is preventing /usr/sbin/vsftpd from name_bind access on the tcp_socket port 555. For complete SELinux messages run: sealert -l 1ce60b58-bcbf-498f-ad42-8512d83f0e61
Aug 28 15:25:30 localhost setroubleshoot: SELinux is preventing /usr/sbin/vsftpd from name_bind access on the tcp_socket port 555. For complete SELinux messages run: sealert -l 1ce60b58-bcbf-498f-ad42-8512d83f0e61


[root@localhost system]# sealert -l  1ce60b58-bcbf-498f-ad42-8512d83f0e61           #然后通过这个编号,再来sealert -l一下,就能看到详细信息了,如下图。是不是跟刚才那个    journalctl -xe 的结果是类似的?不过这个中文,那个英文。
SELinux is preventing /usr/sbin/vsftpd from name_bind access on the tcp_socket port 555.

*****  插件 bind_ports (92.2 置信度) 建议  ******************************************

If you want to allow /usr/sbin/vsftpd to bind to network port 555
Then you need to modify the port type.
Do
# semanage port -a -t PORT_TYPE -p tcp 555
    其中 PORT_TYPE 是以下之一:certmaster_port_t, cluster_port_t, ephemeral_port_t, ftp_data_port_t, ftp_port_t, hadoop_datanode_port_t, hplip_port_t, isns_port_t, port_t, postgrey_port_t, unreserved_port_t。#这里就是上一张图缺失的类型列表

*****  插件 catchall_boolean (7.83 置信度) 建议  ************************************

If you want to allow nis to enabled
Then 必须启用 ‘nis_enabled‘ 布尔值告知 SELinux 此情况。

Do
setsebool -P nis_enabled 1

*****  插件 catchall (1.41 置信度) 建议  ********************************************

If you believe that vsftpd should be allowed name_bind access on the port 555 tcp_socket by default.
Then 应该将这个情况作为 bug 报告。
可以生成本地策略模块以允许此访问。
Do
allow this access for now by executing:
# ausearch -c ‘vsftpd‘ --raw | audit2allow -M my-vsftpd
# semodule -i my-vsftpd.pp


更多信息:
源环境 (Context)                 system_u:system_r:ftpd_t:s0-s0:c0.c1023
目标环境                          system_u:object_r:hi_reserved_port_t:s0
目标对象                          port 555 [ tcp_socket ]
源                             vsftpd
源路径                           /usr/sbin/vsftpd
端口                            555
主机                            localhost.localdomain
源 RPM 软件包
目标 RPM 软件包
策略 RPM                        selinux-policy-3.13.1-229.el7.noarch
Selinux 已启用                   True
策略类型                          targeted
强制模式                          Enforcing
主机名                           localhost.localdomain
平台                            Linux localhost.localdomain 3.10.0-957.el7.x86_64
                              #1 SMP Thu Nov 8 23:39:32 UTC 2018 x86_64 x86_64
警报计数                          6
第一个                           2019-08-28 15:09:30 CST
最后一个                          2019-08-28 15:25:26 CST
本地 ID                         1ce60b58-bcbf-498f-ad42-8512d83f0e61

原始核查信息
type=AVC msg=audit(1566977126.934:14578): avc:  denied  { name_bind } for  pid=109344 comm="vsftpd" src=555 scontext=system_u:system_r:ftpd_t:s0-s0:c0.c1023 tcontext=system_u:object_r:hi_reserved_port_t:s0 tclass=tcp_socket permissive=0


Hash: vsftpd,ftpd_t,hi_reserved_port_t,tcp_socket,name_bind
接着我们根据他的提示来修改就OK了
semanage port -a -t ftp_port_t -p tcp 555 然后在重启一下,netstat -tlnp一下就看到了
[root@localhost ~]# netstat -tlnp
Active Internet connections (only servers)
Proto Recv-Q Send-Q Local Address Foreign Address State PID/Program name
tcp 0 0 0.0.0.0:111 0.0.0.0:* LISTEN 1/systemd
tcp 0 0 0.0.0.0:6000 0.0.0.0:* LISTEN 8138/X
tcp 0 0 192.168.122.1:53 0.0.0.0:* LISTEN 8598/dnsmasq
tcp 0 0 0.0.0.0:22 0.0.0.0:* LISTEN 7675/sshd
tcp 0 0 127.0.0.1:631 0.0.0.0:* LISTEN 94257/cupsd
tcp 0 0 127.0.0.1:25 0.0.0.0:* LISTEN 8037/master
tcp6 0 0 :::555 :::* LISTEN 109849/vsftpd #这里,看到了么?端口已经改成了555
tcp6 0 0 :::111 :::* LISTEN 1/systemd
tcp6 0 0 :::6000 :::* LISTEN 8138/X
tcp6 0 0 :::22 :::* LISTEN 7675/sshd
tcp6 0 0 ::1:631 :::* LISTEN 94257/cupsd
tcp6 0 0 ::1:25 :::* LISTEN 8037/master
剩下的,就是两个端口同时运行的问题了。复制conf,复制service,然后重启,开机启动,就OK了
[root@localhost system]# cp vsftpd.conf vsftpd2.conf
然后vim ,在vsftpd中,将端口号,注释掉。就是使用默认端口。复制service
首先要进入目录,然后cp
[root@localhost system]# cd /etc/systemd/system
[root@localhost system]# cp /usr/lib/systemd/system/vsftpd.service vsftpd2.service
然后更改vsftpd2.servcie的配置,
[Unit]
Description=Vsftpd second ftp daemon #更改一下这个,描述改一下,便于识别
After=network.target
[Service]
Type=forking
ExecStart=/usr/sbin/vsftpd /etc/vsftpd/vsftpd.conf /etc/vsftpd/vsftpd2.conf #将2号配置文件写入到servcie中
[Install]
WantedBy=multi-user.target
到这里基本上具体的工作就完成了。剩下的就是重载,重启,开机启动,查看
[root@localhost system]# systemctl daemon-reload #重载
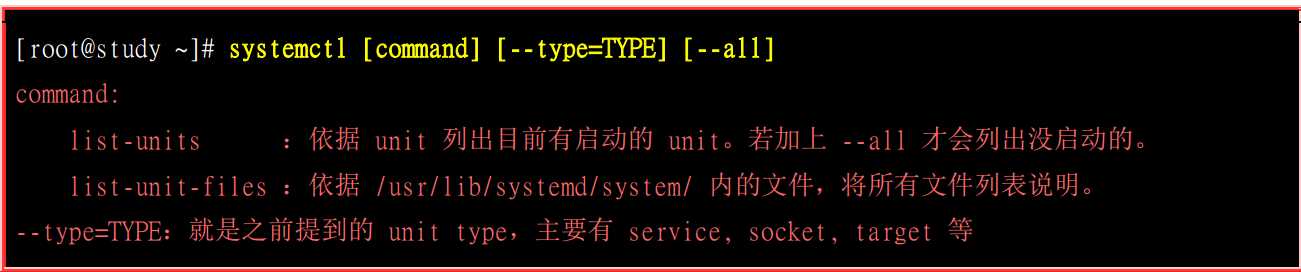
[root@localhost system]# systemctl list-unit-files --all | grep vsftpd #查看vsftpd的相关服务信息
vsftpd.service enabled
vsftpd2.service enabled #默认是disabled,这里是我重新copy的,已经enable,所以现实是enabled
vsftpd@.service disabled
vsftpd.target disabled
[root@localhost system]# systemctl status vsftpd2.service #查看服务2的状态
● vsftpd2.service - Vsftpd second ftp daemon
Loaded: loaded (/etc/systemd/system/vsftpd2.service; enabled; vendor preset: disabled)
Active: active (running) since 三 2019-08-28 15:34:24 CST; 42min ago
Main PID: 110076 (vsftpd)
CGroup: /system.slice/vsftpd2.service
└─110076 /usr/sbin/vsftpd /etc/vsftpd/vsftpd.conf /etc/vsftpd/vsftpd2.conf
8月 28 15:34:24 localhost.localdomain systemd[1]: Starting Vsftpd second ftp daemon...
8月 28 15:34:24 localhost.localdomain systemd[1]: Started Vsftpd second ftp daemon.
[root@localhost system]# systemctl restart vsftpd.service vsftpd2.service #重启服务
[root@localhost system]# systemctl enable vsftpd.service vsftpd2.servcie #设置开机启动,这里我字母写错了,看出来了么
Failed to execute operation: No such file or directory
[root@localhost system]# systemctl enable vsftpd.service vsftpd2.service#这是改完之后的,不认真真看不出来
[root@localhost system]# systemctl status vsftpd.service vsftpd2.service#查看状态
● vsftpd.service - Vsftpd ftp daemon
Loaded: loaded (/usr/lib/systemd/system/vsftpd.service; enabled; vendor preset: disabled)
Active: active (running) since 三 2019-08-28 16:17:14 CST; 35s ago
Main PID: 112853 (vsftpd)
CGroup: /system.slice/vsftpd.service
└─112853 /usr/sbin/vsftpd /etc/vsftpd/vsftpd.conf
8月 28 16:17:14 localhost.localdomain systemd[1]: Starting Vsftpd ftp daemon...
8月 28 16:17:14 localhost.localdomain systemd[1]: Started Vsftpd ftp daemon.
● vsftpd2.service - Vsftpd second ftp daemon
Loaded: loaded (/etc/systemd/system/vsftpd2.service; enabled; vendor preset: disabled)
Active: active (running) since 三 2019-08-28 16:17:14 CST; 35s ago
Main PID: 112856 (vsftpd)
CGroup: /system.slice/vsftpd2.service
└─112856 /usr/sbin/vsftpd /etc/vsftpd/vsftpd.conf /etc/vsftpd/vsftpd2.conf
8月 28 16:17:14 localhost.localdomain systemd[1]: Starting Vsftpd second ftp daemon...
8月 28 16:17:14 localhost.localdomain systemd[1]: Started Vsftpd second ftp daemon.
[root@localhost system]# netstat -ntlp #查看一下信息
Active Internet connections (only servers)
Proto Recv-Q Send-Q Local Address Foreign Address State PID/Program name
tcp 0 0 0.0.0.0:111 0.0.0.0:* LISTEN 1/systemd
tcp 0 0 0.0.0.0:6000 0.0.0.0:* LISTEN 8138/X
tcp 0 0 192.168.122.1:53 0.0.0.0:* LISTEN 8598/dnsmasq
tcp 0 0 0.0.0.0:22 0.0.0.0:* LISTEN 7675/sshd
tcp 0 0 127.0.0.1:631 0.0.0.0:* LISTEN 94257/cupsd
tcp 0 0 127.0.0.1:25 0.0.0.0:* LISTEN 8037/master
tcp6 0 0 :::555 :::* LISTEN 112856/vsftpd #555端口的vsftpd
tcp6 0 0 :::111 :::* LISTEN 1/systemd
tcp6 0 0 :::6000 :::* LISTEN 8138/X
tcp6 0 0 :::21 :::* LISTEN 112853/vsftpd #默认端口的vsftpd
tcp6 0 0 :::22 :::* LISTEN 7675/sshd
tcp6 0 0 ::1:631 :::* LISTEN 94257/cupsd
tcp6 0 0 ::1:25 :::* LISTEN 8037/master
多重的重复设定
就是要重复设置的指令,例如上例子中的,多端口的vsftp就是一个例子,还有书中提到的getty,多用户登录
从文中的意思就是,所有在/usr/lib/systemd/system文件夹中,带有@的服务,都可以直接用 systemctl start xxxxxx.service来启动
我们进入/usr/lib/systemd/system文件夹中,然后ls | grep @ 来查看所有带@符号的服务
[root@localhost system]# ls | grep @
anaconda-shell@.service
anaconda-tmux@.service
autovt@.service
chrony-dnssrv@.service
chrony-dnssrv@.timer
clean-mount-point@.service
configure-printer@.service
container-getty@.service
getty@.service              #多用户的例子,就是书中的例子
lvm2-pvscan@.service
mdadm-grow-continue@.service
mdadm-last-resort@.service
mdadm-last-resort@.timer
mdmon@.service
rdma-load-modules@.service
rsyncd@.service
saned@.service
selinux-policy-migrate-local-changes@.service
serial-getty@.service
sshd@.service
systemd-backlight@.service
systemd-fsck@.service
systemd-hibernate-resume@.service
systemd-nspawn@.service
systemd-rfkill@.service
teamd@.service
usb_modeswitch@.service
vsftpd@.service                #我们要用的例子
wacom-inputattach@.service
[root@localhost system]#
上面的这些服务,都可以在更改配置文件后,直接起动。例如 vsftp。下面我们如果要开启 一个6666端口的vsftp服务该如何呢?
首先修改配置文件,然后直接start就可以,试试看
[root@localhost system]# cd /etc/vsftpd
[root@localhost vsftpd]# ls
ftpusers  user_list  vsftpd2.conf  vsftpd.conf  vsftpd_conf_migrate.sh
[root@localhost vsftpd]# cp vsftpd.conf vsftpd3.conf  #创建一个新的配置文件vsftpd3.conf
[root@localhost vsftpd]# ls
ftpusers  user_list  vsftpd2.conf  vsftpd3.conf  vsftpd.conf  vsftpd_conf_migrate.sh
[root@localhost vsftpd]# vim vsftpd3.conf #修改他,然后将端口更改为6666
# Example config file /etc/vsftpd/vsftpd.conf
#
# The default compiled in settings are fairly paranoid. This sample file
# loosens things up a bit, to make the ftp daemon more usable.
# Please see vsftpd.conf.5 for all compiled in defaults.
#
# READ THIS: This example file is NOT an exhaustive list of vsftpd options.
# Please read the vsftpd.conf.5 manual page to get a full idea of vsftpd‘s
# capabilities.
#
# Allow anonymous FTP? (Beware - allowed by default if you comment this out).
anonymous_enable=YES
#
# Uncomment this to allow local users to log in.
# When SELinux is enforcing check for SE bool ftp_home_dir
local_enable=YES
#
# Uncomment this to enable any form of FTP write command.
write_enable=YES
#
# Default umask for local users is 077. You may wish to change this to 022,
# if your users expect that (022 is used by most other ftpd‘s)
local_umask=022
#
# Uncomment this to allow the anonymous FTP user to upload files. This only
# has an effect if the above global write enable is activated. Also, you will
# obviously need to create a directory writable by the FTP user.
# When SELinux is enforcing check for SE bool allow_ftpd_anon_write, allow_ftpd_full_access
#anon_upload_enable=YES
#
# Uncomment this if you want the anonymous FTP user to be able to create
# new directories.
#anon_mkdir_write_enable=YES
#
# Activate directory messages - messages given to remote users when they
# go into a certain directory.
dirmessage_enable=YES
#
# Activate logging of uploads/downloads.
xferlog_enable=YES
#
# Make sure PORT transfer connections originate from port 20 (ftp-data).
connect_from_port_20=YES
#
# If you want, you can arrange for uploaded anonymous files to be owned by
# a different user. Note! Using "root" for uploaded files is not
# recommended!
#chown_uploads=YES
#chown_username=whoever
#
# You may override where the log file goes if you like. The default is shown
# below.
#xferlog_file=/var/log/xferlog
#
# If you want, you can have your log file in standard ftpd xferlog format.
# Note that the default log file location is /var/log/xferlog in this case.
xferlog_std_format=YES
#
# You may change the default value for timing out an idle session.
"vsftpd3.conf" 129L, 5133C                                                                                                                                                                                                1,1          顶端
# however, may confuse older FTP clients.
#async_abor_enable=YES
#
# By default the server will pretend to allow ASCII mode but in fact ignore
# the request. Turn on the below options to have the server actually do ASCII
# mangling on files when in ASCII mode. The vsftpd.conf(5) man page explains
# the behaviour when these options are disabled.
# Beware that on some FTP servers, ASCII support allows a denial of service
# attack (DoS) via the command "SIZE /big/file" in ASCII mode. vsftpd
# predicted this attack and has always been safe, reporting the size of the
# raw file.
# ASCII mangling is a horrible feature of the protocol.
#ascii_upload_enable=YES
#ascii_download_enable=YES
#
# You may fully customise the login banner string:
#ftpd_banner=Welcome to blah FTP service.
#
# You may specify a file of disallowed anonymous e-mail addresses. Apparently
# useful for combatting certain DoS attacks.
#deny_email_enable=YES
# (default follows)
#banned_email_file=/etc/vsftpd/banned_emails
#
# You may specify an explicit list of local users to chroot() to their home
# directory. If chroot_local_user is YES, then this list becomes a list of
# users to NOT chroot().
# (Warning! chroot‘ing can be very dangerous. If using chroot, make sure that
# the user does not have write access to the top level directory within the
# chroot)
#chroot_local_user=YES
#chroot_list_enable=YES
# (default follows)
#chroot_list_file=/etc/vsftpd/chroot_list
#
# You may activate the "-R" option to the builtin ls. This is disabled by
# default to avoid remote users being able to cause excessive I/O on large
# sites. However, some broken FTP clients such as "ncftp" and "mirror" assume
# the presence of the "-R" option, so there is a strong case for enabling it.
#ls_recurse_enable=YES
#
# When "listen" directive is enabled, vsftpd runs in standalone mode and
# listens on IPv4 sockets. This directive cannot be used in conjunction
# with the listen_ipv6 directive.
listen=NO
#
# This directive enables listening on IPv6 sockets. By default, listening
# on the IPv6 "any" address (::) will accept connections from both IPv6
# and IPv4 clients. It is not necessary to listen on *both* IPv4 and IPv6
# sockets. If you want that (perhaps because you want to listen on specific
# addresses) then you must run two copies of vsftpd with two configuration
# files.
# Make sure, that one of the listen options is commented !!
listen_ipv6=YES

pam_service_name=vsftpd
userlist_enable=YES
tcp_wrappers=YES
listen_port=6666        #更改端口为6666
"vsftpd3.conf" 129L, 5133C 已写入
[root@localhost vsftpd]# systemctl start vsftp@vsftp3.service
Failed to start vsftp@vsftp3.service: Unit not found.
[root@localhost vsftpd]# systemctl start vsftp@vsftpd3.service
Failed to start vsftp@vsftpd3.service: Unit not found.
[root@localhost vsftpd]# systemctl start vsftpd@vsftpd3.service    #我们重启服务,前面的vsftpd就是我们在前面/usr/lib/systemd/system中的带@的服务。后面的vsftpd3就是你改的配置文件的名字对应的服务

[root@localhost vsftpd]# netstat -tlnp
Active Internet connections (only servers)
Proto Recv-Q Send-Q Local Address           Foreign Address         State       PID/Program name
tcp        0      0 0.0.0.0:111             0.0.0.0:*               LISTEN      1/systemd
tcp        0      0 0.0.0.0:6000            0.0.0.0:*               LISTEN      8138/X
tcp        0      0 192.168.122.1:53        0.0.0.0:*               LISTEN      8598/dnsmasq
tcp        0      0 0.0.0.0:22              0.0.0.0:*               LISTEN      7675/sshd
tcp        0      0 127.0.0.1:631           0.0.0.0:*               LISTEN      94257/cupsd
tcp        0      0 127.0.0.1:25            0.0.0.0:*               LISTEN      8037/master
tcp6       0      0 :::6666                 :::*                    LISTEN      116405/vsftpd   #看到了么?直接就OK了。。。。是不是很简单,是不是比刚才那么改简单?但是要这样做的根本就是要有对应的@服务才行,否则你还是要。。。。。
tcp6       0      0 :::555                  :::*                    LISTEN      112856/vsftpd
tcp6       0      0 :::111                  :::*                    LISTEN      1/systemd
tcp6       0      0 :::6000                 :::*                    LISTEN      8138/X
tcp6       0      0 :::21                   :::*                    LISTEN      112853/vsftpd
tcp6       0      0 :::22                   :::*                    LISTEN      7675/sshd
tcp6       0      0 ::1:631                 :::*                    LISTEN      94257/cupsd
tcp6       0      0 ::1:25                  :::*                    LISTEN      8037/master
重点来了。做我们自己的服务,有意思喽。我喜欢这玩意。书中做一个自动备份系统的服务,我们来敲一遍
原文:https://www.cnblogs.com/Lonelychampion/p/11425297.html