加载数据库驱动程序 → 建立数据库连接 Connection → 创建执行 SQL 的语句
Statement → 处理执行结果 ResultSet → 释放资源
1.1MySQL 驱动
https://dev.mysql.com/downloads/connector/j/
由于我的MySQL是8.0.17的,所以要安装8.0的JDBC;
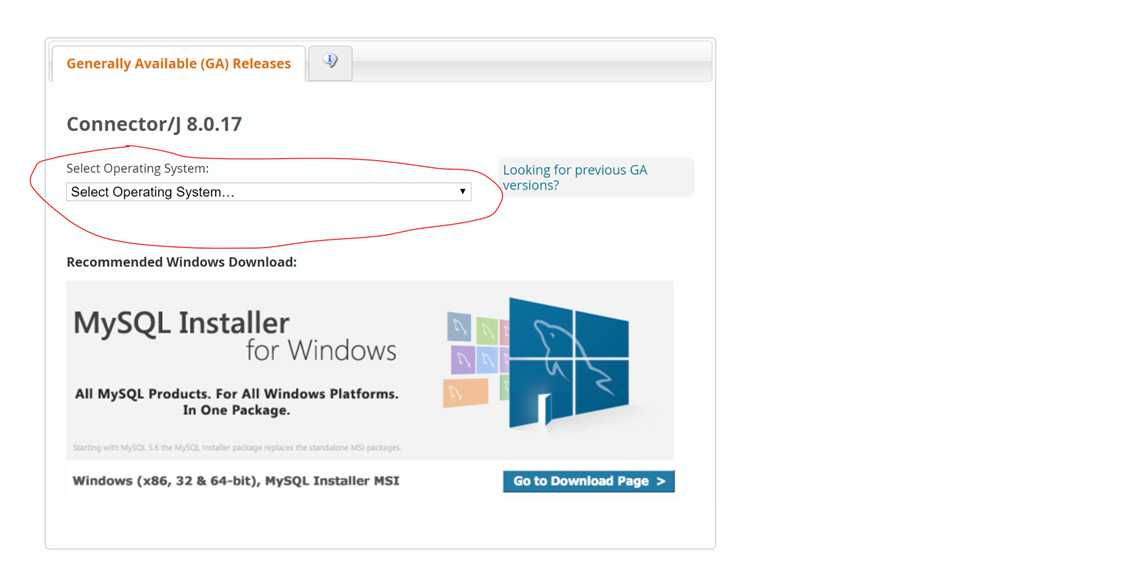
我们选择platform independent(独立于平台), 然后选择.ZIP Archive格式即可;
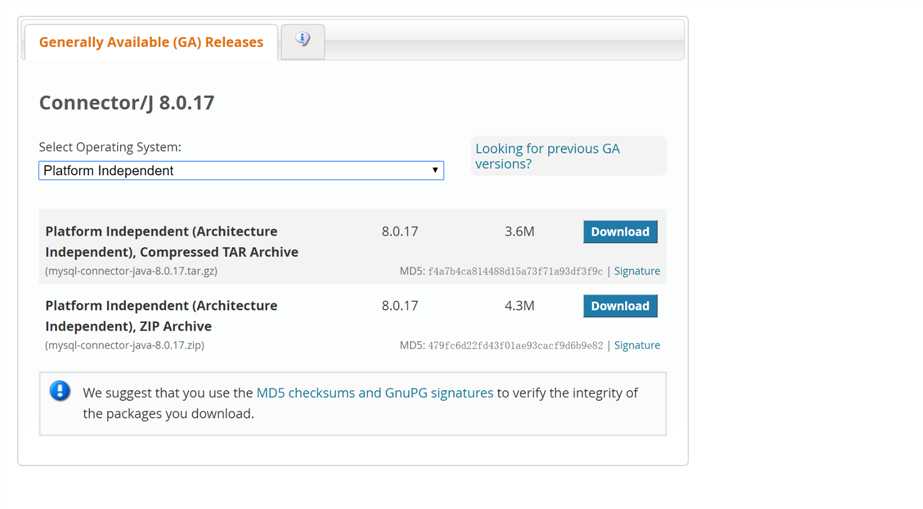
下载完成后, 我们把jar包提取出来, 放到eclipse的项目中的lib文件夹, 然后build path就可以使用JDBC了!

//注册驱动(通过反射,调用数据库驱动类;)
//获取连接
"jdbc:数据库类型://数据库存储位置:数据库端口号/连接哪一个数据库?数据库编码格式", "用户名", "密码"
"jdbc:mysql://localhost:3306/test2?useUnicode=true&characterEncoding=utf-8&useSSL=false&serverTimezone =GMT","root"."root"
//执行 SQL
//释放资源

Statement 对象修改表中的数据
4.1代码
//更新 departments 表中的 department_id 为 6 的数据,将部门名称修改为教学部,location_id 修改为 6
public void updateDempartments(String
department_name,int location_id,int department_id){
Connection conn = null;
Statement state = null;
try{
Class.forName("com.mysql.jdbc.Driver");
conn
=DriverManager.getConnection("jdbc:mysql://localhost:
3306/bjsxt?useUnicode=true&characterEncoding=utf-8",
"root", "root");
state = conn.createStatement();
String sql = "update departments d set
d.department_name = ‘"+department_name+"‘,d.location_id
= "+location_id+" where d.department_id
="+department_id;
int flag = state.executeUpdate(sql);
System.out.println(flag);
}catch(Exception e){
e.printStackTrace();
}finally{
if(state != null){try {
state.close();
} catch (SQLException e) {
// TODO Auto-generated catch block
e.printStackTrace();
}
}
if(conn != null){
try {
conn.close();
} catch (SQLException e) {
// TODO Auto-generated catch block
e.printStackTrace();
}
}
}
}
5 封装 JDBC 工具类
5.1普通版
5.1.1工具类代码
/**
* jdbc 工具类
* @author Administrator
*
*/
public class JdbcUtil {
private static String driver =
"com.mysql.jdbc.Driver";
private static String
jdbcUrl="jdbc:mysql://localhost:3306/bjsxt?useUnicode
=true&characterEncoding=utf-8";
private static String username ="root";
private static String userpassword="root";
static{
try {
Class.forName(driver);
} catch (ClassNotFoundException e) {
e.printStackTrace();}
}
//获取 Connection 对象
public static Connection getConnection(){
Connection conn = null;
try {
conn = DriverManager.getConnection(jdbcUrl,
username, userpassword);
} catch (SQLException e) {
// TODO Auto-generated catch block
e.printStackTrace();
}
return conn;
}
//关闭 Statement
public static void closeStatement(Statement
state){
try {
if(state != null){
state.close();}
} catch (SQLException e) {
e.printStackTrace();
}
}
//关闭 Connection
public static void closeConnection(Connection
conn){
try {
if(conn != null){
conn.close();
}
} catch (SQLException e) {
e.printStackTrace();
}
}
//關閉資源
public static void closeResource(Statement
state,Connection conn){
closeStatement(state);
closeConnection(conn);
}}
5.2升级版
5.2.1工模具类代码
/**
* jdbc 工具类
* @author Administrator
*
*/
public class JdbcUtil {
private static String driver;
private static String jdbcUrl;
private static String username;
private static String userpassword;
static{
//读取 Properties 文件
ResourceBundle bundle =
ResourceBundle.getBundle("jdbc");
driver = bundle.getString("driver");
jdbcUrl= bundle.getString("jdbcUrl");
username = bundle.getString("username");
userpassword =bundle.getString("userpassword");
try {
Class.forName(driver);
} catch (ClassNotFoundException e) {
e.printStackTrace();
}
}
//获取 Connection 对象
public static Connection getConnection(){
Connection conn = null;
try {
conn = DriverManager.getConnection(jdbcUrl,
username, userpassword);
} catch (SQLException e) {
// TODO Auto-generated catch block
e.printStackTrace();
}
return conn;
}
//关闭 Statementpublic static void closeStatement(Statement
state){
try {
if(state != null){
state.close();
}
} catch (SQLException e) {
e.printStackTrace();
}
}
//关闭 Connection
public static void closeConnection(Connection
conn){
try {
if(conn != null){
conn.close();
}
} catch (SQLException e) {
e.printStackTrace();
}
}
//關閉資源public static void closeResource(Statement
state,Connection conn){
closeStatement(state);
closeConnection(conn);
}
}
6 通过 Statement 对象查询数据
6.1代码
//查询 Departmetns 表中部门 ID 为 6 的部门信息
public void selectDepartmentsById(int
departmentId){
Connection conn = null;
Statement state = null;
ResultSet rs = null;
try{
conn= JdbcUtil.getConnection();
state = conn.createStatement();
String sql = "select * from departments d where
d.department_id = "+departmentId;
//执行查询返回结果
rs=state.executeQuery(sql);while(rs.next()){
System.out.println(rs.getInt("department_id")+"
"+rs.getString("department_name")+" "+rs.getInt(3));
}
}catch(Exception e){
e.printStackTrace();
}finally{
JdbcUtil.closeResource(state, conn,rs);
}
}
7 ResultSet 讲解
注意 ResultSet 中封装的并不是我们查询到的所有的结果集,而是返回了查询到的结果
集的数据库游标。通过 ResultSet 中的 next()方法操作游标的位置获取结果集。
8 通过 ResultSet 实现逻辑分页
8.1代码
//查询 departments 表中的所有的数据,并且通过 ResultSet 实现逻辑分
页
public void selectDeptPage(int currentPage,int pageRows){
Connection conn = null;
Statement state = null;
ResultSet rs = null;
try{
conn = JdbcUtil.getConnection();
state = conn.createStatement();
String sql = "select * from departments";
rs = state.executeQuery(sql);//开始位置与结束位置
int begin = (currentPage -1)*pageRows;
int end = currentPage * pageRows;
//当前位置的计数器
int currentNum = 0;
while(rs.next()){
//什么情况下获取结果集中的数据
if(currentNum >= begin && currentNum < end){
System.out.println(rs.getInt("department_id")+"
"+rs.getString("department_name"));
//结束操作 ResultSet 的边界条件
if(currentNum == end -1){
break;
}
}
currentNum++;
}
}catch(Exception e){
e.printStackTrace();
}finally{
JdbcUtil.closeResource(state, conn, rs);
}
}
原文:https://www.cnblogs.com/EricShen/p/11573724.html