1、什么是配置中心
从字面意思上来说,配置中心就是管理程序配置的一个公共服务;它管理了系统业务相关的配置内容,在系统启动时去加载这些数据。
2、使用配置中心的好处
)统一管理配置的格式,可以更加有效的维护配置
)让私密配置更安全(配置不在项目中,而是在配置中心,使生产配置不可见)
)。。。。。。
1、添加maven依赖
1 <dependency>
2     <groupId>org.springframework.cloud</groupId>
3     <artifactId>spring-cloud-config-server</artifactId>
4 </dependency>
2、启动类加上@EnableConfigServer注解
3、配置properties
 1 # 配置中心实例名
 2 spring.application.name=config-server
 3 # 端口
 4 server.port=9090
 5
 6 ## 远程仓库配置
 7 # git仓库地址
 8 spring.cloud.config.server.git.uri=https://github.com/xxx/xxx
 9 # 本地备份
10 spring.cloud.config.server.git.basedir=git-config
11
12 ## 本地仓库(也可以不读远端git、svn等,直接读本地配置)
13 # spring.profiles.active=native
14 # spring.cloud.config.server.native.search-locations=file:///E:/SpringCloud Config
15
16 ## Actuator
17 # 关闭安全校验
18 management.security.enabled=false
1、添加maven依赖
1 <dependency>
2     <groupId>org.springframework.cloud</groupId>
3     <artifactId>spring-cloud-config-client</artifactId>
4 </dependency>
2、配置bootstrap.properties、application.properties
1 ## Config Server配置信息
2 ## 配置中心的服务地址
3 spring.cloud.config.uri=http://localhost:9090/
4 ## Environment 的 application 客户端的应用名称
5 spring.cloud.config.name=test
6 ## spring.profiles.active配置
7 spring.cloud.config.profile=dev
8 ## 配置的版本(git/svn 分支)
9 spring.cloud.config.label=master
1 ## 客户端的实例名
2 spring.application.name=config-server
3 ## 客户端提供端口
4 server.port=8080
首先我们知道SpringCloud Config分为服务端和客户端,服务端用于拉取远端的配置,客户端用于拉取服务端配置以供应用使用,那么一次刷新配置的过程应该有以下几点:
1、服务端拉取最新的git配置(只要获取一次数据就会拉取远端的数据)
2、客户端拉取服务端的配置(通过调用public java.lang.Object org.springframework.cloud.endpoint.GenericPostableMvcEndpoint.invoke()方法让客户端获取服务端最新的配置)
3、刷新bean(此时我们会发现尽管客户端的数据已经刷新了,但为什么我们配置的数据还是旧值呢,原因是spring已经将这个bean注入了,所以我们也需要刷新这个bean:@RefreshScope)
说道这里我们就会有一个疑问,难道我们每次刷新客户端的配置都需要手动curl这个invoke()方法???
答案是否定的,我们可以有很多方法,这里列举一个简单的定时器(那定时器应该执行些什么呢,我们来进一步看看invoke()的源码)。
1、我们看public java.lang.Object org.springframework.cloud.endpoint.GenericPostableMvcEndpoint.invoke(),得知invoke调用父类的invoke,我们再看下父类的invoke;
 1 @RequestMapping(method = RequestMethod.POST)
 2 @ResponseBody
 3 @Override
 4 public Object invoke() {
 5     if (!getDelegate().isEnabled()) {
 6         return new ResponseEntity<>(Collections.singletonMap(
 7                 "message", "This endpoint is disabled"), HttpStatus.NOT_FOUND);
 8     }
 9     return super.invoke();
10 }
2、父类invoke >>> public java.lang.Object org.springframework.boot.actuate.endpoint.mvc.EndpointMvcAdapter.invoke()调用其父类invoke;
1 @Override
2 @ActuatorGetMapping
3 @ResponseBody
4 public Object invoke() {
5     return super.invoke();
6 }
3、protected java.lang.Object org.springframework.boot.actuate.endpoint.mvc.AbstractEndpointMvcAdapter.invoke()调用一个对象的invoke,而这个对象时通过构造方法传进来的;我们在一步步看构造方法的delegate是从哪来的
 1 private final E delegate;
 2
 3 public AbstractEndpointMvcAdapter(E delegate) {
 4     Assert.notNull(delegate, "Delegate must not be null");
 5     this.delegate = delegate;
 6 }
 7
 8 protected Object invoke() {
 9     if (!this.delegate.isEnabled()) {
10         // Shouldn‘t happen - shouldn‘t be registered when delegate‘s disabled
11         return getDisabledResponse();
12     }
13     return this.delegate.invoke();
14 }
4、通过一步步网上看,发现是最开始的public java.lang.Object org.springframework.cloud.endpoint.GenericPostableMvcEndpoint,然后我们看看哪里有调用GenericPostableMvcEndpoint的构造
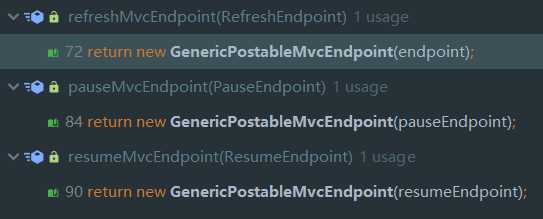
从图中我们可以看出有三处调用,而因为我们是刷新操作,我们就大胆的猜测是第一个refreshMvcEndpoint,我们在点进去看看。
发现入参是org.springframework.cloud.endpoint.RefreshEndpoint,我们看看RefreshEndpoint是怎样实现的。
 1 @ConfigurationProperties(prefix = "endpoints.refresh", ignoreUnknownFields = false)
 2 @ManagedResource
 3 public class RefreshEndpoint extends AbstractEndpoint<Collection<String>> {
 4
 5     private ContextRefresher contextRefresher;
 6
 7     public RefreshEndpoint(ContextRefresher contextRefresher) {
 8         super("refresh");
 9         this.contextRefresher = contextRefresher;
10     }
11
12     @ManagedOperation
13     public String[] refresh() {
14         Set<String> keys = contextRefresher.refresh();
15         return keys.toArray(new String[keys.size()]);
16     }
17
18     @Override
19     public Collection<String> invoke() {
20         return Arrays.asList(refresh());
21     }
22
23 }
从中的我们可以看出刷新原来调用的就是RefreshEndpoint的invoke方法,而Set<String> keys = contextRefresher.refresh()便是刷新时所执行的函数!!!!!!∑(?Д?ノ)ノ
综上所述:我们的job中调用Set<String> keys = contextRefresher.refresh()这段代码即可刷新配置啦!!!
Spring的事件监听模式的实质就是观察者模式,其主要分为两个类
1、ApplicationListener(监听器)>>> public interface ApplicationListener<E extends ApplicationEvent> extends EventListener
2、ApplicationEvent(监听对象)>>> public abstract class ApplicationEvent extends EventObject
健康检查health,主要作业是对当前系统的运行态进行展示的一个接口,我们可以定制自己系统的健康检查,也可以使用已提供好的。
如果我们要实现自己的健康检查,那应该如何实现呢,我们先看下health()的源码。
1、我们从启动日志中可以看到health()接口是调用:
public java.lang.Object org.springframework.boot.actuate.endpoint.mvc.HealthMvcEndpoint.invoke(javax.servlet.http.HttpServletRequest,java.security.Principal)方法
我们根进去看看
 1 @ActuatorGetMapping
 2 @ResponseBody
 3 public Object invoke(HttpServletRequest request, Principal principal) {
 4     if (!getDelegate().isEnabled()) {
 5         // Shouldn‘t happen because the request mapping should not be registered
 6         return getDisabledResponse();
 7     }
 8     Health health = getHealth(request, principal);
 9     HttpStatus status = getStatus(health);
10     if (status != null) {
11         return new ResponseEntity<Health>(health, status);
12     }
13     return health;
14 }
2、从上述代码中可以看出invoke的主要返回在第8行,我们继续跟进
1 private Health getHealth(HttpServletRequest request, Principal principal) {
2     Health currentHealth = getCurrentHealth();
3     if (exposeHealthDetails(request, principal)) {
4         return currentHealth;
5     }
6     return Health.status(currentHealth.getStatus()).build();
7 }
同理主要代码是第2行,继续跟进
 1 private Health getCurrentHealth() {
 2     long accessTime = System.currentTimeMillis();
 3     CachedHealth cached = this.cachedHealth;
 4     if (cached == null || cached.isStale(accessTime, getDelegate().getTimeToLive())) {
 5         Health health = getDelegate().invoke();
 6         this.cachedHealth = new CachedHealth(health, accessTime);
 7         return health;
 8     }
 9     return cached.getHealth();
10 }
3、从第5行可以看出,又是代理类org.springframework.boot.actuate.endpoint.mvc.AbstractEndpointMvcAdapter的invoke方法 !!!∑(?Д?ノ)ノ
那我们看看AbstractEndpointMvcAdapter的实现

从中可以肯定实现类是第二个HealthMvcEndpoint
4、所以只能看HealthMvcEndpoint的invoke方法咯 ψ(*`ー´)ψ
1 @Override
2 public Health invoke() {
3     return this.healthIndicator.health();
4 }
这就很简单了,仅一行代码;继续跟进后可以得知healthIndicator是一个接口,然后我们找到这个接口是在构造函数中初始化的,我们来看看初始化的对象是谁
 1 public HealthEndpoint(HealthAggregator healthAggregator, Map<String, HealthIndicator> healthIndicators) {
 2     super("health", false);
 3     Assert.notNull(healthAggregator, "HealthAggregator must not be null");
 4     Assert.notNull(healthIndicators, "HealthIndicators must not be null");
 5     CompositeHealthIndicator healthIndicator = new CompositeHealthIndicator(
 6             healthAggregator);
 7     for (Map.Entry<String, HealthIndicator> entry : healthIndicators.entrySet()) {
 8         healthIndicator.addHealthIndicator(getKey(entry.getKey()), entry.getValue());
 9     }
10     this.healthIndicator = healthIndicator;
11 }
哈哈,原来healthIndicator就是CompositeHealthIndicator healthIndicator = new CompositeHealthIndicator(healthAggregator);
所以this.healthIndicator.health()就是CompositeHealthIndicator的health了,来来来我们看看CompositeHealthIndicator的health
1 @Override
2 public Health health() {
3     Map<String, Health> healths = new LinkedHashMap<String, Health>();
4     for (Map.Entry<String, HealthIndicator> entry : this.indicators.entrySet()) {
5         healths.put(entry.getKey(), entry.getValue().health());
6     }
7     return this.healthAggregator.aggregate(healths);
8 }
5、从代码中我们可以看出CompositeHealthIndicator的health就是从this.indicators拿出所有的HealthIndicator,并调用其health()方法
而HealthIndicator是一个接口,所以我们可以通过实现HealthIndicator接口进行自定义的health()健康检查
但实际上我们并不需要再去包装一层,springboot已经实现了一个org.springframework.boot.actuate.health.AbstractHealthIndicator,所以我们实现AbstractHealthIndicator,并重写doHealthCheck方法就可以了
综上所述:如果我们要实现自己的健康检查,只需要重写AbstractHealthIndicator的doHealthCheck方法就可以了
1 public class MyHealthIndicator extends AbstractHealthIndicator {
2     @Override
3     protected void doHealthCheck(Health.Builder builder) throws Exception {
4         System.out.println("自定义健康检查 MyHealthIndicator");
5         builder.down().withDetail("This is MyHealthIndicator", "just so so!");
6     }
7 }
注意:需要将MyHealthIndicator注入成一个bean哦 (?ω?)
1、传统模式
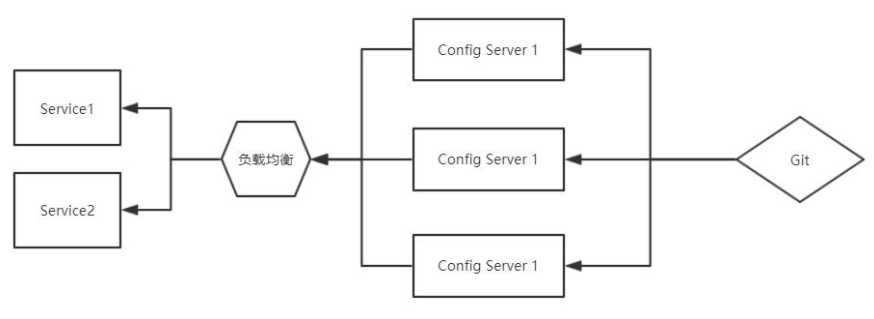
传统模式就是多个config server集群,然后通过负载均衡器实现高可用
2、服务模式:将config server注册到eureka
SpringCloud学习笔记(二、SpringCloud Config)
原文:https://www.cnblogs.com/bzfsdr/p/11589902.html