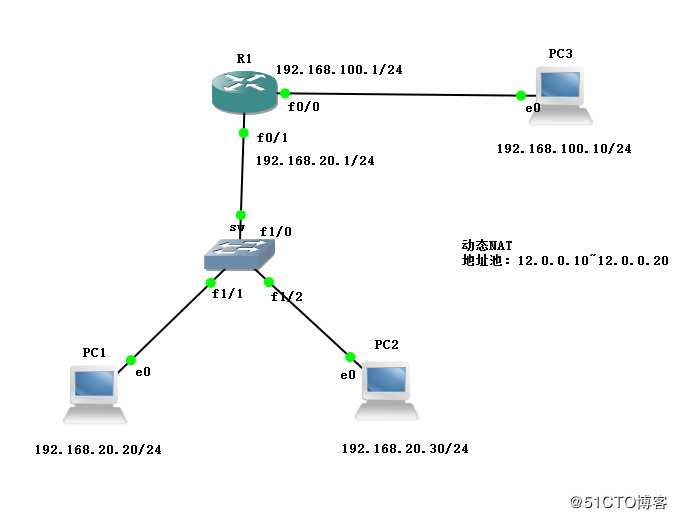
拓扑图如下:
1、设置三层交换机sw
sw#conf t
Enter configuration commands, one per line.  End with CNTL/Z.
sw(config)#no ip routing
sw(config)#
2、设置路由R1
R1#conf t
Enter configuration commands, one per line.  End with CNTL/Z.
R1(config)#int f 0/1
R1(config-if)#ip add 192.168.20.1 255.255.255.0         //仅设置IP地址与子网掩码
R1(config-if)#no shut
*Mar  1 00:00:54.063: %LINK-3-UPDOWN: Interface FastEthernet0/1, changed state to up
*Mar  1 00:00:55.063: %LINEPROTO-5-UPDOWN: Line protocol on Interface FastEthernet0/1, changed state to up
R1(config-if)#int f 0/0
R1(config-if)#ip add 192.168.100.1 255.255.255.0          //仅设置IP地址与子网掩码
R1(config-if)#no shut
R1(config-if)#ex
*Mar  1 00:01:08.423: %LINK-3-UPDOWN: Interface FastEthernet0/0, changed state to up
*Mar  1 00:01:09.423: %LINEPROTO-5-UPDOWN: Line protocol on Interface FastEthernet0/0, changed state to up
R1(config)#
3、对三台PC机进行设置
PC1
PC1>
PC1> ip 192.168.20.20 192.168.20.1
Checking for duplicate address...
PC1 : 192.168.20.20 255.255.255.0 gateway 192.168.20.1

PC1>
PC2
PC2>
PC2> ip 192.168.20.30 192.168.20.1
Checking for duplicate address...
PC1 : 192.168.20.30 255.255.255.0 gateway 192.168.20.1

PC2>
PC3
PC3>
PC3> ip 192.168.100.10 192.168.100.1
Checking for duplicate address...
PC1 : 192.168.100.10 255.255.255.0 gateway 192.168.100.1

PC3>
为满足实验要求,下面将正式进行动态NAT的设置。
R1
R1(config)#
R1(config)#ip access-list standard zhy                          //设置命名访问控制列表
R1(config-std-nacl)#permit 192.168.20.0 0.0.0.255
R1(config)#ip nat pool test 12.0.0.10 12.0.0.20 netmask 255.255.255.0        //设置公网地址池
R1(config)#
*Mar  1 00:09:46.123: %LINEPROTO-5-UPDOWN: Line protocol on Interface NVI0, changed state to up
R1(config)#ip nat inside source list zhy pool test                  //实现网络地址转换

R1(config)#int f 0/1
R1(config-if)#ip nat inside                          //启用内部NAT
R1(config-if)#int f 0/0
R1(config-if)#ip nat outside                         //启用外部NAT
R1(config-if)#ex 
原文:https://blog.51cto.com/14484404/2443206