最近在前后端分离的学习中逐步找到了乐趣,并且不知不觉对前端也产生了一些学习的冲动,经过一系列的咨询,最终决定从学习vue开始。感谢在本文中涉及到的各位博客大神的指导(可以通过本文中的链接进一步学习大神们的思想),站在巨人的肩膀上学习,是一种莫大的幸福。
一、准备知识
1) vscode快捷键
https://www.cnblogs.com/weihe-xunwu/p/6687000.html
https://blog.csdn.net/ss515896745/article/details/85651912
2) ES6知识
https://blog.csdn.net/qq_36838191/article/details/87776369
https://www.cnblogs.com/crazymagic/p/9714153.html
注意:相关的几篇博客都要看一下,这个人写的,就在后面
https://www.jianshu.com/p/7cb40e8d145a
http://www.cnblogs.com/chrischjh/p/4848934.html
3) 基础知识
https://www.cnblogs.com/ppJuan/p/7151000.html
https://www.cnblogs.com/xiaotanke/p/7448383.html
https://www.jianshu.com/p/d9be7c410e10
https://www.cnblogs.com/beyrl-blog/p/8625145.html
https://blog.csdn.net/ccc1929969359/article/details/80798593
https://blog.csdn.net/zbl744949461/article/details/80476888
https://blog.csdn.net/qq_34182808/article/details/86690193
https://blog.csdn.net/qq_32963841/article/details/86063941
https://blog.csdn.net/luoyu6/article/details/80098145
https://www.runoob.com/w3cnote/vue2-start-coding.html
https://www.cnblogs.com/rik28/p/6024425.html
4) 生命周期
http://baijiahao.baidu.com/s?id=1603406094025961442&wfr=spider&for=pc
https://blog.csdn.net/blueblueskyhua/article/details/78024836
5) vue前端核心语法
https://blog.csdn.net/transformer_wsz/article/details/80245962
http://www.cnblogs.com/keepfool/p/5619070.html
https://www.jianshu.com/p/4bd5e745ce95
6) 动态切换组件
https://www.cnblogs.com/tugenhua0707/p/8722003.html
https://www.cnblogs.com/x123811/p/8329289.html
https://blog.csdn.net/shenzhen_zsw/article/details/81128271
https://blog.csdn.net/succuba_ckr/article/details/82817872
7) 前后端交互
https://blog.csdn.net/joyce_lcy/article/details/78873733
https://blog.csdn.net/joyce_lcy/article/details/78871204
https://www.cnblogs.com/daijinxue/p/8309476.html
https://blog.csdn.net/m0_37836194/article/details/80370315
https://www.jianshu.com/p/ba2e92b8b6bd
8)render函数
https://www.cnblogs.com/weichen913/p/9676210.html
举例:
// The Vue build version to load with the `import` command
// (runtime-only or standalone) has been set in webpack.base.conf with an alias.
import Vue from ‘vue‘
import App from ‘./App‘
import router from ‘./router‘
import myPage from ‘./components/firstPage‘
Vue.config.productionTip = false
/* eslint-disable no-new */
// 创建vue入口实例
// 可行方式1:需要vue将虚拟dom(template)转换成真实dom
// new Vue({
// el: ‘#app‘,//这个#app指的是index.html文件中id为app的div,将组件App加载到这个div下面,这就是mvvm的含义。el就是指向view的。而data就是指向module的
// router,//使用路由
// components: { App },
// template: ‘<App/>‘
// })
//可行方式2,使用render函数,不需要vue将虚拟dom转换成真实dom
// new Vue({
// el: "#app",
// router,
// render: h => h(App)
// });
//可行方式3:与方式2基本一样,只是箭头函数使用了正规返回格式;方式2中不用{}时代表返回箭头后面的结果
new Vue({
el: "#app",
router,
render: h => { return h(App) }
});
//这个并不是一个新的方式,只是用如下的方式指明el和template或者h(组件名)到底加载什么,加载到哪里
// new Vue({
// el: "#myApp",//这个#app指的是index.html文件中id为myApp的div
// router,
// render: h => { return h(myPage) }//加载组件myPage到index.html的id为myApp的div下面
// });
9)watch方法--监听值变化的方法,如果值没有变化,则不会触发
https://www.imooc.com/article/70010
举例:
<template>
<div>
<!-- <router-link to="/test">test</router-link> -->
<button @click="changeA">切换到页面A</button>
<button @click="changeB">切换到页面B</button>
<button @click="changeC">切换到页面C</button>
<!-- 这里就是动态加载组件,使用:is方法 -->
<!-- 一般使用component标签即可 -->
<!-- is后面的值就是组件名和原来的组件标签用法一致(重点就是大写和-等价问题) -->
<!-- :is后面的值就是加载对应的组件 -->
<component :is="changePageIndex"></component>
<p @click="changeValue">{{myObj}}</p>
<router-view/>
</div>
</template>
<script>
import ATEst from "./itemPage/APage";
import Btest from "./itemPage/BPage";
import cTest from "./itemPage/CPage";
export default {
data() {
return {
changePageIndex: "A-t-Est",
myObj: {
id: "1",
name: "张三"
}
};
},
methods: {
changeA() {
this.changePageIndex = "A-tEst";
},
changeB() {
this.changePageIndex = "Btest";
},
changeC() {
this.changePageIndex = "c-test";
},
changeValue() {
this.myObj = { id: "2", name: "李四" };
},
showNewAndOldValue(newVaule, oldValue) {}
},
components: {
ATEst,
Btest,
cTest
},
watch: {
changePageIndex(newVaule, oldVuale) {
alert(newVaule);
alert(oldVuale);
},
myObj(newValue, oldValue) {
console.log(newValue);
alert(newValue.id);
console.log(oldValue);
alert(oldValue.name);
}
}
};
</script>
<style>
/* @import url("../css/myCss.css"); */
</style>
10)this的理解
https://blog.csdn.net/wojiaomaxiaoqi/article/details/78030548
普通函数和简化版函数的this是调用者,如果没有明显的调用者,那么this就是全局对象。
箭头函数的this是当前定义时上下文的对象。
尤其是axios前后端交互的时候一定要注意this的使用。如果使用普通函数或者简化版函数,由于异步的问题,this一般是undefined(异步时不知道调用者是谁)。如果使用箭头函数就是当前这个方法所在的vue组件(文件)对象。如果非要使用普通函数或者简化版函数,那么在定义的时候将this赋值给一个局部变量,作为当前vue组件(文件)的对象。
11)父子组件传值
https://blog.csdn.net/qq_40259641/article/details/81265950
12)计算属性
https://cn.vuejs.org/v2/guide/computed.html
13)状态管理:vuex的简单使用
https://baijiahao.baidu.com/s?id=1618794879569468435&wfr=spider&for=pc
https://blog.csdn.net/Jasons_xie/article/details/89402662
https://vuex.vuejs.org/zh/guide/actions.html
https://www.cnblogs.com/wenbronk/p/9738031.html
https://blog.csdn.net/qq_39523111/article/details/79638614
https://www.cnblogs.com/yeziTesting/p/7182904.html
二、安装与启动
1、 首先去node的官方网站下载稳定版的node,里面已经集成了npm
2、 使用命令行安装vue-cli
1) 切换成淘宝镜像路径
2) 安装vue-cli
3、 下载vscode编辑器,并在该软件内安装vue所需插件,以便用于编写vue工程
4、 创建一个空的文件夹,用于存放vue工程
5、 通过命令行的方式切换到该空的文件夹中,使用命令创建项目
https://www.cnblogs.com/ylboke/p/8393216.html
项目名字不要有大写字母
该回车就回车,回车表示yes继续。
创建过程可能有点慢,要有耐心。
6、 在项目的根目录下,通过命令行的方式启动项目
ps:
至于有哪些命令,可以去package.json文件中查看。
npm run XXX命令
注意:
1) 如果不需要创建新项目,而是已经有的项目,最好打开根目录,通过npm install的方式导入一下依赖;
2) 如果需要其他的依赖,也可以通过npm install XXX的方式导入
3) 依赖都是放在node_modules这个文件夹中
4) 想打开页面看效果,必须使用npm启动了项目
5) Node就是一个用js编写的后端服务,通过nmp启动,给vue工程提供一个可以运行的环境
F12断点调试:可以在事件处理程序中添加断点(debugger)或者在页面调试处打断点(一般vue文件在webpack的src下面)
三、ES6语法
一、ES6基本语法
1、 let和const声明
2、 模板字符串
3、 箭头函数
4、 function的缩写方式
5、 import和export以及export default
6、 解构和…
https://www.cnblogs.com/chrischjh/p/4848934.html
7、 遍历数组(2个方法)和对象map(3个方法)
forArray() {
const a = [1, "2张三", 3, 4, 5, "6"];
a.forEach(function(value, index, arr) {
console.log(`数组下标:${index}`);
console.log(`元素值:${value}`);
console.log(`整个数组:${arr}`);
console.log("================");
});
for (let index in a) {
console.log(`数组下标:${index}`);
console.log(`元素值:${a[index]}`);
console.log("================");
}
},
forMap() {
const map = { a: "A", b: "B", d: "D" };
for (let key in map) {
console.log(`键${key}`);
console.log(`值${map[key]}`);
console.log("================");
}
Object.keys(map).forEach(function(key, index, arr) {
//本质获取键数组,然后遍历键数组获取结果
console.log(`键:${key}`);
console.log(`值:${map[key]}`);
console.log(`键在数组中的下标:${index}`);
console.log(`整个键数组:${arr}`);
console.log("================");
});
Object.entries(map).forEach(function(entry, index, arr) {
console.log(`entry:${entry }`);
console.log(`键:${entry[0]}`);
console.log(`值:${entry[1]}`);
console.log(`entry在entry数组中的下标:${index}`);
console.log(`整个entry数组:${arr}`);
console.log("================");
});
}
四、vue的简单使用
注意:vue工程都是单页面工程,需要的组件按需加载进这个页面里面!!!
1、MVVM模型:双向绑定的理解,vue实例的理解。
Vue实例中el就是指向真实dom的dom元素,template中的内容就是加载到el指向的地方(view);
Vue实例中的data就是数据(module);
Vue实例就是view-moudle
2、this的使用
https://blog.csdn.net/wojiaomaxiaoqi/article/details/78030548
普通函数和简化版函数的this是调用者,如果没有明显的调用者,那么this就是全局对象。
箭头函数的this是当前定义时上下文的对象。
尤其是axios前后端交互的时候一定要注意this的使用。如果使用普通函数或者简化版函数,由于异步的问题,this一般是undefined(异步时不知道调用者是谁)。如果使用箭头函数就是当前这个方法所在的vue组件(文件)对象。如果非要使用普通函数或者简化版函数,那么在定义的时候将this赋值给一个局部变量,作为当前vue组件(文件)的对象。
3、通过vue-cli创建的工程的结构认识,加载顺序如下:
注意:代码一般写在src下面
1) index.html
2) main.js
3) App.vue
4) Router文件夹下面的index.js
4、组件的使用要点
1)一个组件可以理解成就是一个vue文件,所以需要使用前需要先有这个组件。
2)使用方式
A)在script标签下import
B)在export default的components中声明
C)使用该组件
方式一:直接通过组件名标签的方式在template标签中使用
方式二:通过component标签和:is的方式动态加载所需的组件
注意:无论是哪种方式,import和components中的组件名字A必须一致(随便起),并且“组件名标签或者:is的动态值”与组件名字A必须相协调(这里指的是大写和-具有互换能力)
3)一个vue组件的常见结构
<template>
<!-- template中只允许有一个标签 -->
<div>
<!-- 这个里面就是该组件需要显示的内容 -->
<!-- 使用vue语法的地方的变量直接写名字即可,标签体使用{{数据变量}}的形式 -->
<!-- 该标签用于展示在router文件夹的index.js中定义的路由 -->
<route-view></route-view>
</div>
</template>
<script>
// 在export default的上方可以通过import A from ‘vue组件路径‘的方式导入所需组件
// 一个vue文件中只允许有一个export default
exportdefault {
name:"该vue标签的额名字,其实可以不写",
data(){
return{
message1:"template中需要的数据变量必须在这里定义",
message2:"template中需要的数据变量必须在这里定义"
}
},
methods:{//template中的时间处理程序都要在这里定义
method1(){
},
method2(){
}
},
components:{
// 这个地方声明需要的组件
},
//下面就是八大常见声明周期函数
beforeCreate(){
//创建vue实例之前
},
created(){
//创建vue实例之后
},
beforeMount(){
//生成真实dom树之前
},
mounted(){
//生成这是dom树之后
//类似window.onloaded和$(function(){});
},
beforeUpdate(){
//数据更新之前
//数据已经改变,只是没有在真实的dom树加载
},
updated(){
//数据更新完毕,真实dom树已经加载
},
beforeDestroy(){
//销毁实例之前
},
destroyed(){
//销毁实例之后
}
}
</script>
<style>
/* 这个地方就是用于样式设计,可以在这里直接写,也可以写到一个css文件中,通过@import的方式加载 */
/* 只要是当前vue和其已经加载的组件,都能够使用这里的css样式;更一般的是,该组价真正加载的真实dom所在的文件内的各个dom元素都可以使用这里的css样式*/
</style>
对于style更一般情况的举例:
在index.html文件中创建了一个p标签,这个标签使用了组件App.vue中导入的样式,p标签也会显示对应的样式。原因就是App.vue组件其实最终进入了index.html之中,所以其内容(当然包括css样式)也会一并加载到index.html文件中。这样一来,index.html中的dom元素就可以使用App.vue中导入的样式了。
5、router的index.js文件
1)它就是需要在route-view标签中显示的导航,根据不同的路径,显示不同的内容。
注意,路由也不一定非要使用在#app这个地方,只要导入route组件,放到创建vue实例中即可在对应的组件内使用路由。
例如:
//这个并不是一个新的方式,只是用如下的方式指明el和template或者h(组件名)到底加载什么,加载到哪里
// new Vue({
// el: "#myApp",//这个#app指的是index.html文件中id为myApp的div
// router,
// render: h => { return h(myPage) }//加载组件myPage到index.html的id为myApp的div下面
// });
2)至于路径可以通过两种方式实现:
A)直接在浏览器输入:ip:端口/#/路径
B)在template中添加route-link to=”路径”,会在页面生成一个超链接
3)route-view不一定非要在App.vue中,可以在其他组件中。只要有route-view的地方就都会显示(前提该组件已经加载,并且route的路径是正确的(可以通过浏览器查看路径))
4)基本结构
importVuefrom‘vue‘
importRouterfrom‘vue-router‘
// 在这里通过import和from的方式导入需要的组件,import 组件名(随便起) from ‘组件路径‘
Vue.use(Router)
exportdefaultnewRouter({
routes: [
{
path:"路径,例如/表示根路径,再例如/myPage等,这个路径是虚拟的,不是真实的,类似后端的接口路径一样",
name:"组件名,要和最上面import中的一致",
component:要和name值一致(不是字符串)
},
{
path:"路径,例如/表示根路径,再例如/myPage等,这个路径是虚拟的,不是真实的,类似后端的接口路径一样",
name:"组件名,要和最上面import中的一致",
component:要和name值一致(不是字符串)
}
]
})
6、watch方--监听数据变量的变化。如果有变化,进行相应的操作;如果没有变化,不会调用其内部对应的监听方法。
https://www.imooc.com/article/70010
格式:
写在export default内
watch:{
数据变量1(参数1,参数2){//参数1用于自动存储新值,参数2用于存储旧值
数据变化时的操作方法
},
数据变量2(参数1,参数2){//参数1用于自动存储新值,参数2用于存储旧值
数据变化时的操作方法
}
}
举例:
<template>
<div>
<!-- <router-link to="/test">test</router-link> -->
<button @click="changeA">切换到页面A</button>
<button @click="changeB">切换到页面B</button>
<button @click="changeC">切换到页面C</button>
<!-- 这里就是动态加载组件,使用:is方法 -->
<!-- 一般使用component标签即可 -->
<!-- is后面的值就是组件名和原来的组件标签用法一致(重点就是大写和-等价问题) -->
<!-- :is后面的值就是加载对应的组件 -->
<component :is="changePageIndex"></component>
<p @click="changeValue">{{myObj}}</p>
<router-view/>
</div>
</template>
<script>
importATEstfrom"./itemPage/APage";
importBtestfrom"./itemPage/BPage";
importcTestfrom"./itemPage/CPage";
exportdefault {
data() {
return {
changePageIndex:"A-t-Est",
myObj: {
id:"1",
name:"张三"
}
};
},
methods: {
changeA() {
this.changePageIndex = "A-tEst";
},
changeB() {
this.changePageIndex = "Btest";
},
changeC() {
this.changePageIndex = "c-test";
},
changeValue() {
this.myObj = { id:"2", name:"李四" };
},
showNewAndOldValue(newVaule, oldValue) {}
},
components: {
ATEst,
Btest,
cTest
},
watch: {
changePageIndex(newVaule, oldVuale) {
alert(newVaule);
alert(oldVuale);
},
myObj(newValue, oldValue) {
console.log(newValue);
alert(newValue.id);
console.log(oldValue);
alert(oldValue.name);
}
}
};
</script>
<style>
/* @import url("../css/myCss.css"); */
</style>
7、计算属性
https://cn.vuejs.org/v2/guide/computed.html
1)目的
{{A}},A最好是一个数据变量,而不是一个关于数据变量表达式。希望有一个数据变量B(成为计算属性)可以作为数据变量表达式,并且数据变量发生变化时,B也同步更新。此时就用到了计算属性。
2)用法
在export default中写
computed:{
计算属性1:function(){//这个方法就像是计算属性1的getter方法
return this.数据变量1的运算结果;
},
计算属性2:function(){//这个方法就像是计算属性2的getter方法
return this.数据变量2的运算结果;
}
}
数据变量1或者数据变量2发生变化,那么计算属性1或者2也会同步更新。计算属性1和计算属性2也可以当成数据变量使用,即{{计算属性1}}、{{计算属性2}}
举例:
<template>
<div>
<h1>这个是普通数据变量apple的个数:{{appleCount}}</h1>
<h1>这个是普通数据变量apple的个数的2倍:{{beishu}}</h1>
<h1>这个是普通数据变量apple的个数的3倍:{{beishu2}}</h1>
<inputtype="text"v-model="appleCount">
</div>
</template>
<script>
exportdefault {
data() {
return {
appleCount:1
};
},
computed: {
beishu:function() {
leta;
a = this.appleCount * 2;
returna;
},
beishu2:function() {
leta;
a = this.appleCount * 3;
returna;
}
}
};
</script>
<style>
</style>
8、使用js方法
1)创建一个js文件,在这个js文件中定义相应的方法,并对外提供接口
2)在需要的js文件中的方法的地方导入该组件
3)使用导入的组件方法
9、父子组件传值
https://blog.csdn.net/qq_40259641/article/details/81265950
1)概念
A) 父组件:导入(import)其他组件的组件就是父组件
B) 子组件:被import的组件就是子组件
2)基本步骤
A)父组件给子组件传值
前提:子组件已经被父组件导入,且components中声明
步骤1:子组件在export default中的props:[“要接收父组件的值的名称A”]
步骤2:在父组件中使用该子组件的标签中添加属性A的值
B)子组件给父组件传值
前提:子组件已经被父组件导入,且components中声明
步骤1:子组件在methods中定义事件处理程序,主要使用this.$emit(“父组件的监听方法F”,要传递给父组件的值);
步骤2:子组件绑定这个事件处理程序
步骤3:在父组件使用该子组件的标签中@F=“处理方法B”
步骤4:在父组件的methods中定义处理方法B(data){处理子组件传递值data的方法}
举例:
(父组件:myInit.vue)
<template>
<div>
<h1>父子页面传值测试页面</h1>
<button @click="changeColor(‘blue‘)">blue</button>
<button @click="changeColor(‘red‘)">red</button>
<button @click="changeColor(‘green‘)">green</button>
<br>
<button @click="changeSonPage(‘son1‘)">son1</button>
<button @click="changeSonPage(‘son2‘)">son2</button>
<button @click="changeSonPage(‘son3‘)">son3</button>
<component
:is="sonName"
:zdyColor1="parentDataWithColor1"
:zdyColor2="parentDataWithColor2"
:zdyColor3="parentDataWithColor3"
:zdyId="parentDataWithId"
@mySon1Function="mySonFunction"
@mySon2Function="mySonFunction"
@mySon3Function="mySonFunction"
@allSonFunction="mySonFunction"
></component>
</div>
</template>
<script>
importson1from"./son/son1";
importson2from"./son/son2";
importson3from"./son/son3";
exportdefault {
data() {
return {
parentDataWithColor1:"",
parentDataWithColor2:"",
parentDataWithColor3:"",
sonName:"son1",
parentDataWithId:""
};
},
components: {
son1,
son2,
son3
},
methods: {
changeColor(color) {
constidValue = `${color}_id`;
if (this.sonName === "son1") {
this.parentDataWithId = newDate();
this.parentDataWithColor1 = { color:color, id:idValue };
} elseif (this.sonName === "son2") {
this.parentDataWithColor2 = { color:color, id:idValue };
} elseif (this.sonName === "son3") {
this.parentDataWithColor3 = { color:color, id:idValue };
}
},
changeSonPage(sonNum) {
this.sonName = sonNum;
},
mySonFunction(data) {
alert(data.id);
alert(data.name);
}
}
};
</script>
<style>
</style>
(子组件1:son1.vue)
<template>
<div>
<h1 :style="{color:zdyColor1.color}" :id="zdyId">这是第一个子组件页面</h1>
<button @click="son1ToParent">son1ToParent</button>
</div>
</template>
<script>
exportdefault {
props: ["zdyColor1", "zdyId"],
watch: {
zdyColor1(v1, v2) {
if (!!v1) {
alert(`${v1.color},${v1.id}`);
}
if (!!v2) {
alert(`${v2.color},${v2.id}`);
}
},
zdyId(v1, v2) {
alert(`zdyId=${v1}`);
}
},
methods: {
son1ToParent() {
constdataWithSon1 = { id:1, name:"son1" };
this.$emit("mySon1Function", dataWithSon1);
this.$emit("allSonFunction", dataWithSon1);
}
}
};
</script>
<style>
</style>
(子组件2:son2.vue)
<template>
<div>
<h1 :style="{color:zdyColor2.color}">这是第二个子组件页面</h1>
<button @click="son2ToParent">son2ToParent</button>
</div>
</template>
<script>
exportdefault {
props: ["zdyColor2"],
watch: {
zdyColor2(v1, v2) {
if (!!v1) {
alert(`${v1.color},${v1.id}`);
}
if (!!v2) {
alert(`${v2.color},${v2.id}`);
}
}
},
methods: {
son2ToParent() {
constdataWithSon2 = { id:2, name:"son2" };
this.$emit("mySon2Function", dataWithSon2);
this.$emit("allSonFunction", dataWithSon2);
}
}
};
</script>
<style>
</style>
(子组件3:son3.vue)
<template>
<div>
<h1 :style="{color:zdyColor3.color}">这是第三个子组件页面</h1>
<button @click="son3ToParent">son3ToParent</button>
</div>
</template>
<script>
exportdefault {
props: ["zdyColor3"],
watch: {
zdyColor3(v1, v2) {
if (!!v1) {
alert(`${v1.color},${v1.id}`);
}
if (!!v2) {
alert(`${v2.color},${v2.id}`);
}
}
},
methods: {
son3ToParent() {
constdataWithSon3 = { id:3, name:"son3" };
this.$emit("mySon3Function", dataWithSon3);
this.$emit("allSonFunction", dataWithSon3);
}
}
};
</script>
<style>
</style>
10、 状态管理:Vuex的简单使用
https://baijiahao.baidu.com/s?id=1618794879569468435&wfr=spider&for=pc
https://blog.csdn.net/Jasons_xie/article/details/89402662
https://vuex.vuejs.org/zh/guide/actions.html
https://www.cnblogs.com/wenbronk/p/9738031.html
https://blog.csdn.net/qq_39523111/article/details/79638614
https://www.cnblogs.com/yeziTesting/p/7182904.html
1)目的:全局管理变量,方便各组件之间传值
2)使用方法(不使用module)
A)在项目根目录下,通过命令行的方式安装vuex插件
npm install vuex --save
B)在src下面创建store文件夹,在store下面创建index.js文件
C)在store/index.js文件中编写需要的内容
// 引入vue 和 vuex
importVuefrom‘vue‘;
importVuexfrom‘vuex‘;
Vue.use(Vuex); // 使用vuex插件,跟router一样
conststore = newVuex.Store({
state: {//这里存放全局变量,要是想改变其值,只能使用actions或者mutations,没有setters方法
countPage1:1,
countPage2:2
},
getters: {//这里存放state的对应属性的计算属性,state就是全局变量,必须这样写方法
getDoubleCountWithPage1(state) {
leta;
a = state.countPage1 * 2;
returna;
},
getDoubleCountWithPage2(state) {
leta;
a = state.countPage2 * 2;
returna;
}
},
actions: {//这里用于其他组件调用方法
addPage1(obj, data) {//obj是一个json对象,我们主要使用其属性commit,而data就是参数值
obj.commit("realAddPage1", data);
},
dePage1({ commit }, data) {//与写成obj原理一样,只是这里通过解构思想,直接获取到了commit
commit("realDePage1", data);
},
addPage2(obj, data) {
obj.commit("realAddPage2", data);
},
dePage2({ commit }, data) {
commit("realDePage2", data);
}
},
mutations: {//操作state中属性的真正方法
realAddPage1(state, data) {//state就是全局变量,data就是参数值
state.countPage1 += data;
},
realDePage1(state, data) {
state.countPage1 -= data;
},
realAddPage2(state, data) {
state.countPage2 += data;
},
realDePage2(state, data) {
state.countPage2 -= data;
}
}
});
exportdefaultstore;
D)在main.js中导入这个组件,放到vue实例中。
此时其他组件就可以通过this.$store.XXX.XXX的方式使用这个全局变量了。
// The Vue build version to load with the `import` command
// (runtime-only or standalone) has been set in webpack.base.conf with an alias.
importVuefrom‘vue‘
importAppfrom‘./App‘
importrouterfrom‘./router‘
import store from ‘./store‘
Vue.config.productionTip = false
/* eslint-disable no-new */
newVue({
el:‘#app‘,
router,
store,
components: { App },
template:‘<App/>‘
})
E)如果觉得每次都通过this.$store.XXX的方式很麻烦,可以在组件内通过映射别名的方式实现。主要就是使用mapState、mapGetters、mapActions
注意原名要用引号引起来;
并且必须保证使用别名的时候按照如下规则:
方法内使用别名,前面加this.,否则会报未定义的异常;
标签体内使用别名(例如事件处理程序直接调用别名方法),不要加this.,否则会报未定义的异常;
例如:
<template>
<div>
<!-- 方式一:直接使用$store -->
<!-- <h1>页面2的变量为{{this.$store.state.countPage2}}</h1> -->
<!-- 方式二:使用映射别名的方法 -->
<h1>页面2的变量为{{twoVal}}</h1>
<!-- <h1>页面1的变量的二倍为{{this.$store.getters.getDoubleCountWithPage1}}</h1> -->
<h1>页面1的变量的二倍为{{beishuWithPage1}}</h1>
<!-- <button @click="addPgaeOne">增加页面1的变量值,默认写死为10</button> -->
<button @click="finalAddPage1(10)">增加页面1的变量值,默认写死为10</button>
<!-- <button @click="dePgaeOne">减少页面1的变量值,默认写死为5</button> -->
<button @click="finalDePage1(5)">减少页面1的变量值,默认写死为5</button>
</div>
</template>
<script>
import { mapState, mapGetters, mapActions } from"vuex";
exportdefault {
methods: {
addPgaeOne() {
this.$store.dispatch("addPage1", 10); //参数1是actions中的方法名,参数2是actions中需要的data参数值
},
dePgaeOne() {
this.$store.dispatch("dePage1", 5);
},
...mapActions({
//this.finalAddPage1(5)等价于this.$store.dispatch("addPage1",5)
finalAddPage1:"addPage1",
finalDePage1:"dePage1"
})
},
computed: {
...mapState({
//方式一::this.twoVal等价于this.$store.state.countPage2
// twoVal: state => state.countPage2
//方式二:this.twoVal等价于this.$store.state.countPage2
twoVal:"countPage2"
}),
...mapGetters({
//this.beishuWithPage1等价于this.$store.getters.getDoubleCountWithPage1
beishuWithPage1:"getDoubleCountWithPage1"
})
}
};
</script>
<style>
</style>
3)使用module--store/index.js太过于冗余了,而且明显就是有几个不同的模块各自使用各自的状态(全局变量),此时就可以考虑通过module的方式解决冗余问题。
A) 安装vuex
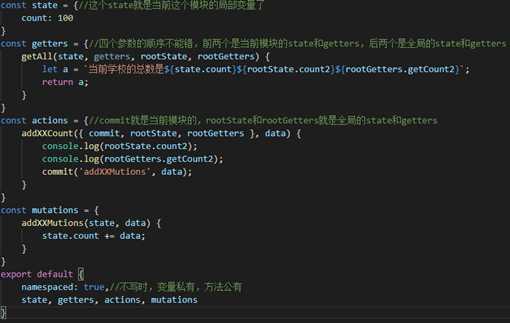
B) 编写模块js--可以先创建一个文件夹,然后在文件夹下面创建一个index.js。在这个index.js里面写state、getters、actions、mutations并导出,且注意命名空间为true。
C) 将这个模块导入store/index.js之中
D) store/index.js导入main.js
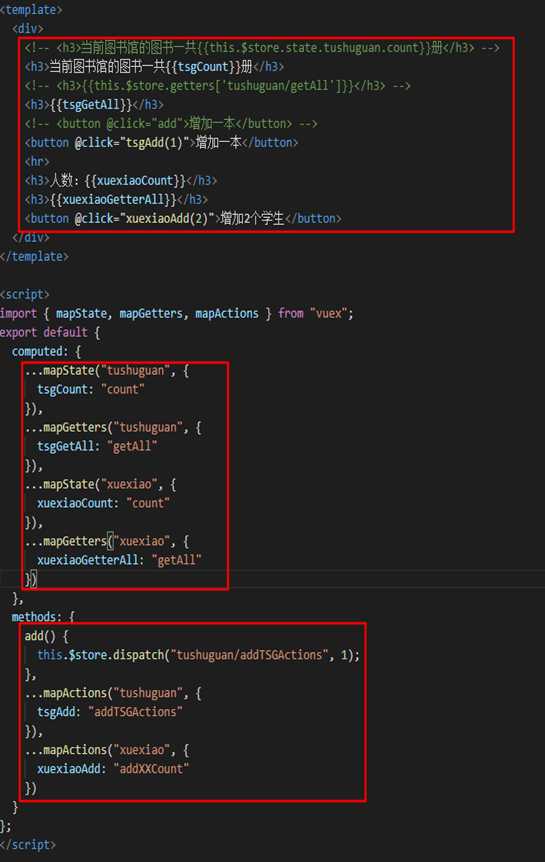
E) 在需要的组件只用即可
使用变量
this.$store.state.模块名key.模块变量值
使用getters
this.$store.getters[‘模块名key/模块的getters中的方法名’]
使用actions
this.$store.dispatch(‘模块名key/模块的actions中的方法名’,参数值)
F) 如果需要别名,和2)中不同的就是需要给出是哪个模块的,mapState、mapGetters、mapActions可以写多组
注意原名要用引号引起来
11、前后端交互—axios组件的使用
https://www.cnblogs.com/chjlxxc/p/frontend001.html
https://blog.csdn.net/joyce_lcy/article/details/78873733
https://blog.csdn.net/joyce_lcy/article/details/78871204
https://www.cnblogs.com/daijinxue/p/8309476.html
https://blog.csdn.net/m0_37836194/article/details/80370315
https://www.jianshu.com/p/ba2e92b8b6bd
https://www.cnblogs.com/ylyw/p/7692071.html
1) 安装axios组件
npm install axios –save –dev
2) 配置axios全局参数
//注意:axios组件的defaults的相关配置是全局配置,一旦一个地方配置了,无论哪里引入这个axios组件,则默认的情况都是使用如下配置;
//这也就是这个Axios配置文件存在的原因;
//但是一定注意这个配置文件需要引用到可以用的地方,否则不起作用;例如在App.vue中导入
//如果不配置如下内容,那么对于post和put请求而言前端将传递json字符串,后端的post和put接口需要通过@RequestBody接收;对于get和delete无所谓。
//建议进行如下配置
//使用@RequestBody接收的好处是最后传给后端的是一个json字符串,所以后端可以直接解析自定义的类型
//而不使用@RequestBody的时候,后端是不识别前端传递的自定义类型,需要将自定义的类型转换成字符串(JSON.stringify(json对象)),后端在方法体中对字符串进行json转换成自定义类型对象
import MyAxios from ‘axios‘;
import qs from ‘qs‘;
//一个通用的前缀,用于设置请求URL中相同的部分,所有axios的方法就会自动加上这个前缀url
MyAxios.defaults.baseURL = "http://10.17.66.19:7070/vue-sb";
//以下三个配置就是用于设置请求方式和内容
MyAxios.defaults.headers.common[‘X-Requested-With‘] = ‘XMLHttpRequest‘;//必须要配置一下
MyAxios.defaults.transformRequest = [function (data, headers) {//data是请求数据,headers是请求头
//上传Excel文件到后端
if (!!headers[‘Content-Type‘] && (headers[‘Content-Type‘].indexOf(‘multipart/form-data‘) > -1)) {
return data;
}
//上传json字符串到后端,后端需要用@RequestBody接收请求参数
if (!!headers[‘Content-Type‘] && headers[‘Content-Type‘].indexOf("application/json") > -1) {
return JSON.stringify(data);
}
//后端可以按照不同的json对象的方式直接接收,不需要@RequestBody修饰请求参数
return qs.stringify(data);
//对比qs.stringify与JSON.stringify两个方法的对比
// var a = { name: ‘hehe‘, age: 10 };
// qs.stringify(a) 结果:‘name=hehe&age=10‘;理解:qs.stringify将json对象序列化成URL的形式,以&进行拼接
// JSON.stringify(a) 结果:‘{"name":"hehe","age":10}‘;理解:JSON.stringify将json对象转换成json字符串
}];
//对于post和put请求,请求参数的格式默认就是application/x-www-form-urlencoded;charset=UTF-8;后端按照json对象的方式接收,不需要@RequestBody
//如果需要修改参数格式,可以在具体的请求中传入配置参数,例如上传Excel文件的方法
//无论是否配置请求参数格式类型,对于get和delete请求,直接参数接收或者POJO类接收都是可以的,因为参数在URL的后面通过?和&连接,不在请求体内
MyAxios.defaults.headers.post[‘Content-Type‘] = ‘application/x-www-form-urlencoded;charset=UTF-8‘;
3) 在一个可用的地方引入配置js文件
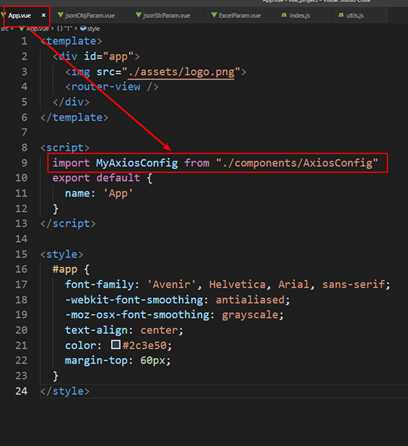
4) 在需要使用axios组件的地方import组件
import 自定义组件名 from ‘axios’
5) 使用axios的get、post、put、delete、axios等相关方法即可(前后请求参数名称要一致)
A) json字符串版--对于post和put需要使用@RequestBody,可以解析自定义类型对象。
B) json对象版--不需要使用@RequestBody,但是自定义类型对象需要在前端通过JSON.stringify(json对象)转换成json字符串,然后后端使用String类型接收,进而后端在方法体内通过Alibaba的JSONObject方法解析json字符串为json对象。
C) Excel文件版--使用MutipartFile接收
注意事项:
1)注意谷歌浏览器跨域问题;
2)一般是在vuex中进行前后端交互,结果存放到状态变量中,便于全局管理使用;
3)then方法中如果使用到了this,最好使用箭头函数,而非普通方法;
4)返回结果res.data是后端返回的数据,res.status是系统返回的状态码
5) 前后端请求参数必须一致
12、常见命令:就当成html标签的一些属性使用即可。类比jsp标签的各个属性。
1)v-model
双向绑定思想,尤其是在input标签中使用,不在理会value中的值,仅根据v-model绑定的数据变量的值在input中显示内容。
2)v-if与v-else和v-else-if
决定标签是否加载
3)v-show
标签始终存在,就是样式display是否是none(隐藏)
4)v-for
v-for = “(item,index) in items” :key=”唯一标示”
{{item}}或者{{item.XXX}}
5)v-bind
v-bind:html标签的属性=””或者:html标签的属性=””
用于绑定属性,似的属性可以根据数据变量动态变化
例如:
<h1 v-bind:style="{‘color‘:zdyColor,‘font-size‘:zdySize}">这个测试一波</h1>
<h1 class="zdyFontFamily" :class="{‘red‘:isRed,‘disn‘:isDisn,‘font-size‘:isSize}">这个测试二波</h1>
<h1 class="red font-size">这个测试三波</h1>
<a :href="zdyUrl">跳转</a>
6)v-on
v-on:事件=“方法名(加参数,可以有字符串(只要和外面的引号区分开即可))”或者:事件“方法名(加参数,可以有字符串(只要和外面的引号区分开即可))”
用于声明触发事件
方法在export default的methods中定义
7)获取dom元素
方式一:ref法
方式二:原生dom元素编程,通过document获取
常见命令整体演练:
<template>
<div>
<hr>
<hr>
<button @click="testModelAndView">理解双向的含义(修改input时p值变,修改p值时input值也变)-顺便测试v-model</button>
<p>{{message}}</p>
<input type="text" name id v-model="message" value="123">
<hr>
<hr>
<button @click="testIfAndShow">测试v-if和v-show</button>
<p v-if="one">if_1</p>
<p v-if="two">if_2</p>
<p v-if="three">if_3</p>
<p v-show="one">show_1</p>
<p v-show="two">show_2</p>
<p v-show="three">show_3</p>
<hr>
<hr>
<hr>
<hr>
<button @click="testIfAndShow">测试v-if和v-else(-show不支持)</button>
<p v-if="one">if_1</p>
<p v-else>if_1_else</p>
<hr>
<hr>
<button @click="testIfAndShow">测试v-if和v-else-if(-show不支持)</button>
<p v-if="if_one">if_1</p>
<p v-else-if="if_two">if_1_else_if</p>
<hr>
<hr>
<hr>
<hr>
<button @click="testIfAndShow">测试v-if和v-else-if(-show不支持)和v-else(-show不支持)</button>
<p v-if="if_one">if_1</p>
<p v-else-if="if_two">if_1_else_if</p>
<p v-else>if_1_else</p>
<hr>
<hr>
<ul>
<!-- key属性必须要加上,并且是唯一不可变的值;index就是索引编号,从0开始 -->
<li v-for="(user,index) in users" :key="user.id">
<input type="checkbox">
第{{index+1}}个用户:{{user.name}},来自{{user.address}}
</li>
</ul>
<!-- 提供增加列表的功能,并且新增加的对象放到最前面 -->
<input type="text" v-model="userName">
<br>
<input type="text" v-model="userCity">
<button @click="addUser">addUser</button>
<hr>
<hr>
<button @click="changeColorAndUrl">修改颜色和url</button>
<h1 v-bind:style="{‘color‘:zdyColor,‘font-size‘:zdySize}">这个测试一波</h1>
<h1 class="zdyFontFamily" :class="{‘red‘:isRed,‘disn‘:isDisn,‘font-size‘:isSize}">这个测试二波</h1>
<h1 class="red font-size">这个测试三波</h1>
<a :href="zdyUrl">跳转</a>
<hr>
<hr>
<!-- 获取dom元素,进而获取值 -->
<button @click="getDom(domIndex)">获取dom元素</button>
<p id="dom1" data="1" ref="testDom1">dom1文本</p>
<p id="dom2" data="2" ref="testDom2">dom2文本</p>
<p id="dom3" data="3" ref="testDom3">dom3文本</p>
<hr>
<hr>
</div>
</template>
<script>
export default {
data() {
return {
message: "helloworld",
one: true,
two: false,
three: true,
if_one: false,
if_two: false,
userName: "",
userCity: "",
users: [
{ name: "张三", address: "唐山", id: 1 },
{ name: "李四", address: "北京", id: 2 },
{ name: "王五", address: "上海", id: 3 }
],
zdyColor: "red",
zdySize: "100px",
isRed: false,
isDisn: false,
isSize: true,
zdyUrl: "https://www.baidu.com",
domIndex: "dom2"
};
},
methods: {
testModelAndView() {
this.message = this.message === "testModel" ? "helloworld" : "testModel";
},
testIfAndShow() {
this.one = this.message === "testModel" ? true : false;
this.two = !this.one;
this.three = !!this.one;
},
addUser() {
const user = {
name: this.userName,
address: this.userCity,
id: this.users.length + 1
};
this.users.unshift(user);
(this.userName = ""), (this.userCity = "");
},
changeColorAndUrl() {
this.isRed = !this.isRed;
this.zdyColor = this.zdyColor === "red" ? "blue" : "red";
this.zdyUrl =
this.zdyUrl === "https://www.baidu.com"
? "http://www.cnblogs.com/keepfool/p/5619070.html"
: "https://www.baidu.com";
},
getDom(domId) {
//方法一,使用ref
const domNode = this.$refs.testDom1;
console.log(domNode.getAttribute("data")); //自定义属性
console.log(domNode.id); //固有属性
console.log(domNode.innerHTML);
domNode.innerHTML = "123";
//方法二:使用dom元素编程思想
const domNode2 = document.getElementById(domId);
alert(domNode2.id);
},
}
};
</script>
<style>
/* 标识符./表示当前目录,而../表示父目录,而/表示下级 */
@import "../../css/myCss.css";
</style>
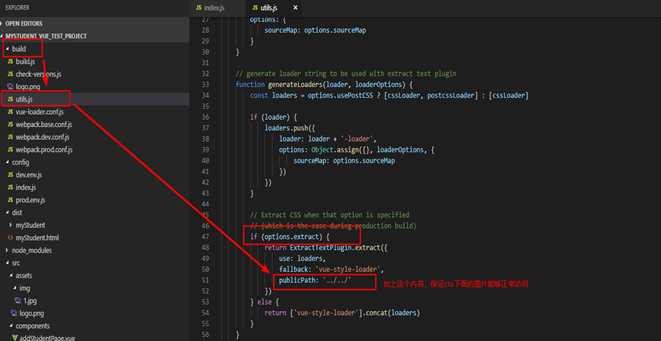
13、打包,并与后端合并
1) 修改如下2个文件
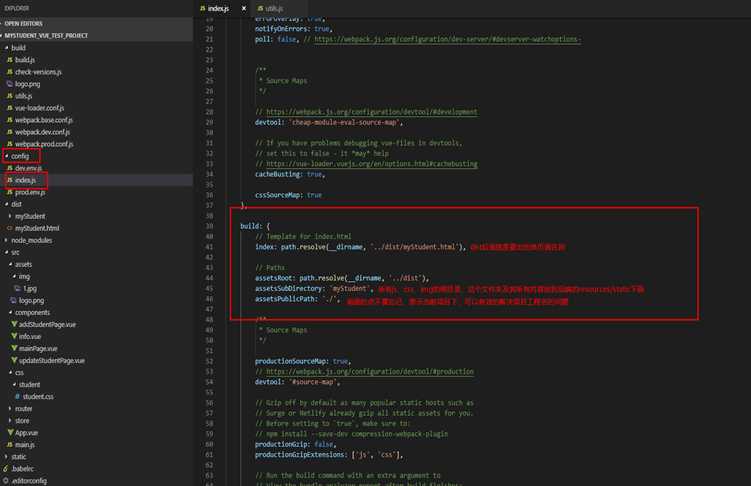
2)最好先删除原来的dist,然后在前端项目所在的根目录,运行命令npm run build
注意:打包命令是不是build,可以通过package.json查看。
3)获取打包出来的dist文件夹内的所有内容(除了单页面html)放入后端的静态文件夹中。例如resources/static下面,如果后端的static文件夹没有,可以自己创建。
注意:前后端的static不要混为一谈。
4)由于vue最后的项目其实只有一个单页面html页面,这个页面最好通过后端接口的方式找到。所以把dist里面的单页面html放到resource/后端接口路径下面即可。
(导入所需依赖—放到控制器的pom文件下)
<dependency>
<groupId>org.springframework.boot</groupId>
<artifactId>spring-boot-starter-thymeleaf</artifactId>
</dependency>
(在application.properties中配置如下信息)
spring.thymeleaf.cache=false

spring.thymeleaf.mode=HTML5

spring.thymeleaf.prefix=classpath:/
(在controller中定义转向单页面的路径接口函数)
注意使用@Controller注解,而不是@RestController注解
返回值类型是String
返回的是路径,开头不需要/,且结尾处不需要.html
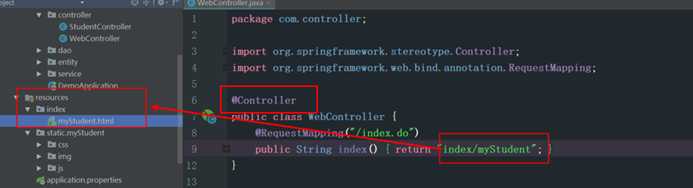
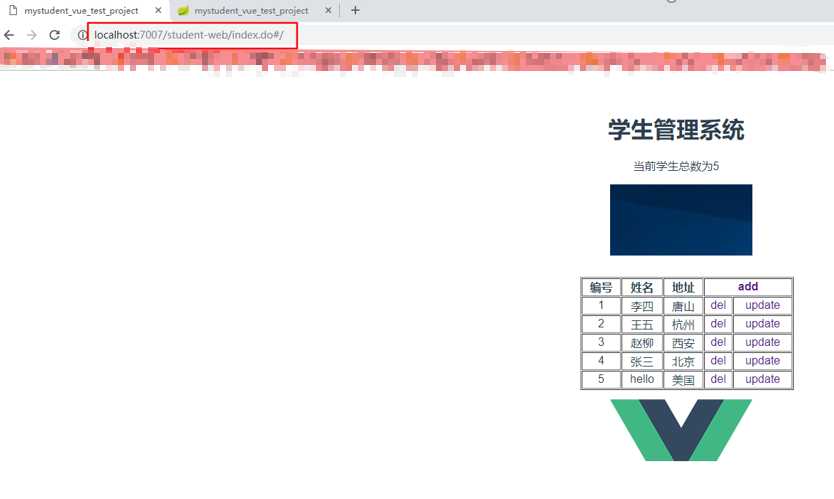
5)最后启动后端服务,输入ip:端口/context-path/接口路径URL
例如:ip:端口/context-path/index.do
五、技巧
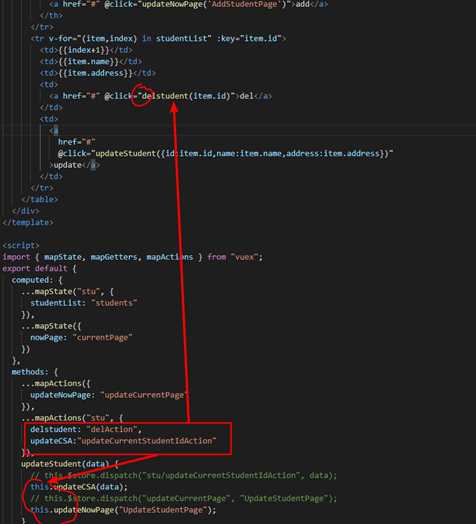
1、前端各个组件间传值
一般就是通过vuex这个状态管理(全局变量管理)实现的,具体可以通过两种方式进行传值。
1)直接调用store中的actions的方法,将参数直接传递到方法参数中
例如:delete方法就可以直接把主键id传递给actions中的方法。
2)将修改store中state的变量值
例如:update方法就可以把各个参数方法state的变量中,以便可以在其他组件中显示。
2、前后端在哪里进行交互
一般就是在vuex中mutations中实现。便于全局管理变量。
3、结果排序输出
一般后端返回的数据可以通过v-for的方式实现动态显示,但是要注意的是:key并不是能够实现自动排序的。需要通过如下两种方式实现排序输出:
方式1:后端排序后返回数据
方式2:前端对后端返回的数据进行排序(sort+自定义排序方法)后使用v-for动态显示。注意:sort修改本身结果。一般可以按照创建时间排序,因此后端需要有一个createTime属性。
例如:
4、图片问题
1)图片一般放到assets下面,可以在此文件夹下自己创建新的文件夹
2)通过vscode是无法直接存储图片的,可以打开路径,直接去文件夹里面存放图片,此后vscode就会加载了。
5、vue使用jQuery的方法
https://www.jianshu.com/p/8118f7f5298e
1)安装jQuery组件依赖
npm install jquery --save
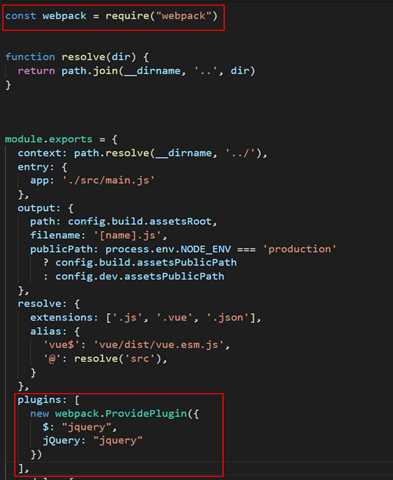
2)build/webpack.base.conf.js中添加如下内容
3)在需要使用jQuery库的地方使用jQuery即可
A)导入jquery:import $ from “jquery”
B)正常使用jQuery即可
6、导入第三方组件的一般步骤(例如使用axios组件)
1)如果当前项目的本地库node_modules中没有这个组件,需要先安装导入这个组件
2)在需要的地方通过import的方式引入这个组件
3)使用这个组件即可
Vue的使用
原文:https://www.cnblogs.com/lennar/p/11721939.html